---
title: Prepare for deployment with MDT (Windows 10)
description: This topic will walk you through the steps necessary to create the server structure required to deploy the Windows 10 operating system using the Microsoft Deployment Toolkit (MDT).
ms.assetid: 5103c418-0c61-414b-b93c-a8e8207d1226
ms.reviewer:
manager: dougeby
ms.author: aaroncz
keywords: deploy, system requirements
ms.prod: w10
ms.mktglfcycl: deploy
ms.localizationpriority: medium
ms.sitesec: library
ms.pagetype: mdt
audience: itpro
author: aczechowski
ms.topic: article
---
# Prepare for deployment with MDT
**Applies to**
- Windows 10
This article will walk you through the steps necessary to prepare your network and server infrastructure to deploy Windows 10 with the Microsoft Deployment Toolkit (MDT). It covers the installation of the necessary system prerequisites, the creation of shared folders and service accounts, and the configuration of security permissions in the file system and in Active Directory.
## Infrastructure
The procedures in this guide use the following names and infrastructure.
### Network and servers
For the purposes of this topic, we will use three server computers: **DC01**, **MDT01**, and **HV01**.
- All servers are running Windows Server 2019.
- You can use an earlier version of Windows Server with minor modifications to some procedures.
- Note: Although MDT supports Windows Server 2008 R2, at least Windows Server 2012 R2 or later is required to perform the procedures in this guide.
- **DC01** is a domain controller, DHCP server, and DNS server for contoso.com, representing the fictitious Contoso Corporation.
- **MDT01** is a domain member server in contoso.com with a data (D:) drive that can store at least 200GB. MDT01 will host deployment shares and run the Windows Deployment Service. Optionally, MDT01 is also a WSUS server.
- A second MDT server (**MDT02**) configured identically to MDT01 is optionally used to [build a distributed environment](build-a-distributed-environment-for-windows-10-deployment.md) for Windows 10 deployment. This server is located on a different subnet than MDT01 and has a different default gateway.
- **HV01** is a Hyper-V host computer that is used to build a Windows 10 reference image.
- See [Hyper-V requirements](#hyper-v-requirements) below for more information about HV01.
### Client computers
Several client computers are referenced in this guide with hostnames of PC0001 to PC0007.
- **PC0001**: A computer running Windows 10 Enterprise x64, fully patched with the latest security updates, and configured as a member in the contoso.com domain.
- Client name: PC0001
- IP Address: DHCP
- **PC0002**: A computer running Windows 7 SP1 Enterprise x64, fully patched with the latest security updates, and configured as a member in the contoso.com domain. This computer is referenced during the migration scenarios.
- Client name: PC0002
- IP Address: DHCP
- **PC0003 - PC0007**: These are other client computers similar to PC0001 and PC0002 that are used in this guide and another guide for various scenarios. The device names are incremented for clarity within each scenario. For example, PC0003 and PC0004 are running Windows 7 just like PC0002, but are used for Configuration Manager refresh and replace scenarios, respectively.
### Storage requirements
MDT01 and HV01 should have the ability to store up to 200 GB of files on a data drive (D:). If you use a computer with a single system partition (C:), you will need to adjust some procedures in this guide to specify the C: drive instead of the D: drive.
### Hyper-V requirements
If you do not have access to a Hyper-V server, you can install Hyper-V on a Windows 10 or Windows 8.1 computer temporarily to use for building reference images. For instructions on how to enable Hyper-V on Windows 10, see the [Verify support and install Hyper-V](../windows-10-poc.md#verify-support-and-install-hyper-v) section in the Windows 10 deployment test lab guide. This guide is a proof-of-concept guide that has detailed instructions for installing Hyper-V.
### Network requirements
All server and client computers referenced in this guide are on the same subnet. This is not required, but each server and client computer must be able to connect to each other to share files, and to resolve all DNS names and Active Directory information for the contoso.com domain. Internet connectivity is also required to download OS and application updates.
### Domain credentials
The following generic credentials are used in this guide. You should replace these credentials as they appear in each procedure with your credentials.
**Active Directory domain name**: contoso.com
**Domain administrator username**: administrator
**Domain administrator password**: pass@word1
### Organizational unit structure
The following OU structure is used in this guide. Instructions are provided [below](#create-the-ou-structure) to help you create the required OUs.
## Install the Windows ADK
These steps assume that you have the MDT01 member server running and configured as a domain member server.
On **MDT01**:
Visit the [Download and install the Windows ADK](/windows-hardware/get-started/adk-install) page and download the following items to the **D:\\Downloads\\ADK** folder on MDT01 (you will need to create this folder):
- [The Windows ADK for Windows 10](https://go.microsoft.com/fwlink/?linkid=2086042)
- [The Windows PE add-on for the ADK](https://go.microsoft.com/fwlink/?linkid=2087112)
- [The Windows System Image Manager (WSIM) 1903 update](https://go.microsoft.com/fwlink/?linkid=2095334)
- (Optional) [The MDT_KB4564442 patch for BIOS firmware](https://download.microsoft.com/download/3/0/6/306AC1B2-59BE-43B8-8C65-E141EF287A5E/KB4564442/MDT_KB4564442.exe)
- This patch is needed to resolve a bug that causes detection of BIOS-based machines as UEFI-based machines. If you have a UEFI deployment, you do not need this patch.
>[!TIP]
>You might need to temporarily disable IE Enhanced Security Configuration for administrators in order to download files from the Internet to the server. This setting can be disabled by using Server Manager (Local Server/Properties).
1. On **MDT01**, ensure that you are signed in as an administrator in the CONTOSO domain.
- For the purposes of this guide, we are using a Domain Admin account of **administrator** with a password of pass@word1. You can use your own administrator username and password as long as you properly adjust all steps in this guide that use these login credentials.
2. Start the **ADK Setup** (D:\\Downloads\\ADK\\adksetup.exe), click **Next** twice to accept the default installation parameters, click **Accept** to accept the license agreement, and then on the **Select the features you want to install** page accept the default list of features by clicking **Install**. This will install deployment tools and the USMT. Verify that the installation completes successfully before moving to the next step.
3. Start the **WinPE Setup** (D:\\Downloads\\ADK\\adkwinpesetup.exe), click **Next** twice to accept the default installation parameters, click **Accept** to accept the license agreement, and then on the **Select the features you want to install** page click **Install**. This will install Windows PE for x86, AMD64, ARM, and ARM64. Verify that the installation completes successfully before moving to the next step.
4. Extract the **WSIM 1903 update** (D:\\Downloads\ADK\\WSIM1903.zip) and then run the **UpdateWSIM.bat** file.
- You can confirm that the update is applied by viewing properties of the ImageCat.exe and ImgMgr.exe files at **C:\\Program Files (x86)\\Windows Kits\\10\\Assessment and Deployment Kit\\Deployment Tools\\WSIM** and verifying that the **Details** tab displays a **File version** of **10.0.18362.144** or later.
5. If you downloaded the optional MDT_KB4564442 patch for BIOS based deployment, see [this support article](https://support.microsoft.com/en-us/topic/windows-10-deployments-fail-with-microsoft-deployment-toolkit-on-computers-with-bios-type-firmware-70557b0b-6be3-81d2-556f-b313e29e2cb7) for instructions on how to install the patch.
## Install and initialize Windows Deployment Services (WDS)
On **MDT01**:
1. Open an elevated Windows PowerShell prompt and enter the following command:
```powershell
Install-WindowsFeature -Name WDS -IncludeManagementTools
WDSUTIL /Verbose /Progress /Initialize-Server /Server:MDT01 /RemInst:"D:\RemoteInstall"
WDSUTIL /Set-Server /AnswerClients:All
```
## Optional: Install Windows Server Update Services (WSUS)
If you wish to use MDT as a WSUS server using the Windows Internal Database (WID), use the following command to install this service. Alternatively, change the WSUS server information in this guide to the WSUS server in your environment.
To install WSUS on MDT01, enter the following at an elevated Windows PowerShell prompt:
```powershell
Install-WindowsFeature -Name UpdateServices, UpdateServices-WidDB, UpdateServices-Services, UpdateServices-RSAT, UpdateServices-API, UpdateServices-UI
cmd /c "C:\Program Files\Update Services\Tools\wsusutil.exe" postinstall CONTENT_DIR=C:\WSUS
```
>To use the WSUS that you have installed on MDT01, you must also [configure Group Policy](../update/waas-manage-updates-wsus.md#configure-automatic-updates-and-update-service-location) on DC01 and perform the neccessary post-installation configuration of WSUS on MDT01.
## Install MDT
>[!NOTE]
>MDT installation requires the following:
>- The Windows ADK for Windows 10 (installed in the previous procedure)
>- Windows PowerShell ([version 5.1](https://www.microsoft.com/download/details.aspx?id=54616) is recommended; type **$host** to check)
>- Microsoft .NET Framework
On **MDT01**:
1. Visit the [MDT resource page](/mem/configmgr/mdt/) and click **Download MDT**.
2. Save the **MicrosoftDeploymentToolkit_x64.msi** file to the D:\\Downloads\\MDT folder on MDT01.
- **Note**: As of the publishing date for this guide, the current version of MDT is 8456 (6.3.8456.1000), but a later version will also work.
3. Install **MDT** (D:\\Downloads\\MDT\\MicrosoftDeploymentToolkit_x64.exe) with the default settings.
## Create the OU structure
Switch to **DC01** and perform the following procedures on **DC01**:
To create the OU structure, you can use the Active Directory Users and Computers console (dsa.msc), or you can use Windows PowerShell.
Copy the following list of OU names and paths into a CSV file and save it as `~\Setup\Scripts\oulist.csv`.
```csv
OUName,OUPath
Contoso,"DC=CONTOSO,DC=COM"
Accounts,"OU=Contoso,DC=CONTOSO,DC=COM"
Computers,"OU=Contoso,DC=CONTOSO,DC=COM"
Groups,"OU=Contoso,DC=CONTOSO,DC=COM"
Admins,"OU=Accounts,OU=Contoso,DC=CONTOSO,DC=COM"
Service Accounts,"OU=Accounts,OU=Contoso,DC=CONTOSO,DC=COM"
Users,"OU=Accounts,OU=Contoso,DC=CONTOSO,DC=COM"
Servers,"OU=Computers,OU=Contoso,DC=CONTOSO,DC=COM"
Workstations,"OU=Computers,OU=Contoso,DC=CONTOSO,DC=COM"
Security Groups,"OU=Groups,OU=Contoso,DC=CONTOSO,DC=COM"
```
Next, copy the following commands into a file and save it as `~\Setup\Scripts\ou.ps1`. Be sure that you are viewing file extensions and that you save the file with the `.ps1` extension.
```powershell
Import-CSV -Path $home\Setup\Scripts\oulist.csv | ForEach-Object {
New-ADOrganizationalUnit -Name $_.ouname -Path $_.oupath
Write-Host -ForegroundColor Green "OU $($_.ouname) is created in the location $($_.oupath)"
}
```
Lastly, open an elevated Windows PowerShell prompt on DC01 and run the `ou.ps1` script:
```powershell
Set-ExecutionPolicy -ExecutionPolicy RemoteSigned -Force
Set-Location $home\Setup\Scripts
.\ou.ps1
```
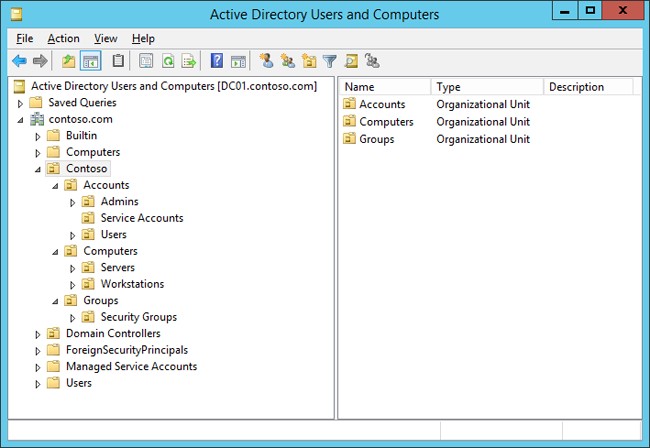
This will create an OU structure as shown below.
To use the Active Directory Users and Computers console (instead of PowerShell):
On **DC01**:
1. Using the Active Directory Users and Computers console (dsa.msc), in the contoso.com domain level, create a top-level OU named **Contoso**.
2. In the **Contoso** OU, create the following OUs:
1. Accounts
2. Computers
3. Groups
3. In the **Contoso / Accounts** OU, create the following underlying OUs:
1. Admins
2. Service Accounts
3. Users
4. In the **Contoso / Computers** OU, create the following underlying OUs:
1. Servers
2. Workstations
5. In the **Contoso / Groups** OU, create the following OU:
1. Security Groups
The final result of either method is shown below. The **MDT_BA** account will be created next.
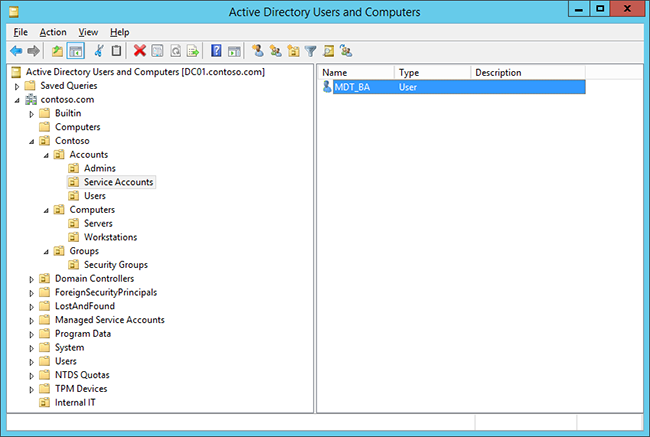
## Create the MDT service account
When creating a reference image, you need an account for MDT. The MDT build account is used for Windows Preinstallation Environment (Windows PE) to connect to MDT01.
To create an MDT build account, open an elevated Windows PowerShell prompt on DC01 and enter the following (copy and paste the entire command, taking care to notice the scroll bar at the bottom). This command will create the MDT_BA user account and set the password to "pass@word1":
```powershell
New-ADUser -Name MDT_BA -UserPrincipalName MDT_BA -path "OU=Service Accounts,OU=Accounts,OU=Contoso,DC=CONTOSO,DC=COM" -Description "MDT Build Account" -AccountPassword (ConvertTo-SecureString "pass@word1" -AsPlainText -Force) -ChangePasswordAtLogon $false -PasswordNeverExpires $true -Enabled $true
```
If you have the Active Directory Users and Computers console open you can refresh the view and see this new account in the **Contoso\Accounts\Service Accounts** OU as shown in the screenshot above.
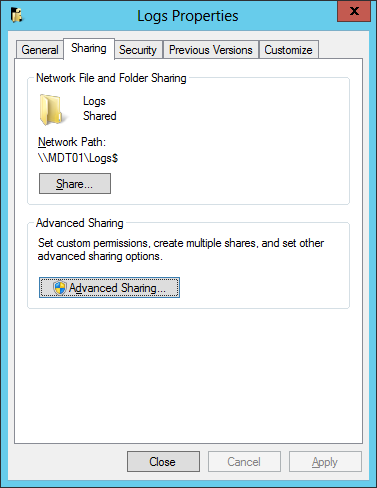
## Create and share the logs folder
By default MDT stores the log files locally on the client. In order to capture a reference image, you will need to enable server-side logging and, to do that, you will need to have a folder in which to store the logs. For more information, see [Create a Windows 10 reference image](create-a-windows-10-reference-image.md).
On **MDT01**:
1. Sign in as **CONTOSO\\administrator**.
2. Create and share the **D:\\Logs** folder by running the following commands in an elevated Windows PowerShell prompt:
```powershell
New-Item -Path D:\Logs -ItemType directory
New-SmbShare -Name Logs$ -Path D:\Logs -ChangeAccess EVERYONE
icacls D:\Logs /grant '"MDT_BA":(OI)(CI)(M)'
```
See the following example:
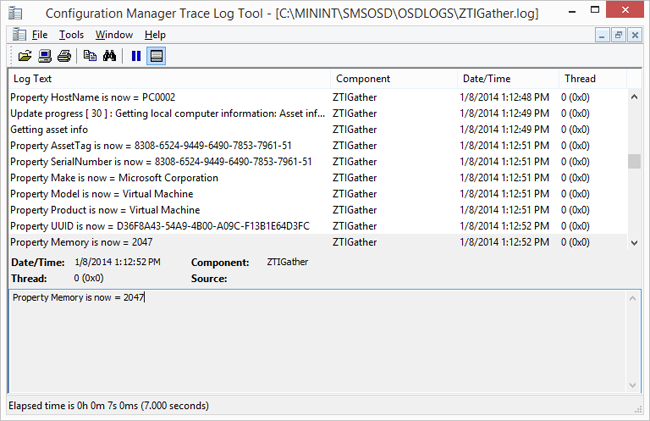
## Use CMTrace to read log files (optional)
The log files in MDT Lite Touch are formatted to be read by Configuration Manager Trace ([CMTrace](/sccm/core/support/cmtrace)), which is available as part of the [Microsoft System 2012 R2 Center Configuration Manager Toolkit](https://go.microsoft.com/fwlink/p/?LinkId=734717). You should also download this tool.
You can use Notepad (example below):
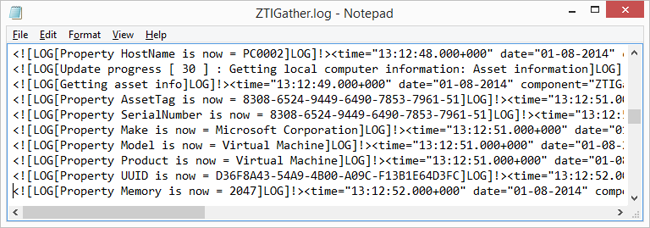
Alternatively, CMTrace formatting makes the logs much easier to read. See the same log file below, opened in CMTrace:
After installing the ConfigMgrTools.msi file, you can search for **cmtrace** and pin the tool to your taskbar for easy access.
## Next steps
When you have completed all the steps in this section to prepare for deployment, see [Create a Windows 10 reference image](create-a-windows-10-reference-image.md).
## Appendix
**Sample files**
The following sample files are also available to help automate some MDT deployment tasks. This guide does not use these files, but they are made available here so you can see how some tasks can be automated with Windows PowerShell.
- [Set-OUPermissions.ps1](https://go.microsoft.com/fwlink/p/?LinkId=619362). This sample Windows PowerShell script creates a domain account and then configures OU permissions to allow the account to join machines to the domain in the specified OU.
- [MDTSample.zip](https://go.microsoft.com/fwlink/p/?LinkId=619363). This sample web service shows you how to configure a computer name dynamically using MDT.