tag, use the value in the **LicenseID** attribute.
4. Select the new **LicenseProductId** node. For **LicenseInstall**, click **Browse** to find and select the license file that you renamed in Step 1.
### Add a policy to your package
Surface Hub supports a subset of the policies in the [Policy configuration service provider](https://msdn.microsoft.com/library/windows/hardware/dn904962.aspx). Some of those policies can be configured with ICD.
1. In the **Available customizations** pane, go to **Runtime settings** > **Policies**.
2. Select one of the available policy areas.
3. Select and set the policy you want to add to your provisioning package.
### Add Surface Hub settings to your package
You can add settings from the [SurfaceHub configuration service provider](https://msdn.microsoft.com/library/windows/hardware/mt608323.aspx) to your provisioning package.
1. In the **Available customizations** pane, go to **Runtime settings** > **WindowsTeamSettings**.
2. Select one of the available setting areas.
3. Select and set the setting you want to add to your provisioning package.
## Build your package
1. When you are done configuring the provisioning package, on the **File** menu, click **Save**.
2. Read the warning that project files may contain sensitive information, and click **OK**.
> [!IMPORTANT]
> When you build a provisioning package, you may include sensitive information in the project files and in the provisioning package (.ppkg) file. Although you have the option to encrypt the .ppkg file, project files are not encrypted. You should store the project files in a secure location and delete the project files when they are no longer needed.
3. On the **Export** menu, click **Provisioning package**.
4. Change **Owner** to **IT Admin**, which will set the precedence of this provisioning package higher than provisioning packages applied to this device from other sources.
5. Set a value for **Package Version**, and then select **Next.**
> [!TIP]
> You can make changes to existing packages and change the version number to update previously applied packages.
6. Optional: You can choose to encrypt the package and enable package signing.
- **Enable package encryption** - If you select this option, an auto-generated password will be shown on the screen.
- **Enable package signing** - If you select this option, you must select a valid certificate to use for signing the package. You can specify the certificate by clicking **Browse...** and choosing the certificate you want to use to sign the package.
> [!IMPORTANT]
> We recommend that you include a trusted provisioning certificate in your provisioning package. When the package is applied to a device, the certificate is added to the system store and any package signed with that certificate thereafter can be applied silently.
7. Click **Next** to specify the output location where you want the provisioning package to go once it's built. By default, Windows ICD uses the project folder as the output location.
Optionally, you can click **Browse** to change the default output location.
8. Click **Next**.
9. Click **Build** to start building the package. The project information is displayed in the build page and the progress bar indicates the build status.
If you need to cancel the build, click **Cancel**. This cancels the current build process, closes the wizard, and takes you back to the **Customizations Page**.
10. If your build fails, an error message will show up that includes a link to the project folder. You can scan the logs to determine what caused the error. Once you fix the issue, try building the package again.
If your build is successful, the name of the provisioning package, output directory, and project directory will be shown.
- If you choose, you can build the provisioning package again and pick a different path for the output package. To do this, click **Back** to change the output package name and path, and then click **Next** to start another build.
- If you are done, click **Finish** to close the wizard and go back to the **Customizations Page**.
11. Select the **output location** link to go to the location of the package. Copy the .ppkg to an empty USB flash drive.
## Apply a provisioning package to Surface Hub
There are two options for deploying provisioning packages to a Surface Hub. [During the first run wizard](#apply-a-provisioning-package-during-first-run), you can apply a provisioning package that installs certificates, or after the first-run program is complete, you can apply a provisioning package that configures settings, apps, and certificates by using [Settings](#apply-a-package-using-settings).
### Apply a provisioning package during first run
> [!IMPORTANT]
> During the first-run program, you can only use provisioning packages to install certificates. Use the **Settings** app to install apps and apply other settings.
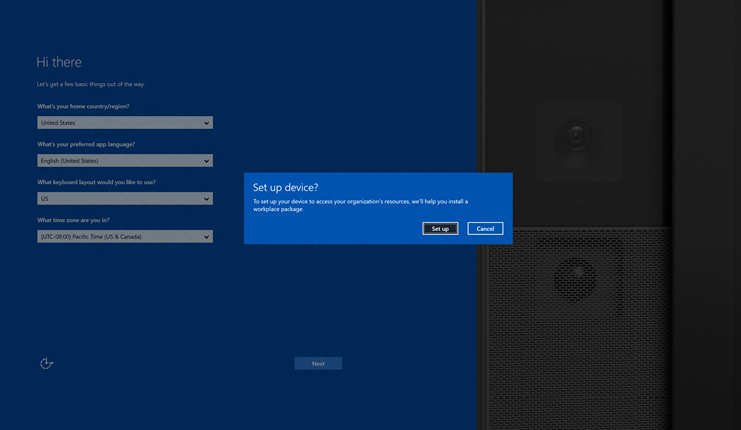
1. When you turn on the Surface Hub for the first time, the first-run program will display the [**Hi there page**](first-run-program-surface-hub.md#first-page). Make sure that the settings are properly configured before proceeding.
2. Insert the USB flash drive containing the .ppkg file into the Surface Hub. If the package is in the root directory of the drive, the first-run program will recognize it and ask if you want to set up the device. Select **Set up**.
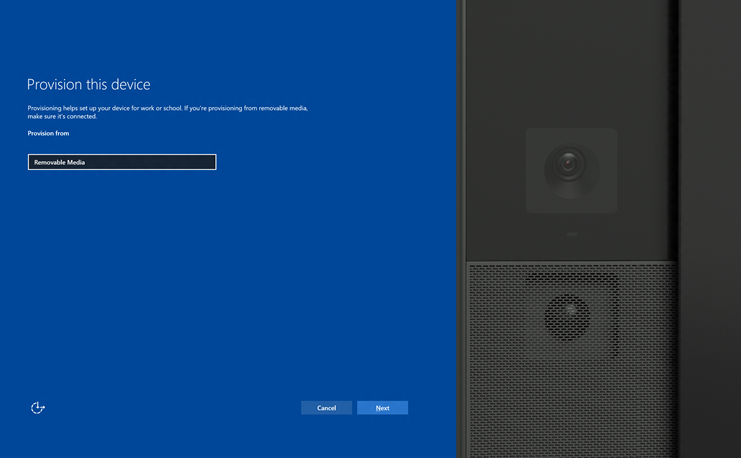
3. The next screen asks you to select a provisioning source. Select **Removable Media** and tap **Next**.
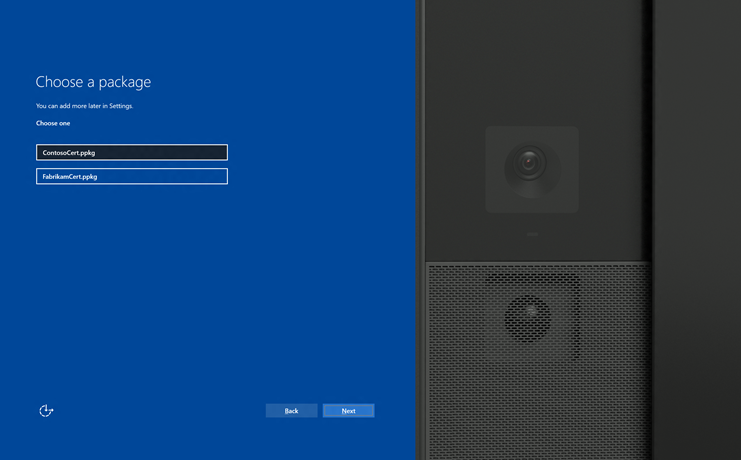
4. Select the provisioning package (\*.ppkg) that you want to apply, and tap **Next**. Note that you can only install one package during first run.
5. The first-run program will show you a summary of the changes that the provisioning package will apply. Select **Yes, add it**.

6. If a configuration file is included in the root directory of the USB flash drive, you will see **Select a configuration**. The first device account in the configuration file will be shown with a summary of the account information that will be applied to the Surface Hub.
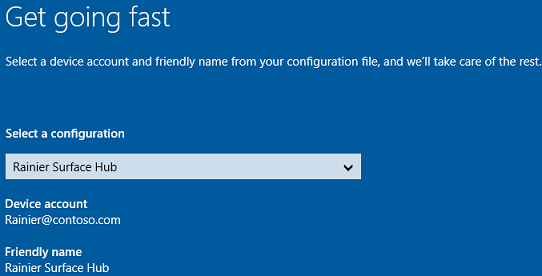
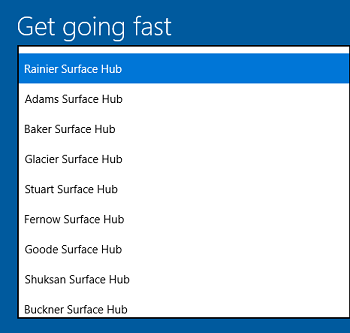
7. In **Select a configuration**, select the device name to apply, and then click **Next**.
The settings from the provisioning package will be applied to the device and OOBE will be complete. After the device restarts, you can remove the USB flash drive.
### Apply a package using Settings
1. Insert the USB flash drive containing the .ppkg file into the Surface Hub.
2. From the Surface Hub, start **Settings** and enter the admin credentials when prompted.
3. Navigate to **Surface Hub** > **Device management**. Under **Provisioning packages**, select **Add or remove a provisioning package**.
4. Select **Add a package**.
5. Choose your provisioning package and select **Add**. You may have to re-enter the admin credentials if prompted.
6. You'll see a summary of the changes that the provisioning package will apply. Select **Yes, add it**.

 To provision the device with a certificate, click Add a certificate. Enter a name for the certificate, and then browse to and select the certificate to be used.

 Toggle Yes or No for proxy settings. The default configuration for Surface Hub is to automatically detect proxy settings, so you can select No if that is the setting that you want. However, if your infrastructure previously required using a proxy server and has changed to not require a proxy server, you can use a provisioning package to revert your Surface Hub devices to the default settings by selecting Yes and Automatically detect settings. If you toggle Yes, you can select to automatically detect proxy settings, or you can manually configure the settings by entering a URL to a setup script, or a static proxy server address. You can also identify whether to use the proxy server for local addresses, and enter exceptions (addresses that Surface Hub should connect to directly without using the proxy server).

 You can enroll the device in Active Directory and specify a security group to use the Settings app, enroll in Azure Active Directory to allow global admins to use the Settings app, or create a local administrator account on the device.To enroll the device in Active Directory, enter the credentials for a least-privileged user account to join the device to the domain, and specify the security group to have admin credentials on Surface Hub. If a provisioning package that enrolls a device in Active Directory is going to be applied to a Surface Hub that was reset, the same domain account can only be used if the account listed is a domain administrator or is the same account that set up the Surface Hub initially. Otherwise, a different domain account must be used in the provisioning package.Before you use a Windows Configuration Designer wizard to configure bulk Azure AD enrollment, set up Azure AD join in your organization. The maximum number of devices per user setting in your Azure AD tenant determines how many times the bulk token that you get in the wizard can be used. To enroll the device in Azure AD, select that option and enter a friendly name for the bulk token you will get using the wizard. Set an expiration date for the token (maximum is 30 days from the date you get the token). Click Get bulk token. In the Let's get you signed in window, enter an account that has permissions to join a device to Azure AD, and then the password. Click Accept to give Windows Configuration Designer the necessary permissions.To create a local administrator account, select that option and enter a user name and password. Important: If you create a local account in the provisioning package, you must change the password using the Settings app every 42 days. If the password is not changed during that period, the account might be locked out and unable to sign in.

 Toggle Yes or No for enrollment in MDM. If you toggle Yes, you must provide a service account and password or certificate thumbprint that is authorized to enroll the device, and also specify the authentication type. If required by your MDM provider, also enter the URLs for the discovery service, enrollment service, and policy service. Learn more about managing Surface Hub with MDM.

 You can install multiple Universal Windows Platform (UWP) apps in a provisioning package. For help with the settings, see Provision PCs with apps. Important: Although the wizard interface allows you to select a Classic Win32 app, only include UWP apps in a provisioning package that will be applied to Surface Hub. If you include a Classic Win32 app, provisioning will fail.

 You don't configure any settings in this step. It provides instructions for including a configuration file that contains a list of device accounts. The configuration file must not contain column headers. When you apply the provisioning package to Surface Hub, if a Surface Hub configuration file is included on the USB drive, you can select the account and friendly name for the device from the file. See Sample configuration file for an example.Important: The configuration file can only be applied during the out-of-box setup experience (OOBE) and can only be used with provisioning packages created using the Windows Configuration Designer released with Windows 10, version 1703.
 You can set a password to protect your provisioning package. You must enter this password when you apply the provisioning package to a device.