---
title: Configure a test lab to deploy Windows 10
description: Learn about concepts and procedures for deploying Windows 10 in a proof of concept lab environment.
manager: aaroncz
ms.author: frankroj
author: frankroj
ms.service: windows-client
ms.subservice: itpro-deploy
ms.localizationpriority: medium
ms.topic: tutorial
ms.date: 11/23/2022
---
# Step by step guide: Configure a test lab to deploy Windows 10
*Applies to:*
- Windows 10
This guide contains instructions to configure a proof of concept (PoC) environment requiring a minimum amount of resources.
> [!NOTE]
> Microsoft also offers a pre-configured lab using an evaluation version of Configuration Manager. For more information, see [Windows and Office deployment and management lab kit](/microsoft-365/enterprise/modern-desktop-deployment-and-management-lab).
This lab guide makes extensive use of Windows PowerShell and Hyper-V. Subsequent companion guides contain steps to deploy Windows 10 using the PoC environment. After completing this guide, see the following Windows 10 PoC deployment guides:
- [Step by step: Deploy Windows 10 in a test lab using Microsoft Configuration Manager](windows-10-poc-sc-config-mgr.md)
- [Step by step: Deploy Windows 10 in a test lab using MDT](windows-10-poc-mdt.md)
The proof of concept (PoC) deployment guides are intended to provide a demonstration of Windows 10 deployment tools and processes for IT professionals that aren't familiar with these tools, and you want to set up a PoC environment. Don't use the instructions in this guide in a production setting. They aren't meant to replace the instructions found in production deployment guidance.
Approximately 3 hours are required to configure the PoC environment. You'll need a Hyper-V capable computer running Windows 8.1 or later with at least 16 GB of RAM. Detailed [requirements](#hardware-and-software-requirements) are provided below.
Windows PowerShell commands are provided to set up the PoC environment quickly. You don't need to be an expert in Windows PowerShell to complete the steps in the guide, however you'll need to customize some commands to your environment.
> [!TIP]
> Instructions to "type" Windows PowerShell commands provided in this guide can be followed literally by typing the commands, but the preferred method is to copy and paste these commands.
>
> A Windows PowerShell window can be used to run all commands in this guide. However, when commands are specified for a command prompt, either type CMD at the Windows PowerShell prompt to enter the command prompt, or preface the command with `cmd /c`. You can also escape special characters in the command using the back-tick character (\`). In most cases, the simplest action is to type `cmd` and enter a command prompt, type the necessary commands, then type `exit` to return to Windows PowerShell.
Hyper-V is installed, configured and used extensively in this guide. If you aren't familiar with Hyper-V, review the [terminology](#appendix-b-terminology-used-in-this-guide) used in this guide before starting.
## In this guide
This guide contains instructions for three general procedures: Install Hyper-V, configure Hyper-V, and configure VMs. If you already have a computer running Hyper-V, you can use this computer and skip the first procedure. In this case, modify your virtual switch settings to match the settings used in this guide. Alternatively, you can modify the steps in this guide to use your existing Hyper-V settings.
After completing the instructions in this guide, you'll have a PoC environment that enables you to test Windows 10 deployment procedures by following instructions in companion guides that are written to use the PoC environment. Links are provided to download trial versions of Windows Server 2012, Windows 10 Enterprise, and all deployment tools necessary to complete the lab.
The procedures in this guide are summarized in the following table. An estimate of the time required to complete each procedure is also provided. Time required to complete procedures will vary depending on the resources available to the Hyper-V host and assigned to VMs, such as processor speed, memory allocation, disk speed, and network speed.
|Procedure|Description|Time|
|--- |--- |--- |
|[Hardware and software requirements](#hardware-and-software-requirements)|Prerequisites to complete this guide.|Informational|
|[Lab setup](#lab-setup)|A description and diagram of the PoC environment.|Informational|
|[Configure the PoC environment](#configure-the-poc-environment)|Parent section for procedures.|Informational|
|[Verify support and install Hyper-V](#verify-support-and-install-hyper-v)|Verify that installation of Hyper-V is supported, and install the Hyper-V server role.|10 minutes|
|[Download VHD and ISO files](#download-vhd-and-iso-files)|Download evaluation versions of Windows Server 2012 R2 and Windows 10 and prepare these files to be used on the Hyper-V host.|30 minutes|
|[Convert PC to VM](#convert-pc-to-vm)|Convert a physical computer on your network to a VM hosted in Hyper-V.|30 minutes|
|[Resize VHD](#resize-vhd)|Increase the storage capacity for one of the Windows Server VMs.|5 minutes|
|[Configure Hyper-V](#configure-hyper-v)|Create virtual switches, determine available RAM for virtual machines, and add virtual machines.|15 minutes|
|[Configure service and user accounts](#configure-vms)|Start virtual machines and configure all services and settings.|60 minutes|
|[Configure VMs](#configure-vms)|Start virtual machines and configure all services and settings.|60 minutes|
|[Appendix A: Verify the configuration](#appendix-a-verify-the-configuration)|Verify and troubleshoot network connectivity and services in the PoC environment.|30 minutes|
|[Appendix B: Terminology in this guide](#appendix-b-terminology-used-in-this-guide)|Terms used in this guide.|Informational|
## Hardware and software requirements
One computer that meets the hardware and software specifications below is required to complete the guide; A second computer is recommended to validate the upgrade process.
- **Computer 1**: the computer you'll use to run Hyper-V and host virtual machines. This computer should have 16 GB or more of installed RAM and a multi-core processor.
- **Computer 2**: a client computer from your network. It's shadow-copied to create a VM that can be added to the PoC environment, enabling you to test a mirror image of a computer on your network. If you don't have a computer to use for this simulation, you can download an evaluation VHD and use it to represent this computer. Subsequent guides use this computer to simulate Windows 10 replace and refresh scenarios, so the VM is required even if you can't create this VM using computer 2.
Hardware requirements are displayed below:
| |Computer 1 (required)|Computer 2 (recommended)|
|--- |--- |--- |
|**Role**|Hyper-V host|Client computer|
|**Description**|This computer will run Hyper-V, the Hyper-V management tools, and the Hyper-V Windows PowerShell module.|This computer is a Windows 8.1 client on your network that will be converted to a VM to demonstrate the upgrade process.|
|**OS**|Windows 8.1/10 or Windows Server 2012/2012 R2/2016|Windows 8.1 or a later|
|**Edition**|Enterprise, Professional, or Education|Any|
|**Architecture**|64-bit|Any
Retaining applications and settings requires that architecture (32-bit or 64-bit) is the same before and after the upgrade.|
|**RAM**|8-GB RAM (16 GB recommended) to test Windows 10 deployment with MDT.
16-GB RAM to test Windows 10 deployment with Microsoft Configuration Manager.|Any|
|**Disk**|200-GB available hard disk space, any format.|Any size, MBR formatted.|
|**CPU**|SLAT-Capable CPU|Any|
|**Network**|Internet connection|Any|
## Lab setup
The lab architecture is summarized in the following diagram:

- Computer 1 is configured to host four VMs on a private, PoC network.
- Two VMs are running Windows Server 2012 R2 with required network services and tools installed.
- Two VMs are client systems: One VM is intended to mirror a host on your network (computer 2) and one VM is running Windows 10 Enterprise to demonstrate the hardware replacement scenario.
> [!NOTE]
> If you have an existing Hyper-V host, you can use this host and skip the Hyper-V installation section in this guide.
The two Windows Server VMs can be combined into a single VM to conserve RAM and disk space if necessary. However, instructions in this guide assume two server systems are used. Using two servers enables Active Directory Domain Services and DHCP to be installed on a server that isn't directly connected to the network. This action mitigates the risk of clients on the network receiving DHCP leases from the PoC network. In other words, a "rogue" DHCP server. It also limits NETBIOS service broadcasts.
## Configure the PoC environment
> [!TIP]
> Before you begin, ensure that Windows PowerShell is pinned to the taskbar for easy access. If the Hyper-V host is running Windows Server then Windows PowerShell is automatically pinned to the taskbar. To pin Windows PowerShell to the taskbar on Windows 8.1 or Windows 10: Click **Start**, type **power**, right click **Windows PowerShell**, and then click **Pin to taskbar**. After Windows PowerShell is pinned to the taskbar, you can open an elevated Windows PowerShell prompt by right-clicking the icon on the taskbar and then clicking **Run as Administrator**.
### Procedures in this section
- [Verify support and install Hyper-V](#verify-support-and-install-hyper-v)
- [Download VHD and ISO files](#download-vhd-and-iso-files)
- [Convert PC to VM](#convert-pc-to-vm)
- [Resize VHD](#resize-vhd)
- [Configure Hyper-V](#configure-hyper-v)
- [Configure VMs](#configure-vms)
### Verify support and install Hyper-V
Starting with Windows 8, the host computer's microprocessor must support second level address translation (SLAT) to install Hyper-V. See [Hyper-V: List of SLAT-Capable CPUs for Hosts](https://social.technet.microsoft.com/wiki/contents/articles/1401.hyper-v-list-of-slat-capable-cpus-for-hosts.aspx) for more information.
1. To verify your computer supports SLAT, open an administrator command prompt, type **systeminfo**, press ENTER, and review the section displayed at the bottom of the output, next to Hyper-V Requirements. See the following example:
```cmd
C:\>systeminfo.exe
...
Hyper-V Requirements: VM Monitor Mode Extensions: Yes
Virtualization Enabled In Firmware: Yes
Second Level Address Translation: Yes
Data Execution Prevention Available: Yes
```
In this example, the computer supports SLAT and Hyper-V.
If one or more requirements are evaluated as **No**, then the computer doesn't support installing Hyper-V. However, if only the virtualization setting is incompatible, you might be able to enable virtualization in the BIOS and change the **Virtualization Enabled In Firmware** setting from **No** to **Yes**. The location of this setting will depend on the manufacturer and BIOS version, but is typically found associated with the BIOS security settings.
You can also identify Hyper-V support using [tools](/archive/blogs/taylorb/hyper-v-will-my-computer-run-hyper-v-detecting-intel-vt-and-amd-v) provided by the processor manufacturer, the [msinfo32](/previous-versions/windows/it-pro/windows-server-2012-R2-and-2012/cc731397(v=ws.11)) tool, or you can download the [coreinfo](/sysinternals/downloads/coreinfo) utility and run it, as shown in the following example:
```cmd
C:\>coreinfo.exe -v
Coreinfo v3.31 - Dump information on system CPU and memory topology
Copyright (C) 2008-2014 Mark Russinovich
Sysinternals - www.sysinternals.com
Intel(R) Core(TM) i7-2600 CPU @ 3.40GHz
Intel64 Family 6 Model 42 Stepping 7, GenuineIntel
Microcode signature: 0000001B
HYPERVISOR - Hypervisor is present
VMX * Supports Intel hardware-assisted virtualization
EPT * Supports Intel extended page tables (SLAT)
```
> [!NOTE]
> A 64-bit operating system is required to run Hyper-V.
2. The Hyper-V feature isn't installed by default. To install it, open an elevated Windows PowerShell window and type the following command:
```powershell
Enable-WindowsOptionalFeature -Online -FeatureName Microsoft-Hyper-V -All
```
This command works on all operating systems that support Hyper-V, but on Windows Server operating systems you must type an extra command to add the Hyper-V Windows PowerShell module and the Hyper-V Manager console. This command will also install Hyper-V if it isn't already installed, so if desired you can just type the following command on Windows Server 2012 or 2016 instead of using the Enable-WindowsOptionalFeature command:
```powershell
Install-WindowsFeature -Name Hyper-V -IncludeManagementTools
```
When you're prompted to restart the computer, choose **Yes**. The computer might restart more than once. After installation is complete, you can open Hyper-V Manager by typing **virtmgmt.msc** at an elevated command prompt.
Alternatively, you can install Hyper-V using the Control Panel in Windows under **Turn Windows features on or off** for a client operating system, or using Server Manager's **Add Roles and Features Wizard** on a server operating system, as shown below:
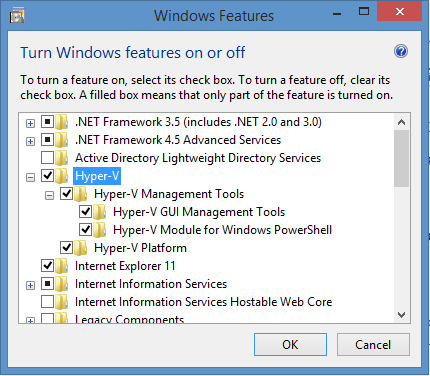
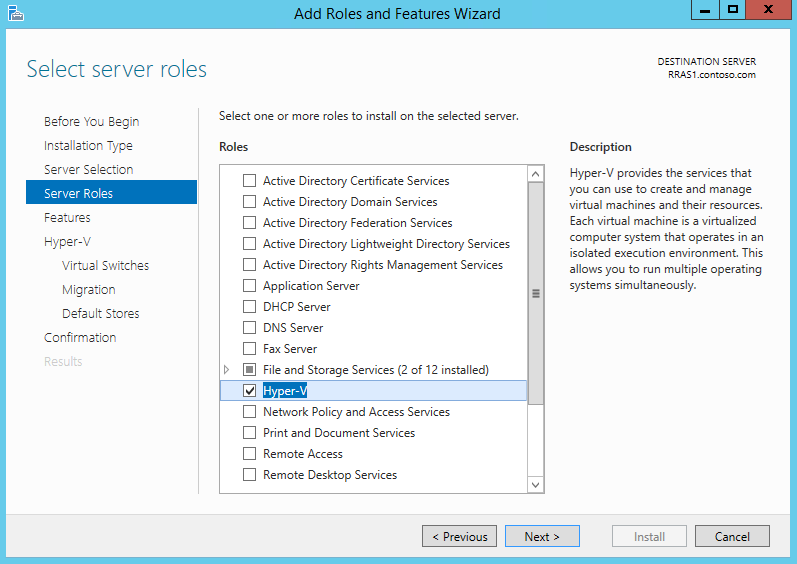
If you choose to install Hyper-V using Server Manager, accept all default selections. Also be sure to install both items under **Role Administration Tools\Hyper-V Management Tools**.
### Download VHD and ISO files
When you have completed installation of Hyper-V on the host computer, begin configuration of Hyper-V by downloading VHD and ISO files to the Hyper-V host. These files will be used to create the VMs used in the lab.
1. Create a directory on your Hyper-V host named **C:\VHD**. Download a single VHD file for [Windows Server](https://www.microsoft.com/evalcenter/evaluate-windows-server-2022) to the **C:\VHD** directory.
> [!NOTE]
> The currently available downloads are Windows Server 2019 or Windows Server 2022. The rest of this article refers to "Windows Server 2012 R2" and similar variations.
> [!IMPORTANT]
> This guide assumes that VHDs are stored in the **C:\VHD** directory on the Hyper-V host. If you use a different directory to store VHDs, you must adjust steps in this guide appropriately.
2. Download the file to the **C:\VHD** directory. When the download is complete, rename the VHD file that you downloaded to **2012R2-poc-1.vhd**. Do this action to make the filename simple to recognize and type.
3. Copy the VHD to a second file also in the **C:\VHD** directory and name this VHD **2012R2-poc-2.vhd**.
4. Download the [Windows 10 Enterprise](https://www.microsoft.com/evalcenter/evaluate-windows-10-enterprise) ISO file to the **C:\VHD** directory on your Hyper-V host.
You can select the type, version, and language of installation media to download. In this example, a Windows 10 Enterprise, 64 bit, English ISO is chosen. You can choose a different version.
> [!NOTE]
> The evaluation version of Windows 10 doesn't support in-place upgrade**.
5. Rename the ISO file that you downloaded to **w10-enterprise.iso**. This step is so that the filename is simple to type and recognize.
After completing these steps, you'll have three files in the **C:\VHD** directory: **2012R2-poc-1.vhd**, **2012R2-poc-2.vhd**, **w10-enterprise.iso**.
The following example displays the procedures described in this section, both before and after downloading files:
```cmd
C:>mkdir VHD
C:>cd VHD
C:\VHD>ren 9600*.vhd 2012R2-poc-1.vhd
C:\VHD>copy 2012R2-poc-1.vhd 2012R2-poc-2.vhd
1 file(s) copied.
C:\VHD ren *.iso w10-enterprise.iso
C:\VHD>dir /B
2012R2-poc-1.vhd
2012R2-poc-2.vhd
w10-enterprise.iso
```
### Convert PC to VM
> [!IMPORTANT]
> Don't attempt to use the VM resulting from the following procedure as a reference image. Also, to avoid conflicts with existing clients, don't start the VM outside the PoC network.
If you have a PC available to convert to VM (computer 2):
1. Sign in on computer 2 using an account with Administrator privileges.
> [!IMPORTANT]
> The account used in this step must have local administrator privileges. You can use a local computer account, or a domain account with administrative rights if domain policy allows the use of cached credentials. After converting the computer to a VM, you must be able to sign in on this VM with administrator rights while the VM is disconnected from the network.
2. [Determine the VM generation and partition type](#determine-the-vm-generation-and-partition-type) that is required.
3. Based on the VM generation and partition type, perform one of the following procedures: [Prepare a generation 1 VM](#prepare-a-generation-1-vm), [Prepare a generation 2 VM](#prepare-a-generation-2-vm), or [prepare a generation 1 VM from a GPT disk](#prepare-a-generation-1-vm-from-a-gpt-disk).
#### Determine the VM generation and partition type
When creating a VM in Hyper-V, you must specify either generation 1 or generation 2. The following table describes requirements for these two types of VMs.
||Architecture|Operating system|Partition style|
|--- |--- |--- |--- |
|**Generation 1**|32-bit or 64-bit|Windows 7 or later|MBR|
|**Generation 2**|64-bit|Windows 8 or later|MBR or GPT|
If the PC is running a 32-bit OS or the OS is Windows 7, it must be converted to a generation 1 VM. Otherwise, it can be converted to a generation 2 VM.
- To determine the OS and architecture of a PC, type **systeminfo** at a command prompt and review the output next to **OS Name** and **System Type**.
- To determine the partition style, open a Windows PowerShell prompt on the PC and type the following command:
```powershell
Get-WmiObject -Class Win32_DiskPartition | Select-Object -Property SystemName,Caption,Type
```
If the **Type** column doesn't indicate GPT, then the disk partition format is MBR ("Installable File System" = MBR). In the following example, the disk is GPT:
```powershell
Get-WmiObject -Class Win32_DiskPartition | Select-Object -Property SystemName,Caption,Type
SystemName Caption Type
---------- ------- ----
USER-PC1 Disk #0, Partition #0 GPT: System
USER-PC1 Disk #0, Partition #1 GPT: Basic Data
```
On a computer running Windows 8 or later, you can also type **Get-Disk** at a Windows PowerShell prompt to discover the partition style. The default output of this cmdlet displays the partition style for all attached disks. Both commands are displayed below. In this example, the client computer is running Windows 8.1 and uses a GPT style partition format:
```powershell
Get-WmiObject -Class Win32_DiskPartition | Select-Object -Property SystemName,Caption,Type
SystemName Caption Type
---------- ------- ----
PC-X1 Disk #0, Partition #0 GPT: Unknown
PC-X1 Disk #0, Partition #1 GPT: System
PC-X1 Disk #0, Partition #2 GPT: Basic Data
PC-X1 Disk #0, Partition #3 GPT: Basic Data
PC-X1 Disk #0, Partition #4 GPT: Basic Data
PS C:> Get-Disk
Number Friendly Name OperationalStatus Total Size Partition Style
------ ------------- ----------------- ---------- ---------------
0 INTEL SSDSCMMW240A3L Online 223.57 GB GPT
```
##### Choosing a VM generation
The following tables display the Hyper-V VM generation to choose based on the OS, architecture, and partition style. Links to procedures to create the corresponding VMs are included.
###### Windows 7 MBR
|Architecture|VM generation|Procedure|
|--- |--- |--- |
|32|1|[Prepare a generation 1 VM](#prepare-a-generation-1-vm)|
|64|1|[Prepare a generation 1 VM](#prepare-a-generation-1-vm)|
###### Windows 7 GPT
|Architecture|VM generation|Procedure|
|--- |--- |--- |
|32|N/A|N/A|
|64|1|[Prepare a generation 1 VM from a GPT disk](#prepare-a-generation-1-vm-from-a-gpt-disk)|
###### Windows 8 or later MBR
|Architecture|VM generation|Procedure|
|--- |--- |--- |
|32|1|[Prepare a generation 1 VM](#prepare-a-generation-1-vm)|
|64|1, 2|[Prepare a generation 1 VM](#prepare-a-generation-1-vm)|
###### Windows 8 or later GPT
|Architecture|VM generation|Procedure|
|--- |--- |--- |
|32|1|[Prepare a generation 1 VM from a GPT disk](#prepare-a-generation-1-vm-from-a-gpt-disk)|
|64|2|[Prepare a generation 2 VM](#prepare-a-generation-2-vm)|
> [!NOTE]
>
> - If the PC is running Windows 7, it can only be converted and hosted in Hyper-V as a generation 1 VM. This Hyper-V requirement means that if the Windows 7 PC is also using a GPT partition style, the OS disk can be shadow copied, but a new system partition must be created. In this case, see [Prepare a generation 1 VM from a GPT disk](#prepare-a-generation-1-vm-from-a-gpt-disk).
>
> - If the PC is running Windows 8 or later and uses the GPT partition style, you can capture the disk image and create a generation 2 VM. To do this, you must temporarily mount the EFI system partition which is accomplished using the `mountvol` command. In this case, see [Prepare a generation 2 VM](#prepare-a-generation-2-vm).
>
> - If the PC is using an MBR partition style, you can convert the disk to VHD and use it to create a generation 1 VM. If you use the Disk2VHD tool described in this guide, it is not necessary to mount the MBR system partition, but it is still necessary to capture it. In this case, see [Prepare a generation 1 VM](#prepare-a-generation-1-vm).
#### Prepare a generation 1 VM
1. Download the [Disk2vhd utility](/sysinternals/downloads/disk2vhd), extract the .zip file and copy **disk2vhd.exe** to a flash drive or other location that is accessible from the computer you wish to convert.
> [!TIP]
> You might experience timeouts if you attempt to run Disk2vhd from a network share, or specify a network share for the destination. To avoid timeouts, use local, portable media such as a USB drive.
2. On the computer you wish to convert, double-click the disk2vhd utility to start the graphical user interface.
3. Select the checkboxes next to the `C:\` and the **system reserved** (BIOS/MBR) volumes. The system volume isn't assigned a drive letter, but will be displayed in the Disk2VHD tool with a volume label similar to `\?\Volume{`. See the following example.
> [!IMPORTANT]
> You must include the system volume in order to create a bootable VHD. If this volume isn't displayed in the disk2vhd tool, then the computer is likely to be using the GPT partition style. For more information, see [Choosing a VM generation](#choosing-a-vm-generation).
4. Specify a location to save the resulting VHD or VHDX file (F:\VHD\w7.vhdx in the following example) and select **Create**. See the following example:
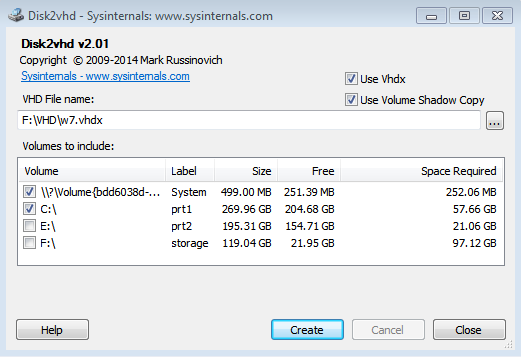
Disk2vhd can save VHDs to local hard drives, even if they're the same as the volumes being converted. Performance is better, however, when the VHD is saved on a disk different than the disks being converted, such as a flash drive.
5. When the Disk2vhd utility has completed converting the source computer to a VHD, copy the VHDX file (w7.vhdx) to your Hyper-V host in the C:\VHD directory. There should now be four files in this directory:
```cmd
C:\vhd>dir /B
2012R2-poc-1.vhd
2012R2-poc-2.vhd
w10-enterprise.iso
w7.VHDX
```
#### Prepare a generation 2 VM
1. Download the [Disk2vhd utility](/sysinternals/downloads/disk2vhd), extract the .zip file and copy **disk2vhd.exe** to a flash drive or other location that is accessible from the computer you wish to convert.
> [!TIP]
> You might experience timeouts if you attempt to run Disk2vhd from a network share, or specify a network share for the destination. To avoid timeouts, use local, portable media such as a USB drive.
2. On the computer you wish to convert, open an elevated command prompt and type the following command:
```cmd
mountvol.exe s: /s
```
This command temporarily assigns a drive letter of S to the system volume and mounts it. If the letter S is already assigned to a different volume on the computer, then choose one that is available (ex: mountvol z: /s).
3. On the computer you wish to convert, double-click the disk2vhd utility to start the graphical user interface.
4. Select the checkboxes next to the **C:\\** and the **S:\\** volumes, and clear the **Use Volume Shadow Copy checkbox**. Volume shadow copy won't work if the EFI system partition is selected.
> [!IMPORTANT]
> You must include the EFI system partition in order to create a bootable VHD. The Windows RE tools partition (shown below) is not required, but it can also be converted if desired.
5. Specify a location to save the resulting VHD or VHDX file (F:\VHD\PC1.vhdx in the following example) and select **Create**. See the following example:
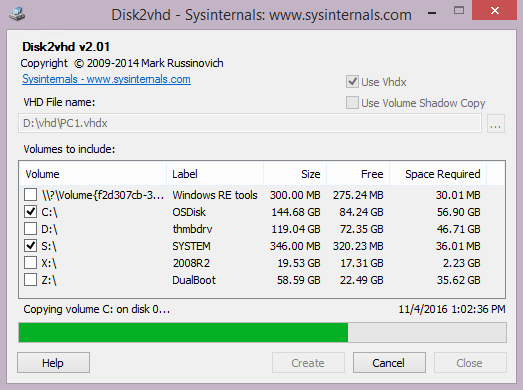
Disk2vhd can save VHDs to local hard drives, even if they're the same as the volumes being converted. Performance is better however when the VHD is saved on a disk different than those disks being converted, such as a flash drive.
6. When the Disk2vhd utility has completed converting the source computer to a VHD, copy the VHDX file (PC1.vhdx) to your Hyper-V host in the C:\VHD directory. There should now be four files in this directory:
```cmd
C:\vhd>dir /B
2012R2-poc-1.vhd
2012R2-poc-2.vhd
w10-enterprise.iso
PC1.VHDX
```
#### Prepare a generation 1 VM from a GPT disk
1. Download the [Disk2vhd utility](/sysinternals/downloads/disk2vhd), extract the .zip file and copy **disk2vhd.exe** to a flash drive or other location that is accessible from the computer you wish to convert.
You might experience timeouts if you attempt to run Disk2vhd from a network share, or specify a network share for the destination. To avoid timeouts, use local, portable media such as a USB drive.
2. On the computer you wish to convert, double-click the disk2vhd utility to start the graphical user interface.
3. Select the checkbox next to the **C:\\** volume and clear the checkbox next to **Use Vhdx**.
> [!NOTE]
> The system volume isn't copied in this scenario, it will be added later.
4. Specify a location to save the resulting VHD file (F:\VHD\w7.vhd in the following example) and select **Create**. See the following example:

Disk2vhd can save VHDs to local hard drives, even if they're the same as the volumes being converted. Performance is better however when the VHD is saved on a disk different than those disks being converted, such as a flash drive.
5. When the Disk2vhd utility has completed converting the source computer to a VHD, copy the VHD file (w7.vhd) to your Hyper-V host in the C:\VHD directory. There should now be four files in this directory:
```cmd
C:\vhd>dir /B
2012R2-poc-1.vhd
2012R2-poc-2.vhd
w10-enterprise.iso
w7.VHD
```
In its current state, the w7.VHD file isn't bootable. The VHD will be used to create a bootable VM later in the [Configure Hyper-V](#configure-hyper-v) section.
### Enhanced session mode
> [!IMPORTANT]
> Before proceeding, verify that you can take advantage of [enhanced session mode](/windows-server/virtualization/hyper-v/learn-more/Use-local-resources-on-Hyper-V-virtual-machine-with-VMConnect) when completing instructions in this guide. Enhanced session mode enables you to copy and paste the commands from the Hyper-V host to VMs, between VMs, and between RDP sessions. After copying some text, you can paste into a Windows PowerShell window by simply right-clicking. Before right-clicking, do not left click other locations as this can empty the clipboard. You can also copy and paste files directly from one computer to another by right-clicking and selecting copy on one computer, then right-clicking and selecting paste on another computer.
To ensure that enhanced session mode is enabled on the Hyper-V host, type the following command at an elevated Windows PowerShell prompt on the Hyper-V host:
```powershell
Set-VMhost -EnableEnhancedSessionMode $TRUE
```
If enhanced session mode wasn't previously enabled, close any existing virtual machine connections and reopen them to enable access to enhanced session mode. As mentioned previously: instructions to "type" commands provided in this guide can be typed, but the preferred method is to copy and paste these commands. Most of the commands to this point in the guide have been brief, but many commands in sections below are longer and more complex.
### Resize VHD
The second Windows Server 2012 R2 VHD needs to be expanded in size from 40 GB to 100 GB to support installing imaging tools and storing OS images.
1. To add available space for the partition, type the following commands at an elevated Windows PowerShell prompt on the Hyper-V host:
```powershell
Resize-VHD -Path c:\VHD\2012R2-poc-2.vhd -SizeBytes 100GB
$x = (Mount-VHD -Path c:\VHD\2012R2-poc-2.vhd -passthru | Get-Disk | Get-Partition | Get-Volume).DriveLetter
Resize-Partition -DriveLetter $x -Size (Get-PartitionSupportedSize -DriveLetter $x).SizeMax
```
2. Verify that the mounted VHD drive is resized to 100 GB, and then dismount the drive:
```powershell
Get-Volume -DriveLetter $x
Dismount-VHD -Path c:\VHD\2012R2-poc-2.vhd
```
### Configure Hyper-V
1. Open an elevated Windows PowerShell window and type the following command to create two virtual switches named "poc-internal" and "poc-external":
If the Hyper-V host already has an external virtual switch bound to a physical NIC, don't attempt to add a second external virtual switch. Attempting to add a second external switch will result in an error indicating that the NIC is **already bound to the Microsoft Virtual Switch protocol.** In this case, choose one of the following options:
**A**: Remove the existing external virtual switch, then add the poc-external switch
**B**: Rename the existing external switch to "poc-external"
**C**: Replace each instance of "poc-external" used in this guide with the name of your existing external virtual switch
If you choose B) or C), then don't run the second command below.
```powershell
New-VMSwitch -Name poc-internal -SwitchType Internal -Notes "PoC Network"
New-VMSwitch -Name poc-external -NetAdapterName (Get-NetAdapter |?{$_.Status -eq "Up" -and !$_.Virtual}).Name -Notes "PoC External"
```
> [!NOTE]
> The second command above will temporarily interrupt network connectivity on the Hyper-V host.
Since an external virtual switch is associated to a physical network adapter on the Hyper-V host, this adapter must be specified when adding the virtual switch. The previous commands automate this action by filtering for active non-virtual ethernet adapters using the Get-NetAdapter cmdlet (`$_.Status -eq "Up" -and !$_.Virtual`). If your Hyper-V host is dual-homed with multiple active ethernet adapters, this automation won't work, and the second command above will fail. In this case, you must edit the command used to add the "poc-external" virtual switch by inserting the appropriate NetAdapterName. The NetAdapterName value corresponds to the name of the network interface you wish to use. For example, if the network interface you use on the Hyper-V host to connect to the internet is named "Ethernet 2" then type the following command to create an external virtual switch: `New-VMSwitch -Name poc-external -NetAdapterName "Ethernet 2" -Notes "PoC External"`
2. At the elevated Windows PowerShell prompt, type the following command to determine the megabytes of RAM that are currently available on the Hyper-V host:
```powershell
(Get-VMHostNumaNode).MemoryAvailable
```
This command will display the megabytes of RAM available for VMs. On a Hyper-V host computer with 16 GB of physical RAM installed, 10,000 MB of RAM or greater should be available if the computer isn't also running other applications. On a computer with 8 GB of physical RAM installed, at least 4000 MB should be available. If the computer has less RAM available, try closing applications to free up more memory.
3. Determine the available memory for VMs by dividing the available RAM by 4. For example:
```powershell
(Get-VMHostNumaNode).MemoryAvailable/4
2775.5
```
In this example, VMs can use a maximum of 2700 MB of RAM each, to run four VMs simultaneously.
4. At the elevated Windows PowerShell prompt, type the following command to create two new VMs. Other VMs will be added later.
> [!IMPORTANT]
> Replace the value of 2700MB for $maxRAM in the first command below with the RAM value that you calculated in the previous step.
```powershell
$maxRAM = 2700MB
New-VM -Name "DC1" -VHDPath c:\vhd\2012R2-poc-1.vhd -SwitchName poc-internal
Set-VMMemory -VMName "DC1" -DynamicMemoryEnabled $true -MinimumBytes 512MB -MaximumBytes $maxRAM -Buffer 20
Enable-VMIntegrationService -Name "Guest Service Interface" -VMName DC1
New-VM -Name "SRV1" -VHDPath c:\vhd\2012R2-poc-2.vhd -SwitchName poc-internal
Add-VMNetworkAdapter -VMName "SRV1" -SwitchName "poc-external"
Set-VMMemory -VMName "SRV1" -DynamicMemoryEnabled $true -MinimumBytes 512MB -MaximumBytes $maxRAM -Buffer 80
Enable-VMIntegrationService -Name "Guest Service Interface" -VMName SRV1
```
> [!NOTE]
> The RAM values assigned to VMs in this step are not permanent, and can be easily increased or decreased later if needed to address performance issues.
5. Using the same elevated Windows PowerShell prompt that was used in the previous step, type one of the following sets of commands, depending on the type of VM that was prepared in the [Choosing a VM generation](#choosing-a-vm-generation) section, either generation 1, generation 2, or generation 1 with GPT.
To create a generation 1 VM (using c:\vhd\w7.vhdx):
```powershell
New-VM -Name "PC1" -VHDPath c:\vhd\w7.vhdx -SwitchName poc-internal
Set-VMMemory -VMName "PC1" -DynamicMemoryEnabled $true -MinimumBytes 512MB -MaximumBytes $maxRAM -Buffer 20
Enable-VMIntegrationService -Name "Guest Service Interface" -VMName PC1
```
To create a generation 2 VM (using c:\vhd\PC1.vhdx):
```powershell
New-VM -Name "PC1" -Generation 2 -VHDPath c:\vhd\PC1.vhdx -SwitchName poc-internal
Set-VMMemory -VMName "PC1" -DynamicMemoryEnabled $true -MinimumBytes 512MB -MaximumBytes $maxRAM -Buffer 20
Enable-VMIntegrationService -Name "Guest Service Interface" -VMName PC1
```
To create a generation 1 VM from a GPT disk (using c:\vhd\w7.vhd):
> [!NOTE]
> The following procedure is more complex because it includes steps to convert the OS partition from GPT to MBR format. Steps are included to create a temporary VHD and attach it to the VM, the OS image is saved to this drive, the OS drive is then reformatted to MBR, the OS image restored, and the temporary drive is removed.
First, type the following commands at an elevated Windows PowerShell prompt on the Hyper-V host to create a temporary VHD that will be used to save the OS image. Don't forget to include a pipe (`|`) at the end of the first five commands:
```powershell
New-VHD -Path c:\vhd\d.vhd -SizeBytes 1TB |
Mount-VHD -Passthru |
Get-Disk -Number {$_.DiskNumber} |
Initialize-Disk -PartitionStyle MBR -PassThru |
New-Partition -UseMaximumSize |
Format-Volume -Confirm:$false -FileSystem NTFS -force
Dismount-VHD -Path c:\vhd\d.vhd
```
Next, create the PC1 VM with two attached VHDs, and boot to DVD ($maxram must be defined previously using the same Windows PowerShell prompt):
```powershell
New-VM -Name "PC1" -VHDPath c:\vhd\w7.vhd -SwitchName poc-internal
Add-VMHardDiskDrive -VMName PC1 -Path c:\vhd\d.vhd
Set-VMDvdDrive -VMName PC1 -Path c:\vhd\w10-enterprise.iso
Set-VMMemory -VMName "PC1" -DynamicMemoryEnabled $true -MinimumBytes 512MB -MaximumBytes $maxRAM -Buffer 20
Enable-VMIntegrationService -Name "Guest Service Interface" -VMName PC1
Start-VM PC1
vmconnect localhost PC1
```
The VM will automatically boot into Windows Setup. In the PC1 window:
1. Select **Next**.
2. Select **Repair your computer**.
3. Select **Troubleshoot**.
4. Select **Command Prompt**.
5. Type the following command to save an image of the OS drive:
```cmd
dism.exe /Capture-Image /ImageFile:D:\c.wim /CaptureDir:C:\ /Name:Drive-C
```
6. Wait for the OS image to complete saving, and then type the following commands to convert the C: drive to MBR:
```cmd
diskpart.exe
select disk 0
clean
convert MBR
create partition primary size=100
format fs=ntfs quick
active
create partition primary
format fs=ntfs quick label=OS
assign letter=c
exit
```
7. Type the following commands to restore the OS image and boot files:
```cmd
dism.exe /Apply-Image /ImageFile:D:\c.wim /Index:1 /ApplyDir:C:\
bcdboot.exe c:\windows
exit
```
8. Select **Continue** and verify the VM boots successfully. Don't boot from DVD.
9. Select **Ctrl+Alt+Del**, and then in the bottom right corner, select **Shut down**.
10. Type the following commands at an elevated Windows PowerShell prompt on the Hyper-V host to remove the temporary disks and drives from PC1:
```powershell
Remove-VMHardDiskDrive -VMName PC1 -ControllerType IDE -ControllerNumber 0 -ControllerLocation 1
Set-VMDvdDrive -VMName PC1 -Path $null
```
### Configure VMs
1. At an elevated Windows PowerShell prompt on the Hyper-V host, start the first Windows Server VM and connect to it by typing the following commands:
```powershell
Start-VM DC1
vmconnect localhost DC1
```
2. Select **Next** to accept the default settings, read the license terms and select **I accept**, provide a strong administrator password, and select **Finish**.
3. Select **Ctrl+Alt+Del** in the upper left corner of the virtual machine connection window, and then sign in to DC1 using the Administrator account.
4. Right-click **Start**, point to **Shut down or sign out**, and select **Sign out**. The VM connection will reset and a new connection dialog box will appear enabling you to choose a custom display configuration. Select a desktop size, select **Connect** and sign in again with the local Administrator account.
> [!NOTE]
> Signing in this way ensures that [enhanced session mode](/windows-server/virtualization/hyper-v/learn-more/Use-local-resources-on-Hyper-V-virtual-machine-with-VMConnect) is enabled. It's only necessary to do this action the first time you sign in to a new VM.
5. If DC1 is configured as described in this guide, it will currently be assigned an APIPA address, have a randomly generated hostname, and a single network adapter named "Ethernet." Open an elevated Windows PowerShell prompt on DC1 and type or paste the following commands to provide a new hostname and configure a static IP address and gateway:
```powershell
Rename-Computer DC1
New-NetIPAddress -InterfaceAlias Ethernet -IPAddress 192.168.0.1 -PrefixLength 24 -DefaultGateway 192.168.0.2
Set-DnsClientServerAddress -InterfaceAlias Ethernet -ServerAddresses 192.168.0.1,192.168.0.2
```
The default gateway at 192.168.0.2 will be configured later in this guide.
> [!NOTE]
> A list of available tasks for an app will be populated the first time you run it on the taskbar. Because these tasks aren't available until the App has been run, you will not see the **Run as Administrator** task until you have left-clicked Windows PowerShell for the first time. In this newly created VM, you will need to left-click Windows PowerShell one time, and then you can right-click and choose Run as Administrator to open an elevated Windows PowerShell prompt.
6. Install the Active Directory Domain Services role by typing the following command at an elevated Windows PowerShell prompt:
```powershell
Install-WindowsFeature -Name AD-Domain-Services -IncludeAllSubFeature -IncludeManagementTools
```
7. Before promoting DC1 to a Domain Controller, you must reboot so that the name change in step 3 above takes effect. To restart the computer, type the following command at an elevated Windows PowerShell prompt:
```powershell
Restart-Computer
```
8. When DC1 has rebooted, sign in again and open an elevated Windows PowerShell prompt. Now you can promote the server to be a domain controller. The directory services restore mode password must be entered as a secure string. Type the following commands at the elevated Windows PowerShell prompt:
```powershell
$pass = "pass@word1" | ConvertTo-SecureString -AsPlainText -Force
Install-ADDSForest -DomainName contoso.com -InstallDns -SafeModeAdministratorPassword $pass -Force
```
Ignore any warnings that are displayed. The computer will automatically reboot upon completion.
9. When the reboot has completed, reconnect to DC1, sign in using the CONTOSO\Administrator account, open an elevated Windows PowerShell prompt, and use the following commands to add a reverse lookup zone for the PoC network, add the DHCP Server role, authorize DHCP in Active Directory, and suppress the post-DHCP-install alert:
```powershell
Add-DnsServerPrimaryZone -NetworkID "192.168.0.0/24" -ReplicationScope Forest
Add-WindowsFeature -Name DHCP -IncludeManagementTools
netsh dhcp add securitygroups
Restart-Service DHCPServer
Add-DhcpServerInDC dc1.contoso.com 192.168.0.1
Set-ItemProperty -Path registry::HKEY_LOCAL_MACHINE\SOFTWARE\Microsoft\ServerManager\Roles\12 -Name ConfigurationState -Value 2
```
10. Next, add a DHCP scope and set option values:
```powershell
Add-DhcpServerv4Scope -Name "PoC Scope" -StartRange 192.168.0.100 -EndRange 192.168.0.199 -SubnetMask 255.255.255.0 -Description "Windows 10 PoC" -State Active
Set-DhcpServerv4OptionValue -ScopeId 192.168.0.0 -DnsDomain contoso.com -Router 192.168.0.2 -DnsServer 192.168.0.1,192.168.0.2 -Force
```
The -Force option is necessary when adding scope options to skip validation of 192.168.0.2 as a DNS server because we haven't configured it yet. The scope should immediately begin issuing leases on the PoC network. The first DHCP lease that will be issued is to vEthernet interface on the Hyper-V host, which is a member of the internal network. You can verify this configuration by using the command: `Get-DhcpServerv4Lease -ScopeId 192.168.0.0`
11. The DNS server role will also be installed on the member server, SRV1, at 192.168.0.2 so that we can forward DNS queries from DC1 to SRV1 to resolve internet names without having to configure a forwarder outside the PoC network. Since the IP address of SRV1 already exists on DC1's network adapter, it will be automatically added during the DCPROMO process. To verify this server-level DNS forwarder on DC1, type the following command at an elevated Windows PowerShell prompt on DC1:
```powershell
Get-DnsServerForwarder
```
The following output should be displayed:
```console
UseRootHint : True
Timeout(s) : 3
EnableReordering : True
IPAddress : 192.168.0.2
ReorderedIPAddress : 192.168.0.2
```
If this output isn't displayed, you can use the following command to add SRV1 as a forwarder:
```powershell
Add-DnsServerForwarder -IPAddress 192.168.0.2
```
**Configure service and user accounts**
Windows 10 deployment with Configuration Manager and MDT requires specific accounts to perform some actions. Service accounts will be created to use for these tasks. A user account is also added in the contoso.com domain that can be used for testing purposes. In the test lab environment, passwords are set to never expire.
To keep this test lab relatively simple, we won't create a custom OU structure and set permissions. Required permissions are enabled by adding accounts to the Domain Admins group. To configure these settings in a production environment, see [Prepare for Zero Touch Installation of Windows 10 with Configuration Manager](deploy-windows-cm/prepare-for-zero-touch-installation-of-windows-10-with-configuration-manager.md)
On DC1, open an elevated Windows PowerShell prompt and type the following commands:
```powershell
New-ADUser -Name User1 -UserPrincipalName user1 -Description "User account" -AccountPassword (ConvertTo-SecureString "pass@word1" -AsPlainText -Force) -ChangePasswordAtLogon $false -Enabled $true
New-ADUser -Name MDT_BA -UserPrincipalName MDT_BA -Description "MDT Build Account" -AccountPassword (ConvertTo-SecureString "pass@word1" -AsPlainText -Force) -ChangePasswordAtLogon $false -Enabled $true
New-ADUser -Name CM_JD -UserPrincipalName CM_JD -Description "Configuration Manager Join Domain Account" -AccountPassword (ConvertTo-SecureString "pass@word1" -AsPlainText -Force) -ChangePasswordAtLogon $false -Enabled $true
New-ADUser -Name CM_NAA -UserPrincipalName CM_NAA -Description "Configuration Manager Network Access Account" -AccountPassword (ConvertTo-SecureString "pass@word1" -AsPlainText -Force) -ChangePasswordAtLogon $false -Enabled $true
Add-ADGroupMember "Domain Admins" MDT_BA,CM_JD,CM_NAA
Set-ADUser -Identity user1 -PasswordNeverExpires $true
Set-ADUser -Identity administrator -PasswordNeverExpires $true
Set-ADUser -Identity MDT_BA -PasswordNeverExpires $true
Set-ADUser -Identity CM_JD -PasswordNeverExpires $true
Set-ADUser -Identity CM_NAA -PasswordNeverExpires $true
```
12. Minimize the DC1 VM window but **do not stop** the VM.
Next, the client VM will be started and joined to the contoso.com domain. This action is done before adding a gateway to the PoC network so that there's no danger of duplicate DNS registrations for the physical client and its cloned VM in the domain.
13. If the PC1 VM isn't started yet, using an elevated Windows PowerShell prompt on the Hyper-V host, start the client VM (PC1), and connect to it:
```powershell
Start-VM PC1
vmconnect localhost PC1
```
14. Sign in to PC1 using an account that has local administrator rights.
PC1 will be disconnected from its current domain, so you can't use a domain account to sign on unless these credentials are cached and the use of cached credentials is permitted by Group Policy. If cached credentials are available and permitted, you can use these credentials to sign in. Otherwise, use an existing local administrator account.
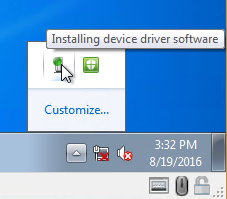
15. After you sign in, Windows detects that it's running in a new environment. New drivers will be automatically installed, including the network adapter driver. The network adapter driver must be updated before you can proceed, so that you'll be able to join the contoso.com domain. Depending on the resources allocated to PC1, installing the network adapter driver might take a few minutes. You can monitor device driver installation by clicking **Show hidden icons** in the notification area.
If the client was configured with a static address, you must change this address to a dynamic one so that it can obtain a DHCP lease.
16. When the new network adapter driver has completed installation, you'll receive an alert to set a network location for the contoso.com network. Select **Work network** and then select **Close**. When you receive an alert that a restart is required, select **Restart Later**.
17. Open an elevated Windows PowerShell prompt on PC1 and verify that the client VM has received a DHCP lease and can communicate with the consoto.com domain controller.
To open Windows PowerShell on Windows 7, select **Start**, and search for "**power**." Right-click **Windows PowerShell** and then select **Pin to Taskbar** so that it's simpler to use Windows PowerShell during this lab. Select **Windows PowerShell** on the taskbar, and then type `ipconfig` at the prompt to see the client's current IP address. Also type `ping dc1.contoso.com` and `nltest /dsgetdc:contoso.com` to verify that it can reach the domain controller. See the following examples of a successful network connection:
```cmd
ipconfig.exe
Windows IP Configuration
Ethernet adapter Local Area Connection 3:
Connection-specific DNS Suffix . : contoso.com
Link-local IPv6 Address . . . . . : fe80::64c2:4d2a:7403:6e02%18
Ipv4 Address. . . . . . . . . . . : 192.168.0.101
Subnet Mask . . . . . . . . . . . : 255.255.255.0
Default Gateway . . . . . . . . . : 192.168.0.2
ping dc1.contoso.com
Pinging dc1.contoso.com [192.168.0.1] with 32 bytes of data:
Reply from 192.168.0.1: bytes=32 time<1ms TTL=128
Reply from 192.168.0.1: bytes=32 time<1ms TTL=128
Reply from 192.168.0.1: bytes=32 time<1ms TTL=128
Reply from 192.168.0.1: bytes=32 time<1ms TTL=128
nltest /dsgetdc:contoso.com
DC: \\DC1
Address: \\192.168.0.1
Dom Guid: fdbd0643-d664-411b-aea0-fe343d7670a8
Dom Name: CONTOSO
Forest Name: contoso.com
Dc Site Name: Default-First-Site-Name
Our Site Name: Default-First-Site-Name
Flags: PDC GC DS LDAP KDC TIMESERV WRITABLE DNS_FOREST CLOSE_SITE FULL_SECRET WS 0xC000
```
> [!NOTE]
> If PC1 is running Windows 7, enhanced session mode might not be available, which means that you cannot copy and paste commands from the Hyper-V host to a Windows PowerShell prompt on PC1. However, it's possible to use integration services to copy a file from the Hyper-V host to a VM. The next procedure demonstrates this. If the Copy-VMFile command fails, then type the commands below at an elevated Windows PowerShell prompt on PC1 instead of saving them to a script to run remotely. If PC1 is running Windows 8 or a later operating system, you can use enhanced session mode to copy and paste these commands instead of typing them.
18. Minimize the PC1 window and switch to the Hyper-V host computer. Open an elevated Windows PowerShell ISE window on the Hyper-V host (right-click Windows PowerShell and then select **Run ISE as Administrator**) and type the following commands in the (upper) script editor pane:
```powershell
(Get-WmiObject Win32_ComputerSystem).UnjoinDomainOrWorkgroup($null,$null,0)
$pass = "pass@word1" | ConvertTo-SecureString -AsPlainText -Force
$user = "contoso\administrator"
$cred = New-Object System.Management.Automation.PSCredential($user,$pass)
Add-Computer -DomainName contoso.com -Credential $cred
Restart-Computer
```
If you don't see the script pane, select **View** and verify **Show Script Pane Top** is enabled. Select **File** and then select **New**.
See the following example:
:::image type="content" alt-text="ISE 1." source="images/ISE.png" lightbox="images/ISE.png":::
19. Select **File**, select **Save As**, and save the commands as **c:\VHD\pc1.ps1** on the Hyper-V host.
20. In the (lower) terminal input window, type the following commands to enable Guest Service Interface on PC1 and then use this service to copy the script to PC1:
```powershell
Enable-VMIntegrationService -VMName PC1 -Name "Guest Service Interface"
Copy-VMFile "PC1" -SourcePath "C:\VHD\pc1.ps1" -DestinationPath "C:\pc1.ps1" -CreateFullPath -FileSource Host
```
> [!NOTE]
> In order for this command to work properly, PC1 must be running the vmicguestinterface (Hyper-V Guest Service Interface) service. If this service is not enabled in this step, then the copy-VMFile command will fail. In this case, you can try updating integration services on the VM by mounting the Hyper-V Integration Services Setup (vmguest.iso), which is located in C:\Windows\System32 on Windows Server 2012 and 2012 R2 operating systems that are running the Hyper-V role service.
If the copy-vmfile command doesn't work and you can't properly enable or upgrade integration services on PC1, then create the file c:\pc1.ps1 on the VM by typing the commands into this file manually. The copy-vmfile command is only used in this procedure as a demonstration of automation methods that can be used in a Hyper-V environment when enhanced session mode isn't available. After typing the script file manually, be sure to save the file as a Windows PowerShell script file with the `.ps1` extension and not as a text (`.txt`) file.
21. On PC1, type the following commands at an elevated Windows PowerShell prompt:
```powershell
Get-Content c:\pc1.ps1 | powershell.exe -noprofile -
```
The commands in this script might take a few moments to complete. If an error is displayed, check that you typed the command correctly, paying close attention to spaces. PC1 is removed from its domain in this step while not connected to the network so as to ensure the computer object in the domain is unaffected. PC1 is also not renamed to "PC1" in system properties so that it maintains some of its mirrored identity. However, if desired you can also rename the computer.
22. Upon completion of the script, PC1 will automatically restart. When it has restarted, sign in to the contoso.com domain using the **Switch User** option, with the **user1** account you created in step 11 of this section.
> [!IMPORTANT]
> The settings that will be used later to migrate user data specifically select only accounts that belong to the CONTOSO domain. However, this can be changed to migrate all user accounts, or only other specified accounts. If you wish to test migration of user data and settings with accounts other than those in the CONTOSO domain, you must specify these accounts or domains when you configure the value of **ScanStateArgs** in the MDT test lab guide. This value is specifically called out when you get to that step. If you wish to only migrate CONTOSO accounts, then you can log in with the user1 account or the administrator account at this time and modify some of the files and settings for later use in migration testing.
23. Minimize the PC1 window but don't turn it off while the second Windows Server 2012 R2 VM (SRV1) is configured. This action verifies that the Hyper-V host has enough resources to run all VMs simultaneously. Next, SRV1 will be started, joined to the contoso.com domain, and configured with RRAS and DNS services.
24. On the Hyper-V host computer, at an elevated Windows PowerShell prompt, type the following commands:
```powershell
Start-VM SRV1
vmconnect localhost SRV1
```
25. Accept the default settings, read license terms and accept them, provide a strong administrator password, and select **Finish**. When you're prompted about finding PCs, devices, and content on the network, select **Yes**.
26. Sign in to SRV1 using the local administrator account. In the same way that was done on DC1, sign out of SRV1 and then sign in again to enable enhanced session mode. Enhanced session mode will enable you to copy and paste Windows PowerShell commands from the Hyper-V host to the VM.
27. Open an elevated Windows PowerShell prompt on SRV1 and type the following commands:
```powershell
Rename-Computer SRV1
New-NetIPAddress -InterfaceAlias Ethernet -IPAddress 192.168.0.2 -PrefixLength 24
Set-DnsClientServerAddress -InterfaceAlias Ethernet -ServerAddresses 192.168.0.1,192.168.0.2
Restart-Computer
```
> [!IMPORTANT]
> Verify that you are configuring the correct interface in this step. The commands in this step assume that the poc-internal interface on SRV1 is named "Ethernet." If you are unsure how to check the interface, see step #30 below for instructions and tips on how to verify and modify the interface name.
28. Wait for the computer to restart, sign in again, then type the following commands at an elevated Windows PowerShell prompt:
```powershell
$pass = "pass@word1" | ConvertTo-SecureString -AsPlainText -Force
$user = "contoso\administrator"
$cred = New-Object System.Management.Automation.PSCredential($user,$pass)
Add-Computer -DomainName contoso.com -Credential $cred
Restart-Computer
```
29. Sign in to the contoso.com domain on SRV1 using the domain administrator account (enter contoso\administrator as the user), open an elevated Windows PowerShell prompt, and type the following commands:
```powershell
Install-WindowsFeature -Name DNS -IncludeManagementTools
Install-WindowsFeature -Name WDS -IncludeManagementTools
Install-WindowsFeature -Name Routing -IncludeManagementTools
```
30. Before configuring the routing service that was installed, verify that network interfaces were added to SRV1 in the right order, resulting in an interface alias of "Ethernet" for the private interface, and an interface alias of "Ethernet 2" for the public interface. Also verify that the external interface has a valid external DHCP IP address lease.
To view a list of interfaces, associated interface aliases, and IP addresses on SRV1, type the following Windows PowerShell command. Example output of the command is also shown below:
```powershell
Get-NetAdapter | ? status -eq 'up' | Get-NetIPAddress -AddressFamily IPv4 | ft IPAddress, InterfaceAlias
IPAddress InterfaceAlias
--------- --------------
10.137.130.118 Ethernet 2
192.168.0.2 Ethernet
```
In this example, the poc-internal network interface at 192.168.0.2 is associated with the "Ethernet" interface and the internet-facing poc-external interface is associated with the "Ethernet 2" interface. If your interfaces are different, you must adjust the commands provided in the next step appropriately to configure routing services. Also note that if the "Ethernet 2" interface has an IP address in the 192.168.0.100-105 range then it likely is getting a DHCP lease from DC1 instead of your network. If so, you can try removing and readding the second network interface from the SRV1 VM through its Hyper-V settings.
> [!TIP]
> Sometimes a computer will have hidden, disconnected interfaces that prevent you from naming a network adapter. When you attempt to rename an adapter, you will receive an error that the adapter name already exists. These disconnected devices can be viewed in device manager by clicking **View** and then clicking **Show hidden devices**. The disconnected device can then be uninstalled, enabling you to reuse the adapter name.
31. To configure SRV1 with routing capability for the PoC network, type or paste the following commands at an elevated Windows PowerShell prompt on SRV1:
```powershell
Install-RemoteAccess -VpnType Vpn
cmd /c netsh routing ip nat install
cmd /c netsh routing ip nat add interface name="Ethernet 2" mode=FULL
cmd /c netsh routing ip nat add interface name="Ethernet" mode=PRIVATE
cmd /c netsh routing ip nat add interface name="Internal" mode=PRIVATE
```
32. The DNS service on SRV1 also needs to resolve hosts in the `contoso.com` domain. This step can be accomplished with a conditional forwarder. Open an elevated Windows PowerShell prompt on SRV1 and type the following command:
```powershell
Add-DnsServerConditionalForwarderZone -Name contoso.com -MasterServers 192.168.0.1
```
33. In most cases, this process completes configuration of the PoC network. However, if your network has a firewall that filters queries from local DNS servers, you'll also need to configure a server-level DNS forwarder on SRV1 to resolve internet names. To test whether or not DNS is working without this forwarder, try to reach a name on the internet from DC1 or PC1, which are only using DNS services on the PoC network. You can test DNS with the ping command, for example:
```cmd
ping.exe www.microsoft.com
```
If you see "Ping request couldn't find host `www.microsoft.com`" on PC1 and DC1, but not on SRV1, then you'll need to configure a server-level DNS forwarder on SRV1. To do this action, open an elevated Windows PowerShell prompt on SRV1 and type the following command.
> [!NOTE]
> This command also assumes that "Ethernet 2" is the external-facing network adapter on SRV1. If the external adapter has a different name, replace "Ethernet 2" in the command below with that name:
```powershell
Add-DnsServerForwarder -IPAddress (Get-DnsClientServerAddress -InterfaceAlias "Ethernet 2").ServerAddresses
```
34. If DNS and routing are both working correctly, you'll see the following output on DC1 and PC1 (the IP address might be different, but that's OK):
```cmd
ping www.microsoft.com
Pinging e2847.dspb.akamaiedge.net [23.222.146.170] with 32 bytes of data:
Reply from 23.222.146.170: bytes=32 time=3ms TTL=51
Reply from 23.222.146.170: bytes=32 time=2ms TTL=51
Reply from 23.222.146.170: bytes=32 time=2ms TTL=51
Reply from 23.222.146.170: bytes=32 time=1ms TTL=51
Ping statistics for 23.222.146.170:
Packets: Sent = 4, Received = 4, Lost = 0 (0% loss),
Approximate round trip times in milli-seconds:
Minimum = 1ms, Maximum = 3ms, Average = 2ms
```
35. Verify that all three VMs can reach each other, and the internet. See [Appendix A: Verify the configuration](#appendix-a-verify-the-configuration) for more information.
36. Lastly, because the client computer has different hardware after copying it to a VM, its Windows activation will be invalidated and you might receive a message that you must activate Windows in three days. To extend this period to 30 days, type the following commands at an elevated Windows PowerShell prompt on PC1:
```powershell
runas.exe /noprofile /env /user:administrator@contoso.com "cmd.exe /c slmgr -rearm"
Restart-Computer
```
This process completes configuration of the starting PoC environment. More services and tools are installed in subsequent guides.
## Appendix A: Verify the configuration
Use the following procedures to verify that the PoC environment is configured properly and working as expected.
1. On DC1, open an elevated Windows PowerShell prompt and type the following commands:
```powershell
Get-Service NTDS,DNS,DHCP
DCDiag -a
Get-DnsServerResourceRecord -ZoneName contoso.com -RRType A
Get-DnsServerForwarder
Resolve-DnsName -Server dc1.contoso.com -Name www.microsoft.com
Get-DhcpServerInDC
Get-DhcpServerv4Statistics
ipconfig.exe /all
```
**Get-Service** displays a status of "Running" for all three services.
**DCDiag** displays "passed test" for all tests.
**Get-DnsServerResourceRecord** displays the correct DNS address records for DC1, SRV1, and the computername of PC1. Other address records for the zone apex (@), DomainDnsZones, and ForestDnsZones will also be registered.
**Get-DnsServerForwarder** displays a single forwarder of 192.168.0.2.
**Resolve-DnsName** displays public IP address results for `www.microsoft.com`.
**Get-DhcpServerInDC** displays 192.168.0.1, `dc1.contoso.com`.
**Get-DhcpServerv4Statistics** displays one scope with two addresses in use. These addresses belong to PC1 and the Hyper-V host.
**ipconfig** displays a primary DNS suffix and suffix search list of `contoso.com`, IP address of 192.168.0.1, subnet mask of 255.255.255.0, default gateway of 192.168.0.2, and DNS server addresses of 192.168.0.1 and 192.168.0.2.
2. On SRV1, open an elevated Windows PowerShell prompt and type the following commands:
```powershell
Get-Service DNS,RemoteAccess
Get-DnsServerForwarder
Resolve-DnsName -Server dc1.contoso.com -Name www.microsoft.com
ipconfig.exe /all
netsh.exe int ipv4 show address
```
**Get-Service** displays a status of "Running" for both services.
**Get-DnsServerForwarder** either displays no forwarders, or displays a list of forwarders you're required to use so that SRV1 can resolve internet names.
**Resolve-DnsName** displays public IP address results for `www.microsoft.com`.
**ipconfig** displays a primary DNS suffix of `contoso.com`. The suffix search list contains `contoso.com` and your domain. Two ethernet adapters are shown: Ethernet adapter "Ethernet" has an IP address of 192.168.0.2, subnet mask of 255.255.255.0, no default gateway, and DNS server addresses of 192.168.0.1 and 192.168.0.2. Ethernet adapter "Ethernet 2" has an IP address, subnet mask, and default gateway configured by DHCP on your network.
**netsh** displays three interfaces on the computer: interface "Ethernet 2" with DHCP enabled = Yes and IP address assigned by your network, interface "Ethernet" with DHCP enabled = No and IP address of 192.168.0.2, and interface "Loopback Pseudo-Interface 1" with IP address of 127.0.0.1.
3. On PC1, open an elevated Windows PowerShell prompt and type the following commands:
```cmd
whoami.exe
hostname.exe
nslookup.exe www.microsoft.com
ping.exe -n 1 dc1.contoso.com
tracert.exe www.microsoft.com
```
**whoami.exe** displays the current user context, for example in an elevated Windows PowerShell prompt, contoso\administrator is displayed.
**hostname.exe** displays the name of the local computer, for example W7PC-001.
**nslookup.exe** displays the DNS server used for the query, and the results of the query. For example, server `dc1.contoso.com`, address 192.168.0.1, Name `e2847.dspb.akamaiedge.net`.
**ping.exe** displays if the source can resolve the target name, and whether or not the target responds to ICMP. If it can't be resolved, "couldn't find host" will be displayed. If the target is found and also responds to ICMP, you'll see "Reply from" and the IP address of the target.
**tracert.exe** displays the path to reach the destination, for example `srv1.contoso.com` [192.168.0.2] followed by a list of hosts and IP addresses corresponding to subsequent routing nodes between the source and the destination.
## Appendix B: Terminology used in this guide
|Term|Definition|
|--- |--- |
|**GPT**|GUID partition table (GPT) is an updated hard-disk formatting scheme that enables the use of newer hardware. GPT is one of the partition formats that can be chosen when first initializing a hard drive, prior to creating and formatting partitions.|
|**Hyper-V**|Hyper-V is a server role introduced with Windows Server 2008 that lets you create a virtualized computing environment. Hyper-V can also be installed as a Windows feature on Windows client operating systems, starting with Windows 8.|
|**Hyper-V host**|The computer where Hyper-V is installed.|
|**Hyper-V Manager**|The user-interface console used to view and configure Hyper-V.|
|**MBR**|Master Boot Record (MBR) is a legacy hard-disk formatting scheme that limits support for newer hardware. MBR is one of the partition formats that can be chosen when first initializing a hard drive, prior to creating and formatting partitions. MBR is in the process of being replaced by the GPT partition format.|
|**Proof of concept (PoC)**|Confirmation that a process or idea works as intended. A PoC is carried out in a test environment to learn about and verify a process.|
|**Shadow copy**|A copy or "snapshot" of a computer at a point in time, created by the Volume Shadow Copy Service (VSS), typically for backup purposes.|
|**Virtual machine (VM)**|A VM is a virtual computer with its own operating system, running on the Hyper-V host.|
|**Virtual switch**|A virtual network connection used to connect VMs to each other and to physical network adapters on the Hyper-V host.|
|**VM snapshot**|A point in time image of a VM that includes its disk, memory and device state. It can be used to return a virtual machine to a former state corresponding to the time the snapshot was taken.|
## Next steps
[Windows 10 deployment scenarios](windows-10-deployment-scenarios.md)