---
title: Customize and export the Start layout
description: Learn how to customize the Windows Start layout and export the configuration to apply to other devices.
ms.topic: how-to
ms.date: 03/04/2024
zone_pivot_groups: windows-versions-11-10
ms.collection:
- tier1
---
# Customize and export the Start layout
::: zone pivot="windows-11"
> **Looking for OEM information?** See [Customize the Taskbar](/windows-hardware/customize/desktop/customize-the-windows-11-taskbar) and [Customize the Start layout](/windows-hardware/customize/desktop/customize-the-windows-11-start-menu).
Your organization can deploy a customized Start layout to your Windows 11 devices. Customizing the Start layout is common when you have similar devices used by many users, or you want to pin specific apps.
For example, you can override the default set of apps with your own a set of pinned apps, and in the order you choose. As an administrator, use this feature to pin apps, remove default pinned apps, order the apps, and more.
To add apps you want pinned to the Start menu, you use a JSON file. In previous Windows versions, IT administrators used an XML file to customize the Start menu. The XML file isn't available on Windows 11 and later ***unless*** [you're an OEM](/windows-hardware/customize/desktop/customize-the-windows-11-start-menu).
This article shows you how to export an existing Start menu layout, and use the JSON in a Microsoft Intune policy.
## Before you begin
- When you customize the Start layout, you overwrite the entire full layout. A partial Start layout isn't available. Users can pin and unpin apps, and uninstall apps from Start. When a user signs in or Explorer restarts, Windows reapplies the MDM policy. This action restores the specified layout and doesn't retain any user changes.
To prevent users from making any changes to the Start menu layout, see the [NoChangeStartMenu](/windows/client-management/mdm/policy-csp-admx-startmenu#admx-startmenu-nochangestartmenu) policy.
- It's recommended to use a mobile device management (MDM) provider. MDM providers help manage your devices, and help manage apps on your devices. You can use Microsoft Intune. Intune is a family of products that include Microsoft Intune, which is a cloud service, and Configuration Manager, which is on-premises.
In this article, we mention these services. If you're not managing your devices using an MDM provider, the following resources may help you get started:
- [Endpoint Management at Microsoft](/mem/endpoint-manager-overview)
- [What is Microsoft Intune](/mem/intune/fundamentals/what-is-intune) and [Microsoft Intune planning guide](/mem/intune/fundamentals/intune-planning-guide)
- [What is Configuration Manager?](/mem/configmgr/core/understand/introduction)
## Start menu features and areas
In Windows 11, the Start menu is redesigned with a simplified set of apps that are arranged in a grid of pages. There aren't folders, groups, or different-sized app icons:
:::image type="content" source="./images/start-windows-11.png" alt-text="Sample start menu layout on Windows 11 that shows pinned apps, access to all apps, and recommended files.":::
Start has the following areas:
- **Pinned**: Shows pinned apps, or a subset of all of the apps installed on the device. You can create a list of pinned apps you want on the devices using the **ConfigureStartPins** policy. **ConfigureStartPins** overrides the entire layout, which also removes apps that are pinned by default.
This article shows you [how to use the **ConfigureStartPins** policy](#get-the-pinnedlist-json).
- **All apps**: Users select this option to see an alphabetical list of all the apps on the device. This section can't be customized using the JSON file.
The [Start/HideFrequentlyUsedApps CSP](/windows/client-management/mdm/policy-csp-start#start-hidefrequentlyusedapps) exposes settings that configure the "Most used" section, which is at the top of the all apps list.
In **Intune**, you can configure this Start menu layout feature, and more. For more information on the Start menu settings you can configure in an Intune policy, see [Windows 10/11 device settings to allow or restrict features](/mem/intune/configuration/device-restrictions-windows-10#start).
In **Group Policy**, there are policies that include settings that control the Start menu layout. Some policies may not work as expected. Be sure to test your policies before broadly deploying them across your devices:
- `Computer Configuration\Administrative Templates\Start Menu and Taskbar`
- `User Configuration\Administrative Templates\Start Menu and Taskbar`
- **Recommended**: Shows recently opened files and recently installed apps. This section can only be customized in Windows 11 SE using the following policy.
- `Computer Configuration\Administrative Templates\Start Menu and Taskbar\Remove Recommended section from Start Menu`
## Create the JSON file
On an existing Windows 11 device, set up your own Start layout with the pinned apps you want users to see. Then, use the [Windows PowerShell Export-StartLayout](/powershell/module/startlayout/export-startlayout) cmdlet to export the existing layout to a `LayoutModification.json` file.
The JSON file controls the Start menu layout, and lists all the apps that are pinned. You can update the JSON file to:
- Change the order of existing apps. The apps in the JSON file are shown on Start in the same order.
- Add more apps by entering the app ID. For more information, see [Get the pinnedList JSON](#get-the-pinnedlist-json) (in this article).
If you're familiar with creating JSON files, you can create your own `LayoutModification.json` file. But, it's easier and faster to export the layout from an existing device.
### Export an existing Start layout
1. Create a folder to save the `.json` file. For example, create the `C:\Layouts` folder.
1. On a Windows 11 device, open the Windows PowerShell app.
1. Run the following cmdlet. Name the file `LayoutModification.json`.
```powershell
Export-StartLayout -Path "C:\Layouts\LayoutModification.json"
```
### Get the pinnedList JSON
1. Open the `LayoutModification.json` file in a JSON editor, such as Visual Studio Code or Notepad. For more information, see [edit JSON with Visual Studio Code](https://code.visualstudio.com/docs/languages/json).
1. In the file, you see the `pinnedList` section. This section includes all of the pinned apps. Copy the `pinnedList` content in the JSON file. You'll use it in the next section.
In the following example, you see that Microsoft Edge, Microsoft Word, the Microsoft Store app, and Notepad are pinned:
```json
{
"pinnedList": [
{ "desktopAppId": "MSEdge" },
{ "desktopAppId": "Microsoft.Office.WINWORD.EXE.15" },
{ "packagedAppId": "Microsoft.WindowsStore_8wekyb3d8bbwe!App" },
{ "packagedAppId": "Microsoft.WindowsNotepad_8wekyb3d8bbwe!App" }
]
}
```
1. Starting with Windows 11, the **ConfigureStartPins** policy is available. This policy uses the `LayoutModification.json` file to add apps to the Pinned section. In your JSON file, you can add more apps to this section using the following keys:
| Key | Description |
|--|--|
| packagedAppID | Use this option for Universal Windows Platform apps. To pin a UWP app, use the app's AUMID. |
| desktopAppID | Use this option for unpackaged Win32 apps. To pin a Win32 app, use the app's AUMID. If the app doesn't have an AUMID, then enter the `desktopAppLink` instead. |
| desktopAppLink | Use this option for unpackaged Win32 apps that don't have an associated AUMID. To pin this type of app, use the path to the `.lnk` shortcut that points to the app. |
## Use MDM to create and deploy a pinned list policy
Now that you have the JSON syntax, you're ready to deploy your customized Start layout to devices in your organization.
MDM providers can deploy policies to devices managed by the organization, including organization-owned devices, and personal or bring your own device (BYOD). Using an MDM provider, such as Microsoft Intune, you can deploy a policy that configures the pinned list.
This section shows you how to create a pinned list policy in Intune. There isn't a Group Policy to create a pinned list.
### Create a pinned list using an Intune policy
To deploy this policy, the devices must be enrolled, and managed by your organization. For more information, see [What is device enrollment?](/mem/intune/enrollment/device-enrollment).
1. Sign in to the [Intune admin center](https://go.microsoft.com/fwlink/?linkid=2109431).
1. Select **Devices** > **Configuration profiles** > **Create profile**.
1. Enter the following properties:
- **Platform**: Select **Windows 10 and later**.
- **Profile**: Select **Templates** > **Custom**.
1. Select **Create**.
1. In **Basics**, enter the following properties:
- **Name**: Enter a descriptive name for the profile. Name your profiles so you can easily identify them later. For example, a good profile name is **Win11: Custom Start layout**.
- **Description**: Enter a description for the profile. This setting is optional, and recommended.
1. Select **Next**.
1. In **Configuration settings** > **OMA-URI**, select **Add**. Add the following properties:
- **Name**: Enter something like **Configure Start pins**.
- **Description**: Enter a description for the row. This setting is optional, and recommended.
- **OMA-URI**: Enter `./Vendor/MSFT/Policy/Config/Start/ConfigureStartPins`.
- **Data type**: Select **String**.
- **Value**: Paste the JSON you created or updated in the previous section. For example, enter the following text:
```json
{
"pinnedList": [
{ "desktopAppId": "MSEdge" },
{ "desktopAppId": "Microsoft.Office.WINWORD.EXE.15" },
{ "packagedAppId": "Microsoft.WindowsStore_8wekyb3d8bbwe!App" },
{ "packagedAppId": "Microsoft.WindowsNotepad_8wekyb3d8bbwe!App" }
]
}
```
Your settings look similar to the following settings:
:::image type="content" source="./images/endpoint-manager-admin-center-custom-oma-uri-start-layout.png" alt-text="Custom OMA-URI settings to customize Start menu layout using pinnedList":::
1. Select **Save** > **Next** to save your changes.
1. Configure the rest of the policy settings. For more specific information, see [Create a profile with custom settings](/mem/intune/configuration/custom-settings-configure).
The Windows OS exposes many CSPs that apply to the Start menu. For a list, see [Supported CSP policies for Windows 11 Start menu](supported-csp-start-menu-layout-windows.md).
### Deploy the policy using Intune
When the policy is created, you can deploy it now, or deploy it later. Since this policy is a customized Start layout, the policy can be deployed anytime, including before users sign in the first time.
For more information and guidance on assigning policies to devices in your organization, see [Assign user and device profiles](/mem/intune/configuration/device-profile-assign).
::: zone-end
::: zone pivot="windows-10"
>**Looking for consumer information?** See [Customize the Start menu](https://go.microsoft.com/fwlink/p/?LinkId=623630)
The easiest method for creating a customized Start layout to apply to other Windows 10 devices is to set up the Start screen on a test computer and then export the layout.
After you export the layout, decide whether you want to apply a *full* Start layout or a *partial* Start layout.
When a full Start layout is applied, the users can't pin, unpin, or uninstall apps from Start. Users can view and open all apps in the **All Apps** view, but they can't pin any apps to Start.
When [a partial Start layout](#configure-a-partial-start-layout) is applied, the contents of the specified tile groups can't be changed, but users can move those groups, and can also create and customize their own groups.
You can deploy the resulting .xml file to devices using one of the following methods:
- [Group Policy](customize-windows-10-start-screens-by-using-group-policy.md)
- [Windows Configuration Designer provisioning package](customize-windows-10-start-screens-by-using-provisioning-packages-and-icd.md)
- [Mobile device management (MDM)](customize-windows-10-start-screens-by-using-mobile-device-management.md)
## Customize the Start screen on your test computer
To prepare a Start layout for export, you simply customize the Start layout on a test computer.
To prepare a test computer:
1. Set up a test computer on which to customize the Start layout. Your test computer should have the operating system that is installed on the users' computers (Windows 10 Pro, Enterprise, or Education). Install all apps and services that the Start layout should display.
1. Create a new user account that you'll use to customize the Start layout.
To customize Start:
1. Sign in to your test computer with the user account that you created.
1. Customize the Start layout as you want users to see it by using the following techniques:
- **Pin apps to Start**. From Start, type the name of the app. When the app appears in the search results, right-click the app, and then select **Pin to Start**.
To view all apps, select **All apps** in the bottom-left corner of Start. Right-click any app, and pin or unpin it from Start.
- **Unpin apps** that you don't want to display. To unpin an app, right-click the app, and then select **Unpin from Start**.
- **Drag tiles** on Start to reorder or group apps.
- **Resize tiles**. To resize tiles, right-click the tile and then select **Resize.**
- **Create your own app groups**. Drag the apps to an empty area. To name a group, select above the group of tiles and then type the name in the **Name group** field that appears above the group.
> [!IMPORTANT]
> If the Start layout includes tiles for apps that are not installed on the device that the layout is later applied to, the tiles for those apps will be blank. The blank tiles will persist until the next time the user signs in, at which time the blank tiles are removed. Some system events may cause the blank tiles to be removed before the next sign-in.
### Export the Start layout
When you have the Start layout that you want your users to see, use the [Export-StartLayout](/powershell/module/startlayout/export-startlayout) cmdlet in Windows PowerShell to export the Start layout to an .xml file. Start layout is located by default at C:\Users\username\AppData\Local\Microsoft\Windows\Shell\
> [!IMPORTANT]
> If you include secondary Microsoft Edge tiles (tiles that link to specific websites in Microsoft Edge), see [Add custom images to Microsoft Edge secondary tiles](start-secondary-tiles.md) for instructions.
To export the Start layout to an .xml file:
1. While signed in with the same account that you used to customize Start, right-click Start, and select **Windows PowerShell**.
1. Run `Export-StartLayout` with the switch `-UseDesktopApplicationID`. For example:
```PowerShell
Export-StartLayout -UseDesktopApplicationID -Path layout.xml
```
In the previous command, `-path` is a required parameter that specifies the path and file name for the export file. You can specify a local path or a UNC path (for example, `\\FileServer01\StartLayouts\StartLayoutMarketing.xml`).
Use a file name of your choice—for example, StartLayoutMarketing.xml. Include the .xml file name extension. The [Export-StartLayout](/powershell/module/startlayout/export-startlayout) cmdlet doesn't append the file name extension, and the policy settings require the extension.
Example of a layout file produced by `Export-StartLayout`:
```xml
```
1. (Optional) Edit the .xml file to add [a taskbar configuration](../taskbar/configure-windows-10-taskbar.md) or to [modify the exported layout](start-layout-xml-desktop.md). When you make changes to the exported layout, be aware that [the order of the elements in the .xml file is critical.](start-layout-xml-desktop.md#required-order)
> [!IMPORTANT]
> If the Start layout that you export contains tiles for desktop (Win32) apps or .url links, **Export-StartLayout** will use **DesktopApplicationLinkPath** in the resulting file. Use a text or XML editor to change **DesktopApplicationLinkPath** to **DesktopApplicationID**. See [Specify Start tiles](start-layout-xml-desktop.md#specify-start-tiles) for details on using the app ID in place of the link path.
> [!NOTE]
> All clients that the start layout applies to must have the apps and other shortcuts present on the local system in the same location as the source for the Start layout.
>
> For scripts and application tile pins to work correctly, follow these rules:
>
>- Executable files and scripts should be listed in \Program Files or wherever the installer of the app places them.
>- Shortcuts that will pinned to Start should be placed in \ProgramData\Microsoft\Windows\Start Menu\Programs.
>- If you place executable files or scripts in the \ProgramData\Microsoft\Windows\Start Menu\Programs folder, they will not pin to Start.
>- Start on Windows 10 does not support subfolders. We only support one folder. For example, \ProgramData\Microsoft\Windows\Start Menu\Programs\Folder. If you go any deeper than one folder, Start will compress the contents of all the subfolder to the top level.
>- Three additional shortcuts are pinned to the start menu after the export. These are shortcuts to %ALLUSERSPROFILE%\Microsoft\Windows\Start Menu\Programs, %APPDATA%\Microsoft\Windows\Start Menu\Programs, and %APPDATA%\Microsoft\Windows\Start Menu\Programs\System Tools\.
### Configure a partial Start layout
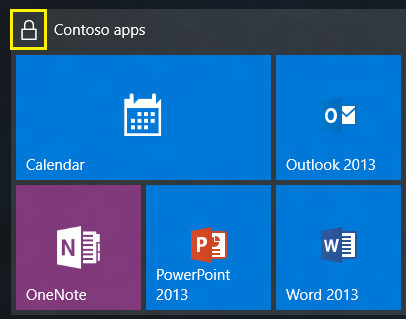
A partial Start layout enables you to add one or more customized tile groups to users' Start screens or menus, while still allowing users to make changes to other parts of the Start layout. All groups that you add are *locked*, meaning users can't change the contents of those tile groups, however users can change the location of those groups. Locked groups are identified with an icon, as shown in the following image.
When a partial Start layout is applied for the first time, the new groups are added to the users' existing Start layouts. If an app tile is in both an existing group and in a new locked group, the duplicate app tile is removed from the existing (unlocked) group.
When a partial Start layout is applied to a device that already has a StartLayout.xml applied, groups that were added previously are removed and the groups in the new layout are added.
If the Start layout is applied by Group Policy or MDM, and the policy is removed, the groups remain on the devices but become unlocked.
To configure a partial Start screen layout:
1. [Customize the Start layout](#customize-the-start-screen-on-your-test-computer).
1. [Export the Start layout](#export-the-start-layout).
1. Open the layout .xml file. There is a `` element. Add `LayoutCustomizationRestrictionType="OnlySpecifiedGroups"` to the **DefaultLayoutOverride** element as follows:
```xml
```
1. Save the file and apply using any of the deployment methods.
> [!NOTE]
> Office 2019 tiles might be removed from the Start menu when you upgrade Office 201. This only occurs if Office 2019 app tiles are in a custom group in the Start menu and only contains the Office 2019 app tiles. To avoid this problem, place another app tile in the Office 2019 group prior to the upgrade. For example, add Notepad.exe or calc.exe to the group. This issue occurs because Office 2019 removes and reinstalls the apps when they are upgraded. Start removes empty groups when it detects that all apps for that group have been removed.
::: zone-end