24 KiB
title, description, ms.assetid, keywords, ms.prod, ms.mktglfcycl, ms.sitesec, ms.pagetype, author, localizationpriority
| title | description | ms.assetid | keywords | ms.prod | ms.mktglfcycl | ms.sitesec | ms.pagetype | author | localizationpriority |
|---|---|---|---|---|---|---|---|---|---|
| Hybrid deployment (Surface Hub) | A hybrid deployment requires special processing to set up a device account for your Microsoft Surface Hub. | 7BFBB7BE-F587-422E-9CE4-C9DDF829E4F1 | hybrid deployment, device account for Surface Hub, Exchange hosted on-prem, Exchange hosted online | w10 | deploy | library | surfacehub | jdeckerMS | medium |
Hybrid deployment (Surface Hub)
A hybrid deployment requires special processing to set up a device account for your Microsoft Surface Hub. If you’re using a hybrid deployment, in which your organization has a mix of services, with some hosted on-premises and some hosted online, then your configuration will depend on where each service is hosted. This topic covers hybrid deployments for Exchange hosted on-prem, Exchange hosted online, Skype for Business on-prem, Skype for Business online, and Skype for Business hybrid. Because there are so many different variations in this type of deployment, it's not possible to provide detailed instructions for all of them. The following process will work for many configurations. If the process isn't right for your setup, we recommend that you use PowerShell (see Appendix: PowerShell) to achieve the same end result as documented here, and for other deployment options. You should then use the provided Powershell script to verify your Surface Hub setup. (See Account Verification Script.)
Exchange on-prem
Use this procedure if you use Exchange on-prem.
-
For this procedure, you'll be using AD admin tools to add an email address for your on-prem domain account. This account will be synced to Office 365.
-
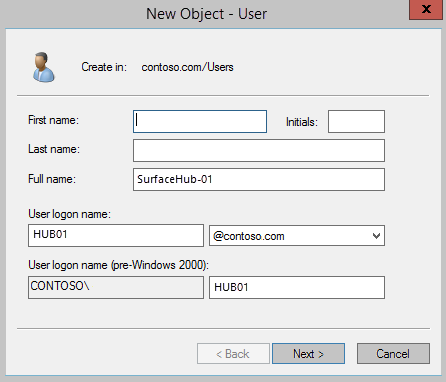
In Active Directory Users and Computers AD tool, right-click on the folder or Organizational Unit that your Surface Hub accounts will be created in, click New, and User.
-
Type the display name from the previous cmdlet into the Full name box, and the alias into the User logon name box. Click Next.
-
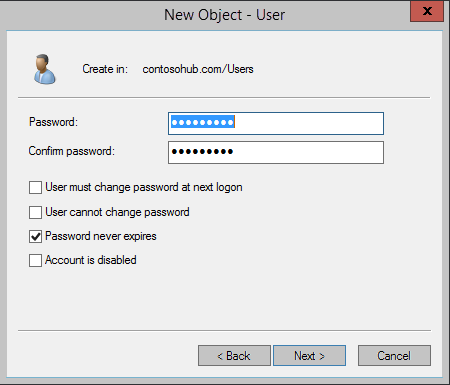
Type the password for this account. You'll need to retype it for verification. Make sure the Password never expires checkbox is the only option selected.
Important
Selecting Password never expires is a requirement for Skype for Business on the Surface Hub. Your domain rules may prohibit passwords that don't expire. If so, you'll need to create an exception for each Surface Hub device account.
-
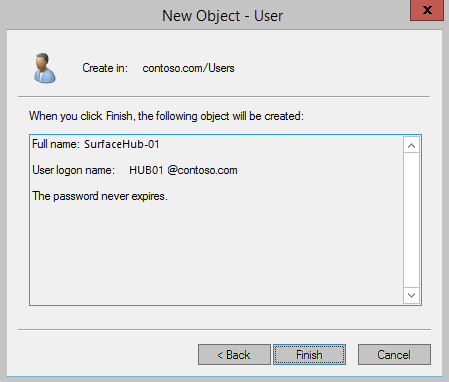
Click Finish to create the account.
-
-
After you've created the account, run a directory synchronization. When it's complete, go to the users page in your Office 365 admin center and verify that the account created in the previous steps has merged to online.
-
Enable the remote mailbox.
Open your on-prem Exchange Management Shell with administrator permissions, and run this cmdlet.
Enable-RemoteMailbox 'HUB01@contoso.com' -RemoteRoutingAddress 'HUB01@contoso.com' -Room -
Connect to Microsoft Exchange Online and set some properties for the account in Office 365.
Start a remote PowerShell session on a PC and connect to Microsoft Exchange. Be sure you have the right permissions set to run the associated cmdlets.
The next steps will be run on your Office 365 tenant.
Set-ExecutionPolicy Unrestricted $cred=Get-Credential -Message "Please use your Office 365 admin credentials" $sess= New-PSSession -ConfigurationName Microsoft.Exchange -ConnectionUri 'https://ps.outlook.com/powershell' -Credential $cred -Authentication Basic -AllowRedirection Import-PSSession $sess -
Create a new Exchange ActiveSync policy, or use a compatible existing policy.
After setting up the mailbox, you will need to either create a new Exchange ActiveSync policy or use a compatible existing policy.
Surface Hubs are only compatible with device accounts that have an ActiveSync policy where the PasswordEnabled property is set to False. If this isn’t set properly, then Exchange services on the Surface Hub (mail, calendar, and joining meetings), will not be enabled.
If you haven’t created a compatible policy yet, use the following cmdlet—-this one creates a policy called "Surface Hubs". Once it’s created, you can apply the same policy to other device accounts.
$easPolicy = New-MobileDeviceMailboxPolicy -Name “SurfaceHubs” -PasswordEnabled $falseOnce you have a compatible policy, then you will need to apply the policy to the device account. However, policies can only be applied to user accounts and not to resource mailboxes. You'll need to convert the mailbox into a user type, apply the policy, and then convert it back into a mailbox; you may need to re-enable it and set the password again too.
Set-Mailbox 'HUB01@contoso.com' -Type Regular Set-CASMailbox 'HUB01@contoso.com' -ActiveSyncMailboxPolicy $easPolicy.id Set-Mailbox 'HUB01@contoso.com' -Type Room $credNewAccount = Get-Credential -Message “Please provide the Surface Hub username and password” Set-Mailbox 'HUB01@contoso.com' -RoomMailboxPassword $credNewAccount.Password -EnableRoomMailboxAccount $true -
Set Exchange properties.
Setting Exchange properties on the device account to improve the meeting experience. You can see which properties need to be set in the Exchange properties section.
Set-CalendarProcessing -Identity 'HUB01@contoso.com' -AutomateProcessing AutoAccept -AddOrganizerToSubject $false –AllowConflicts $false –DeleteComments $false -DeleteSubject $false -RemovePrivateProperty $false Set-CalendarProcessing -Identity 'HUB01@contoso.com' -AddAdditionalResponse $true -AdditionalResponse 'This is a Surface Hub room!' -
Connect to Azure AD.
You need to connect to Azure AD to apply some account settings. You can run this cmdlet to connect.
Connect-MsolService -Credential $cred -
Assign an Office 365 license.
The device account needs to have a valid Office 365 (O365) license, or Exchange and Skype for Business will not work. If you have the license, you need to assign a usage location to your device account—this determines what license SKUs are available for your account.
Next, you can use
Get-MsolAccountSkuto retrieve a list of available SKUs for your O365 tenant.Once you list out the SKUs, you can add a license using the
Set-MsolUserLicensecmdlet. In this case,$strLicenseis the SKU code that you see (for example, contoso:STANDARDPACK).Set-MsolUser -UserPrincipalName 'HUB01@contoso.com' -UsageLocation 'US' Get-MsolAccountSku Set-MsolUserLicense -UserPrincipalName 'HUB01@contoso.com' -AddLicenses $strLicense
Next, you enable the device account with Skype for Business Online, Skype for Business on-prem, or Skype for Business hybrid.
Skype for Business Online
To enable Skype for Business online, your environment will need to meet the following prerequisites:
-
You need to have Lync Online (Plan 2) or higher in your O365 plan. The plan needs to support conferencing capability.
-
If you need Enterprise Voice (PSTN telephony) using telephony service providers for the Surface Hub, you need Lync Online (Plan 3).
-
Your tenant users must have Exchange mailboxes (at least one Exchange mailbox in the tenant is required).
-
Your Surface Hub account does require a Lync Online (Plan 2) or Lync Online (Plan 3) license, but it does not require an Exchange Online license.
-
Start by creating a remote PowerShell session from a PC to the Skype for Business online environment.
```ps1 Import-Module LyncOnlineConnector $cssess=New-CsOnlineSession -Credential $cred Import-PSSession $cssess -AllowClobber ``` -
To enable your Surface Hub account for Skype for Business Server, run this cmdlet:
 ```ps1
 Enable-CsMeetingRoom -Identity 'HUB01@contoso.com' -RegistrarPool 'sippoolbl20a04.infra.lync.com' -SipAddressType UserPrincipalName
 ```
If you aren't sure what value to use for the
RegistrarPoolparameter in your environment, you can get the value from an existing Skype for Business user using this cmdlet:```ps1 Get-CsOnlineUser -Identity ‘HUB01@contoso.com’| fl *registrarpool* ``` -
Assign Skype for Business license to your Surface Hub account.
Once you've completed the preceding steps to enable your Surface Hub account in Skype for Business Online, you need to assign a license to the Surface Hub. Using the O365 administrative portal, assign either a Skype for Business Online (Plan 2) or a Skype for Business Online (Plan 3) to the device.
-
Login as a tenant administrator, open the O365 Administrative Portal, and click on the Admin app.
-
Click on Users and Groups and then Add users, reset passwords, and more.
-
Click the Surface Hub account, and then click the pen icon to edit the account information.
-
Click Licenses.
-
In Assign licenses, select Skype for Business (Plan 2) or Skype for Business (Plan 3), depending on your licensing and Enterprise Voice requirements. You'll have to use a Plan 3 license if you want to use Enterprise Voice on your Surface Hub.
-
Click Save.
Note
You can also use the Windows Azure Active Directory Module for Windows Powershell to run the cmdlets needed to assign one of these licenses, but that's not covered here.
-
For validation, you should be able to use any Skype for Business client (PC, Android, etc.) to sign in to this account.
Skype for Business on-prem
To run this cmdlet, you will need to connect to one of the Skype front-ends. Open the Skype PowerShell and run:
Enable-CsMeetingRoom -Identity 'HUB01@contoso.com' -RegistrarPool registrarpoolfqdn -SipAddressType UserPrincipalName
Skype for Business hybrid
If your organization has set up hybrid connectivity between Skype for Business Server and Skype for Business Online, the guidance for creating accounts differs from a standard Surface Hub deployment.
The Surface Hub requires a Skype account of the type meetingroom, while a normal user would use a user type account in Skype. If your Skype server is set up for hybrid where you might have users on the local Skype server as well as users hosted in Office 365, you might run into a few issues when trying to create a Surface Hub account.
In a hybrid Skype environment, you have to create the user on-prem first, then move the user to the cloud. This means that your user is present in both environments (which makes SIP routing possible). The move from on-prem to online is done via the Move-CsUser cmdlet which can only be used against user type accounts, not meetingroom type accounts. Because of this, you will not be able to move a Surface Hub account that has a meetingroom type of account. You might think of using the Move-CsMeetingRoom cmdlet, unfortunately this will not work between the on-prem Skype server and Office 365 - it only works across on-prem Skype pools.
To have a functional Surface Hub account in a Skype hybrid configuration, create the Skype account as a normal user type account, instead of creating the account as a meetingroom. Enable the account on the on-prem Skype server first:
Enable-CsUser -Identity 'HUB01@contoso.com' -RegistrarPool "registrarpoolfqdn" -SipAddressType UserPrincipalName
After the Surface Hub account is enabled for Skype for Business on-premises, you can keep the account on-premises or you can move the Surface Hub account to Office 365, using the Move-CsUser cmdlet. Learn more about moving a Skype user to Office 365.
Exchange online
Use this procedure if you use Exchange online.
-
Create an email account in Office 365.
Start a remote PowerShell session on a PC and connect to Exchange. Be sure you have the right permissions set to run the associated cmdlets.
Set-ExecutionPolicy Unrestricted $cred=Get-Credential -Message "Please use your Office 365 admin credentials" $sess= New-PSSession -ConfigurationName Microsoft.Exchange -ConnectionUri https://outlook.office365.com/ps1-liveid/ -Credential $cred -Authentication Basic -AllowRedirection Import-PSSession $sess -
Set up mailbox.
After establishing a session, you’ll either create a new mailbox and enable it as a RoomMailboxAccount, or change the settings for an existing room mailbox. This will allow the account to authenticate into the Surface Hub.
If you're changing an existing resource mailbox:
Set-Mailbox -Identity 'HUB01' -EnableRoomMailboxAccount $true -RoomMailboxPassword (ConvertTo-SecureString -String <password> -AsPlainText -Force)If you’re creating a new resource mailbox:
New-Mailbox -MicrosoftOnlineServicesID 'HUB01@contoso.com' -Alias HUB01 -Name "Hub-01" -Room -EnableRoomMailboxAccount $true -RoomMailboxPassword (ConvertTo-SecureString -String <password> -AsPlainText -Force) -
Create Exchange ActiveSync policy.
After setting up the mailbox, you will need to either create a new Exchange ActiveSync policy, or use a compatible existing policy.
Surface Hubs are only compatible with device accounts that have an ActiveSync policy where the PasswordEnabled property is set to False. If this isn’t set properly, then Exchange services on the Surface Hub (mail, calendar, and joining meetings), will not be enabled.
If you haven’t created a compatible policy yet, use the following cmdlet—this one creates a policy called "Surface Hubs". Once it’s created, you can apply the same policy to other device accounts.
$easPolicy = New-MobileDeviceMailboxPolicy -Name “SurfaceHubs” -PasswordEnabled $falseOnce you have a compatible policy, then you will need to apply the policy to the device account. However, policies can only be applied to user accounts and not resource mailboxes. You need to convert the mailbox into a user type, apply the policy, and then convert it back into a mailbox—you may need to re-enable it and set the password again too.
Set-Mailbox 'HUB01@contoso.com' -Type Regular Set-CASMailbox 'HUB01@contoso.com' -ActiveSyncMailboxPolicy $easPolicy.id Set-Mailbox 'HUB01@contoso.com' -Type Room $credNewAccount = Get-Credential -Message "Please provide the Surface Hub username and password" Set-Mailbox 'HUB01@contoso.com' -RoomMailboxPassword $credNewAccount.Password -EnableRoomMailboxAccount $true -
Set Exchange properties.
Various Exchange properties must be set on the device account to improve the meeting experience. You can see which properties need to be set in the Exchange properties section.
Set-CalendarProcessing -Identity 'HUB01@contoso.com' -AutomateProcessing AutoAccept -AddOrganizerToSubject $false –AllowConflicts $false –DeleteComments $false -DeleteSubject $false -RemovePrivateProperty $false Set-CalendarProcessing -Identity 'HUB01@contoso.com' -AddAdditionalResponse $true -AdditionalResponse "This is a Surface Hub room!" -
Add email address for your on-prem domain account.
For this procedure, you'll be using AD admin tools to add an email address for your on-prem domain account.
-
In Active Directory Users and Computers AD tool, right-click on the folder or Organizational Unit that your Surface Hub accounts will be created in, click New, and User.
-
Type the display name from the previous cmdlet into the Full name box, and the alias into the User logon name box. Click Next.
-
Type the password for this account. You'll need to retype it for verification. Make sure the Password never expires checkbox is the only option selected.
Important
Selecting Password never expires is a requirement for Skype for Business on the Surface Hub. Your domain rules may prohibit passwords that don't expire. If so, you'll need to create an exception for each Surface Hub device account.
-
Click Finish to create the account.
-
-
Run directory synchronization.
After you've created the account, run a directory synchronization. When it's complete, go to the users page and verify that the two accounts created in the previous steps have merged.
-
Connect to Azure AD.
You need to connect to Azure AD to apply some account settings. You can run this cmdlet to connect.
Connect-MsolService -Credential $cred -
Assign an Office 365 license.
The device account needs to have a valid Office 365 (O365) license, or Exchange and Skype for Business will not work. If you have the license, you need to assign a usage location to your device account—this determines what license SKUs are available for your account.
Next, you can use
Get-MsolAccountSkuto retrieve a list of available SKUs for your O365 tenant.Once you list out the SKUs, you can add a license using the
Set-MsolUserLicensecmdlet. In this case,$strLicenseis the SKU code that you see (for example, contoso:STANDARDPACK).Set-MsolUser -UserPrincipalName 'HUB01@contoso.com' -UsageLocation 'US' Get-MsolAccountSku Set-MsolUserLicense -UserPrincipalName 'HUB01@contoso.com' -AddLicenses $strLicense
Next, you enable the device account with Skype for Business Online, Skype for Business on-prem, or Skype for Business hybrid.
### Skype for Business OnlineIn order to enable Skype for Business, your environment will need to meet the following prerequisites:
-
You'll need to have Lync Online (Plan 2) or higher in your O365 plan. The plan needs to support conferencing capability.
-
If you need Enterprise Voice (PSTN telephony) using telephony service providers for the Surface Hub, you need Lync Online (Plan 3).
-
Your tenant users must have Exchange mailboxes (at least one Exchange mailbox in the tenant is required).
-
Your Surface Hub account does require a Lync Online (Plan 2) or Lync Online (Plan 3) license, but it does not require an Exchange Online license.
-
Start by creating a remote PowerShell session to the Skype for Business online environment from a PC.
Import-Module LyncOnlineConnector $cssess=New-CsOnlineSession -Credential $cred Import-PSSession $cssess -AllowClobber -
To enable your Surface Hub account for Skype for Business Server, run this cmdlet:
Enable-CsMeetingRoom -Identity 'HUB01@contoso.com' -RegistrarPool
'sippoolbl20a04.infra.lync.com' -SipAddressType UserPrincipalName
If you aren't sure what value to use for the
RegistrarPoolparameter in your environment, you can get the value from an existing Skype for Business user using this cmdlet:Get-CsOnlineUser -Identity 'HUB01@contoso.com'| fl *registrarpool* -
Assign Skype for Business license to your Surface Hub account
Once you've completed the preceding steps to enable your Surface Hub account in Skype for Business Online, you need to assign a license to the Surface Hub. Using the O365 administrative portal, assign either a Skype for Business Online (Plan 2) or a Skype for Business Online (Plan 3) to the device.
-
Sign in as a tenant administrator, open the O365 Administrative Portal, and click on the Admin app.
-
Click on Users and Groups and then Add users, reset passwords, and more.
-
Click the Surface Hub account, and then click the pen icon to edit the account information.
-
Click Licenses.
-
In Assign licenses, select Skype for Business (Plan 2) or Skype for Business (Plan 3), depending on your licensing and Enterprise Voice requirements. You'll have to use a Plan 3 license if you want to use Enterprise Voice on your Surface Hub.
-
Click Save.
Note
You can also use the Windows Azure Active Directory Module for Windows PowerShell to run the cmdlets needed to assign one of these licenses, but that's not covered here.
-
For validation, you should be able to use any Skype for Business client (PC, Android, etc) to sign in to this account.
### Skype for Business on-premTo run this cmdlet, you will need to connect to one of the Skype front-ends. Open the Skype PowerShell and run:
Enable-CsMeetingRoom -Identity 'HUB01@contoso.com' -RegistrarPool registrarpoolfqdn -SipAddressType UserPrincipalName
If your organization has set up hybrid connectivity between Skype for Business Server and Skype for Business Online, the guidance for creating accounts differs from a standard Surface Hub deployment.
The Surface Hub requires a Skype account of the type meetingroom, while a normal user would use a user type account in Skype. If your Skype server is set up for hybrid where you might have users on the local Skype server as well as users hosted in Office 365, you might run into a few issues when trying to create a Surface Hub account.
In a hybrid Skype environment, you have to create the user on-prem first, then move the user to the cloud. This means that your user is present in both environments (which makes SIP routing possible). The move from on-prem to online is done via the Move-CsUser cmdlet which can only be used against user type accounts, not meetingroom type accounts. Because of this, you will not be able to move a Surface Hub account that has a meetingroom type of account. You might think of using the Move-CsMeetingRoom cmdlet, unfortunately this will not work between the on-prem Skype server and Office 365 - it only works across on-prem Skype pools.
In order to have a functional Surface Hub account in a Skype hybrid configuration, create the Skype account as a normal user type account, instead of creating the account as a meetingroom. First follow the Exchange steps - either online or on-prem - and, instead of enabling the user for Skype for Business Online as described, enable the account on the on-prem Skype server:
Enable-CsUser -Identity 'HUB01@contoso.com' -RegistrarPool "registrarpoolfqdn" -SipAddressType UserPrincipalName
After the Surface Hub account is enabled for Skype for Business on-premises, you can keep the account on-premises or you can move the Surface Hub account to Office 365, using the Move-CsUser cmdlet. Learn more about moving a Skype user to Office 365.