3.5 KiB
title, description, keywords, ms.prod, ms.mktglfcycl, ms.sitesec, ms.pagetype, author
| title | description | keywords | ms.prod | ms.mktglfcycl | ms.sitesec | ms.pagetype | author |
|---|---|---|---|---|---|---|---|
| Set up Take a Test on a single PC | Learn how to set up and use the Take a Test app on a single PC. | shared cart, shared PC, school | w10 | plan | library | edu | jdeckerMS |
Set up Take a Test on a single PC
Applies to:
- Windows 10
The Take a Test app in Windows 10, Version 1607, creates the right environment for taking a test:
- Take a Test shows just the test and nothing else.
- Take a Test clears the clipboard.
- Students aren’t able to go to other websites.
- Students can’t open or access other apps.
- Students can't share, print, or record their screens.
- Students can’t change settings, extend their display, see notifications, get updates, or use autofill features.
- Cortana is turned off.
Tip
To exit Take a Test, press Ctrl+Alt+Delete.
How you use Take a Test
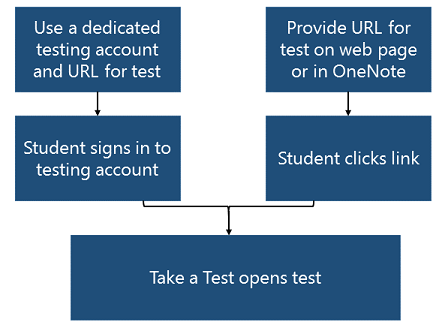
- Use a test URL and a dedicated testing account - A user signs in to the account and the Take a Test app automatically launches the pre-configured assessment URL in Microsoft Edge in a single-app, kiosk mode. A student will never have access to the desktop in this configuration. We recommend this configuration for high stakes testing.
- Put a test URL with an included prefix on a web page or OneNote for students to click - This allows teachers and test administrators an easier way to deploy assessments. We recommend this method for lower stakes assessments.
Set up a dedicated test account
- Sign into the device with an administrator account.
- Go to Settings > Accounts > Work or school access > Set up an account for taking tests.
- Select an existing account to use as the dedicated testing account.
Note
If you don't have an account on the device, you can create a new account. To do this, go to Settings > Accounts > Other Users > Add someone else to this PC > I don’t have this person’s sign-in information > Add a user without a Microsoft account.
-
Specify an assessment URL.
-
Click Save.
-
To take the test, the student signs in to the selected account.
Provide link to test
Anything hosted on the web can be presented in a locked down manner, not just assessments. To lock down online content, just embed a URL with a specific prefix and devices will be locked down when users follow the link. We recommend using this method for lower stakes assessments.
- Create a link to the test URL. Use ms-edu-secureassessment: before the URL and !enforceLockdown after the URL.
ms-edu-secureassessment:<URL>!enforceLockdown
Note
You may want to remove !enforceLockdown for tests that utilizes our lockdown API that checks for running processes before locking down. Removing !enforceLockdown will result in the app not locking down immediately which allows you to close apps that are not allowed to run during lockdown. The test web application may lock down the device once you have closed the apps.
- Distribute the link. You can use the web, email, OneNote, or any other method of your choosing.
- To take the test, the student clicks on the link and provides user consent.