34 KiB
title, description, keywords, ms.prod, ms.mktglfcycl, localizationpriority, author
| title | description | keywords | ms.prod | ms.mktglfcycl | localizationpriority | author |
|---|---|---|---|---|---|---|
| Deploy code integrity policies - steps (Windows 10) | This article describes how to deploy code integrity policies, one of the main features that are part of Device Guard in Windows 10. | virtualization, security, malware | w10 | deploy | high | brianlic-msft |
Deploy code integrity policies: steps
Applies to
- Windows 10
- Windows Server 2016
For an overview of the process described in the following procedures, see Deploy code integrity policies: policy rules and file rules. To understand how the deployment of code integrity policies fits with other steps in the Device Guard deployment process, see Planning and getting started on the Device Guard deployment process.
Create a code integrity policy from a golden computer
The process for creating a golden code integrity policy from a reference system is straightforward. This section outlines the process that is required to successfully create a code integrity policy with Windows PowerShell. First, for this example, you must initiate variables to be used during the creation process. Rather than using variables, you can simply use the full file paths in the command. Next, you create the code integrity policy by scanning the system for installed applications. When created, the policy file is converted to binary format so that Windows can consume its contents.
Note
Before you begin this procedure, ensure that the reference PC is clean of viruses or malware. Each piece of installed software should be validated as trustworthy before you create this policy. Also, be sure that any software that you would like to be scanned is installed on the system before you create the code integrity policy.
To create a code integrity policy, copy each of the following commands into an elevated Windows PowerShell session, in order:
-
Initialize variables that you will use. The following example commands use InitialScan.xml and DeviceGuardPolicy.bin for the names of the files that will be created:
$CIPolicyPath=$env:userprofile+"\Desktop\"$InitialCIPolicy=$CIPolicyPath+"InitialScan.xml"$CIPolicyBin=$CIPolicyPath+"DeviceGuardPolicy.bin" -
Use New-CIPolicy to create a new code integrity policy by scanning the system for installed applications:
New-CIPolicy -Level PcaCertificate -FilePath $InitialCIPolicy –UserPEs 3> CIPolicyLog.txtNotes
- By specifying the –UserPEs parameter, rule option 0 Enabled:UMCI is automatically added to the code integrity policy. If you do not specify this parameter, to enable UMCI, use Set-RuleOption as shown in the following command:
Set-RuleOption -FilePath $InitialCIPolicy -Option 0
- You can add the –Fallback parameter to catch any applications not discovered using the primary file rule level specified by the –Level parameter. For more information about file rule level options, see Code integrity file rule levels in “Deploy code integrity policies: policy rules and file rules.”
- To specify that the code integrity policy scan only a specific drive, include the –ScanPath parameter followed by a path. Without this parameter, the entire system is scanned.
- The preceding example includes
3> CIPolicylog.txt, which redirects warning messages to a text file, CIPolicylog.txt.
- By specifying the –UserPEs parameter, rule option 0 Enabled:UMCI is automatically added to the code integrity policy. If you do not specify this parameter, to enable UMCI, use Set-RuleOption as shown in the following command:
-
Use ConvertFrom-CIPolicy to convert the code integrity policy to a binary format:
ConvertFrom-CIPolicy $InitialCIPolicy $CIPolicyBin
After you complete these steps, the Device Guard binary file (DeviceGuardPolicy.bin) and original .xml file (IntialScan.xml) will be available on your desktop. You can use the binary version as a code integrity policy or sign it for additional security.
Note
We recommend that you keep the original .xml file of the policy for use when you need to merge the code integrity policy with another policy or update its rule options. Alternatively, you would have to create a new policy from a new scan for servicing. For more information about how to merge code integrity policies, see Merge code integrity policies.
We recommend that every code integrity policy be run in audit mode before being enforced. Doing so allows administrators to discover any issues with the policy without receiving error message dialog boxes. For information about how to audit a code integrity policy, see the next section, Audit code integrity policies.
Audit code integrity policies
When code integrity policies are run in audit mode, it allows administrators to discover any applications that were missed during an initial policy scan and to identify any new applications that have been installed and run since the original policy was created. While a code integrity policy is running in audit mode, any binary that runs and would have been denied had the policy been enforced is logged in the Applications and Services Logs\Microsoft\Windows\CodeIntegrity\Operational event log. When these logged binaries have been validated, they can easily be added to a new code integrity policy. When the new exception policy is created, you can merge it with your existing code integrity policies.
Note
Before you begin this process, you need to create a code integrity policy binary file. If you have not already done so, see Create a code integrity policy from a golden computer, earlier in this topic, for a step-by-step walkthrough of the process to create a code integrity policy and convert it to binary format.
To audit a code integrity policy with local policy:
-
Find a *.bin policy file that you have created, for example, the DeviceGuardPolicy.bin file that resulted from the steps in the earlier section, Create a code integrity policy from a golden computer. Copy the file to C:\Windows\System32\CodeIntegrity.
-
On the computer you want to run in audit mode, open the Local Group Policy Editor by running GPEdit.msc.
Notes
- The computer that you will run in audit mode must be clean of viruses or malware. Otherwise, in the process that you follow after auditing the system, you might unintentionally merge in a code integrity policy that allows viruses or malware to run.
- An alternative method to test a policy is to rename the test file to SIPolicy.p7b and drop it into C:\Windows\System32\CodeIntegrity, rather than deploy it by using the Local Group Policy Editor.
-
Navigate to Computer Configuration\Administrative Templates\System\Device Guard, and then select Deploy Code Integrity Policy. Enable this setting by using the appropriate file path, for example, C:\Windows\System32\CodeIntegrity\DeviceGuardPolicy.bin, as shown in Figure 1.
Notes
- The illustration shows the example file name DeviceGuardPolicy.bin because this name was used earlier in this topic, in Create a code integrity policy from a golden computer. Also, this policy file does not need to be copied to every system. You can instead copy the code integrity policies to a file share to which all computer accounts have access.
- Any policy you select here is converted to SIPolicy.p7b when it is deployed to the individual computers.
- You might have noticed that the GPO setting references a .p7b file and this policy uses a .bin file. Regardless of the type of policy you deploy (.bin, .p7b, or .p7), they are all converted to SIPolicy.p7b when dropped onto the computers running Windows 10. We recommend that you make your code integrity policy names friendly and allow the system to convert the policy names for you. By doing this, it ensures that the policies are easily distinguishable when viewed in a share or any other central repository.

Figure 1. Deploy your code integrity policy
-
Restart the reference system for the code integrity policy to take effect.
-
Use the system as you normally would, and monitor code integrity events in the event log. While in audit mode, any exception to the deployed code integrity policy will be logged in the Applications and Services Logs\Microsoft\Windows\CodeIntegrity\Operational event log, as shown in Figure 2.
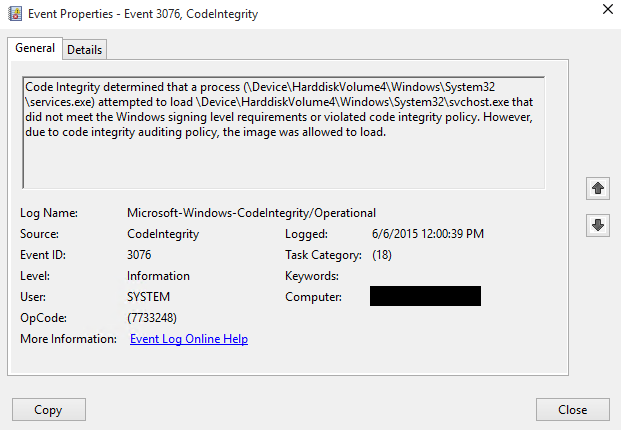
Figure 2. Exceptions to the deployed code integrity policy
You will be reviewing the exceptions that appear in the event log, and making a list of any applications that should be allowed to run in your environment.
- If you want to create a catalog file to simplify the process of including unsigned LOB applications in your code integrity policy, this is a good time to create it. For information, see Deploy catalog files to support code integrity policies.
Now that you have a code integrity policy deployed in audit mode, you can capture any audit information that appears in the event log. This is described in the next section.
Create a code integrity policy that captures audit information from the event log
Use the following procedure after you have been running a computer with a code integrity policy in audit mode for a period of time. When you are ready to capture the needed policy information from the event log (so that you can later merge that information into the original code integrity policy), complete the following steps.
-
Review the audit information in the event log. From the code integrity policy exceptions that you see, make a list of any applications that should be allowed to run in your environment, and decide on the file rule level that should be used to trust these applications.
Although the Hash file rule level will catch all of these exceptions, it may not be the best way to trust all of them. For information about file rule levels, see Code integrity file rule levels in "Deploy code integrity policies: policy rules and file rules."
Your event log might also contain exceptions for applications that you eventually want your code integrity policy to block. If these appear, make a list of these also, for a later step in this procedure.
-
In an elevated Windows PowerShell session, initialize the variables that will be used. The example filename shown here is DeviceGuardAuditPolicy.xml:
$CIPolicyPath=$env:userprofile+"\Desktop\"$CIAuditPolicy=$CIPolicyPath+"DeviceGuardAuditPolicy.xml" -
Use New-CIPolicy to generate a new code integrity policy from logged audit events. This example uses a file rule level of Hash and includes
3> CIPolicylog.txt, which redirects warning messages to a text file, CIPolicylog.txt.New-CIPolicy -Audit -Level Hash -FilePath $CIAuditPolicy –UserPEs 3> CIPolicylog.txtNote
When you create policies from audit events, you should carefully consider the file rule level that you select to trust. The preceding example uses the Hash rule level, which is the most specific. Any change to the file (such as replacing the file with a newer version of the same file) will change the Hash value, and require an update to the policy.
-
Find and review the Device Guard audit policy .xml file that you created. If you used the example variables as shown, the filename will be DeviceGuardAuditPolicy.xml, and it will be on your desktop. Look for the following:
-
Any applications that were caught as exceptions, but should be allowed to run in your environment. These are applications that should be in the .xml file. Leave these as-is in the file.
-
Any applications that actually should not be allowed to run in your environment. Edit these out of the .xml file. If they remain in the .xml file, and the information in the file is merged into your existing code integrity policy, the policy will treat the applications as trusted, and allow them to run.
-
You can now use this file to update the existing code integrity policy that you ran in audit mode by merging the two policies. For instructions on how to merge this audit policy with the existing code integrity policy, see the next section, Merge code integrity policies.
Note
You may have noticed that you did not generate a binary version of this policy as you did in Create a code integrity policy from a golden computer. This is because code integrity policies created from an audit log are not intended to run as stand-alone policies but rather to update existing code integrity policies.
Merge code integrity policies
When you develop code integrity policies, you will occasionally need to merge two policies. A common example is when a code integrity policy is initially created and audited. Another example is when you create a single master policy by using multiple code integrity policies previously created from golden computers. Because each computer running Windows 10 can have only one code integrity policy, it is important to properly maintain these policies. In this example, audit events have been saved into a secondary code integrity policy that you then merge with the initial code integrity policy.
Note
The following example uses the code integrity policy .xml files that you created in earlier sections in this topic. You can follow this process, however, with any two code integrity policies you would like to combine.
To merge two code integrity policies, complete the following steps in an elevated Windows PowerShell session:
-
Initialize the variables that will be used:
$CIPolicyPath=$env:userprofile+"\Desktop\"$InitialCIPolicy=$CIPolicyPath+"InitialScan.xml"$AuditCIPolicy=$CIPolicyPath+"DeviceGuardAuditPolicy.xml"$MergedCIPolicy=$CIPolicyPath+"MergedPolicy.xml"$CIPolicyBin=$CIPolicyPath+"NewDeviceGuardPolicy.bin"Note
The variables in this section specifically expect to find an initial policy on your desktop called InitialScan.xml and an audit code integrity policy called DeviceGuardAuditPolicy.xml. If you want to merge other code integrity policies, update the variables accordingly.
-
Use Merge-CIPolicy to merge two policies and create a new code integrity policy:
Merge-CIPolicy -PolicyPaths $InitialCIPolicy,$AuditCIPolicy -OutputFilePath $MergedCIPolicy -
Use ConvertFrom-CIPolicy to convert the merged code integrity policy to binary format:
ConvertFrom-CIPolicy $MergedCIPolicy $CIPolicyBin
Now that you have created a new code integrity policy (for example, called NewDeviceGuardPolicy.bin), you can deploy the policy to systems manually or by using Group Policy or Microsoft client management solutions. For information about how to deploy this new policy with Group Policy, see the Deploy and manage code integrity policies with Group Policy section.
Enforce code integrity policies
Every code integrity policy is created with audit mode enabled. After you have successfully deployed and tested a code integrity policy in audit mode and are ready to test the policy in enforced mode, complete the following steps in an elevated Windows PowerShell session:
Note
Every code integrity policy should be tested in audit mode first. For information about how to audit code integrity policies, see Audit code integrity policies, earlier in this topic.
-
Initialize the variables that will be used:
$CIPolicyPath=$env:userprofile+"\Desktop\"$InitialCIPolicy=$CIPolicyPath+"InitialScan.xml"$EnforcedCIPolicy=$CIPolicyPath+"EnforcedPolicy.xml"$CIPolicyBin=$CIPolicyPath+"EnforcedDeviceGuardPolicy.bin"Note
The initial code integrity policy that this section refers to was created in the Create a code integrity policy from a golden computer section. If you are using a different code integrity policy, update the CIPolicyPath and InitialCIPolicy variables.
-
Ensure that rule options 9 (“Advanced Boot Options Menu”) and 10 (“Boot Audit on Failure”) are set the way that you intend for this policy. We strongly recommend that you enable these rule options before you run any enforced policy for the first time. Enabling these options provides administrators with a pre-boot command prompt, and allows Windows to start even if the code integrity policy blocks a kernel-mode driver from running. When ready for enterprise deployment, you can remove these options.
To ensure that these options are enabled in a policy, use Set-RuleOption as shown in the following commands. You can run these commands even if you're not sure whether options 9 and 10 are already enabled—if so, the commands have no effect.
Set-RuleOption -FilePath $InitialCIPolicy -Option 9Set-RuleOption -FilePath $InitialCIPolicy -Option 10 -
Copy the initial file to maintain an original copy:
copy $InitialCIPolicy $EnforcedCIPolicy -
Use Set-RuleOption to delete the audit mode rule option:
Set-RuleOption -FilePath $EnforcedCIPolicy -Option 3 -DeleteNote
To enforce a code integrity policy, you delete option 3, the Audit Mode Enabled option. There is no “enforced” option that can be placed in a code integrity policy.
-
Use ConvertFrom-CIPolicy to convert the new code integrity policy to binary format:
ConvertFrom-CIPolicy $EnforcedCIPolicy $CIPolicyBin
Now that this policy is in enforced mode, you can deploy it to your test computers. Rename the policy to SIPolicy.p7b and copy it to C:\Windows\System32\CodeIntegrity for testing, or deploy the policy through Group Policy by following the instructions in Deploy and manage code integrity policies with Group Policy. You can also use other client management software to deploy and manage the policy.
Signing code integrity policies with SignTool.exe
Signed code integrity policies give organizations the highest level of malware protection available in Windows 10. In addition to their enforced policy rules, signed policies cannot be modified or deleted by a user or administrator on the computer. These policies are designed to prevent administrative tampering and kernel mode exploit access. With this in mind, it is much more difficult to remove signed code integrity policies than unsigned ones. Before you sign and deploy a signed code integrity policy, we recommend that you audit the policy to discover any blocked applications that should be allowed to run. For more information about how to audit code integrity policies, see the Audit code integrity policies section.
Signing code integrity policies by using an on-premises CA-generated certificate or a purchased code signing certificate is straightforward. If you do not currently have a code signing certificate exported in .pfx format (containing private keys, extensions, and root certificates), see Optional: Create a code signing certificate for code integrity policies to create one with your on-premises CA.
Before signing code integrity policies for the first time, be sure to enable rule options 9 (“Advanced Boot Options Menu”) and 10 (“Boot Audit on Failure”) to leave troubleshooting options available to administrators. To ensure that a rule option is enabled, you can run a command such as Set-RuleOption -FilePath <PathAndFilename> -Option 9 even if you're not sure whether the option is already enabled—if so, the command has no effect. When validated and ready for enterprise deployment, you can remove these options. For more information about rule options, see Code integrity policy rules in "Deploy code integrity policies: policy rules and file rules."
Note
Signing code integrity policies is the last step in a code integrity deployment. It is much more difficult to remove a signed code integrity policy than an unsigned one. Before you deploy a signed code integrity policy to deployed client computers, be sure to test its effect on a subset of computers.
To sign a code integrity policy with SignTool.exe, you need the following components:
-
SignTool.exe, found in the Windows SDK (Windows 7 or later)
-
The binary format of the code integrity policy that you generated in the Create a code integrity policy from a golden computer section or another code integrity policy that you have created
-
An internal CA code signing certificate or a purchased code signing certificate
If you do not have a code signing certificate, see the Optional: Create a code signing certificate for code integrity policies section for instructions on how to create one. If you use an alternate certificate or code integrity policy, be sure to update the following steps with the appropriate variables and certificate so that the commands will function properly. To sign the existing code integrity policy, copy each of the following commands into an elevated Windows PowerShell session:
-
Initialize the variables that will be used:
$CIPolicyPath=$env:userprofile+"\Desktop\"$InitialCIPolicy=$CIPolicyPath+"InitialScan.xml"$CIPolicyBin=$CIPolicyPath+"DeviceGuardPolicy.bin"Note
This example uses the code integrity policy that you created in the Create a code integrity policy from a golden computer section. If you are signing another policy, be sure to update the $CIPolicyPath and $CIPolicyBin variables with the correct information.
-
Import the .pfx code signing certificate. Import the code signing certificate that you will use to sign the code integrity policy into the signing user’s personal store on the computer that will be doing the signing. In this example, you use the certificate that was created in Optional: Create a code signing certificate for code integrity policies.
-
Export the .cer code signing certificate. After the code signing certificate has been imported, export the .cer version to your desktop. This version will be added to the policy so that it can be updated later.
-
Navigate to your desktop as the working directory:
cd $env:USERPROFILE\Desktop -
Use Add-SignerRule to add an update signer certificate to the code integrity policy:
Add-SignerRule -FilePath $InitialCIPolicy -CertificatePath <Path to exported .cer certificate> -Kernel -User –Update
Notes <Path to exported .cer certificate> should be the full path to the certificate that you exported in step 3.
Also, adding update signers is crucial to being able to modify or disable this policy in the future. For more information about how to disable signed code integrity policies, see the Disable signed code integrity policies within Windows section.
-
Use Set-RuleOption to remove the unsigned policy rule option:
Set-RuleOption -FilePath $InitialCIPolicy -Option 6 -Delete -
Use ConvertFrom-CIPolicy to convert the policy to binary format:
ConvertFrom-CIPolicy $InitialCIPolicy $CIPolicyBin -
Sign the code integrity policy by using SignTool.exe:
<Path to signtool.exe> sign -v /n "ContosoDGSigningCert" -p7 . -p7co 1.3.6.1.4.1.311.79.1 -fd sha256 $CIPolicyBinNote
The <Path to signtool.exe> variable should be the full path to the SignTool.exe utility. ContosoDGSigningCert is the subject name of the certificate that will be used to sign the code integrity policy. You should import this certificate to your personal certificate store on the computer you use to sign the policy.
-
Validate the signed file. When complete, the commands should output a signed policy file called DeviceGuardPolicy.bin.p7 to your desktop. You can deploy this file the same way you deploy an enforced or non-enforced policy. For information about how to deploy code integrity policies, see Deploy and manage code integrity policies with Group Policy.
Disable unsigned code integrity policies
There may come a time when an administrator wants to disable a code integrity policy. For unsigned code integrity policies, this process is simple. Depending on how the code integrity policy was deployed, unsigned policies can be disabled in one of two ways. If a code integrity policy was manually enabled and copied to the code integrity folder location, simply delete the file and restart the computer. The following locations can contain executing code integrity policies:
-
<EFI System Partition>\Microsoft\Boot\
-
<OS Volume>\Windows\System32\CodeIntegrity\
If the code integrity policy was deployed by using Group Policy, the GPO that is currently enabling and deploying the policy must be set to disabled. Then, the code integrity policy will be disabled on the next computer restart.
Disable signed code integrity policies within Windows
Signed policies protect Windows from administrative manipulation as well as malware that has gained administrative-level access to the system. For this reason, signed code integrity policies are intentionally more difficult to remove than unsigned policies. They inherently protect themselves from modification or removal and therefore are difficult even for administrators to remove successfully. If the signed code integrity policy is manually enabled and copied to the CodeIntegrity folder, to remove the policy, you must complete the following steps.
Note
For reference, signed code integrity policies should be replaced and removed from the following locations:
-
<EFI System Partition>\Microsoft\Boot\
-
<OS Volume>\Windows\System32\CodeIntegrity\
-
Replace the existing policy with another signed policy that has the 6 Enabled: Unsigned System Integrity Policy rule option enabled.
Note
To take effect, this policy must be signed with a certificate previously added to the UpdatePolicySigners section of the original signed policy you want to replace.
-
Restart the client computer.
-
Verify that the new signed policy exists on the client.
Note
If the signed policy that contains rule option 6 has not been processed on the client, the addition of an unsigned policy may cause boot failures.
-
Delete the new policy.
-
Restart the client computer.
If the signed code integrity policy has been deployed using by using Group Policy, you must complete the following steps:
-
Replace the existing policy in the GPO with another signed policy that has the 6 Enabled: Unsigned System Integrity Policy rule option enabled.
Note
To take effect, this policy must be signed with a certificate previously added to the UpdatePolicySigners section of the original signed policy you want to replace.
-
Restart the client computer.
-
Verify that the new signed policy exists on the client.
Note
If the signed policy that contains rule option 6 has not been processed on the client, the addition of an unsigned policy may cause boot failures.
-
Set the GPO to disabled.
-
Delete the new policy.
-
Restart the client computer.
Disable signed code integrity policies within the BIOS
There may be a time when signed code integrity policies cause a boot failure. Because code integrity policies enforce kernel mode drivers, it is important that they be thoroughly tested on each software and hardware configuration before being enforced and signed. Signed code integrity policies are validated in the pre-boot sequence by using Secure Boot. When you disable the Secure Boot feature in the BIOS, and then delete the file from the following locations on the operating system disk, it allows the system to boot into Windows:
-
<EFI System Partition>\Microsoft\Boot\
-
<OS Volume>\Windows\System32\CodeIntegrity\
Deploy and manage code integrity policies with Group Policy
Code integrity policies can easily be deployed and managed with Group Policy. A Device Guard administrative template will be available in Windows Server 2016 that allows you to simplify deployment of Device Guard hardware-based security features and code integrity policies. The following procedure walks you through how to deploy a code integrity policy called DeviceGuardPolicy.bin to a test OU called DG Enabled PCs by using a GPO called Contoso GPO Test.
Note
This walkthrough requires that you have previously created a code integrity policy and have a computer running Windows 10 on which to test a Group Policy deployment. For more information about how to create a code integrity policy, see Create a code integrity policy from a golden computer, earlier in this topic.
Note
Signed code integrity policies can cause boot failures when deployed. We recommend that signed code integrity policies be thoroughly tested on each hardware platform before enterprise deployment.
To deploy and manage a code integrity policy with Group Policy:
-
On a domain controller on a client computer on which RSAT is installed, open the GPMC by running GPMC.MSC or searching for “Group Policy Management” in Windows Search.
-
Create a new GPO: right-click an OU, for example, the DG Enabled PCs OU, and then click Create a GPO in this domain, and Link it here, as shown in Figure 3.
Note
You can use any OU name. Also, security group filtering is an option when you consider different ways of combining code integrity policies (or keeping them separate), as discussed in Planning and getting started on the Device Guard deployment process.
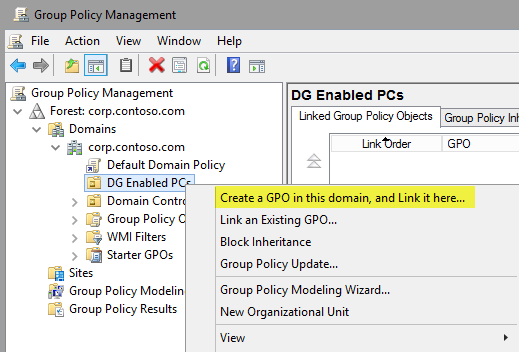
Figure 3. Create a GPO
-
Name new GPO Contoso GPO Test. This example uses Contoso GPO Test as the name of the GPO. You can choose any name that you prefer for this example.
-
Open the Group Policy Management Editor: right-click the new GPO, and then click Edit.
-
In the selected GPO, navigate to Computer Configuration\Administrative Templates\System\Device Guard. Right-click Deploy Code Integrity Policy and then click Edit.
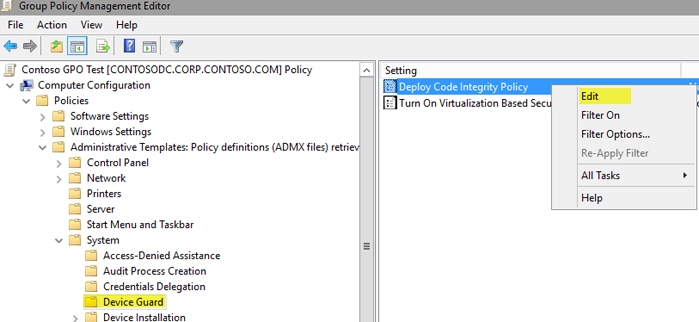
Figure 4. Edit the group policy for code integrity
-
In the Display Code Integrity Policy dialog box, select the Enabled option, and then specify the code integrity policy deployment path.
In this policy setting, you specify either the local path in which the policy will exist on the client computer or a Universal Naming Convention (UNC) path that the client computers will look to retrieve the latest version of the policy. For example, with DeviceGuardPolicy.bin on the test computer, the example file path would be C:\Windows\System32\CodeIntegrity\DeviceGuardPolicy.bin, as shown in Figure 5.
> **Note** The illustration shows the example file name *DeviceGuardPolicy.bin* because this name was used earlier in this topic, in [Create a code integrity policy from a golden computer](#create-a-code-integrity-policy-from-a-golden-computer). Also, this policy file does not need to be copied to every computer. You can instead copy the code integrity policies to a file share to which all computer accounts have access. Any policy selected here is converted to SIPolicy.p7b when it is deployed to the individual client computers.
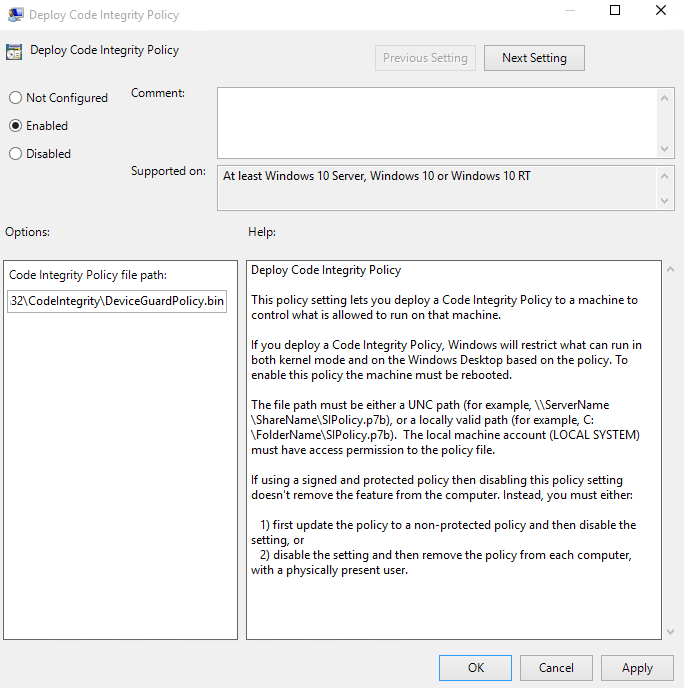
Figure 5. Enable the code integrity policy
> **Note** You may have noticed that the GPO setting references a .p7b file and this example uses a .bin file for the policy. Regardless of the type of policy you deploy (.bin, .p7b, or .p7), they are all converted to SIPolicy.p7b when dropped on the client computer running Windows 10. Make your code integrity policies friendly and allow the system to convert the policy names for you to ensure that the policies are easily distinguishable when viewed in a share or any other central repository.
- Close the Group Policy Management Editor, and then restart the Windows 10 test computer. Restarting the computer updates the code integrity policy. For information about how to audit code integrity policies, see the Audit code integrity policies section.
Related topics
Introduction to Device Guard: virtualization-based security and code integrity policies