6.4 KiB
title, description, ms.assetid, keywords, ms.prod, ms.mktglfcycl, ms.sitesec, ms.pagetype, author, localizationpriority
| title | description | ms.assetid | keywords | ms.prod | ms.mktglfcycl | ms.sitesec | ms.pagetype | author | localizationpriority |
|---|---|---|---|---|---|---|---|---|---|
| Create and deploy a VPN policy for Windows Information Protection (WIP) using Microsoft Intune (Windows 10) | After you've created and deployed your Windows Information Protection (WIP) policy, you can use Microsoft Intune to create and deploy your Virtual Private Network (VPN) policy, linking it to your WIP policy. | d0eaba4f-6d7d-4ae4-8044-64680a40cf6b | WIP, Enterprise Data Protection | w10 | explore | library | security | eross-msft | high |
Create and deploy a VPN policy for Windows Information Protection (WIP) using Microsoft Intune
Applies to:
- Windows 10, version 1607
- Windows 10 Mobile
After you've created and deployed your Windows Information Protection (WIP) policy, you can use Microsoft Intune to create and deploy your Virtual Private Network (VPN) policy, linking it to your WIP policy.
Create your VPN policy using Microsoft Intune
Follow these steps to create the VPN policy you want to use with WIP.
To create your VPN policy
-
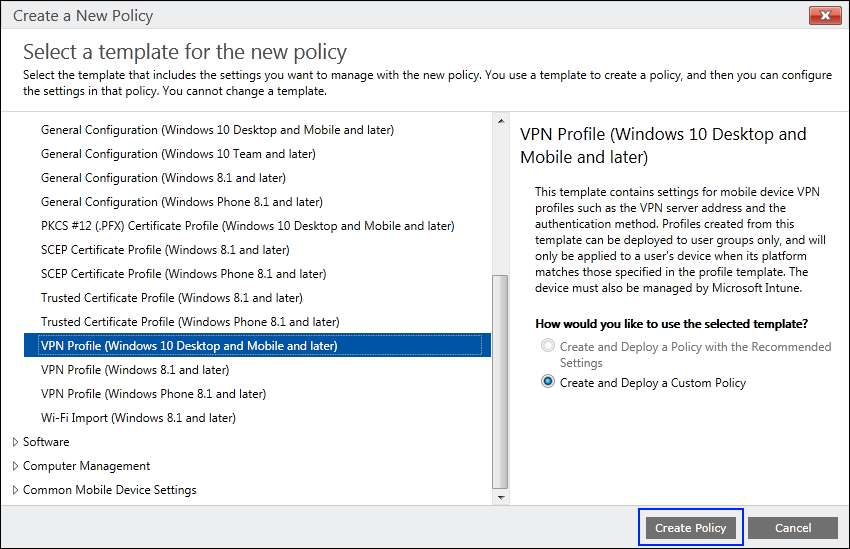
Open the Intune administration console, and go to the Policy node, and then click Add Policy.
-
Go to Windows, click the VPN Profile (Windows 10 Desktop and Mobile and later), click Create and Deploy a Custom Policy, and then click Create Policy.
-
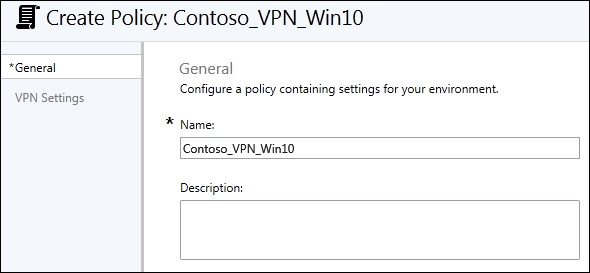
Type Contoso_VPN_Win10 into the Name box, along with an optional description for your policy into the Description box.
-
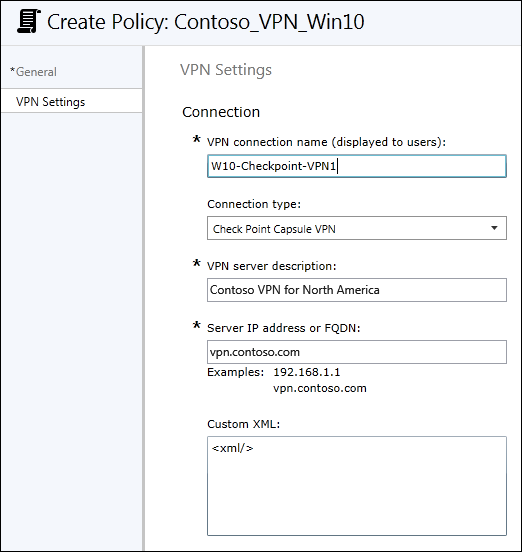
In the VPN Settings area, type the following info:
-
VPN connection name. This name is also what appears to your employees, so it's important that it be clear and understandable.
-
Connection type. Pick the connection type that matches your infrastructure. The options are Pulse Secure, F5 Edge Client, Dell SonicWALL Mobile Connect, or Check Point Capsule VPN.
-
VPN server description. A descriptive name for this connection. Only you will see it, but it should be unique and readable.
-
Server IP address or FQDN. The server's IP address or fully-qualified domain name (FQDN).
-
-
In the Authentication area, choose the authentication method that matches your VPN infrastructure, either Username and Password or Certificates.
It's your choice whether you check the box to Remember the user credentials at each logon.

-
You can leave the rest of the default or blank settings, and then click Save Policy.
Deploy your VPN policy using Microsoft Intune
After you’ve created your VPN policy, you'll need to deploy it to the same group you deployed your Windows Information Protection (WIP) policy.
To deploy your VPN policy
-
On the Configuration policies page, locate your newly-created policy, click to select it, and then click the Manage Deployment button.
-
In the left pane of the Manage Deployment box, click the employees or groups that should get the policy, and then click Add.
The added people move to the Selected Groups list on the right-hand pane.

-
After you've picked all of the employees and groups that should get the policy, click OK.
The policy is deployed to the selected users' devices.
Link your WIP and VPN policies and deploy the custom configuration policy
The final step to making your VPN configuration work with WIP, is to link your two policies together. To do this, you must first create a custom configuration policy, setting it to use your EDPModeID setting, and then deploying the policy to the same group you deployed your WIP and VPN policies
To link your VPN policy
-
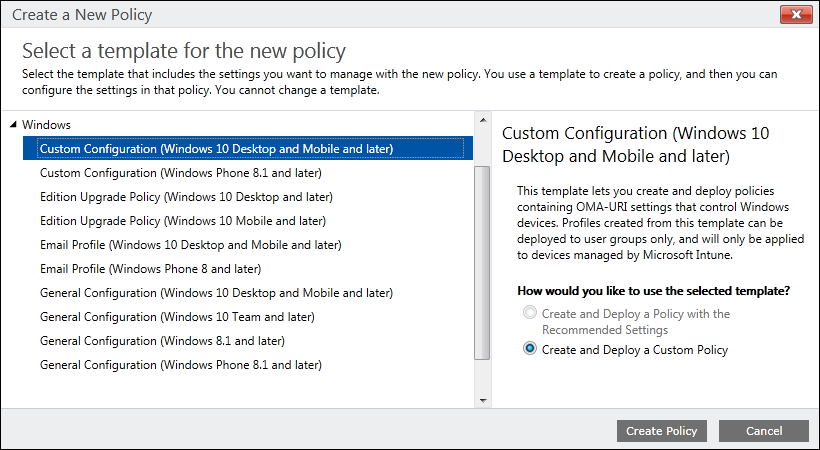
Open the Intune administration console, and go to the Policy node, and then click Add Policy.
-
Go to Windows, click the Custom Configuration (Windows 10 Desktop and Mobile and later), click Create and Deploy a Custom Policy, and then click Create Policy.
-
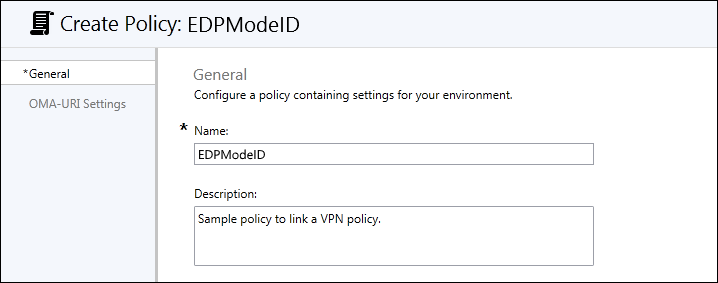
Type a name (required) and an optional description for your policy into the Name and Description boxes.
-
In the OMA-URI Settings area, click Add to add your EDPModeID info.
-
In the OMA-URI Settings area, type the following info:
-
Setting name. Type EDPModeID as the name.
-
Data type. Pick the String data type.
-
OMA-URI. Type
./Vendor/MSFT/VPNv2/<VPNProfileName>/EDPModeId, replacing <VPNProfileName> with the name you gave to your VPN policy. For example,./Vendor/MSFT/VPNv2/W10-Checkpoint-VPN1/EDPModeId. -
Value. Your fully-qualified domain that should be used by the OMA-URI setting.

-
-
Click OK to save your new OMA-URI setting, and then click Save Policy.
To deploy your linked policy
-
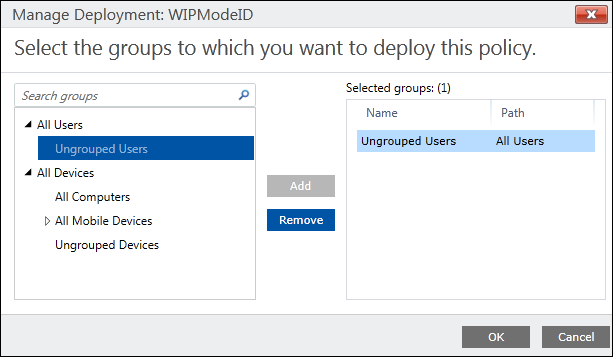
On the Configuration policies page, locate your newly-created policy, click to select it, and then click the Manage Deployment button.
-
In the left pane of the Manage Deployment box, click the employees or groups that should get the policy, and then click Add. The added people move to the Selected Groups list on the right-hand pane.
-
After you've picked all of the employees and groups that should get the policy, click OK. The policy is deployed to the selected users' devices.
Note
Help to make this topic better by providing us with edits, additions, and feedback. For info about how to contribute to this topic, see Contributing to TechNet content.