11 KiB
title, keywords, search.product, ms.pagetype, ms.prod, ms.mktglfcycl, ms.sitesec, ms.pagetype, localizationpriority, author, ms.author
| title | keywords | search.product | ms.pagetype | ms.prod | ms.mktglfcycl | ms.sitesec | ms.pagetype | localizationpriority | author | ms.author |
|---|---|---|---|---|---|---|---|---|---|---|
| eADQiWindows 10XVcnh | security | w10 | manage | library | security | medium | iaanw | iawilt |
Protect devices from exploits with Windows Defender Exploit Guard
Applies to:
- Windows 10 Insider Preview, build 16232 and later
Audience
- Enterprise security administrators
Manageability available with
- Group Policy
- PowerShell
- Windows Management Instrumentation (WMI)
- System Center Configuration Manager
- Microsoft Intune
- Windows Defender Security Center app
Exploit Protection automatically applies a number of exploit mitigation techniques on both the operating system processes and on individual apps.
It is part of Windows Defender Exploit Guard, which is itself a component in the new Windows Defender Advanced Threat Protection offering of security and threat prevention products.
You configure these settings using the Windows Defender Security Center on an individual machine, and then export the configuration as an XML file that you can deploy to other machines. You can use Group Policy to distribute the XML file to multiple devices at once.
Requirements
The following requirements must be met before Exploit Protection will work:
Windows 10 version | Windows Defender Advanced Threat Protection Insider Preview build 16232 or later (dated July 1, 2017 or later) | For full reporting you need a license for Windows Defender ATP
System-level mitigations
What is the scope for these? Any app? Only Windows/system services? Signed apps? Known bad apps?
System-level mitigations are applied to...
You can set each of the following system-level mitigations to on, off, or the default value:
Mitigation | Default value Control flow guard | On Data execution prevention | On Force randomization for images (Mandatory ASLR) | Off Randomize memory allocations (Bottom-up ASLR) | On Validate exception chains (SEHOP) | On Validate heap integrity | Off
Generally, the default values should be used to...
Control flow guard
Data execution prevention
Force randomization for images (Mandatory ASLR)
Randomize memory allocations (Bottom-up ASLR)
Validate exception chains (SEHOP)
Validate heap integrity
- Configure
- Export
- Import
Configure system-level mitigations
-
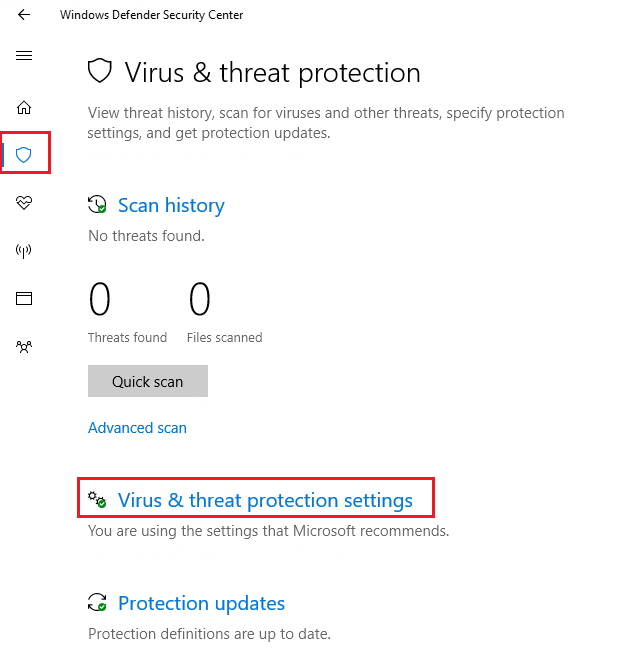
Open the Windows Defender Security Center by clicking the shield icon in the task bar or searching the start menu for Defender.
-
Click the Virus & threat protection tile (or the shield icon on the left menu bar) and then the Virus & threat protection settings label:
-
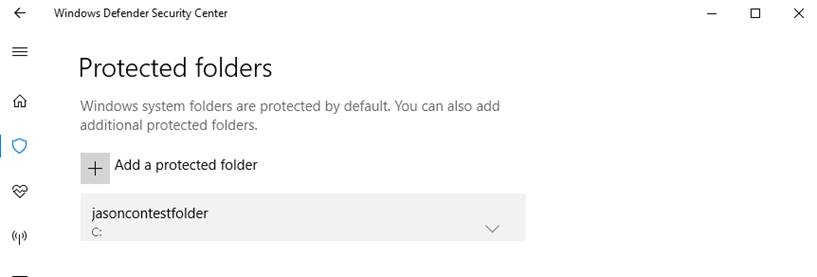
Under the Controlled folder access section, click Protected folders
-
Click Add a protected folder and follow the prompts to add apps.


You can now export these settings as an XML file. This allows you to copy the configuration from one machine onto other machines.
Export system-level mitigations
-
Open the Windows Defender Security Center by clicking the shield icon in the task bar or searching the start menu for Defender.
-
Click the Virus & threat protection tile (or the shield icon on the left menu bar) and then the Virus & threat protection settings label:
-
Under the Controlled folder access section, click Protected folders
-
Click Add a protected folder and follow the prompts to add apps.
You can import the XML file to other machines in your organization. You can do this individually for each machine by using the Windows Defender Security Center, or you can deploy a Group Policy setting for multiple devices.
Import system-level mitigations
Use the Windows Defender Security app to import system-level mitigations:
-
Open the Windows Defender Security Center by clicking the shield icon in the task bar or searching the start menu for Defender.
-
Click the Virus & threat protection tile (or the shield icon on the left menu bar) and then the Virus & threat protection settings label:
-
Under the Controlled folder access section, click Protected folders
-
Click Add a protected folder and follow the prompts to add apps.
Use Group Policy to import and deploy system-level mitigations:
-
On your Group Policy management machine, open the Group Policy Management Console, right-click the Group Policy Object you want to configure and click Edit.
-
In the Group Policy Management Editor go to Computer configuration.
-
Click Policies then Administrative templates.
-
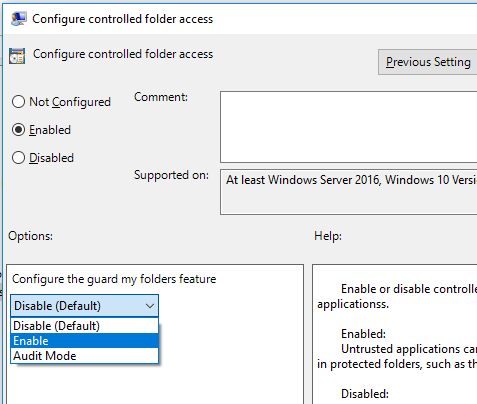
Expand the tree to Windows components > Windows Defender Antivirus > Exploit Guard.
-
Double-click the Configure controlled folder access setting and set the option to Enabled. In the options section you must specify one of the following:
-
Enable - Malicious and suspicious apps will not be allowed to make changes to files in protected folders. A notification will be provided in the Windows event log
-
Disable (Default) - The Controlled Folder Access feature will not work. All apps can make changes to files in protected folders.
-
Audit Mode - If a malicious or suspicious app attempts to make a change to a file in a protected folder, the change will be allowed but will be recorded in the Windows event log. This allows you to assess the impact of this feature on your organization.
-

Important
To fully enable the Controlled Folder Access feature, you must set the Group Policy option to Enabled and also select Enable in the options drop-down menu.
App-specific mitigations
What is the scope for these? Any app? Only Windows/system services? Signed apps? Known bad apps?
- Configure
- Export
- Import
Configure app-specific mitigations
-
Open the Windows Defender Security Center by clicking the shield icon in the task bar or searching the start menu for Defender.
-
Click the Virus & threat protection tile (or the shield icon on the left menu bar) and then the Virus & threat protection settings label:
-
Under the Controlled folder access section, click Protected folders
-
Click Add a protected folder and follow the prompts to add apps.
You can now export these settings as an XML file. This allows you to copy the configuration from one machine onto other machines.
Export app-specific mitigations
-
Open the Windows Defender Security Center by clicking the shield icon in the task bar or searching the start menu for Defender.
-
Click the Virus & threat protection tile (or the shield icon on the left menu bar) and then the Virus & threat protection settings label:
-
Under the Controlled folder access section, click Protected folders
-
Click Add a protected folder and follow the prompts to add apps.
You can import the XML file to other machines in your organization. You can do this individually for each machine by using the Windows Defender Security Center, or you can deploy a Group Policy setting for multiple devices.
Import app-specific mitigations
Use the Windows Defender Security app to import app-specific mitigations:
-
Open the Windows Defender Security Center by clicking the shield icon in the task bar or searching the start menu for Defender.
-
Click the Virus & threat protection tile (or the shield icon on the left menu bar) and then the Virus & threat protection settings label:
-
Under the Controlled folder access section, click Protected folders
-
Click Add a protected folder and follow the prompts to add apps.
Use Group Policy to import and deploy app-specific mitigations:
-
On your Group Policy management machine, open the Group Policy Management Console, right-click the Group Policy Object you want to configure and click Edit.
-
In the Group Policy Management Editor go to Computer configuration.
-
Click Policies then Administrative templates.
-
Expand the tree to Windows components > Windows Defender Antivirus > Exploit Guard.
-
Double-click the Configure controlled folder access setting and set the option to Enabled. In the options section you must specify one of the following:
-
Enable - Malicious and suspicious apps will not be allowed to make changes to files in protected folders. A notification will be provided in the Windows event log
-
Disable (Default) - The controlled folder access feature will not work. All apps can make changes to files in protected folders.
-
Audit Mode - If a malicious or suspicious app attempts to make a change to a file in a protected folder, the change will be allowed but will be recorded in the Windows event log. This allows you to assess the impact of this feature on your organization.
-
Important
To fully enable the Controlled Folder Access feature, you must set the Group Policy option to Enabled and also select Enable in the options drop-down menu.
Review event logs for Exploit Protection
How do you see these event logs? Are they under specific codes/areas?
Also - is there any SCCM, Intune, or MDM functionality here? Can't see anything in the SCCM console.