38 KiB
title, description, ms.topic, ms.date, zone_pivot_groups, appliesto, ms.collection
| title | description | ms.topic | ms.date | zone_pivot_groups | appliesto | ms.collection | |
|---|---|---|---|---|---|---|---|
| Customize and export the Start layout | Learn how to customize the Windows Start layout and export the configuration to apply to other devices. | how-to | 03/04/2024 | windows-versions-11-10 |
|
Customize and export the Start layout
Looking for OEM information? See Customize the Taskbar and Customize the Start layout.
::: zone pivot="windows-11"
Your organization can deploy a customized Start layout to your Windows 11 devices. Customizing the Start layout is common when you have similar devices used by many users, or you want to pin specific apps.
For example, you can override the default set of apps with your own a set of pinned apps, and in the order you choose. As an administrator, use this feature to pin apps, remove default pinned apps, order the apps, and more.
To add apps you want pinned to the Start menu, you use a JSON file. In previous Windows versions, IT administrators used an XML file to customize the Start menu. The XML file isn't available on Windows 11 and later unless you're an OEM.
This article shows you how to export an existing Start menu layout, and use the JSON in a Microsoft Intune policy.
Before you begin
-
When you customize the Start layout, you overwrite the entire full layout. A partial Start layout isn't available. Users can pin and unpin apps, and uninstall apps from Start. When a user signs in or Explorer restarts, Windows reapplies the MDM policy. This action restores the specified layout and doesn't retain any user changes.
To prevent users from making any changes to the Start menu layout, see the NoChangeStartMenu policy.
-
It's recommended to use a mobile device management (MDM) provider. MDM providers help manage your devices, and help manage apps on your devices. You can use Microsoft Intune. Intune is a family of products that include Microsoft Intune, which is a cloud service, and Configuration Manager, which is on-premises.
In this article, we mention these services. If you're not managing your devices using an MDM provider, the following resources may help you get started:
Start menu features and areas
In Windows 11, the Start menu is redesigned with a simplified set of apps that are arranged in a grid of pages. There aren't folders, groups, or different-sized app icons:
:::image type="content" source="./images/start-windows-11.png" alt-text="Sample start menu layout on Windows 11 that shows pinned apps, access to all apps, and recommended files.":::
Start has the following areas:
-
Pinned: Shows pinned apps, or a subset of all of the apps installed on the device. You can create a list of pinned apps you want on the devices using the ConfigureStartPins policy. ConfigureStartPins overrides the entire layout, which also removes apps that are pinned by default.
This article shows you how to use the ConfigureStartPins policy.
-
All apps: Users select this option to see an alphabetical list of all the apps on the device. This section can't be customized using the JSON file.
The Start/HideFrequentlyUsedApps CSP exposes settings that configure the "Most used" section, which is at the top of the all apps list.
In Intune, you can configure this Start menu layout feature, and more. For more information on the Start menu settings you can configure in an Intune policy, see Windows 10/11 device settings to allow or restrict features.
In Group Policy, there are policies that include settings that control the Start menu layout. Some policies may not work as expected. Be sure to test your policies before broadly deploying them across your devices:
Computer Configuration\Administrative Templates\Start Menu and TaskbarUser Configuration\Administrative Templates\Start Menu and Taskbar
-
Recommended: Shows recently opened files and recently installed apps. This section can only be customized in Windows 11 SE using the following policy.
Computer Configuration\Administrative Templates\Start Menu and Taskbar\Remove Recommended section from Start Menu
Create the JSON file
On an existing Windows 11 device, set up your own Start layout with the pinned apps you want users to see. Then, use the Windows PowerShell Export-StartLayout cmdlet to export the existing layout to a LayoutModification.json file.
The JSON file controls the Start menu layout, and lists all the apps that are pinned. You can update the JSON file to:
- Change the order of existing apps. The apps in the JSON file are shown on Start in the same order.
- Add more apps by entering the app ID. For more information, see Get the pinnedList JSON (in this article).
If you're familiar with creating JSON files, you can create your own LayoutModification.json file. But, it's easier and faster to export the layout from an existing device.
Export an existing Start layout
-
Create a folder to save the
.jsonfile. For example, create theC:\Layoutsfolder. -
On a Windows 11 device, open the Windows PowerShell app.
-
Run the following cmdlet. Name the file
LayoutModification.json.Export-StartLayout -Path "C:\Layouts\LayoutModification.json"
Get the pinnedList JSON
-
Open the
LayoutModification.jsonfile in a JSON editor, such as Visual Studio Code or Notepad. For more information, see edit JSON with Visual Studio Code. -
In the file, you see the
pinnedListsection. This section includes all of the pinned apps. Copy thepinnedListcontent in the JSON file. You'll use it in the next section.In the following example, you see that Microsoft Edge, Microsoft Word, the Microsoft Store app, and Notepad are pinned:
{ "pinnedList": [ { "desktopAppId": "MSEdge" }, { "desktopAppId": "Microsoft.Office.WINWORD.EXE.15" }, { "packagedAppId": "Microsoft.WindowsStore_8wekyb3d8bbwe!App" }, { "packagedAppId": "Microsoft.WindowsNotepad_8wekyb3d8bbwe!App" } ] } -
Starting with Windows 11, the ConfigureStartPins policy is available. This policy uses the
LayoutModification.jsonfile to add apps to the Pinned section. In your JSON file, you can add more apps to this section using the following keys:
| Key | Description |
|---|---|
| packagedAppID | Use this option for Universal Windows Platform apps. To pin a UWP app, use the app's AUMID. |
| desktopAppID | Use this option for unpackaged Win32 apps. To pin a Win32 app, use the app's AUMID. If the app doesn't have an AUMID, then enter the desktopAppLink instead. |
| desktopAppLink | Use this option for unpackaged Win32 apps that don't have an associated AUMID. To pin this type of app, use the path to the .lnk shortcut that points to the app. |
Use MDM to create and deploy a pinned list policy
Now that you have the JSON syntax, you're ready to deploy your customized Start layout to devices in your organization.
MDM providers can deploy policies to devices managed by the organization, including organization-owned devices, and personal or bring your own device (BYOD). Using an MDM provider, such as Microsoft Intune, you can deploy a policy that configures the pinned list.
This section shows you how to create a pinned list policy in Intune. There isn't a Group Policy to create a pinned list.
Create a pinned list using an Intune policy
To deploy this policy, the devices must be enrolled, and managed by your organization. For more information, see What is device enrollment?.
-
Sign in to the Intune admin center.
-
Select Devices > Configuration profiles > Create profile.
-
Enter the following properties:
- Platform: Select Windows 10 and later.
- Profile: Select Templates > Custom.
-
Select Create.
-
In Basics, enter the following properties:
- Name: Enter a descriptive name for the profile. Name your profiles so you can easily identify them later. For example, a good profile name is Win11: Custom Start layout.
- Description: Enter a description for the profile. This setting is optional, and recommended.
-
Select Next.
-
In Configuration settings > OMA-URI, select Add. Add the following properties:
-
Name: Enter something like Configure Start pins.
-
Description: Enter a description for the row. This setting is optional, and recommended.
-
OMA-URI: Enter
./Vendor/MSFT/Policy/Config/Start/ConfigureStartPins. -
Data type: Select String.
-
Value: Paste the JSON you created or updated in the previous section. For example, enter the following text:
{
  "pinnedList": [
    { "desktopAppId": "MSEdge" },
    { "desktopAppId": "Microsoft.Office.WINWORD.EXE.15" },
    { "packagedAppId": "Microsoft.WindowsStore_8wekyb3d8bbwe!App" },
    { "packagedAppId": "Microsoft.WindowsNotepad_8wekyb3d8bbwe!App" }
  ]
}
Your settings look similar to the following settings:
:::image type="content" source="./images/endpoint-manager-admin-center-custom-oma-uri-start-layout.png" alt-text="Custom OMA-URI settings to customize Start menu layout using pinnedList":::
-
-
Select Save > Next to save your changes.
-
Configure the rest of the policy settings. For more specific information, see Create a profile with custom settings.
The Windows OS exposes many CSPs that apply to the Start menu. For a list, see Supported CSP policies for Windows 11 Start menu.
Deploy the policy using Intune
When the policy is created, you can deploy it now, or deploy it later. Since this policy is a customized Start layout, the policy can be deployed anytime, including before users sign in the first time.
For more information and guidance on assigning policies to devices in your organization, see Assign user and device profiles.
::: zone-end
::: zone pivot="windows-10"
The easiest method for creating a customized Start layout to apply to other Windows 10 devices is to set up the Start screen on a test computer and then export the layout.
After you export the layout, decide whether you want to apply a full Start layout or a partial Start layout.
When a full Start layout is applied, the users can't pin, unpin, or uninstall apps from Start. Users can view and open all apps in the All Apps view, but they can't pin any apps to Start.
When a partial Start layout is applied, the contents of the specified tile groups can't be changed, but users can move those groups, and can also create and customize their own groups.
Customize the Start screen on your test computer
To prepare a Start layout for export, you simply customize the Start layout on a test computer.
To prepare a test computer:
- Set up a test computer on which to customize the Start layout. Your test computer should have the operating system that is installed on the users' computers (Windows 10 Pro, Enterprise, or Education). Install all apps and services that the Start layout should display.
- Create a new user account that you'll use to customize the Start layout.
To customize Start:
-
Sign in to your test computer with the user account that you created.
-
Customize the Start layout as you want users to see it by using the following techniques:
- Pin apps to Start. From Start, type the name of the app. When the app appears in the search results, right-click the app, and then select Pin to Start. To view all apps, select All apps in the bottom-left corner of Start. Right-click any app, and pin or unpin it from Start.
- Unpin apps that you don't want to display. To unpin an app, right-click the app, and then select Unpin from Start.
- Drag tiles on Start to reorder or group apps.
- Resize tiles. To resize tiles, right-click the tile and then select Resize.
- Create your own app groups. Drag the apps to an empty area. To name a group, select above the group of tiles and then type the name in the Name group field that appears above the group.
Important
If the Start layout includes tiles for apps that are not installed on the device that the layout is later applied to, the tiles for those apps will be blank. The blank tiles will persist until the next time the user signs in, at which time the blank tiles are removed. Some system events may cause the blank tiles to be removed before the next sign-in.
Export the Start layout
When you have the Start layout that you want your users to see, use the Export-StartLayout cmdlet in Windows PowerShell to export the Start layout to an .xml file. Start layout is located by default at C:\Users\username\AppData\Local\Microsoft\Windows\Shell\
Important
If you include secondary Microsoft Edge tiles (tiles that link to specific websites in Microsoft Edge), see Add custom images to Microsoft Edge secondary tiles for instructions.
To export the Start layout to an .xml file:
-
While signed in with the same account that you used to customize Start, right-click Start, and select Windows PowerShell.
-
Run
Export-StartLayoutwith the switch-UseDesktopApplicationID. For example:Export-StartLayout -UseDesktopApplicationID -Path layout.xmlIn the previous command,
-pathis a required parameter that specifies the path and file name for the export file. You can specify a local path or a UNC path (for example,\\FileServer01\StartLayouts\StartLayoutMarketing.xml).Use a file name of your choice—for example, StartLayoutMarketing.xml. Include the .xml file name extension. The Export-StartLayout cmdlet doesn't append the file name extension, and the policy settings require the extension.
Example of a layout file produced by
Export-StartLayout:<LayoutModificationTemplate Version="1" xmlns="https://schemas.microsoft.com/Start/2014/LayoutModification"> <DefaultLayoutOverride> <StartLayoutCollection> <defaultlayout:StartLayout GroupCellWidth="6" xmlns:defaultlayout="https://schemas.microsoft.com/Start/2014/FullDefaultLayout"> <start:Group Name="Life at a glance" xmlns:start="https://schemas.microsoft.com/Start/2014/StartLayout"> <start:Tile Size="2x2" Column="0" Row="0" AppUserModelID="Microsoft.MicrosoftEdge_8wekyb3d8bbwe!MicrosoftEdge" /> <start:Tile Size="2x2" Column="4" Row="0" AppUserModelID="Microsoft.Windows.Cortana_cw5n1h2txyewy!CortanaUI" /> <start:Tile Size="2x2" Column="2" Row="0" AppUserModelID="Microsoft.BingWeather_8wekyb3d8bbwe!App" /> </start:Group> </defaultlayout:StartLayout> </StartLayoutCollection> </DefaultLayoutOverride> </LayoutModificationTemplate> -
(Optional) Edit the .xml file to add a taskbar configuration or to modify the exported layout. When you make changes to the exported layout, be aware that the order of the elements in the .xml file is critical.
Important
If the Start layout that you export contains tiles for desktop (Win32) apps or .url links, Export-StartLayout will use DesktopApplicationLinkPath in the resulting file. Use a text or XML editor to change DesktopApplicationLinkPath to DesktopApplicationID. See Specify Start tiles for details on using the app ID in place of the link path.
Note
All clients that the start layout applies to must have the apps and other shortcuts present on the local system in the same location as the source for the Start layout.
For scripts and application tile pins to work correctly, follow these rules:
- Executable files and scripts should be listed in \Program Files or wherever the installer of the app places them.
- Shortcuts that will pinned to Start should be placed in \ProgramData\Microsoft\Windows\Start Menu\Programs.
- If you place executable files or scripts in the \ProgramData\Microsoft\Windows\Start Menu\Programs folder, they will not pin to Start.
- Start on Windows 10 does not support subfolders. We only support one folder. For example, \ProgramData\Microsoft\Windows\Start Menu\Programs\Folder. If you go any deeper than one folder, Start will compress the contents of all the subfolder to the top level.
- Three additional shortcuts are pinned to the start menu after the export. These are shortcuts to %ALLUSERSPROFILE%\Microsoft\Windows\Start Menu\Programs, %APPDATA%\Microsoft\Windows\Start Menu\Programs, and %APPDATA%\Microsoft\Windows\Start Menu\Programs\System Tools.
Configure a partial Start layout
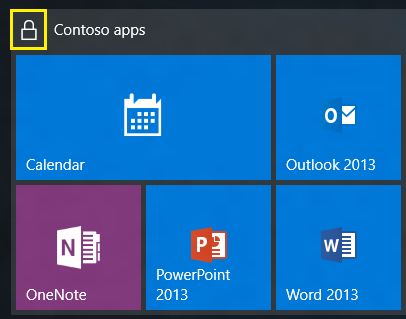
A partial Start layout enables you to add one or more customized tile groups to users' Start screens or menus, while still allowing users to make changes to other parts of the Start layout. All groups that you add are locked, meaning users can't change the contents of those tile groups, however users can change the location of those groups. Locked groups are identified with an icon, as shown in the following image.
When a partial Start layout is applied for the first time, the new groups are added to the users' existing Start layouts. If an app tile is in both an existing group and in a new locked group, the duplicate app tile is removed from the existing (unlocked) group.
When a partial Start layout is applied to a device that already has a StartLayout.xml applied, groups that were added previously are removed and the groups in the new layout are added.
If the Start layout is applied by Group Policy or MDM, and the policy is removed, the groups remain on the devices but become unlocked.
To configure a partial Start screen layout:
-
Open the layout .xml file. There is a
<DefaultLayoutOverride>element. AddLayoutCustomizationRestrictionType="OnlySpecifiedGroups"to the DefaultLayoutOverride element as follows:<DefaultLayoutOverride LayoutCustomizationRestrictionType="OnlySpecifiedGroups"> -
Save the file and apply using any of the deployment methods.
Note
Office 2019 tiles might be removed from the Start menu when you upgrade Office 201. This only occurs if Office 2019 app tiles are in a custom group in the Start menu and only contains the Office 2019 app tiles. To avoid this problem, place another app tile in the Office 2019 group prior to the upgrade. For example, add Notepad.exe or calc.exe to the group. This issue occurs because Office 2019 removes and reinstalls the apps when they are upgraded. Start removes empty groups when it detects that all apps for that group have been removed.
You can deploy the resulting .xml file to devices using one of the following methods:
- Configuration Service Provider (CSP)
- Group Policy
- Provisioning package
[!INCLUDE tab-intro]
:::image type="icon" source="../images/icons/intune.svg"::: Intune/CSP
You can use a mobile device management (MDM) policy to deploy a customized Start and taskbar layout to users. No reimaging is required. The layout can be updated simply by overwriting the .xml file that contains the layout. This feature enables you to customize Start layouts for different departments or organizations, with minimal management overhead.
Before you begin: Customize and export Start layout.
Warning
When a full Start layout is applied with this method, the users cannot pin, unpin, or uninstall apps from Start. Users can view and open all apps in the All Apps view, but they cannot pin any apps to Start. When a partial Start layout is applied, the contents of the specified tile groups cannot be changed, but users can move those groups, and can also create and customize their own groups.
Two features enable Start layout control:
-
The Export-StartLayout cmdlet in Windows PowerShell exports a description of the current Start layout in .xml file format.
Note
To import the layout of Start to a mounted Windows image, use the Import-StartLayout cmdlet.
-
In Microsoft Intune, you select the Start layout XML file and add it to a device configuration profile.
Note
Please do not include XML Prologs like <?xml version="1.0" encoding="utf-8"?> in the Start layout XML file. The settings may not be reflected correctly.
Create a policy for your customized Start layout
The following example uses Microsoft Intune to configure an MDM policy that applies a customized Start layout:
-
Sign in to the Intune admin center.
-
Select Devices > Configuration profiles > Create profile.
-
Enter the following properties:
- Platform: Select Windows 10 and later.
- Profile type: Select Templates > Device restrictions > Create.
-
In Basics, enter the following properties:
- Name: Enter a descriptive name for the profile. Name your profiles so you can easily identify it later. For example, a good profile name is Customize Start menu and taskbar.
- Description: Enter a description for the profile. This setting is optional, but recommended.
-
Select Next.
-
In Configuration settings, select Start:
- If you're using an XML file, select Start menu layout. Browse to and select your Start layout XML file.
- If you don't have an XML file, configure the others settings. For more information on these settings, see Start settings in Microsoft Intune.
-
Select Next.
-
In Scope tags, select Next. For more information about scope tags, see Use RBAC and scope tags for distributed IT.
-
In Assignments, select the user or groups that will receive your profile. Select Next. For more information on assigning profiles, see Assign user and device profiles.
-
In Review + create, review your settings. When you select Create, your changes are saved, and the profile is assigned. The policy is also shown in the profiles list.
Note
For third party partner MDM solutions, you may need to use an OMA-URI setting for Start layout, based on the Policy configuration service provider (CSP). The OMA-URI setting is
./User/Vendor/MSFT/Policy/Config/Start/StartLayout.
:::image type="icon" source="../images/icons/provisioning-package.svg"::: PPKG
You can use a provisioning package that you create with Windows Configuration Designer to deploy a customized Start and taskbar layout to users. No reimaging is required, and the Start and taskbar layout can be updated by overwriting the .xml file that contains the layout. The provisioning package can be applied to a running device. This enables you to customize Start and taskbar layouts for different departments or organizations, with minimal management overhead.
Important
If you use a provisioning package to configure the taskbar, your configuration will be reapplied each time the explorer.exe process restarts. If your configuration pins an app and the user unpins that app, the user's change will be overwritten the next time the configuration is applied. To apply a taskbar configuration and allow users to make changes that will persist, apply your configuration by using Group Policy.
Before you begin: Customize and export Start layout for desktop editions.
Three features enable Start and taskbar layout control:
-
The Export-StartLayout cmdlet in Windows PowerShell exports a description of the current Start layout in .xml file format.
Note
To import the layout of Start to a mounted Windows image, use the Import-StartLayout cmdlet.
-
You can modify the Start .xml file to include
<CustomTaskbarLayoutCollection>or create an .xml file just for the taskbar configuration. -
In Windows Configuration Designer, you use the Policies/Start/StartLayout setting to provide the contents of the .xml file that defines the Start and taskbar layout.
Prepare the Start layout XML file
The Export-StartLayout cmdlet produces an XML file. Because Windows Configuration Designer produces a customizations.xml file that contains the configuration settings, adding the Start layout section to the customizations.xml file directly would result in an XML file embedded in an XML file. Before you add the Start layout section to the customizations.xml file, you must replace the markup characters in your layout.xml with escape characters.
-
Copy the contents of layout.xml into an online tool that escapes characters.
-
During the procedure to create a provisioning package, you will copy the text with the escape characters and paste it in the customizations.xml file for your project.
Create a provisioning package that contains a customized Start layout
Use the Windows Configuration Designer tool to create a provisioning package. Learn how to install Windows Configuration Designer.
Important
When you build a provisioning package, you may include sensitive information in the project files and in the provisioning package (.ppkg) file. Although you have the option to encrypt the .ppkg file, project files are not encrypted. You should store the project files in a secure location and delete the project files when they are no longer needed.
-
Open Windows Configuration Designer (by default, %systemdrive%\Program Files (x86)\Windows Kits\10\Assessment and Deployment Kit\Imaging and Configuration Designer\x86\ICD.exe).
-
Choose Advanced provisioning.
-
Name your project, and click Next.
-
Choose All Windows desktop editions and click Next.
-
On New project, click Finish. The workspace for your package opens.
-
Expand Runtime settings > Policies > Start, and click StartLayout.
Tip
If Start is not listed, check the type of settings you selected in step 1. You must create the project using settings for All Windows desktop editions.
-
Enter layout.xml. This value creates a placeholder in the customizations.xml file that you will replace with the contents of the layout.xml file in a later step.
-
Save your project and close Windows Configuration Designer.
-
In File Explorer, open the project's directory. (The default location is C:\Users\user name\Documents\Windows Imaging and Configuration Designer (WICD)\project name)
-
Open the customizations.xml file in a text editor.
-
Replace layout.xml with the text from the layout.xml file, with markup characters replaced with escape characters.
-
Save and close the customizations.xml file.
-
Open Windows Configuration Designer and open your project.
-
On the File menu, select Save.
-
On the Export menu, select Provisioning package.
-
Change Owner to IT Admin, which will set the precedence of this provisioning package higher than provisioning packages applied to this device from other sources, and then select Next.
-
Optional. In the Provisioning package security window, you can choose to encrypt the package and enable package signing.
-
Enable package encryption - If you select this option, an auto-generated password will be shown on the screen.
-
Enable package signing - If you select this option, you must select a valid certificate to use for signing the package. You can specify the certificate by clicking Browse and choosing the certificate you want to use to sign the package.
-
-
Click Next to specify the output location where you want the provisioning package to go when it's built. By default, Windows Imaging and Configuration Designer (ICD) uses the project folder as the output location.
Optionally, you can click Browse to change the default output location.
-
Click Next.
-
Click Build to start building the package. The provisioning package doesn't take long to build. The project information is displayed in the build page and the progress bar indicates the build status.
If you need to cancel the build, click Cancel. This cancels the current build process, closes the wizard, and takes you back to the Customizations Page.
-
If your build fails, an error message will show up that includes a link to the project folder. You can scan the logs to determine what caused the error. Once you fix the issue, try building the package again.
If your build is successful, the name of the provisioning package, output directory, and project directory will be shown.
- If you choose, you can build the provisioning package again and pick a different path for the output package. To do this, click Back to change the output package name and path, and then click Next to start another build.
- If you are done, click Finish to close the wizard and go back to the Customizations Page.
-
Copy the provisioning package to the target device.
-
Double-click the ppkg file and allow it to install.
:::image type="icon" source="../images/icons/group-policy.svg"::: GPO
You can use a Group Policy Object (GPO) to deploy a customized Start and taskbar layout to users in a domain. No reimaging is required, and the layout can be updated simply by overwriting the .xml file that contains the layout. This enables you to customize Start and taskbar layouts for different departments or organizations, with minimal management overhead.
This topic describes how to update Group Policy settings to display a customized Start and taskbar layout when the users sign in. By creating a domain-based GPO with these settings, you can deploy a customized Start and taskbar layout to users in a domain.
Warning
When a full Start layout is applied with this method, the users cannot pin, unpin, or uninstall apps from Start. Users can view and open all apps in the All Apps view, but they cannot pin any apps to Start. When a partial Start layout is applied, the contents of the specified tile groups cannot be changed, but users can move those groups, and can also create and customize their own groups. When you apply a taskbar layout, users will still be able to pin and unpin apps, and change the order of pinned apps.
Before you begin: Customize and export Start layout
Operating system requirements
The GPO can be configured from any computer on which the necessary ADMX and ADML files (StartMenu.admx and StartMenu.adml) for Windows 10 are installed. In Group Policy, ADMX files are used to define Registry-based policy settings in the Administrative Templates category. To find out how to create a central store for Administrative Templates files, see article 929841, written for Windows Vista and still applicable in the Microsoft Knowledge Base.
Three features enable Start and taskbar layout control:
- The Export-StartLayout cmdlet in Windows PowerShell exports a description of the current Start layout in .xml file format.
Note
To import the layout of Start to a mounted Windows image, use the Import-StartLayout cmdlet.
- You can modify the Start .xml file to include
<CustomTaskbarLayoutCollection>or create an .xml file just for the taskbar configuration. - In Group Policy, you use the Start Layout settings for the Start Menu and Taskbar administrative template to set a Start and taskbar layout from an .xml file when the policy is applied. The Group Policy object doesn't support an empty tile layout, so the default tile layout for Windows is loaded in that case.
Note
To learn how customize Start to include your line-of-business apps when you deploy Windows 10, see Customize the Windows 10 Start layout.
Use Group Policy to apply a customized Start layout in a domain
To apply the Start and taskbar layout to users in a domain, use the Group Policy Management Console (GPMC) to configure a domain-based Group Policy Object (GPO) that sets Start Layout policy settings in the Start Menu and Taskbar administrative template for users in a domain.
The GPO applies the Start and taskbar layout at the next user sign-in. Each time the user signs in, the timestamp of the .xml file with the Start and taskbar layout is checked and if a newer version of the file is available, the settings in the latest version of the file are applied.
The GPO can be configured from any computer on which the necessary ADMX and ADML files (StartMenu.admx and StartMenu.adml) for Windows 10 are installed.
The .xml file with the Start and taskbar layout must be located on shared network storage that is available to the users' computers when they sign in and the users must have Read-only access to the file. If the file is not available when the first user signs in, Start and the taskbar are not customized during the session, but the user will be prevented from making changes to Start. On subsequent sign-ins, if the file is available at sign-in, the layout it contains will be applied to the user's Start and taskbar.
For information about deploying GPOs in a domain, see Working with Group Policy Objects.
Use Group Policy to apply a customized Start layout on the local computer
You can use the Local Group Policy Editor to provide a customized Start and taskbar layout for any user who signs in on the local computer. To display the customized Start and taskbar layout for any user who signs in, configure Start Layout policy settings for the Start Menu and Taskbar administrative template. You can use the Start Menu and Taskbar administrative template in User Configuration or Computer Configuration.
Note
This procedure applies the policy settings on the local computer only. For information about deploying the Start and taskbar layout to users in a domain, see Use Group Policy to deploy a customized Start layout in a domain.
This procedure creates a Local Group Policy that applies to all users on the computer. To configure Local Group Policy that applies to a specific user or group on the computer, see Step-by-Step Guide to Managing Multiple Local Group Policy Objects. The guide was written for Windows Vista and the procedures still apply to Windows 10.
This procedure adds the customized Start and taskbar layout to the user configuration, which overrides any Start layout settings in the local computer configuration when a user signs in on the computer.
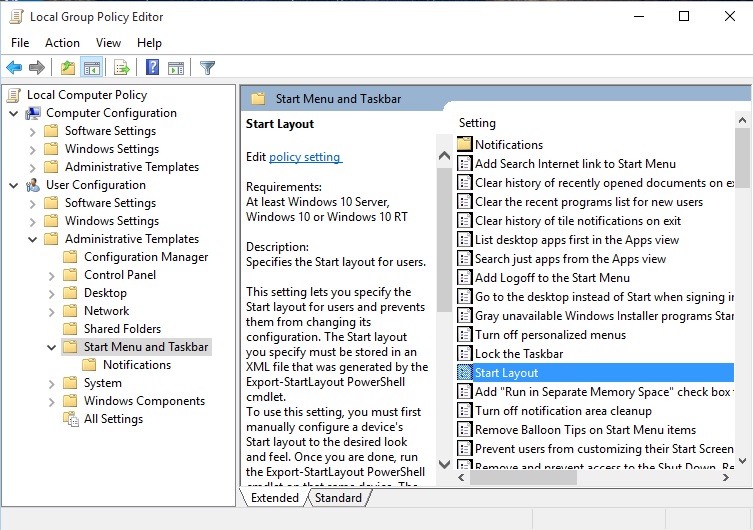
To configure Start Layout policy settings in Local Group Policy Editor:
-
On the test computer, press the Windows key, type gpedit, and then select Edit group policy (Control panel).
-
Go to User Configuration or Computer Configuration > Administrative Templates >Start Menu and Taskbar.
-
Right-click Start Layout in the right pane, and click Edit. This opens the Start Layout policy settings.
-
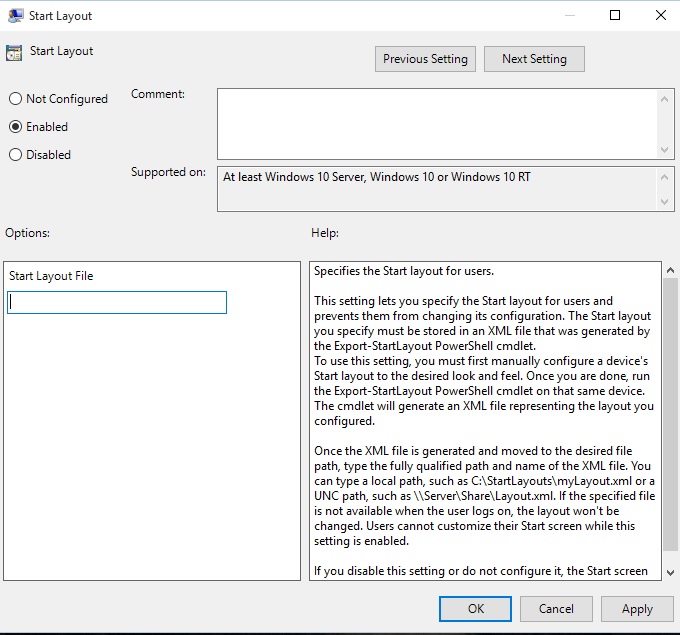
Enter the following settings, and then click OK:
- Select Enabled.
- Under Options, specify the path to the .xml file that contains the Start and taskbar layout. For example, type C:\Users\Test01\StartScreenMarketing.xml.
- Optionally, enter a comment to identify the Start and taskbar layout.
Important
If you disable Start Layout policy settings that have been in effect and then re-enable the policy, users will not be able to make changes to Start, however the layout in the .xml file will not be reapplied unless the file has been updated. In Windows PowerShell, you can update the timestamp on a file by running the following command:
(ls <path>).LastWriteTime = Get-Date
Update a customized Start layout
After you use Group Policy to apply a customized Start and taskbar layout on a computer or in a domain, you can update the layout simply by replacing the .xml file that is specified in the Start Layout policy settings with a file with a newer timestamp.
::: zone-end