47 KiB
title, manager, description, ms.prod, ms.technology, ms.localizationpriority, author, ms.author, ms.collection, ms.topic, ms.date
| title | manager | description | ms.prod | ms.technology | ms.localizationpriority | author | ms.author | ms.collection | ms.topic | ms.date | ||
|---|---|---|---|---|---|---|---|---|---|---|---|---|
| Demonstrate Autopilot deployment | aaroncz | Step-by-step instructions on how to set up a virtual machine with a Windows Autopilot deployment. | windows-client | itpro-deploy | medium | frankroj | frankroj |
|
tutorial | 10/28/2022 |
Demonstrate Autopilot deployment
Applies to
- Windows 10
To get started with Windows Autopilot, you should try it out with a virtual machine (VM). You can also use a physical device that will be wiped and then have a fresh install of Windows 10.
In this article, you'll learn how to set up a Windows Autopilot deployment for a VM using Hyper-V.
Note
Although there are multiple platforms available to enable Autopilot, this lab primarily uses Microsoft Intune.
Hyper-V and a VM aren't required for this lab. You can use a physical device instead. However, the instructions assume that you're using a VM. To use a physical device, skip the instructions to install Hyper-V and create a VM. All references to device in the guide refer to the client device, either physical or virtual.
The following video provides an overview of the process:
Tip
For a list of terms used in this guide, see the Glossary section.
Prerequisites
You'll need the following components to complete this lab:
| Component | Description |
|---|---|
| Windows 10 installation media | Windows 10 Enterprise ISO file for a supported version of Windows 10, general availability channel. If you don't already have an ISO to use, download an evaluation version of Windows 10 Enterprise. |
| Internet access | If you're behind a firewall, see the detailed networking requirements. Otherwise, just make sure that you have a connection to the internet. |
| Hyper-V or a physical device running Windows 10 | The guide assumes that you'll use a Hyper-V VM, and provides instructions to install and configure Hyper-V if needed. To use a physical device, skip the steps to install and configure Hyper-V. |
| An account with Azure Active Directory (Azure AD) Premium license | This guide will describe how to get a free 30-day trial Azure AD Premium subscription that can be used to complete the lab. |
Procedures
A summary of the sections and procedures in the lab is provided below. Follow each section in the order it's presented, skipping the sections that don't apply to you. Optional procedures are provided in the appendices.
If you already have Hyper-V and a Windows 10 VM, you can skip directly to the Capture the hardware ID step. The VM must be running Windows 10, version 1903 or later.
- Demonstrate Autopilot deployment
- Prerequisites
- Procedures
- Verify support for Hyper-V
- Enable Hyper-V
- Create a demo VM
- Capture the hardware ID
- Reset the VM back to Out-Of-Box-Experience (OOBE)
- Verify subscription level
- Configure company branding
- Configure Microsoft Intune auto-enrollment
- Register your VM
- Create and assign a Windows Autopilot deployment profile
- See Windows Autopilot in action
- Remove devices from Autopilot
- Appendix A: Verify support for Hyper-V
- Appendix B: Adding apps to your profile
- Glossary
Verify support for Hyper-V
- If you don't already have Hyper-V enabled, enable it on a computer running Windows 10 or Windows Server (2012 R2 or later).
- If you already have Hyper-V enabled, skip to the Create a demo VM step. If you're using a physical device instead of a VM, skip to Install Windows 10.
- If you're not sure that your device supports Hyper-V, or you have problems installing Hyper-V, see Appendix A in this article for details on verifying that Hyper-V can be successfully installed.
Enable Hyper-V
To enable Hyper-V, open an elevated Windows PowerShell prompt and run the following command:
Enable-WindowsOptionalFeature -Online -FeatureName Microsoft-Hyper-V -All
This command works on all operating systems that support Hyper-V. However, on Windows Server operating systems you must type another command to add the Hyper-V Windows PowerShell module and the Hyper-V Manager console. The following command will also install Hyper-V if it isn't already installed. So, if you're using Windows Server, you can just type the following command instead of using the Enable-WindowsOptionalFeature command:
Install-WindowsFeature -Name Hyper-V -IncludeManagementTools
When you're prompted to restart the computer, choose Yes. The computer might restart more than once.
Alternatively, you can install Hyper-V using the Control Panel in Windows under Turn Windows features on or off for a client operating system, or using Server Manager's Add Roles and Features Wizard on a server operating system, as shown below:

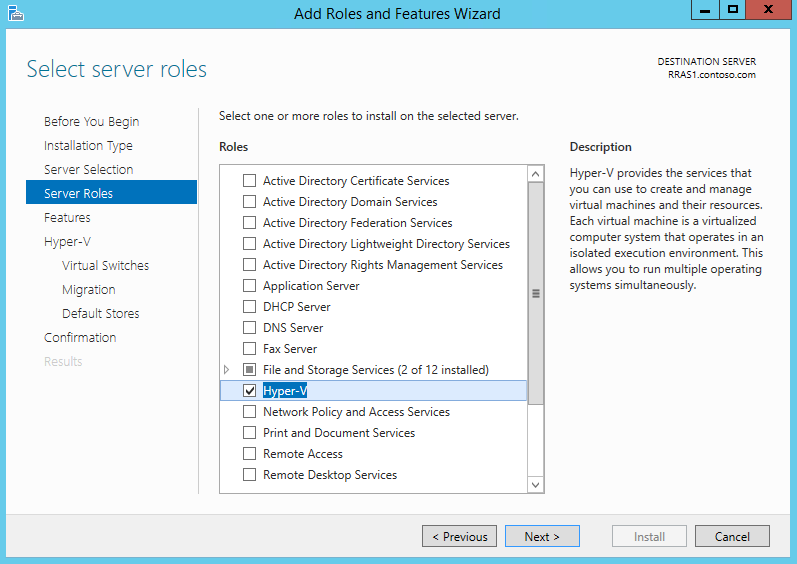
If you choose to install Hyper-V using Server Manager, accept all default selections. Make sure to install both items under Role Administration Tools\Hyper-V Management Tools.
After installation is complete, open Hyper-V Manager by typing virtmgmt.msc at an elevated command prompt, or by typing Hyper-V in the Start menu search box.
To read more about Hyper-V, see Introduction to Hyper-V on Windows 10 and Hyper-V on Windows Server.
Create a demo VM
Now that Hyper-V is enabled, we need to create a VM running Windows 10. We can create a VM and virtual network using Hyper-V Manager, but it's simpler to use Windows PowerShell.
To use Windows PowerShell, you need to know two things:
-
The location of the Windows 10 ISO file.
In the example, the location is c:\iso\win10-eval.iso.
-
The name of the network interface that connects to the internet.
In the example, you'll use a Windows PowerShell command to determine this information automatically.
After you determine the ISO file location and the name of the appropriate network interface, you can install Windows 10.
Set ISO file location
Download an ISO file for an evaluation version of the latest release of Windows 10 Enterprise from the Evaluation Center. Choose a 64-bit version.
After you download an ISO file, the name will be long. For example, 19042.508.200927-1902.20h2_release_svc_refresh_CLIENTENTERPRISEEVAL_OEMRET_x64FRE_en-us.iso
-
So that it's easier to type and remember, rename the file to win10-eval.iso.
-
Create a directory on your computer named c:\iso and move the win10-eval.iso file there, so the path to the file is c:\iso\win10-eval.iso.
-
If you wish to use a different name and location for the file, you must modify the Windows PowerShell commands below to use your custom name and directory.
Determine network adapter name
The Get-NetAdaper cmdlet is used to automatically find the network adapter that's most likely to be the one you use to connect to the internet. You should test this command first by running the following at an elevated Windows PowerShell prompt:
(Get-NetAdapter | Where-Object {$_.Status -eq "Up" -and !$_.Virtual}).Name
The output of this command should be the name of the network interface you use to connect to the internet. Verify that this interface name is correct. If it isn't the correct interface name, you'll need to edit the first command below to use your network interface name.
For example, if the command above displays Ethernet but you wish to use Ethernet2, then the first command below would be New-VMSwitch -Name AutopilotExternal -AllowManagementOS $true -NetAdapterName **Ethernet2
Use Windows PowerShell to create the demo VM
All VM data will be created under the current path in your PowerShell prompt. Consider navigating into a new folder before running the following commands.
Important
VM switch: a VM switch is how Hyper-V connects VMs to a network.
- If you previously enabled Hyper-V and your internet-connected network interface is already bound to a VM switch, then the PowerShell commands below will fail. In this case, you can either delete the existing VM switch (so that the commands below can create one), or you can reuse this VM switch by skipping the first command below and either modifying the second command to replace the switch name AutopilotExternal with the name of your switch, or by renaming your existing switch to
AutopilotExternal.- If you have never created an external VM switch before, then just run the commands below.
- If you're not sure if you already have an External VM switch, enter get-vmswitch at a Windows PowerShell prompt to display a current list of the VM switches that are provisioned in Hyper-V. If one of them is of SwitchType External, then you already have a VM switch configured on the server that's used to connect to the internet. In this case, you need to skip the first command below and modify the others to use the name of your VM switch instead of the name "AutopilotExternal" (or change the name of your switch).
New-VMSwitch -Name AutopilotExternal -AllowManagementOS $true -NetAdapterName (Get-NetAdapter | Where-Object {$_.Status -eq "Up" -and !$_.Virtual}).Name
New-VM -Name WindowsAutopilot -MemoryStartupBytes 4GB -BootDevice VHD -NewVHDPath .\VMs\WindowsAutopilot.vhdx -Path .\VMData -NewVHDSizeBytes 80GB -Generation 2 -Switch AutopilotExternal
Set-VMProcessor WindowsAutopilot -Count 2
Add-VMDvdDrive -Path c:\iso\win10-eval.iso -VMName WindowsAutopilot
Start-VM -VMName WindowsAutopilot
After you enter these commands, connect to this VM. Double-click the VM in Hyper-V Manager to connect to it. Then wait for a prompt to press a key and boot from the DVD.
See the sample output below. In this sample, the VM is created under the c:\autopilot directory and the vmconnect.exe command is used, which is only available on Windows Server. If you installed Hyper-V on Windows 10, use Hyper-V Manager to connect to your VM.
PS C:\autopilot> dir c:\iso


    Directory: C:\iso


Mode                LastWriteTime         Length Name
----                -------------         ------ ----
-a----        3/12/2019   2:46 PM     4627343360 win10-eval.iso

PS C:\autopilot> (Get-NetAdapter |?{$.Status -eq "Up" -and !$.Virtual}).Name
Ethernet
PS C:\autopilot> New-VMSwitch -Name AutopilotExternal -AllowManagementOS $true -NetAdapterName (Get-NetAdapter |?{$.Status -eq "Up" -and !$.Virtual}).Name

Name              SwitchType NetAdapterInterfaceDescription
----              ---------- ------------------------------
AutopilotExternal External   Intel(R) Ethernet Connection (2) I218-LM

PS C:\autopilot> New-VM -Name WindowsAutopilot -MemoryStartupBytes 2GB -BootDevice VHD -NewVHDPath .\VMs\WindowsAutopilot.vhdx -Path .\VMData -NewVHDSizeBytes 80GB -Generation 2 -Switch AutopilotExternal

Name             State CPUUsage(%) MemoryAssigned(M) Uptime   Status             Version
----             ----- ----------- ----------------- ------   ------             -------
WindowsAutopilot Off   0           0                 00:00:00 Operating normally 8.0

PS C:\autopilot> Add-VMDvdDrive -Path c:\iso\win10-eval.iso -VMName WindowsAutopilot
PS C:\autopilot> Start-VM -VMName WindowsAutopilot
PS C:\autopilot> vmconnect.exe localhost WindowsAutopilot
PS C:\autopilot> dir

    Directory: C:\autopilot

Mode                LastWriteTime         Length Name
----                -------------         ------ ----
d-----        3/12/2019   3:15 PM                VMData
d-----        3/12/2019   3:42 PM                VMs

PS C:\autopilot>
Install Windows 10
Note
The VM will be booted to gather a hardware ID. Then it will be reset. The goal in the next few steps is to get to the desktop quickly, so don't worry about how it's configured at this stage. The VM only needs to be connected to the internet.
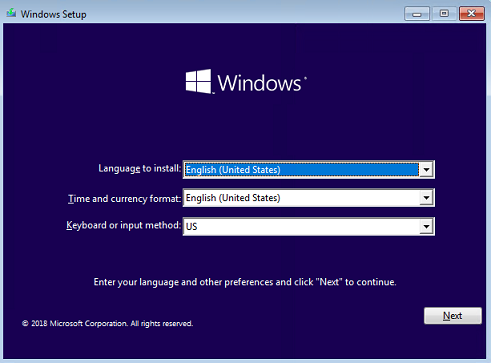
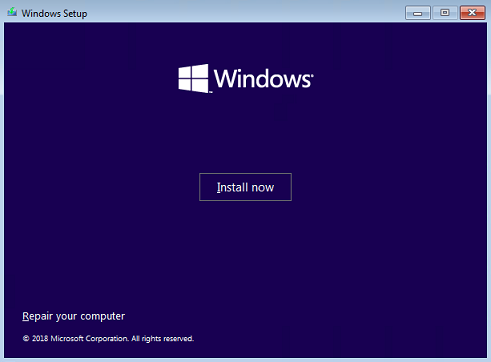
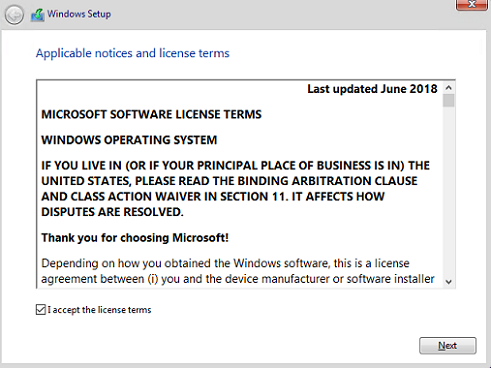
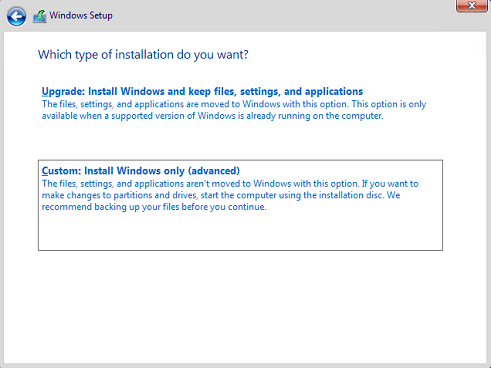
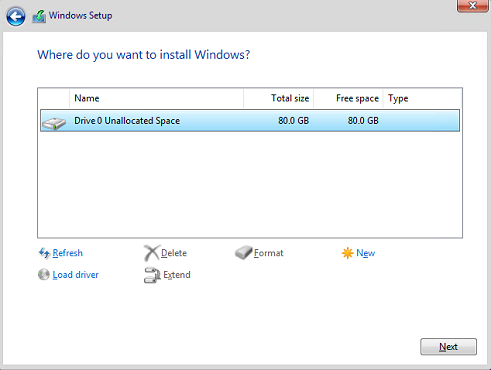
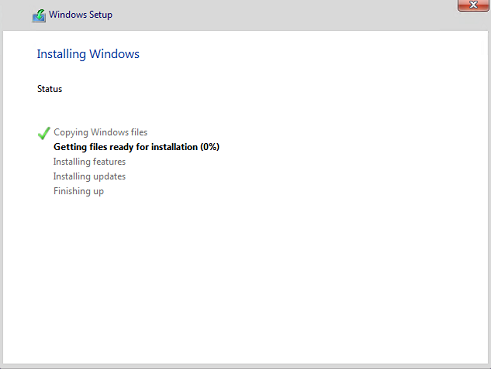
Make sure that the VM booted from the installation ISO, select Next, select Install now, and then complete the Windows installation process. See the following examples:
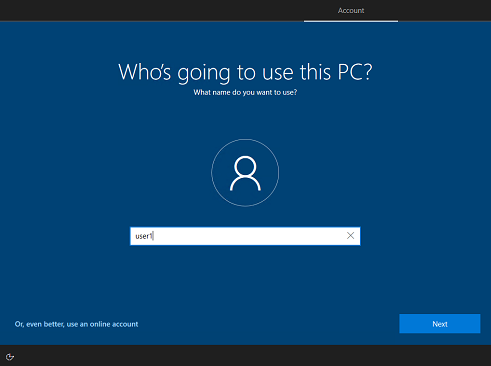
After the VM restarts, during OOBE, it's fine to select Set up for personal use or Domain join instead and then choose an offline account on the Sign in screen. This option offers the fastest way to the desktop. For example:
Once the installation is complete, sign in, and verify that you're at the Windows 10 desktop. Then create your first Hyper-V checkpoint. Checkpoints are used to restore the VM to a previous state.
[!div class="mx-imgBorder"]

To create a checkpoint, open an elevated Windows PowerShell prompt on the computer running Hyper-V (not on the VM), and then run the following command:
Checkpoint-VM -Name WindowsAutopilot -SnapshotName "Finished Windows install"
Select the WindowsAutopilot VM in Hyper-V Manager and verify that you see Finished Windows Install listed in the Checkpoints pane.
Capture the hardware ID
Note
Normally, the Device ID is captured by the OEM as they run the OA3 Tool on each device in the factory. The OEM then submits the 4K HH created by the OA3 Tool to Microsoft by submitting it with a Computer Build Report (CBR). For the purposes of this lab, you're acting as the OEM (capturing the 4K HH), but you're not going to use the OA3 Tool to capture the full 4K HH for various reasons (you'd have to install the OA3 tool, your device couldn't have a volume license version of Windows, it's a more complicated process than using a PowerShell script, etc.). Instead, you'll simulate running the OA3 tool by running a PowerShell script, which captures the device 4K HH just like the OA3 tool.
Follow these steps to run the PowerShell script:
-
On the client VM: Open an elevated Windows PowerShell prompt and run the following commands. These commands are the same whether you're using a VM or a physical device:
New-Item -Type Directory -Path "C:\HWID" Set-Location C:\HWID Set-ExecutionPolicy -Scope Process -ExecutionPolicy RemoteSigned Install-Script -Name Get-WindowsAutopilotInfo -Force $env:Path += ";C:\Program Files\WindowsPowerShell\Scripts" Get-WindowsAutopilotInfo -OutputFile AutopilotHWID.csv -
When you're prompted to install the NuGet package, choose Yes.
See the sample output below. A dir command is issued at the end to show the file that was created.
PS C:\> md c:\HWID Directory: C:\ Mode LastWriteTime Length Name ---- ------------- ------ ---- d----- 11/13/2020 3:00 PM HWID PS C:\Windows\system32> Set-Location c:\HWID PS C:\HWID> Set-ExecutionPolicy -Scope Process -ExecutionPolicy Unrestricted -Force PS C:\HWID> Install-Script -Name Get-WindowsAutopilotInfo -Force NuGet provider is required to continue PowerShellGet requires NuGet provider version '2.8.5.201' or newer to interact with NuGet-based repositories. The NuGet provider must be available in 'C:\Program Files\PackageManagement\ProviderAssemblies' or 'C:\Users\user1\AppData\Local\PackageManagement\ProviderAssemblies'. You can also install the NuGet provider by running 'Install-PackageProvider -Name NuGet -MinimumVersion 2.8.5.201 -Force'. Do you want PowerShellGet to install and import the NuGet provider now? [Y] Yes [N] No [S] Suspend [?] Help (default is "Y"): Y PS C:\HWID> $env:Path += ";C:\Program Files\WindowsPowerShell\Scripts" PS C:\HWID> Get-WindowsAutopilotInfo.ps1 -OutputFile AutopilotHWID.csv Gathered details for device with serial number: 1804-7078-6805-7405-0796-0675-17 PS C:\HWID> dir Directory: C:\HWID Mode LastWriteTime Length Name ---- ------------- ------ ---- -a---- 11/13/2020 3:01 PM 8184 AutopilotHWID.csv PS C:\HWID> -
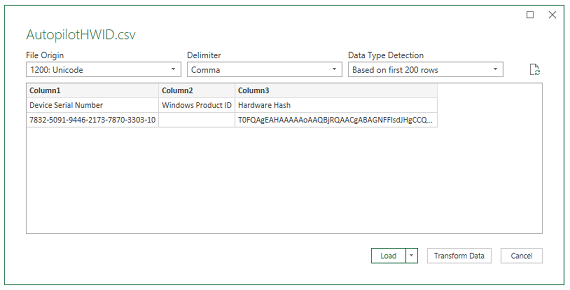
Verify that there's an AutopilotHWID.csv file in the c:\HWID directory that's about 8 KB in size. This file contains the complete 4K HH.
Note
Although the .csv extension might be associated with Microsoft Excel, you cannot view the file properly by double-clicking it. To correctly parse the comma delimiters and view the file in Excel, you must use the Data > From Text/CSV function in Excel to import the appropriate data columns. You don't need to view the file in Excel unless you're curious. The file format is validated when it's imported into Autopilot. Here's an example of the data in this file:
You'll need to upload this data into Intune to register your device for Autopilot. So, the next step is to transfer this file to the computer you'll use to access the Azure portal. If you're using a physical device instead of a VM, you can copy the file to a USB drive. If you're using a VM, you can right-click the AutopilotHWID.csv file and copy it. Then right-click and paste the file to your desktop (outside the VM).
If you have trouble copying and pasting the file, just view the contents in Notepad on the VM, and then copy the text into Notepad outside the VM. Don't use another text editor.
Note
When copying and pasting to or from VMs, avoid selecting other things with your mouse cursor in between the copy and paste process. Doing so can empty or overwrite the clipboard and require that you start over. Go directly from copy to paste.
Reset the VM back to Out-Of-Box-Experience (OOBE)
With the hardware ID captured in a file, prepare your VM for Windows Autopilot deployment by resetting it back to OOBE.
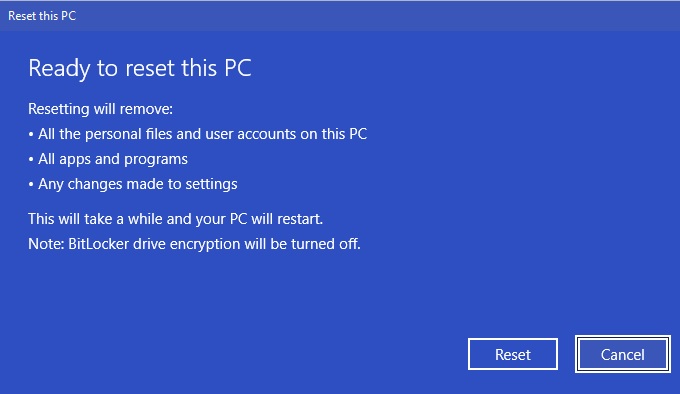
- On the Virtual Machine, go to Settings > Update & Security > Recovery and select Get started under Reset this PC.
- Select Remove everything. On How would you like to reinstall Windows, select Local reinstall.
- Finally, select Reset.
Resetting the VM or device can take a while. Proceed to the next step (verify subscription level) during the reset process.

Verify subscription level
For this lab, you need an Azure AD Premium subscription. To tell if you have a Premium subscription, go to MDM enrollment configuration in the Azure portal. See the following example:
Azure Active Directory > Mobility (MDM and MAM) > Microsoft Intune

If this configuration doesn't appear, it's likely that you don't have a Premium subscription. Auto-enrollment is a feature only available in Azure AD Premium.
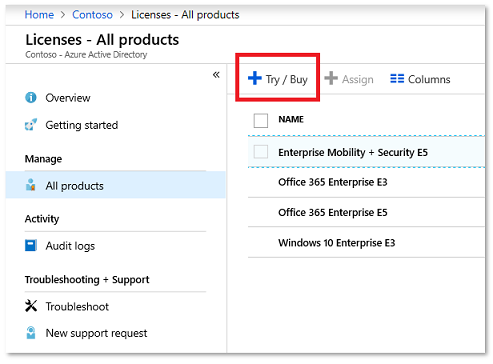
To convert your Intune trial account to a free Premium trial account, go to Azure Active Directory > Licenses > All products > Try / Buy and select Free trial for Azure AD Premium, or EMS E5.
Configure company branding
If you already have company branding configured in Azure AD, you can skip this step.
Important
Make sure to sign-in with a Global Administrator account.
Go to Company branding in Azure Active Directory, select Configure, and then configure any type of company branding you'd like to see during the OOBE.
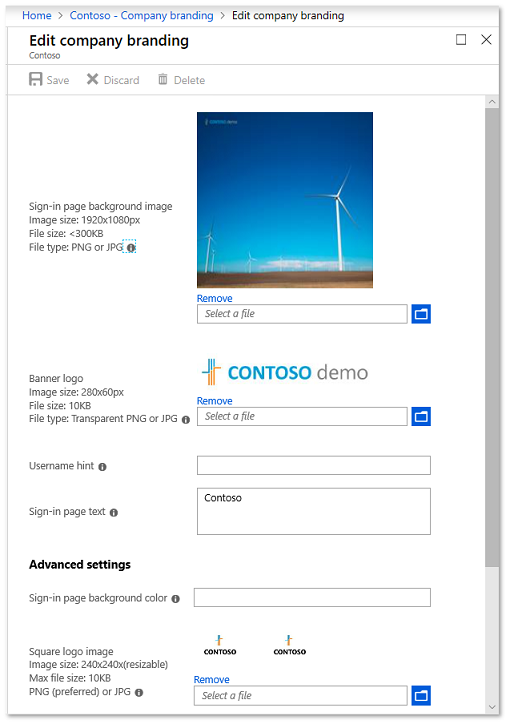
When you're finished, select Save.
Note
Changes to company branding can take up to 30 minutes to apply.
Configure Microsoft Intune auto-enrollment
If you already have MDM auto-enrollment configured in Azure AD, you can skip this step.
Open Mobility (MDM and MAM) in Azure Active Directory and select Microsoft Intune. If you don't see Microsoft Intune, select Add application and choose Intune.
For the purposes of this demo, select All under the MDM user scope and select Save.

Register your VM
Your VM (or device) can be registered either via Intune or Microsoft Store for Business (MSfB). Both processes are shown here, but only pick one for the purposes of this lab. It's highly recommended that you use Intune rather than Microsoft Store for Business.
Autopilot registration using Intune
-
In the Microsoft Endpoint Manager admin center, choose Devices > Device enrollment | Enroll devices > Windows enrollment > Windows Autopilot Deployment Program | Devices and then on the Windows Autopilot devices page, choose Import.
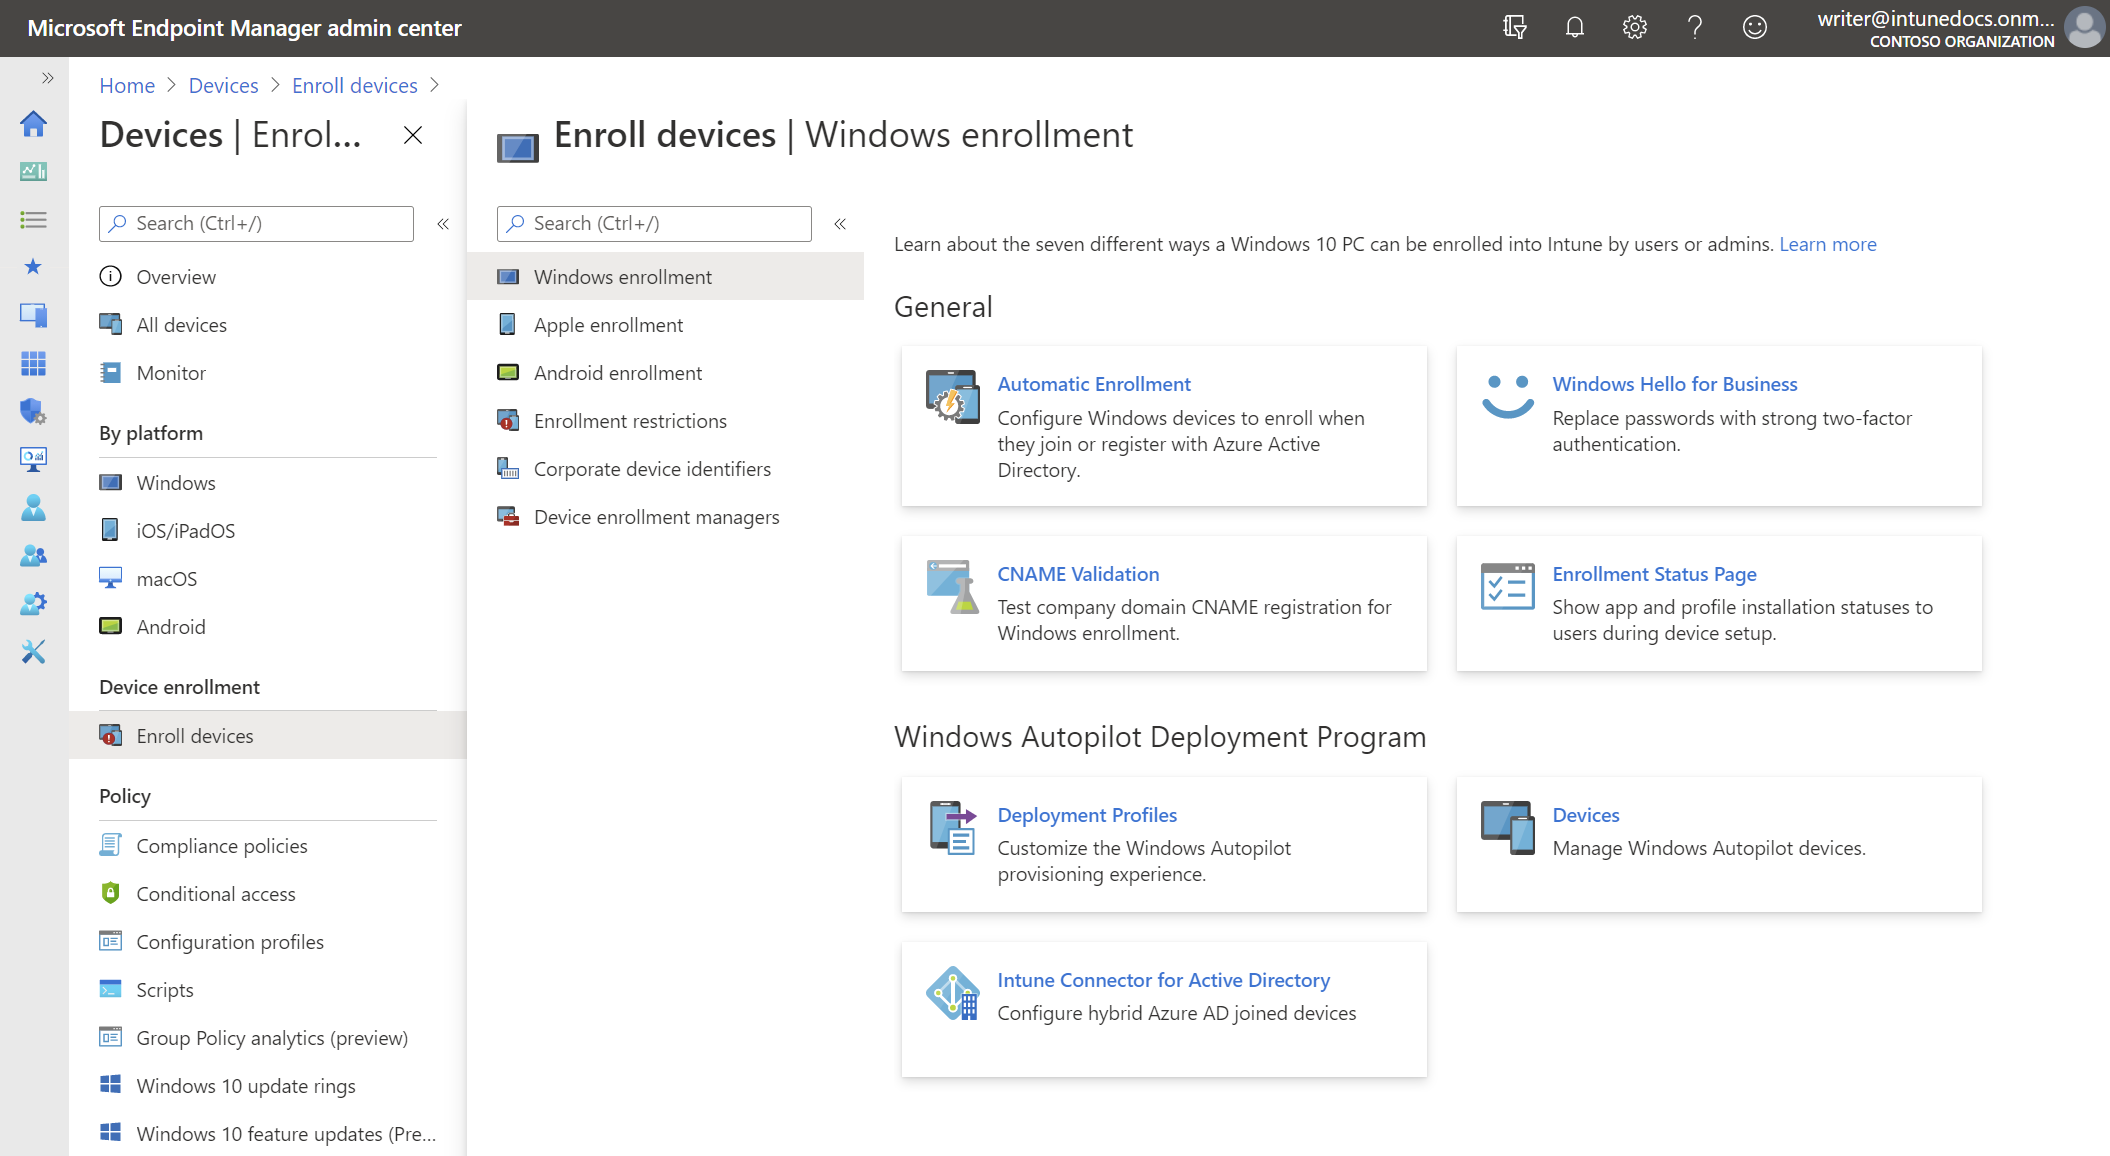
Note
If menu items like Windows enrollment aren't active for you, look to the far-right blade in the UI. You might need to provide Intune configuration privileges in a challenge window that appears.
-
Under Add Windows Autopilot devices in the far-right pane, go to the AutopilotHWID.csv file you previously copied to your local computer. The file should contain the serial number and 4K HH of your VM (or device). It's okay if other fields (Windows Product ID) are left blank.
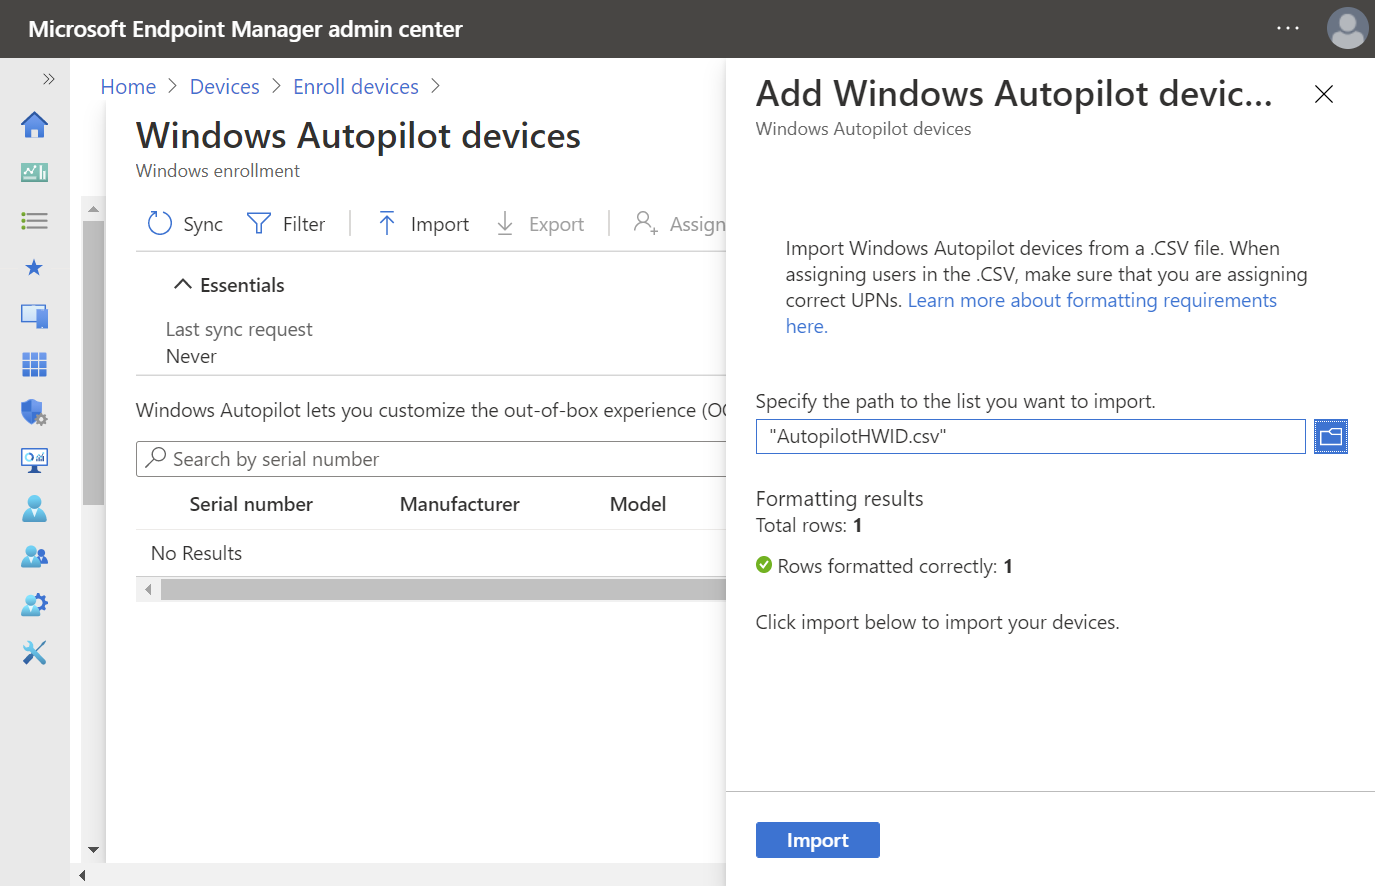
You should receive confirmation that the file is formatted correctly before you upload it, as shown above.
-
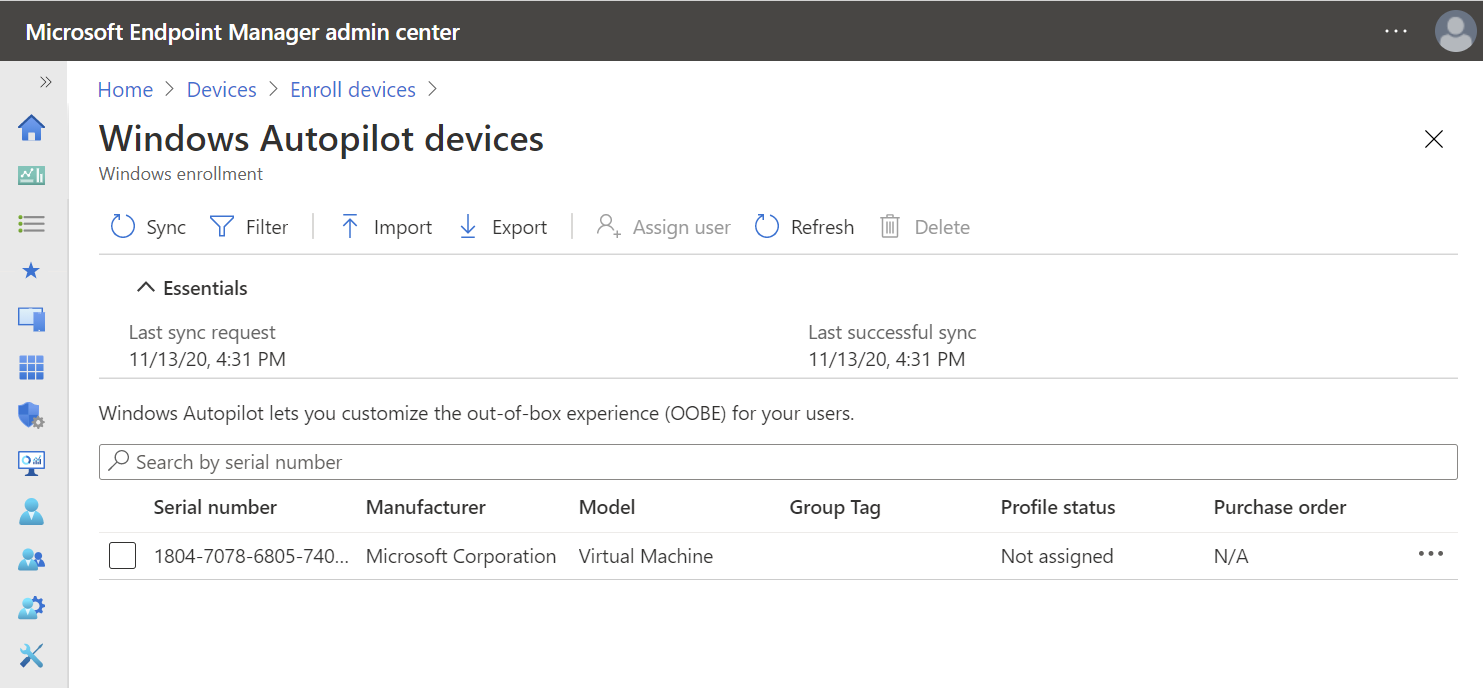
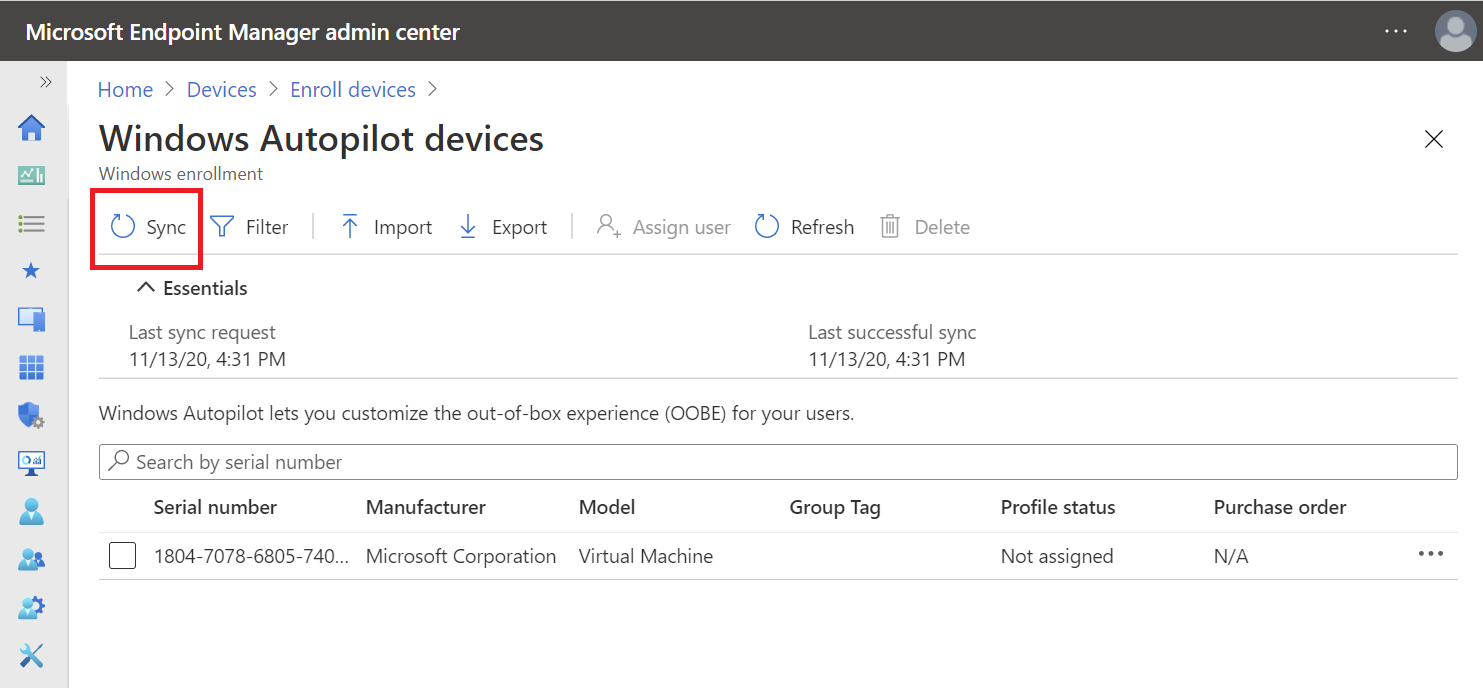
Select Import and wait until the import process completes. This action can take up to 15 minutes.
-
Select Refresh to verify your VM or device is added. See the following example.
Autopilot registration using MSfB
Important
If you've already registered your VM (or device) using Intune, then skip this step.
First, you need a Microsoft Store for Business account. You can use the same one you created above for Intune, or follow these instructions to create a new one.
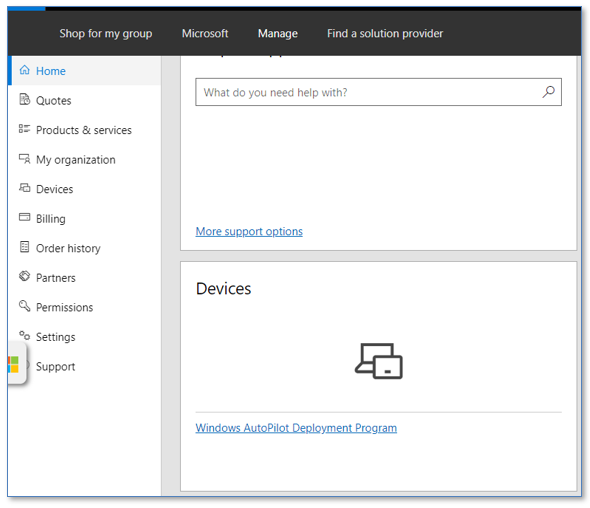
Next, to sign in to Microsoft Store for Business with your test account, select Sign in on the upper-right-corner of the main page.
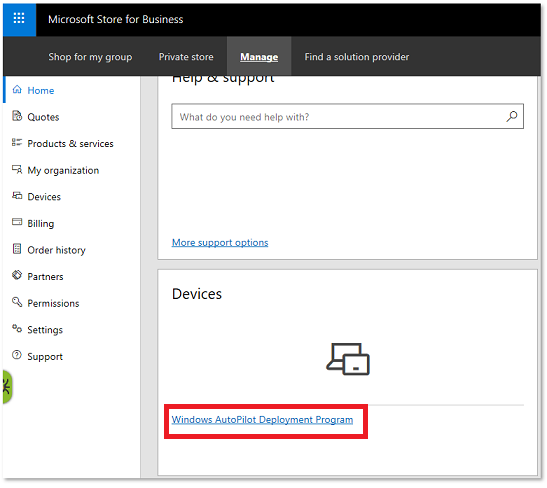
Select Manage from the top menu, then select the Windows Autopilot Deployment Program link under the Devices card. See the following example:
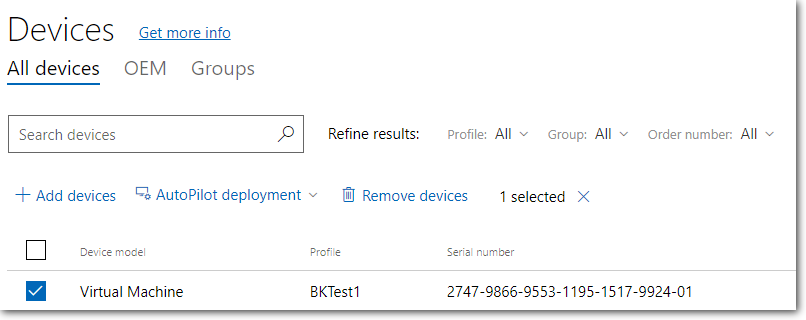
Select the Add devices link to upload your CSV file. A message appears that indicates your request is being processed. Wait a few moments before refreshing to see that your new device is added.

Create and assign a Windows Autopilot deployment profile
Important
Autopilot profiles can be created and assigned to your registered VM or device either through Intune or Microsoft Store for Business. Both processes are shown here, but only pick one for the purposes of this lab:
Pick one:
Create a Windows Autopilot deployment profile using Intune
Note
Even if you registered your device in Microsoft Store for Business, it still appears in Intune. Although, you might have to sync and then refresh your device list.
Create a device group
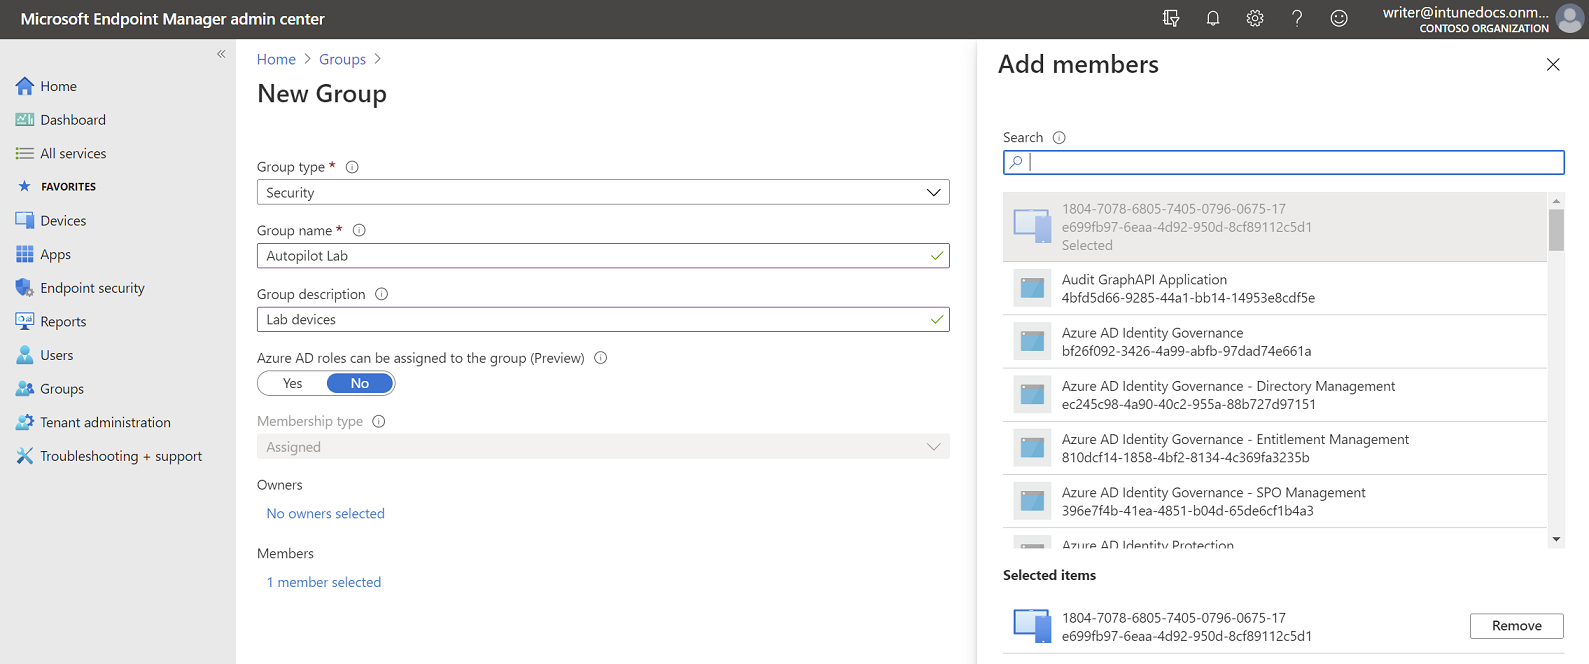
The Autopilot deployment profile wizard asks for a device group, so you must create one first. To create a device group:
-
In the Microsoft Endpoint Manager admin center, choose Groups > New group.
-
In the Group pane:
- For Group type, choose Security.
- Type a Group name and Group description (ex: Autopilot Lab).
- Azure AD roles can be assigned to the group: No
- For Membership type, choose Assigned.
-
Select Members and add the Autopilot VM to the group. See the following example:
[!div class="mx-imgBorder"]
-
Select Create.
Create the deployment profile
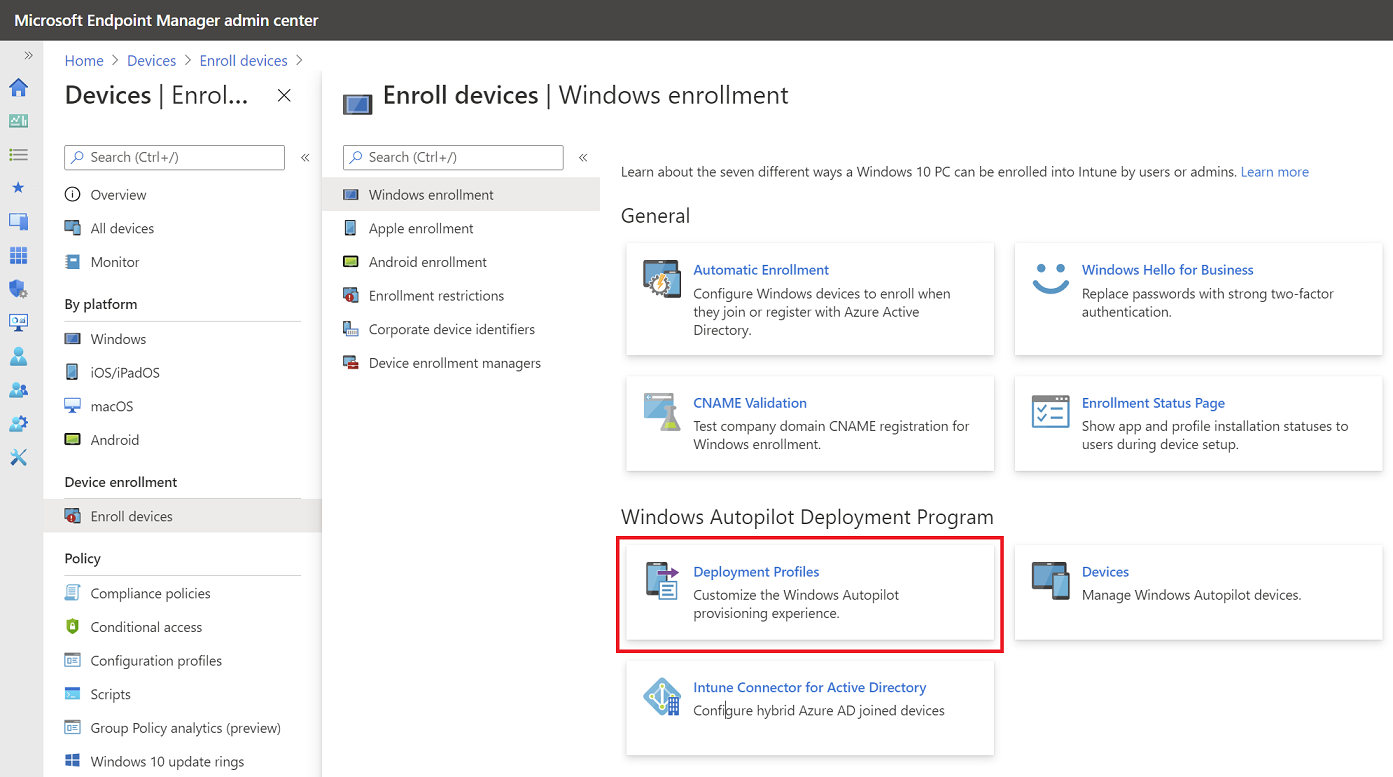
To create a Windows Autopilot profile, scroll back to the left-side pane and select Devices. Then, under Enroll devices | Windows enrollment select Deployment Profiles.
[!div class="mx-imgBorder"]
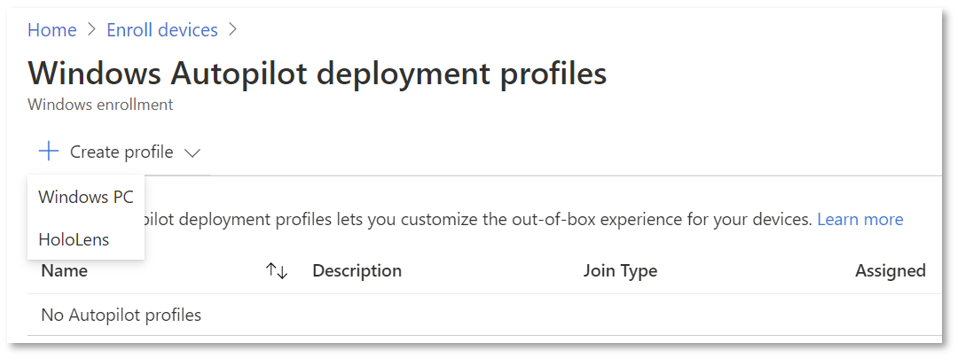
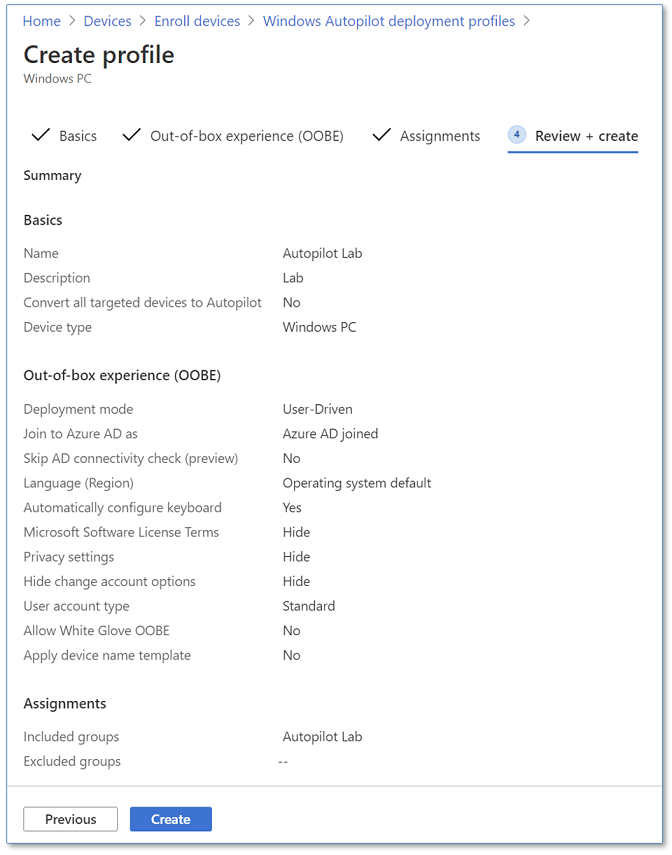
Select Create profile and then select Windows PC.
[!div class="mx-imgBorder"]
On the Create profile pane, use the following values:
| Setting | Value |
|---|---|
| Name | Autopilot Lab profile |
| Description | Lab |
| Convert all targeted devices to Autopilot | No |
Select Next to continue with the Out-of-box experience (OOBE) settings:
| Setting | Value |
|---|---|
| Deployment mode | User-driven |
| Join to Azure AD as | Azure AD joined |
| Microsoft Software License Terms | Hide |
| Privacy Settings | Hide |
| Hide change account options | Hide |
| User account type | Standard |
| Allow pre-provisioned deployment | No |
| Language (Region) | Operating system default |
| Automatically configure keyboard | Yes |
| Apply device name template | No |
Select Next to continue with the Assignments settings:
| Setting | Value |
|---|---|
| Assign to | Selected groups |
- Select Select groups to include.
- Select the Autopilot Lab group, and then choose Select.
- Select Next to continue, and then select Create. See the following example:
Select OK, and then select Create.
Note
If you want to add an app to your profile via Intune, use the optional steps in Appendix B: Adding apps to your profile.
Create a Windows Autopilot deployment profile using MSfB
If you already created and assigned a profile via Intune with the steps immediately above, then skip this section.
First, sign in to the Microsoft Store for Business using the Intune account you initially created for this lab.
Select Manage from the top menu, then select Devices from the left navigation tree.
Select the Windows Autopilot Deployment Program link in the Devices tile.
To CREATE the profile:
Select your device from the Devices list:
[!div class="mx-imgBorder"]
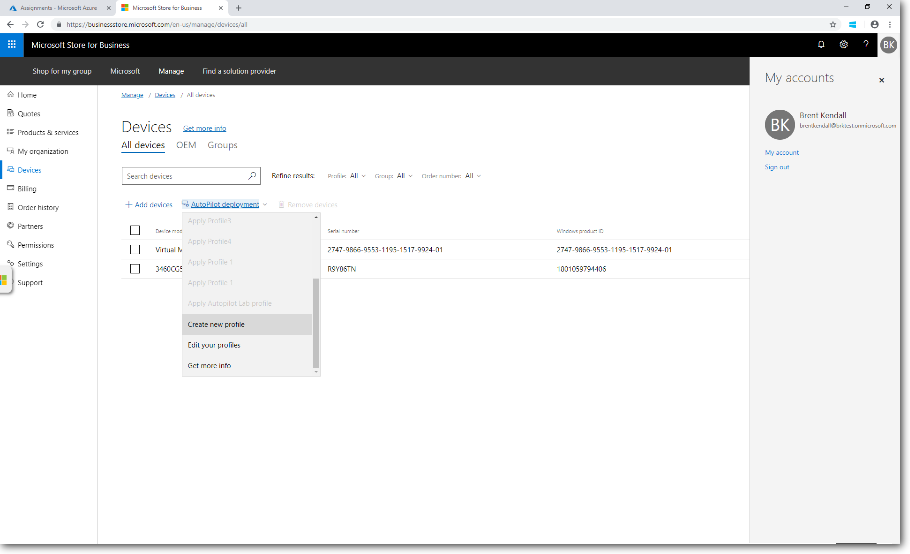
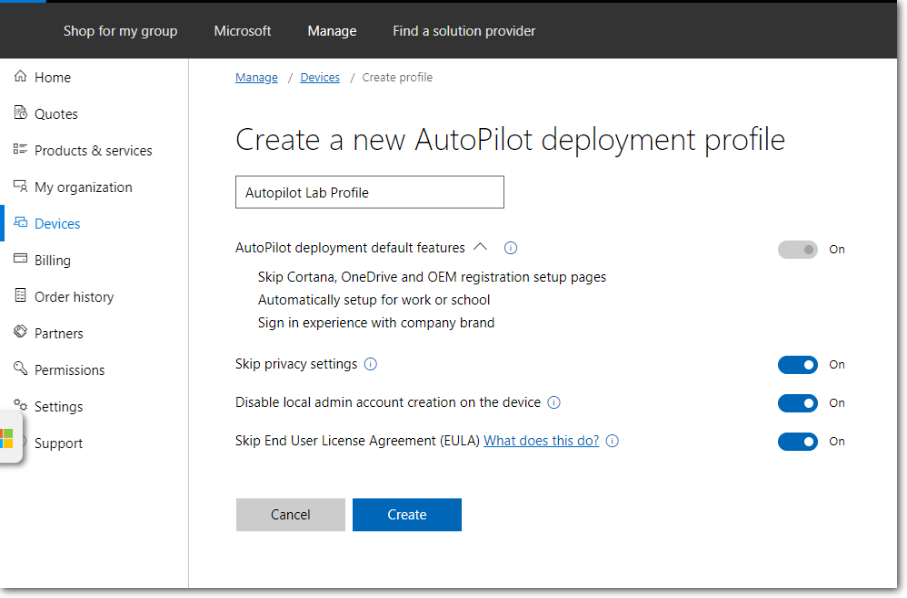
On the Autopilot deployment dropdown menu, select Create new profile:
[!div class="mx-imgBorder"]
Name the profile, choose your desired settings, and then select Create:
[!div class="mx-imgBorder"]
The new profile is added to the Autopilot deployment list.
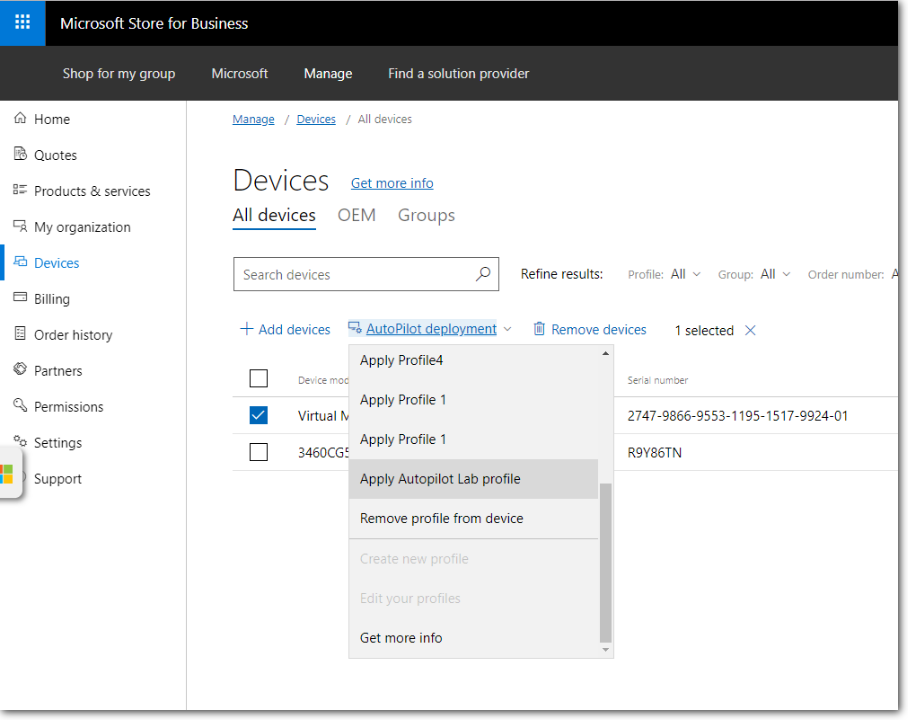
To ASSIGN the profile:
To assign (or reassign) the profile to a device, select the checkboxes next to the device you registered for this lab. Then, select the profile you want to assign from the Autopilot deployment dropdown menu, as shown:
[!div class="mx-imgBorder"]
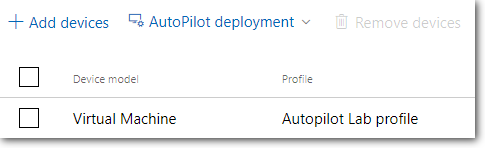
To confirm the profile was successfully assigned to the intended device, check the contents of the Profile column:
[!div class="mx-imgBorder"]
Important
The new profile is only applied if the device hasn't started and gone through OOBE. Settings from a different profile can't be applied when another profile has been applied. Windows would need to be reinstalled on the device for the second profile to be applied to the device.
See Windows Autopilot in action
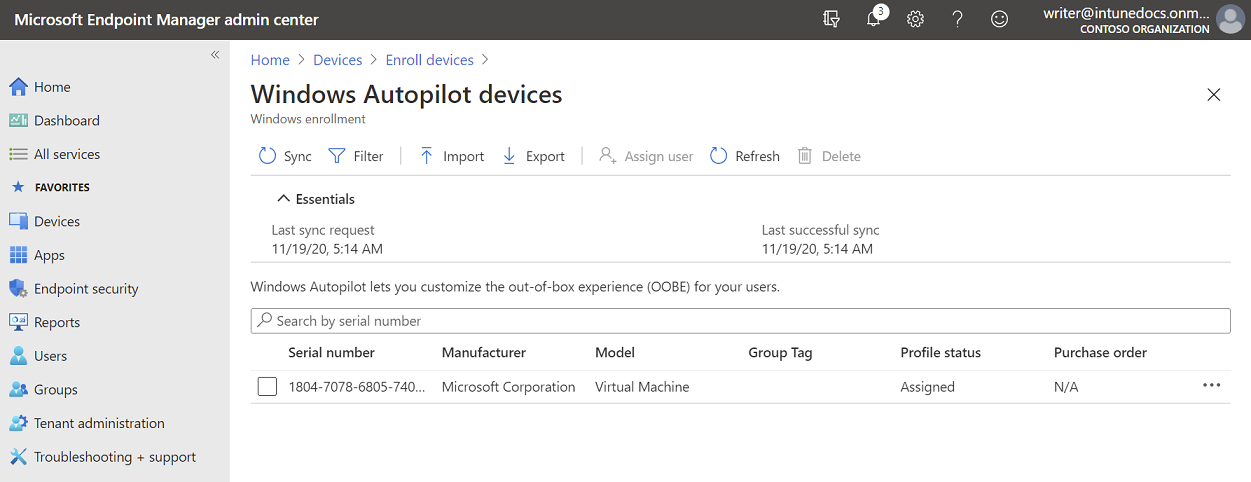
If you shut down your VM after the last reset, start it again. Then it can progress through the Autopilot OOBE experience. However, don't attempt to start your device again until the PROFILE STATUS for your device in Intune is changed from Not assigned to Assigning, and finally to Assigned:
[!div class="mx-imgBorder"]
Also, make sure to wait at least 30 minutes from the time you've configured company branding. Otherwise, these changes might not show up.
Tip
If you reset your device previously, after collecting the 4K HH info, let it restart back to the first OOBE screen. Then you might need to restart the device again to make sure the device is recognized as an Autopilot device and displays the Autopilot OOBE experience you're expecting. If you don't see the Autopilot OOBE experience, then reset the device again (Settings > Update & Security > Recovery and select Get started. Under Reset this PC, select Remove everything and Just remove my files. Select Reset).
- Make sure your device has an internet connection.
- Turn on the device.
- Verify that the appropriate OOBE screens (with appropriate Company Branding) appear. You should see the region selection screen, the keyboard selection screen, and the second keyboard selection screen (which you can skip).
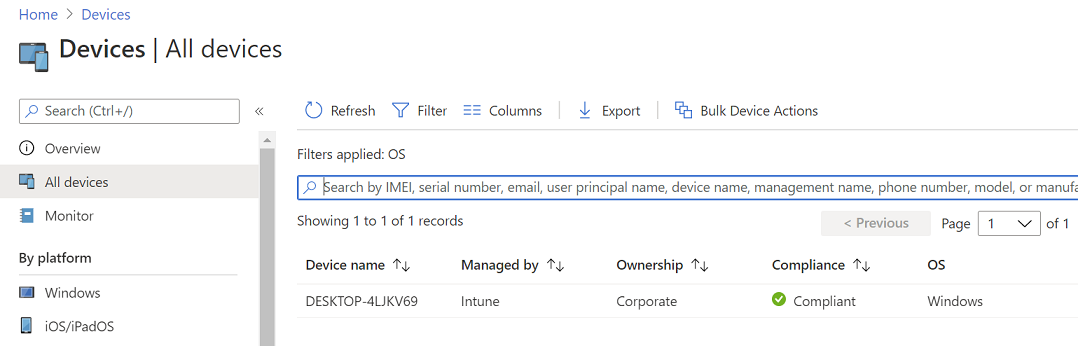
After the device loads the desktop, the device should show up in Intune as an enabled Autopilot device. Go to the Intune portal, and select Devices > All devices. Then Refresh the data to verify that your device has changed to an enabled state, and the name of the device is updated.
[!div class="mx-imgBorder"]
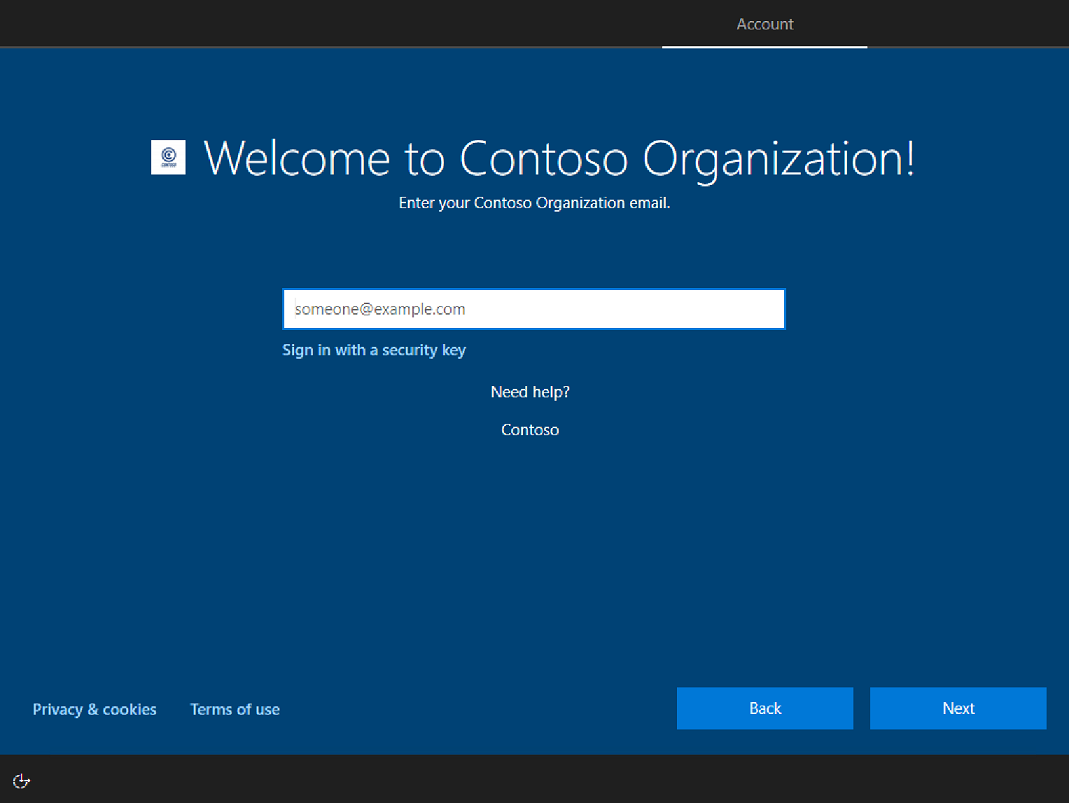
Once you select a language and a keyboard layout, your company branded sign-in screen should appear. Provide your Azure AD credentials. Then you're all done.
Tip
If you receive a message that "Something went wrong" and it "Looks like we can't connect to the URL for your organization's MDM terms of use", verify that you correctly assigned licenses to the current user.
Windows Autopilot takes over to automatically join your device into Azure AD and enroll it into Microsoft Intune. Use the checkpoint you've created to go through this process again with different settings.
Remove devices from Autopilot
To use the device (or VM) for other purposes after completion of this lab, you need to remove (deregister) it from Autopilot via either Intune or Microsoft Store for Business, and then reset it. Instructions for deregistering devices can be found at Enroll Windows devices in Intune by using Windows Autopilot, Remove devices by using wipe, retire, or manually unenrolling the device, and below.
Delete (deregister) Autopilot device
You need to delete (or retire, or factory reset) the device from Intune before deregistering the device from Autopilot. To delete the device from Intune (not Azure AD), sign into the Endpoint Manager admin center, then go to Devices > All Devices. Select the device you want to delete, then select the Delete button along the top menu.
[!div class="mx-imgBorder"]

This action removes the device from Intune management, and it will disappear from Intune > Devices > All devices. But this action doesn't yet deregister the device from Autopilot. So, the device should still appear under Intune > Device Enrollment > Windows Enrollment > Windows Autopilot Deployment Program > Devices.
The Intune > Devices > All Devices list and the Intune > Device Enrollment > Windows Enrollment > Windows Autopilot Deployment Program > Devices list mean different things and are two separate datastores. The former (All devices) is the list of devices currently enrolled into Intune.
Note
A device only appears in the All devices list once it has booted. The latter (Windows Autopilot Deployment Program > Devices) is the list of devices currently registered from that Intune account into the Autopilot program - which may or may not be enrolled to Intune.
To remove the device from the Autopilot program, select the device, and then select Delete. A pop-up dialog box appears to confirm deletion.
[!div class="mx-imgBorder"]
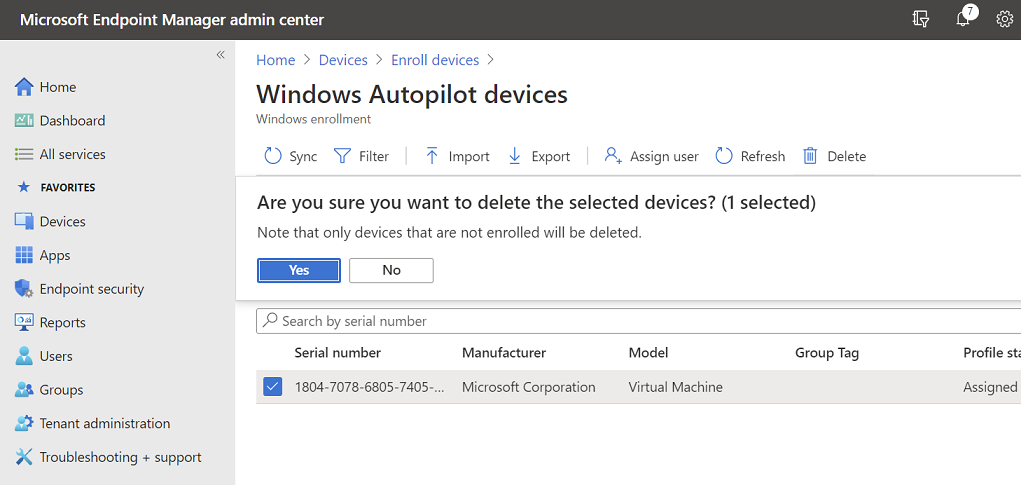
At this point, your device is unenrolled from Intune and also deregistered from Autopilot. After several minutes, select the Sync button, followed by the Refresh button to confirm the device is no longer listed in the Autopilot program.
Once the device no longer appears, you're free to reuse it for other purposes.
If you also (optionally) want to remove your device from Azure AD, go to Azure Active Directory > Devices > All Devices, select your device, and then select the Delete button:
Appendix A: Verify support for Hyper-V
Starting with Windows 8, the host computer's microprocessor must support second level address translation (SLAT) to install Hyper-V. See Hyper-V: List of SLAT-Capable CPUs for Hosts for more information.
To verify your computer supports SLAT, open an administrator command prompt, type systeminfo, press ENTER, scroll down, and review the section displayed at the bottom of the output, next to Hyper-V Requirements. See the following example:
C:>systeminfo

...
Hyper-V Requirements:      VM Monitor Mode Extensions: Yes
                           Virtualization Enabled In Firmware: Yes
                           Second Level Address Translation: Yes
                           Data Execution Prevention Available: Yes
In this example, the computer supports SLAT and Hyper-V.
Note
If one or more requirements are evaluated as No then the computer doesn't support installing Hyper-V. However, if only the virtualization setting is incompatible, you might be able to enable virtualization in the BIOS and change the Virtualization Enabled In Firmware setting from No to Yes. The location of this setting depends on the manufacturer and BIOS version, but is typically found associated with the BIOS security settings.
You can also identify Hyper-V support using tools provided by the processor manufacturer, the msinfo32 tool, or you can download the Coreinfo utility and run it, as shown in the following example:
C:>coreinfo -v

Coreinfo v3.31 - Dump information on system CPU and memory topology
Copyright (C) 2008-2014 Mark Russinovich
Sysinternals - www.sysinternals.com

Intel(R) Core(TM) i7-2600 CPU @ 3.40GHz
Intel64 Family 6 Model 42 Stepping 7, GenuineIntel
Microcode signature: 0000001B
HYPERVISOR      -       Hypervisor is present
VMX             *       Supports Intel hardware-assisted virtualization
EPT             *       Supports Intel extended page tables (SLAT)
Note
A 64-bit operating system is required to run Hyper-V.
Appendix B: Adding apps to your profile
Add a Win32 app
Prepare the app for Intune
Before you can pull an application into Intune to make it part of your AP profile, you need to "package" the application for delivery using the IntuneWinAppUtil.exe command-line tool. After downloading the tool, gather the following information to use the tool:
- The source folder for your application
- The name of the setup executable file
- The output folder for the new file
For the purposes of this lab, we'll use the Notepad++ tool as the Win32 app.
Download the Notepad++ msi package, and then copy the file to a known location, such as C:\Notepad++msi.
Run the IntuneWinAppUtil tool, supplying answers to the three questions, for example:
[!div class="mx-imgBorder"]

After the tool finishes running, you should have an .intunewin file in the Output folder. You can upload the file into Intune by using the following steps.
Create app in Intune
Sign in to the Azure portal, and then select Intune.
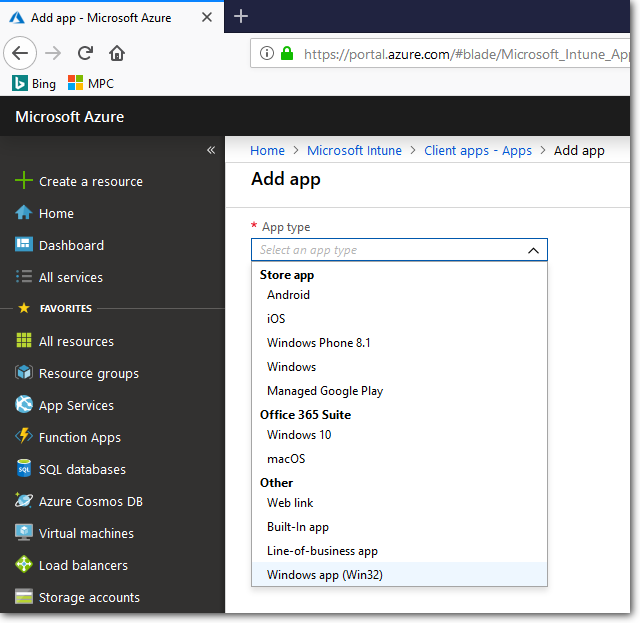
Go to Intune > Clients apps > Apps, and then select the Add button to create a new app package.

Under App Type, select Windows app (Win32):
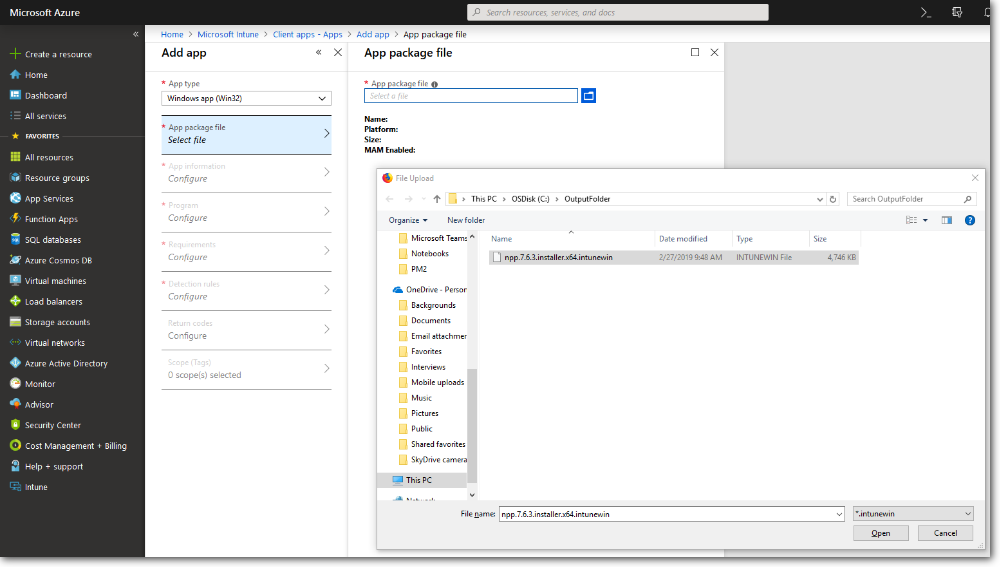
On the App package file pane, browse to the npp.7.6.3.installer.x64.intunewin file in your output folder, open it, then select OK:
[!div class="mx-imgBorder"]
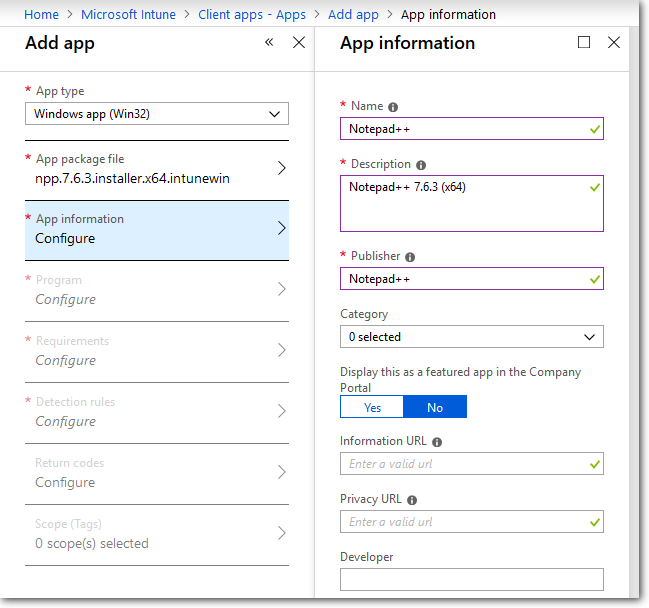
On the App Information Configure pane, provide a friendly name, description, and publisher, such as:
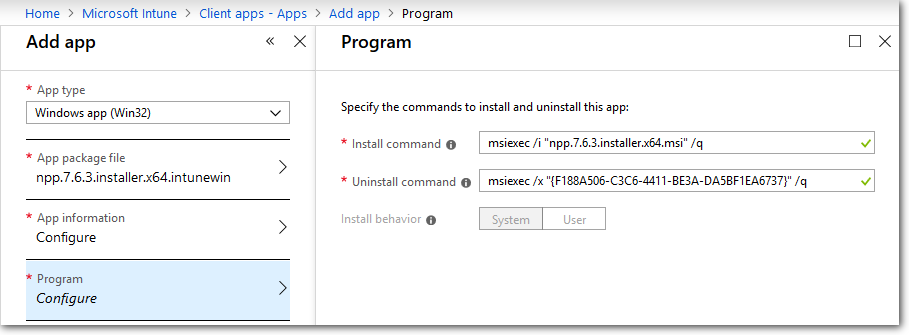
On the Program Configuration pane, supply the install and uninstall commands:
Install:  msiexec /i "npp.7.6.3.installer.x64.msi" /q
Uninstall:  msiexec /x "{F188A506-C3C6-4411-BE3A-DA5BF1EA6737}" /q
Note
Likely, you don't have to write the install and uninstall commands yourself because the IntuneWinAppUtil.exe command-line tool automatically generated them when it converted the .msi file into a .intunewin file.
Simply using an install command like notepad++.exe /S doesn't actually install Notepad++. It only launches the app. To install the program, you need to use the .msi file instead. Notepad++ doesn't have an MSI version of their program, but there's an MSI version from a third party provider.
Select OK to save your input and activate the Requirements pane.
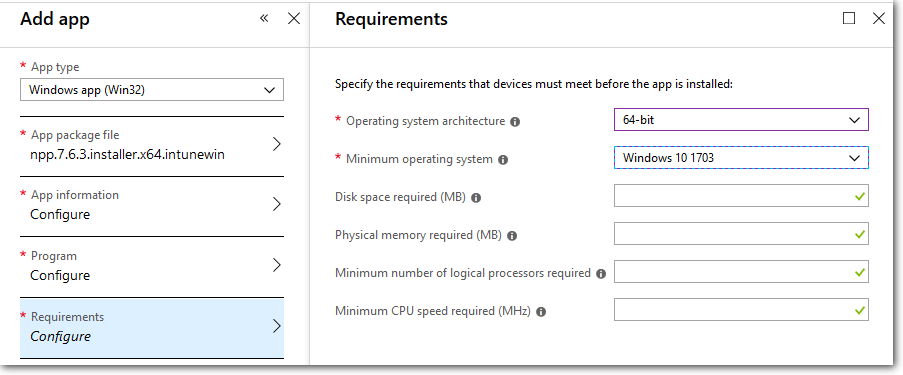
On the Requirements Configuration pane, specify the OS architecture and the Minimum OS version:
[!div class="mx-imgBorder"]
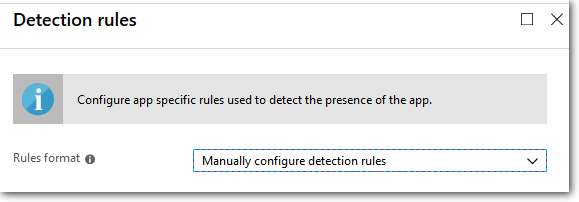
Next, configure the Detection rules. For the purposes of this lab, select manual format:
[!div class="mx-imgBorder"]
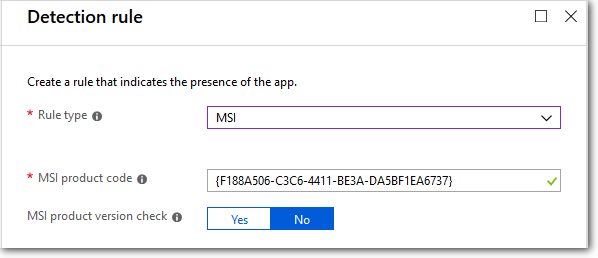
Select Add to define the rule properties. For Rule type, select MSI, which automatically imports the correct MSI product code into the rule:
Select OK twice to save, as you back out to the main Add app pane again for the final configuration.
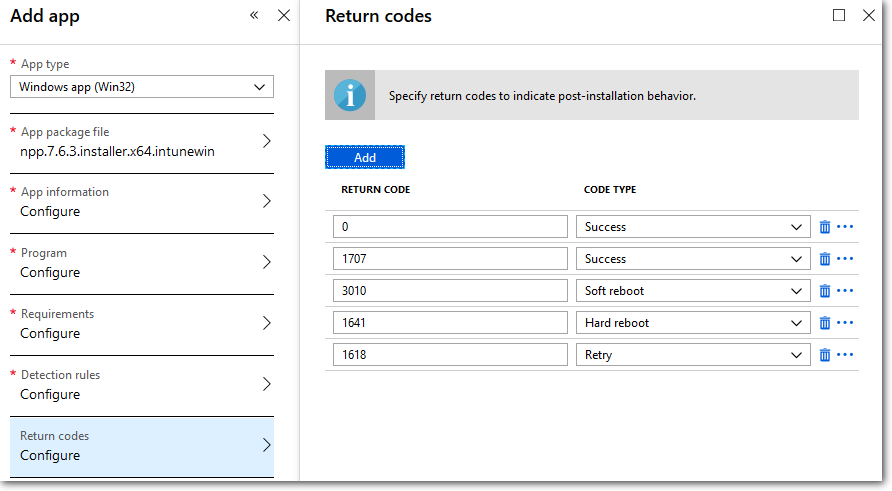
Return codes: For the purposes of this lab, leave the return codes at their default values:
[!div class="mx-imgBorder"]
Select OK to exit.
You can skip configuring the final Scope (Tags) pane.
Select the Add button to finalize and save your app package.
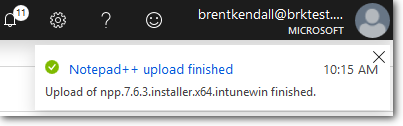
Wait for indicator message that says the addition has completed.
[!div class="mx-imgBorder"]
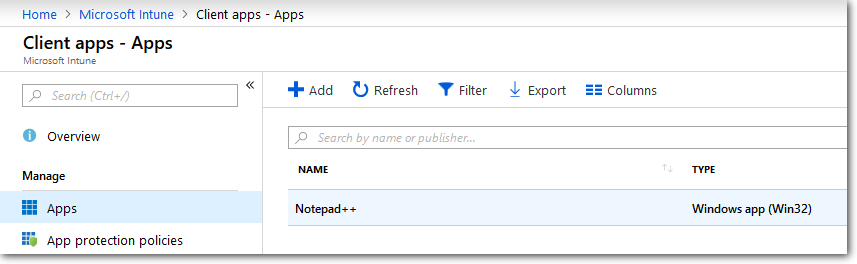
Find your app in your app list:
[!div class="mx-imgBorder"]
Assign the app to your Intune profile
Note
The following steps only work if you previously created a GROUP in Intune and assigned a profile to it. If you haven't done that, return to the main part of the lab and complete those steps before returning here.
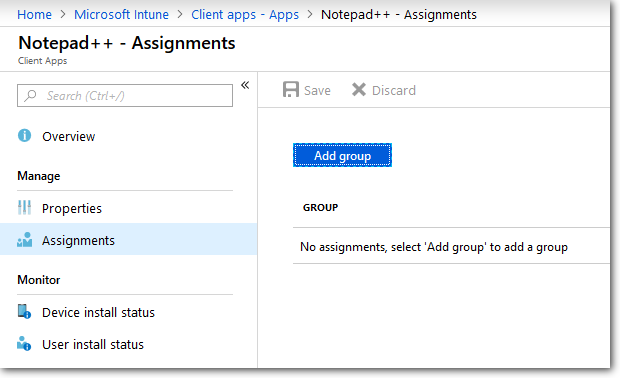
In the Intune > Client Apps > Apps pane, select the app package you already created to reveal its properties pane. Then select Assignments from the menu:
[!div class="mx-imgBorder"]

Select Add Group to open the Add group pane that's related to the app.
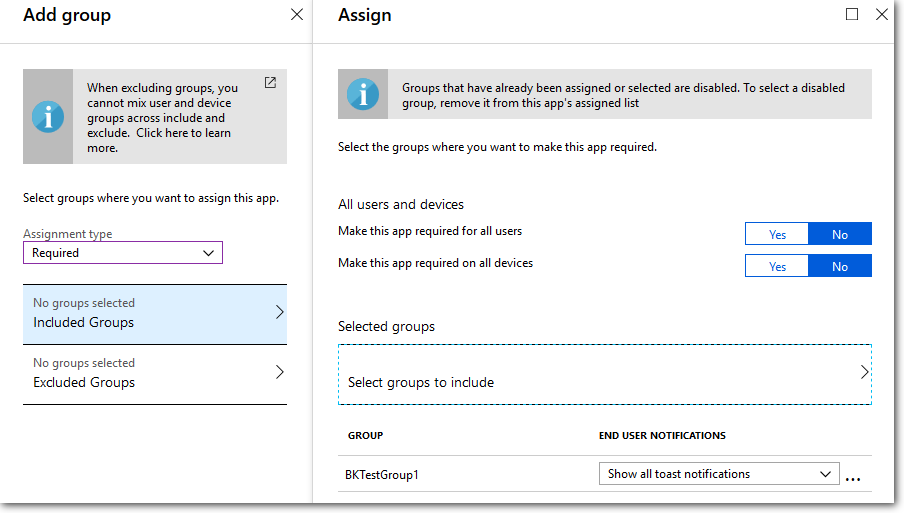
For the purposes of this lab, select Required from the Assignment type dropdown menu.
Note
Available for enrolled devices means users install the app from the Company Portal app or Company Portal website.
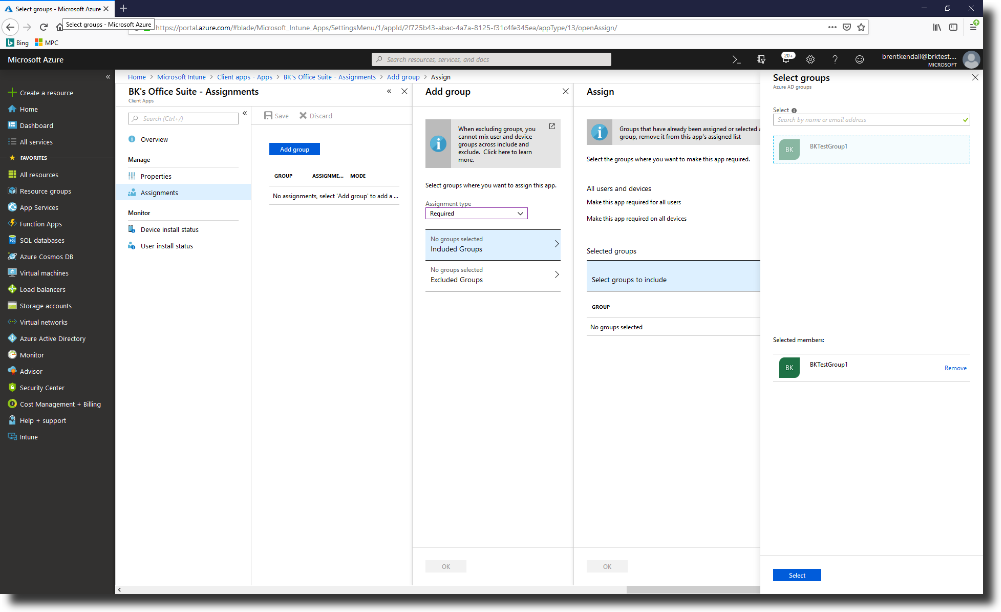
Select Included Groups and assign the groups you previously created that will use this app:
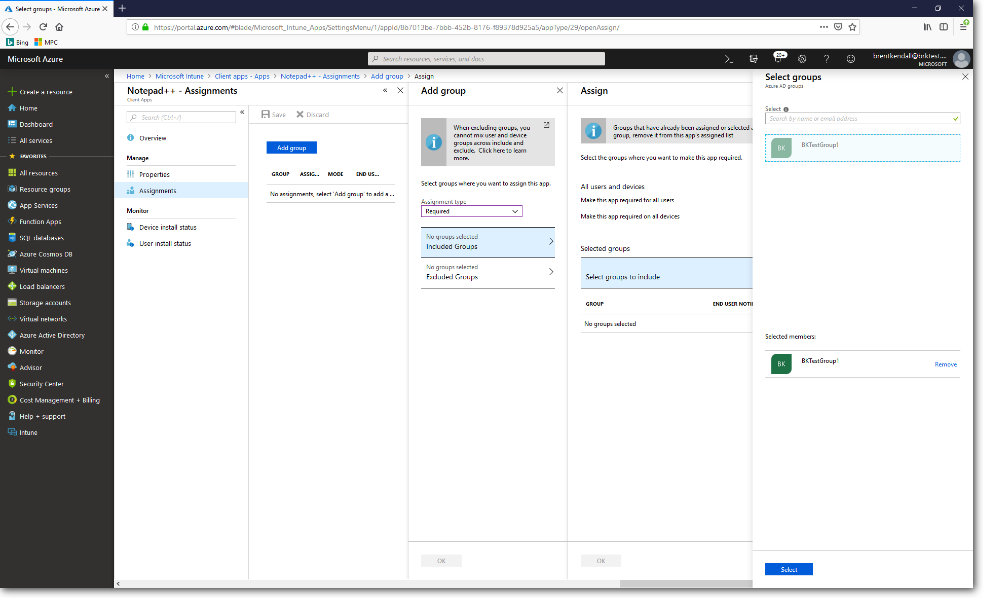
[!div class="mx-imgBorder"]

In the Select groups pane, choose the Select button.
In the Assign group pane, select OK.
In the Add group pane, select OK.
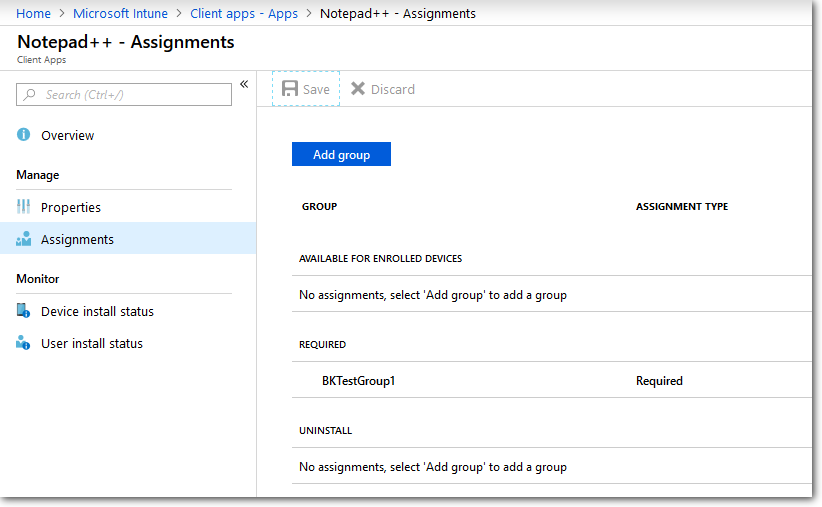
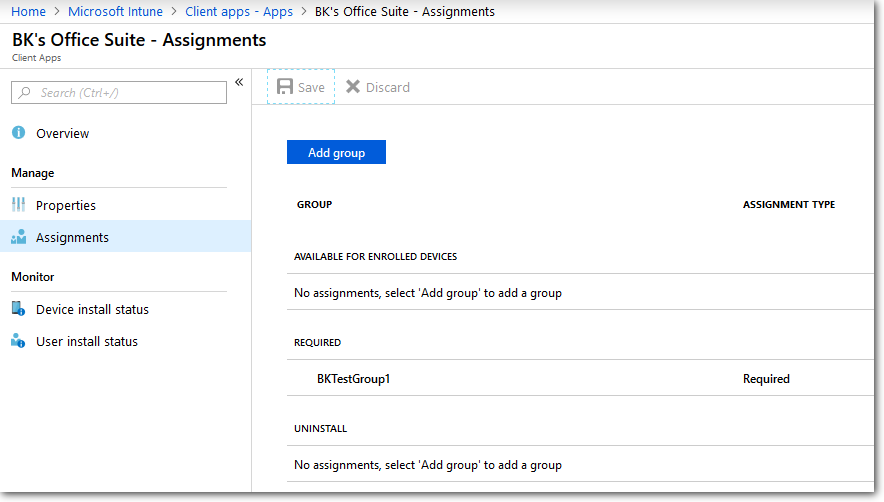
In the app Assignments pane, select Save.
[!div class="mx-imgBorder"]
At this point, you have completed steps to add a Win32 app to Intune.
For more information on adding apps to Intune, see Intune Standalone - Win32 app management.
Add Microsoft 365 Apps
Create app in Microsoft Intune
Sign in to the Azure portal and select Intune.
Go to Intune > Clients apps > Apps, and then select the Add button to create a new app package.
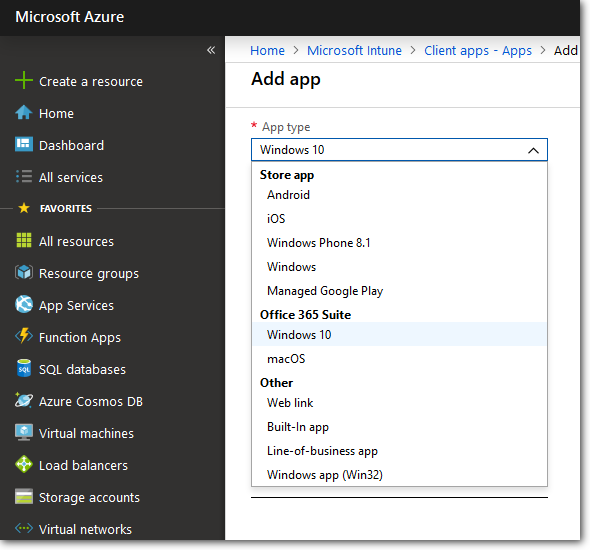
Under App Type, select Microsoft 365 Apps > Windows 10 and later:
Under the Configure App Suite pane, select the Office apps you want to install. For the purposes of this lab, only select Excel:
[!div class="mx-imgBorder"]
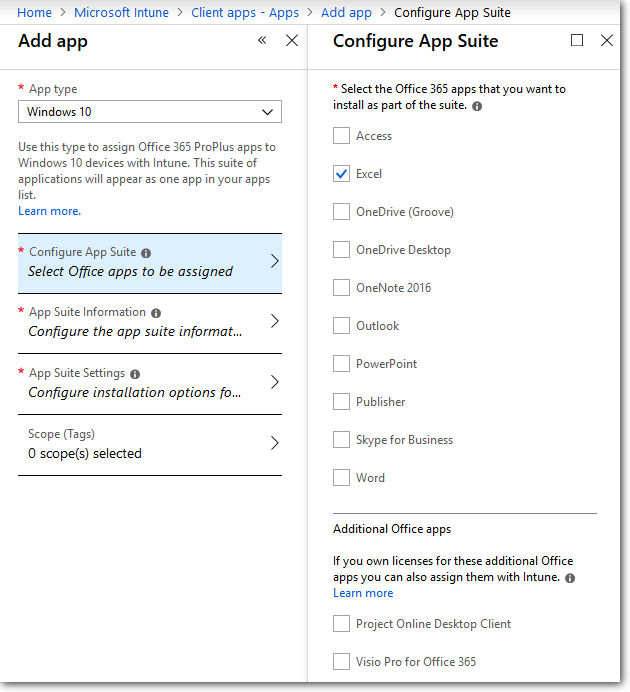
Select OK.
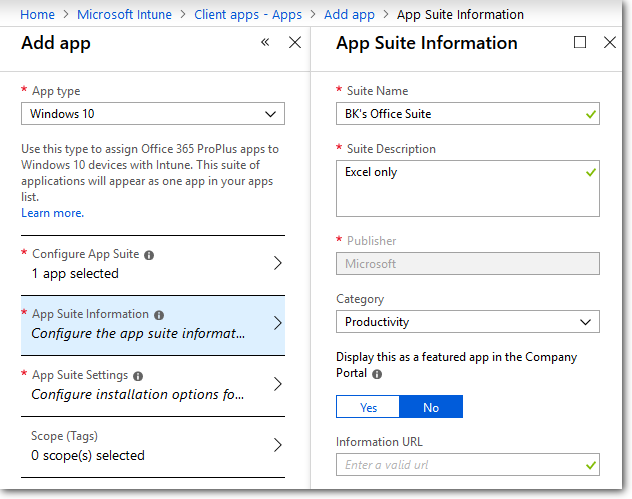
In the App Suite Information pane, enter a unique suite name, and a suitable description.
Enter the name of the app suite as it's displayed in the company portal. Make sure that all suite names that you use are unique. If the same app suite name exists twice, only one of the apps is displayed to users in the company portal.
[!div class="mx-imgBorder"]
Select OK.
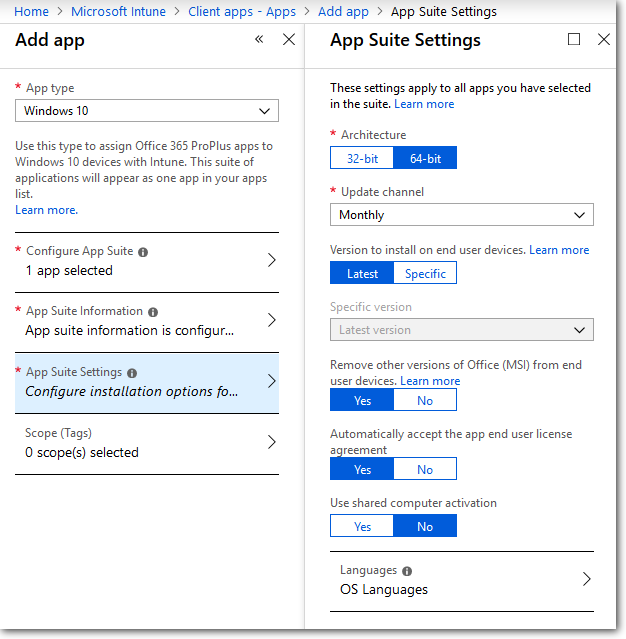
In the App Suite Settings pane, select Monthly for the Update channel (any selection is okay for the purposes of this lab). Also select Yes for Automatically accept the app end user license agreement:
Select OK and, then select Add.
Assign the app to your Intune profile
Note
The following steps only work if you previously created a GROUP in Intune and assigned a profile to it. If you haven't done that, return to the main part of the lab and complete those steps before returning here.
In the Intune > Client Apps > Apps pane, select the Office package you already created to reveal its properties pane. Then select Assignments from the menu:
[!div class="mx-imgBorder"]
Select Add Group to open the Add group pane that's related to the app.
For the purposes of this lab, select Required from the Assignment type dropdown menu.
Available for enrolled devices means users install the app from the Company Portal app or Company Portal website.
Select Included Groups and assign the groups you previously created that will use this app:
[!div class="mx-imgBorder"]
In the Select groups pane, choose the Select button.
In the Assign group pane, select OK.
In the Add group pane, select OK.
In the app Assignments pane, select Save.
At this point, you have completed steps to add Office to Intune.
For more information on adding Office apps to Intune, see Assign Office 365 apps to Windows 10 devices with Microsoft Intune.
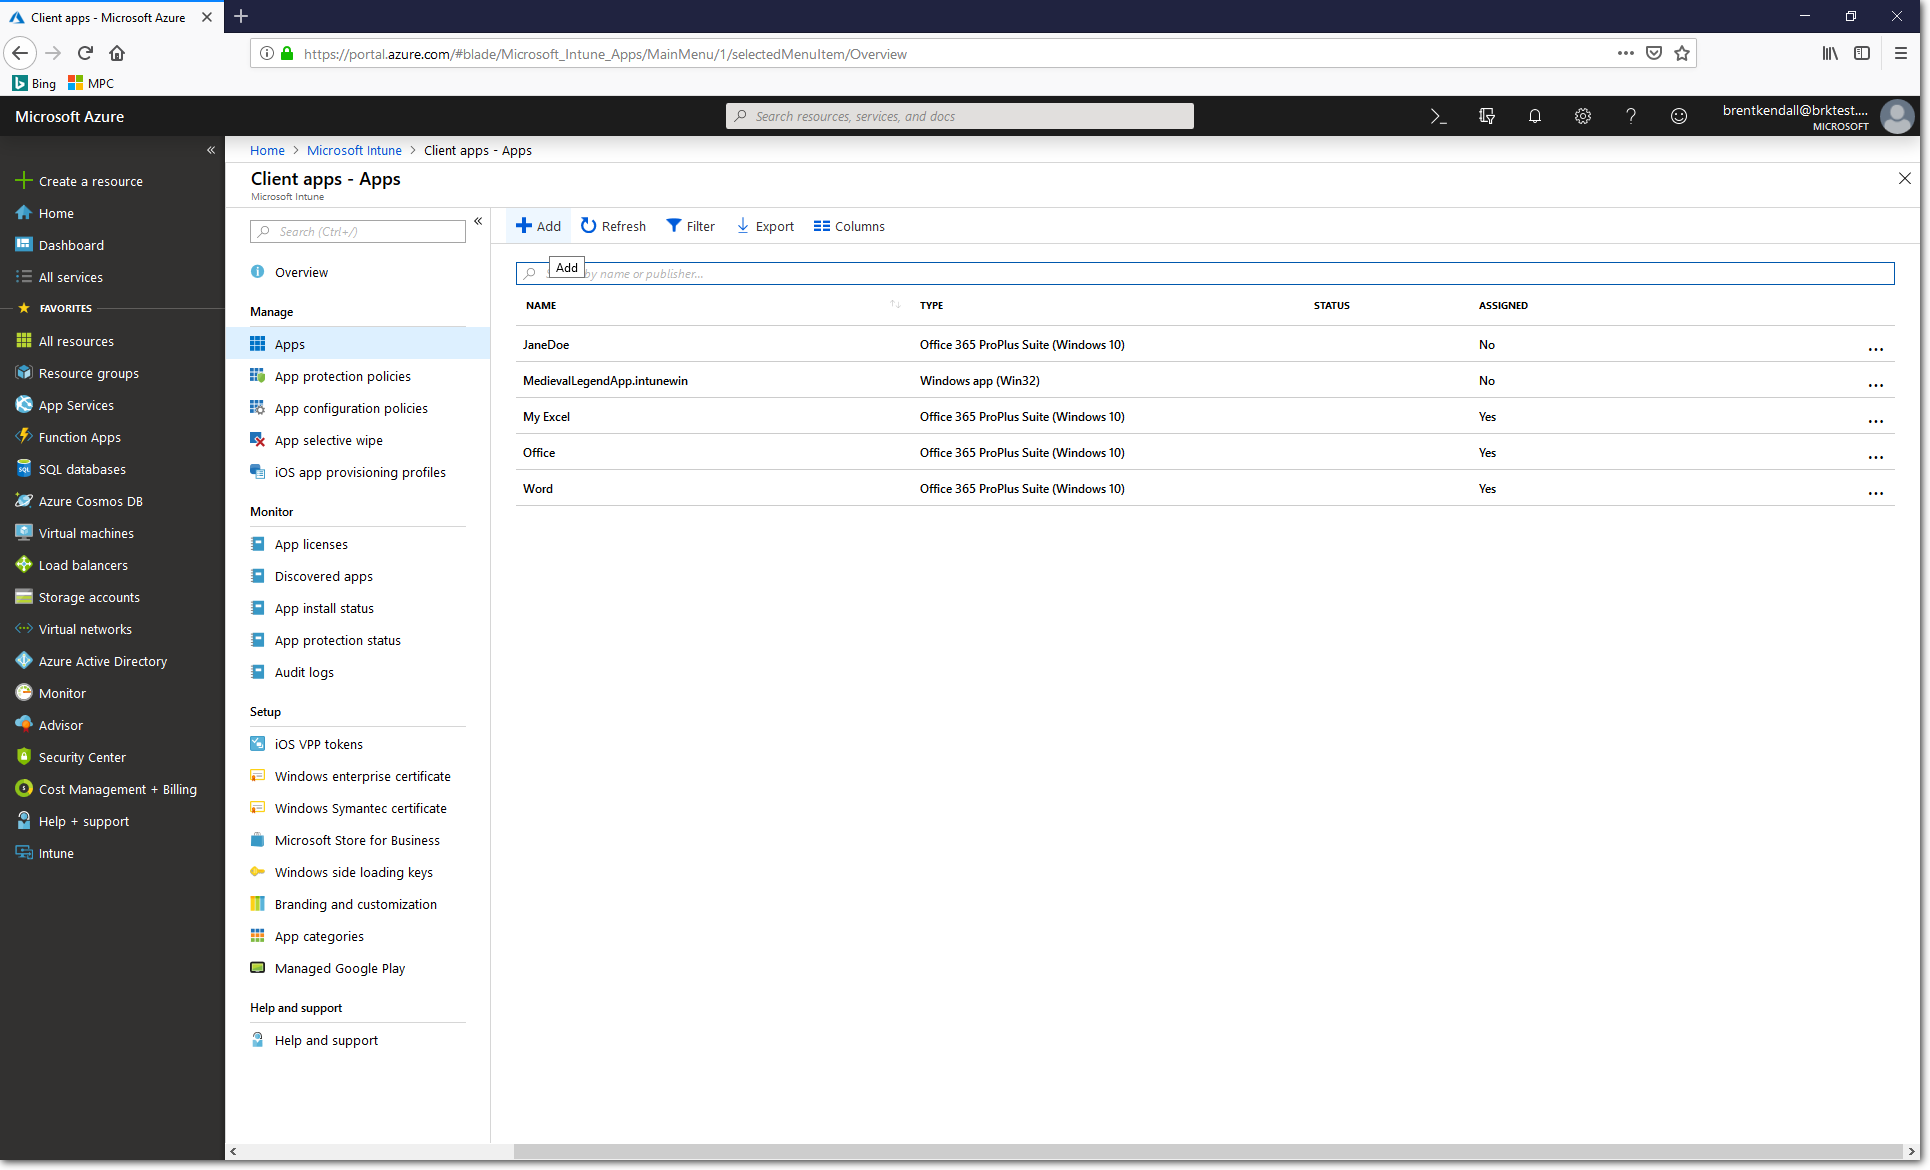
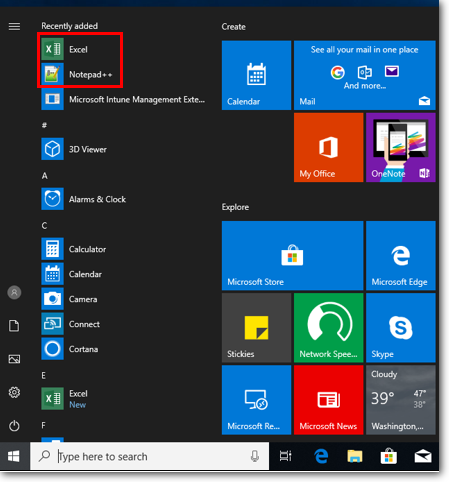
If you installed both the win32 app (Notepad++) and Office (just Excel) per the instructions in this lab, your VM will show them in the apps list. It might take several minutes to populate.
Glossary
| Description | |
|---|---|
| OEM | Original Equipment Manufacturer |
| CSV | Comma Separated Values |
| MPC | Microsoft Partner Center |
| CSP | Cloud Solution Provider |
| MSfB | Microsoft Store for Business |
| Azure AD | Azure Active Directory |
| 4K HH | 4K Hardware Hash |
| CBR | Computer Build Report |
| EC | Enterprise Commerce (server) |
| DDS | Device Directory Service |
| OOBE | Out of the Box Experience |
| VM | Virtual Machine |