21 KiB
Description, ms.assetid, ms.prod, ms.mktglfcycl, ms.sitesec, ms.pagetype, title
| Description | ms.assetid | ms.prod | ms.mktglfcycl | ms.sitesec | ms.pagetype | title |
|---|---|---|---|---|---|---|
| Use Internet Explorer to collect data on computers running Windows Internet Explorer 8 through Internet Explorer 11 on Windows 10, Windows 8.1, or Windows 7. | a145e80f-eb62-4116-82c4-3cc35fd064b6 | IE11 | deploy | library | appcompat | Collect data using Enterprise Site Discovery |
Collect data using Enterprise Site Discovery
Last updated
- January 14, 2015
Applies to:
- Windows 10
- Windows 8.1 Update
- Windows 7 with Service Pack 1 (SP1)
Use Internet Explorer to collect data on computers running Windows Internet Explorer 8 through Internet Explorer 11 on Windows 10, Windows 8.1, or Windows 7. This inventory information helps you build a list of websites used by your company so you can make more informed decisions about your IE deployments, including figuring out which sites might be at risk or require overhauls during future upgrades.
Requirements
Before you start, you need to make sure you have the following:
-
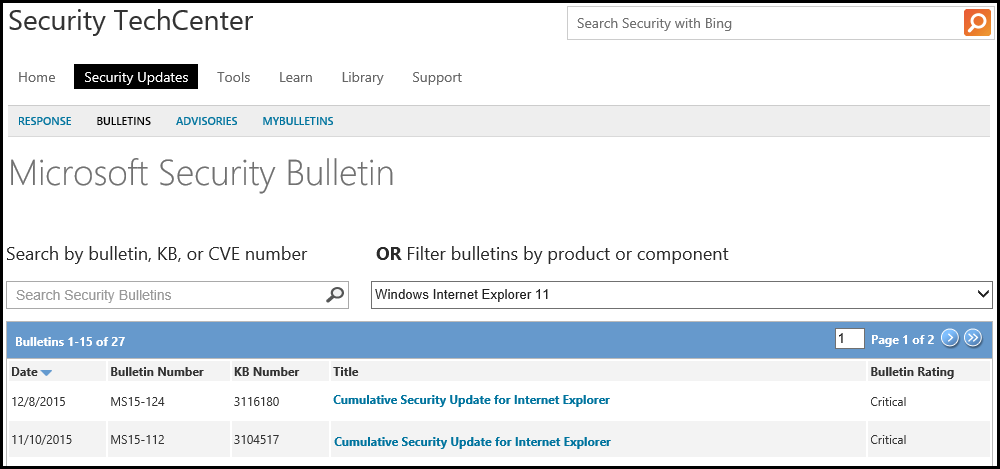
Latest cumulative security update (for all supported versions of Internet Explorer):
-
Go to the Microsoft Security Bulletin page, and change the filter to Windows Internet Explorer 11.
-
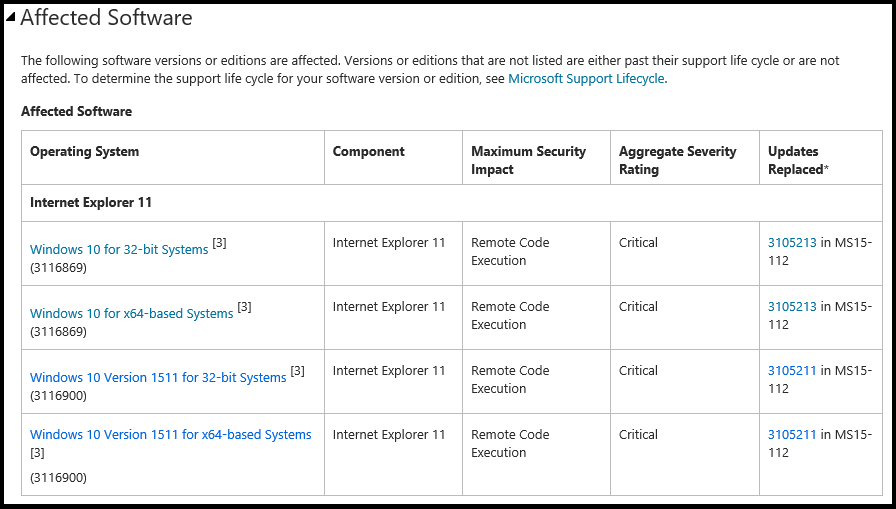
Click the title of the latest cumulative security update, and then scroll down to the Affected software table.
-
Click the link that represents both your operating system version and Internet Explorer 11, and then follow the instructions in the How to get this update section.
-
-
Setup and configuration package, including:
-
Configuration-related PowerShell scripts
-
IETelemetry.mof file
-
Sample System Center 2012 report templates
You must use System Center 2012 R2 Configuration Manager or later for these samples to work.
-
Both the PowerShell script and .mof file need to be copied to the same location on the client computer, before you run the scripts.
What data is collected?
Data is collected on the configuration characteristics of IE and the sites it browses, as shown here.
| Data point | IE11 | IE10 | IE9 | IE8 | Description |
|---|---|---|---|---|---|
| URL | X | X | X | X | URL of the browsed site, including any parameters included in the URL. |
| Domain | X | X | X | X | Top-level domain of the browsed site. |
| ActiveX GUID | X | X | X | X | GUID of the ActiveX controls loaded by the site. |
| Document mode | X | X | X | X | Document mode used by IE for a site, based on page characteristics. |
| Document mode reason | X | X | The reason why a document mode was set by IE. | ||
| Browser state reason | X | X | Additional information about why the browser is in its current state. Also called, browser mode. | ||
| Hang count | X | X | X | X | Number of visits to the URL when the browser hung. |
| Crash count | X | X | X | X | Number of visits to the URL when the browser crashed. |
| Most recent navigation failure (and count) | X | X | X | X | Description of the most recent navigation failure (like, a 404 bad request or 500 internal server error) and the number of times it happened. |
| Number of visits | X | X | X | X | Number of times a site has been visited. |
| Zone | X | X | X | X | Zone used by IE to browse sites, based on browser settings. |
**Important**
By default, IE doesn’t collect this data; you have to turn this feature on if you want to use it. After you turn on this feature, data is collected on all sites visited by IE, except during InPrivate sessions.
The data collection process is silent, so there’s no notification to the employee. Therefore, you must get consent from the employee before you start collecting info. You must also make sure that using this feature complies with all applicable local laws and regulatory requirements.
Where is the data stored and how do I collect it?
The data is stored locally, in an industry-standard WMI class, Managed Object Format (.MOF) file or in an XML file, depending on your configuration. This file remains on the client computer until it’s collected. To collect the files, we recommend:
-
WMI file. Use Microsoft Configuration Manager or any agent that can read the contents of a WMI class on your computer.
-
XML file. Any agent that works with XML can be used.
WMI Site Discovery suggestions
We recommend that you collect your data for at most a month at a time, to capture a user’s typical workflow. We don’t recommend collecting data longer than that because the data is stored in a WMI provider and can fill up your computer’s hard drive. You may also want to collect data only for pilot users or a representative sample of people, instead of turning this feature on for everyone in your company.
On average, a website generates about 250bytes of data for each visit, causing only a minor impact to Internet Explorer’s performance. Over the course of a month, collecting data from 20 sites per day from 1,000 users, you’ll get about 150MB of data:
[250bytes (per site visit) * 20sites/day* 30days = (approximately) 150KB *1000users = (approximately) 150MB].
**Important**
The data collection process is silent, so there’s no notification to the employee. Therefore, you must get consent from the employee before you start collecting info. You must also make sure that using this feature complies with all applicable local laws and regulatory requirements.
Getting ready to use Enterprise Site Discovery
You need to set up your computers for data collection by running the provided PowerShell script (IETelemetrySetUp.ps1) to compile the .mof file and to update security privileges for the new WMI classes.
**Important**
You must run this script if you’re using WMI as your data output. It's not necessary if you're using XML as your data output.
To set up Enterprise Site Discovery
- Start PowerShell in elevated mode (using admin privileges) and run IETElemetrySetUp.ps1 by by-passing the PowerShell execution policy, using this command:
powershell -ExecutionPolicy Bypass .\IETElemetrySetUp.ps1. For more info, see about Execution Policies.
Optional: Set up your firewall for WMI data
If you choose to use WMI as your data output, you need to make sure that your WMI data can travel through your firewall for the domain. If you’re sure, you can skip this section; otherwise, follow these steps:
To set up your firewall
-
In Control Panel, click System and Security, and then click Windows Firewall.
-
In the left pane, click Allow an app or feature through Windows Firewall and scroll down to check the box for Windows Management Instrumentation (WMI).
-
Restart your computer to start collecting your WMI data.
Setting up Enterprise Site Discovery using PowerShell
After you finish the initial setup for Site Discovery using PowerShell, you have the option to continue with PowerShell or to switch to Group Policy.
**Important**
The .ps1 file updates turn on Enterprise Site Discovery and WMI collection for all users on a device.
Setting up zones or domains for data collection
You can determine which zones or domains are used for data collection, using PowerShell.
-
Domain allow list. If you have a domain allow list, a comma-separated list of domains that should have this feature turned on, you should use this process.
-
Zone allow list. If you have a zone allow list, a comma-separated list of zones that should have this feature turned on, you should use this process.
To set up data collection using a domain allow list
- Start PowerShell in elevated mode (using admin privileges) and run IETElemetrySetUp.ps1, using this command:
.\IETElemetrySetUp.ps1 [other args] -SiteAllowList sharepoint.com,outlook.com,onedrive.com.
**Important**
Wildcards, like \*.microsoft.com, aren’t supported.
To set up data collection using a zone allow list
- Start PowerShell in elevated mode (using admin privileges) and run IETElemetrySetUp.ps1, using this command:
.\IETElemetrySetUp.ps1 [other args] -ZoneAllowList Computer,Intranet,TrustedSites,Internet,RestrictedSites.
**Important**
Only Computer, Intranet, TrustedSites, Internet, and RestrictedSites are supported.
Setting up Enterprise Site Discovery using Group Policy
If you don’t want to continue using PowerShell, you can switch to Group Policy after the initial Site Discovery setup.
**Note**
All of the Group Policy settings can be used individually or as a group.
To set up Enterprise Site Discovery using Group Policy
- Open your Group Policy editor, and go to these new settings:
| Setting name and location | Description | Options |
|---|---|---|
| Administrative Templates\Windows Components\Internet Explorer\Turn on Site Discovery WMI output | Writes collected data to a WMI class, which can be aggregated using a client-management solution like Configuration Manager. |
|
| Administrative Templates\Windows Components\Internet Explorer\Turn on Site Discovery XML output | Writes collected data to an XML file, which is stored in your specified location. |
|
| Administrative Templates\Windows Components\Internet Explorer\Limit Site Discovery output by Zone | Manages which zone can collect data. | To specify which zones can collect data, you must include a binary number that represents your selected zones, based on this order: 0 – Restricted Sites zone Example 1: Include only the Local Intranet zone Binary representation: 00010, based on: 0 – Restricted Sites zone Example 2: Include only the Restricted Sites, Trusted Sites, and Local Intranet zones Binary representation: 10110, based on: 1 – Restricted Sites zone |
| Administrative Templates\Windows Components\Internet Explorer\Limit Site Discovery output by domain | Manages which domains can collect data | To specify which domains can collect data, you must include your selected domains, one domain per line, in the provided box. It should look like: microsoft.sharepoint.com |
Combining WMI and XML Group Policy settings
You can use both the WMI and XML settings individually or together, based on:
To turn off Enterprise Site Discovery
- Turn on Site Discovery WMI output: Off
- Turn on Site Discovery XML output: Blank
To turn on WMI recording only
- Turn on Site Discovery WMI output: On
- Turn on Site Discovery XML output: Blank
To turn on XML recording only
- Turn on Site Discovery WMI output: Off
- Turn on Site Discovery XML output: XML file path
To turn on both WMI and XML recording
- Turn on Site Discovery WMI output: On
- Turn on Site Discovery XML output: XML file path
Use Configuration Manager to collect your data
After you’ve collected your data, you’ll need to get the local files off of your employee’s computers. To do this, use the hardware inventory process in Configuration Manager, in one of the following ways.
Collect your hardware inventory using the MOF Editor while connecting to a computer
You can collect your hardware inventory using the MOF Editor, while you’re connected to your client computers.
To collect your inventory
-
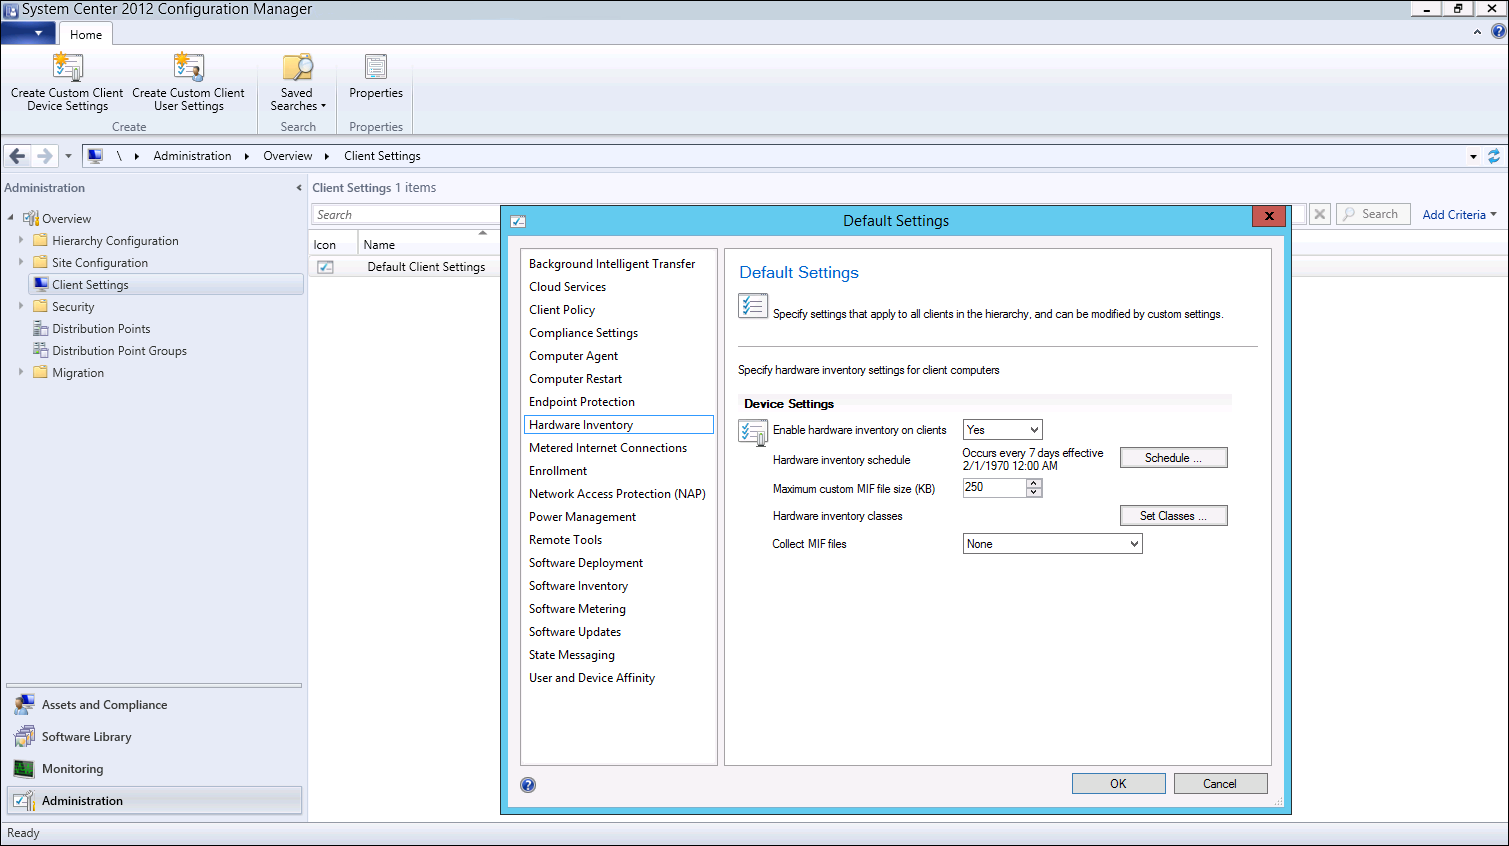
From the Configuration Manager, click Administration, click Client Settings, double-click Default Client Settings, click Hardware Inventory, and then click Set Classes.
-
Click Add, click Connect, and connect to a computer that has completed the setup process and has already existing classes.
-
Change the WMI Namespace to
root\cimv2\IETelemetry, and click Connect.
-
Select the check boxes next to the following classes, and then click OK:
-
IESystemInfo
-
IEURLInfo
-
IECountInfo
-
-
Click OK to close the default windows.
Your environment is now ready to collect your hardware inventory and review the sample reports.
Collect your hardware inventory using the MOF Editor with a MOF import file
You can collect your hardware inventory using the MOF Editor and a MOF import file.
To collect your inventory
-
From the Configuration Manager, click Administration, click Client Settings, double-click Default Client Settings, click Hardware Inventory, and then click Set Classes.
-
Click Import, choose the MOF file from the downloaded package we provided, and click Open.
-
Pick the inventory items to install, and then click Import.
-
Click OK to close the default windows.
Your environment is now ready to collect your hardware inventory and review the sample reports.
Collect your hardware inventory using the SMS\DEF.MOF file
You can collect your hardware inventory using the using the Systems Management Server (SMS\DEF.MOF) file.
To collect your inventory
-
Using a text editor like Notepad, open the SMS\DEF.MOF file, located in your
<Config_Manager_install_location>\inboxes\clifiles.src\hinvdirectory. -
Add this text to the end of the file:
[SMS_Report (TRUE), SMS_Group_Name ("IESystemInfo"), SMS_Class_ID ("MICROSOFT|IESystemInfo|1.0"), Namespace ("root\\\\cimv2\\\\IETelemetry") ] Class IESystemInfo: SMS_Class_Template { [SMS_Report (TRUE), Key ] String SystemKey; [SMS_Report (TRUE) ] String IEVer; }; [SMS_Report (TRUE), SMS_Group_Name ("IEURLInfo"), SMS_Class_ID ("MICROSOFT|IEURLInfo|1.0"), Namespace ("root\\\\cimv2\\\\IETelemetry") ] Class IEURLInfo: SMS_Class_Template { [SMS_Report (TRUE), Key ] String URL; [SMS_Report (TRUE) ] String Domain; [SMS_Report (TRUE) ] UInt32 DocMode; [SMS_Report (TRUE) ] UInt32 DocModeReason; [SMS_Report (TRUE) ] UInt32 Zone; [SMS_Report (TRUE) ] UInt32 BrowserStateReason; [SMS_Report (TRUE) ] String ActiveXGUID[]; [SMS_Report (TRUE) ] UInt32 CrashCount; [SMS_Report (TRUE) ] UInt32 HangCount; [SMS_Report (TRUE) ] UInt32 NavigationFailureCount; [SMS_Report (TRUE) ] UInt32 NumberOfVisits; [SMS_Report (TRUE) ] UInt32 MostRecentNavigationFailure; }; [SMS_Report (TRUE), SMS_Group_Name ("IECountInfo"), SMS_Class_ID ("MICROSOFT|IECountInfo|1.0"), Namespace ("root\\\\cimv2\\\\IETelemetry") ] Class IECountInfo: SMS_Class_Template { [SMS_Report (TRUE), Key ] String CountKey; [SMS_Report (TRUE) ] UInt32 CrashCount; [SMS_Report (TRUE) ] UInt32 HangCount; [SMS_Report (TRUE) ] UInt32 NavigationFailureCount; }; -
Save the file and close it to the same location.
Your environment is now ready to collect your hardware inventory and review the sample reports.
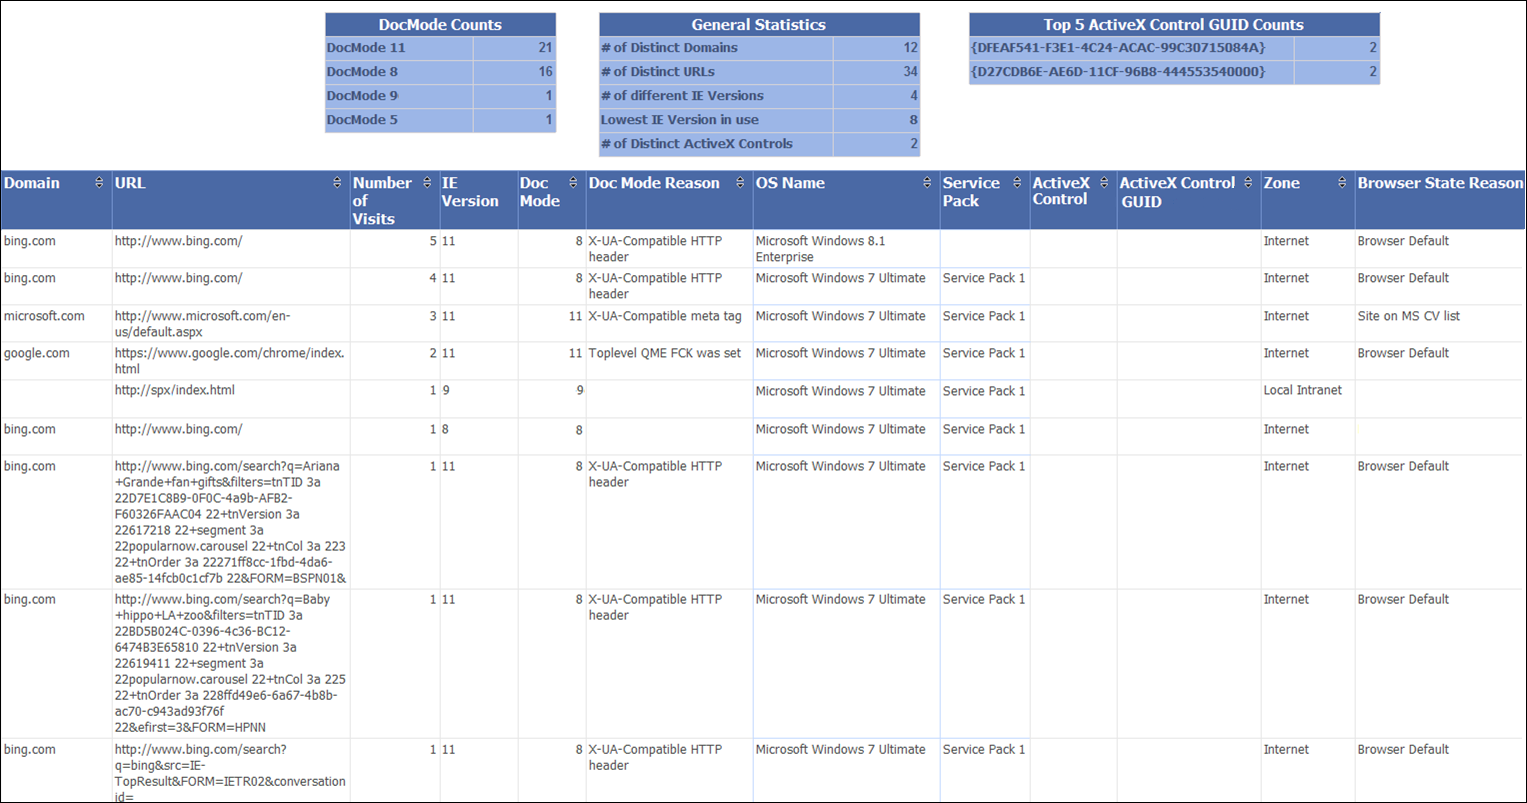
Viewing the sample reports
The sample reports, SCCM Report Sample – ActiveX.rdl and SCCM Report Sample – Site Discovery.rdl, work with System Center 2012, so you can review your collected data.
SCCM Report Sample – ActiveX.rdl
Gives you a list of all of the ActiveX-related sites visited by the client computer.

SCCM Report Sample – Site Discovery.rdl
Gives you a list of all of the sites visited by the client computer.
View the collected XML data
After the XML files are created, you can use your own solutions to extract and parse the data. The data will look like:
<IETelemetry>
     <IECountInfo>
          <CrashCount>[dword]</CrashCount>
          <HangCount>[dword]</HangCount>
          <NavigationFailureCount>[dword]</NavigationFailureCount>
     </IECountInfo>
     <IEURLInfo>
          <URL>[string]</URL>
          <ActiveXGUID>
               <GUID>[guid]</GUID>
          </ActiveXGUID>
          <DocModeReason>[dword]</DocModeReason>
          <DocMode>[dword]</DocMode>
          <NumberOfVisits>[dword]</NumberOfVisits>
          <BrowserStateReason>[dword]</BrowserStateReason>
          <Zone>[dword]</Zone>
          <CrashCount>[dword]</CrashCount>
          <HangCount>[dword]</HangCount>
          <NavigationFailureCount>[dword]</NavigationFailureCount>
          <Domain>[string]</Domain>
          <MostRecentNavigationFailure>[dword]</MostRecentNavigationFailure>
     </IEURLInfo>
     <IEURLInfo>…</IEURLInfo>
     <IEURLInfo>…</IEURLInfo>
</IETelemetry>
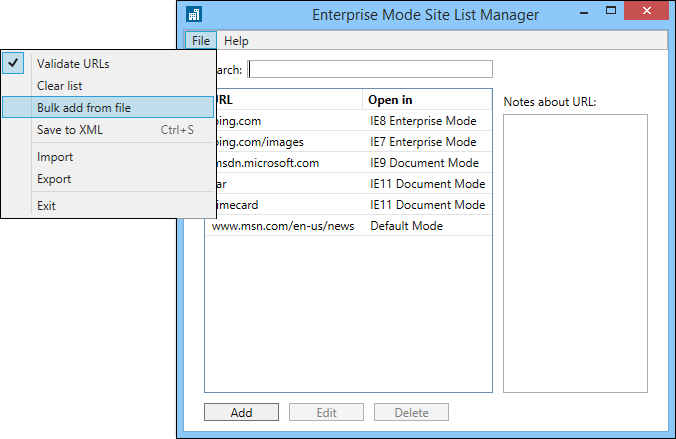
You can import this XML data into the Enterprise Mode Site List Manager, automatically adding the included sites to your Enterprise Mode site list.
To add your XML data to your Enterprise Mode site list
-
Open the Enterprise Mode Site List Manager tool, click File, and then click Bulk add from file.
-
Go to your XML file to add the included sites to the tool, and then click Open.
Each site is validated and if successful, added to the global site list when you click OK to close the menu. If a site doesn’t pass validation, you can try to fix the issues or pick the site and click Add to list to ignore the validation problem. For more information about fixing validation problems, see Fix validation problems using the Enterprise Mode Site List Manager tool. -
Click OK to close the Bulk add sites to the list menu.
Turn off data collection on your client computers
After you’ve collected your data, you’ll need to turn Enterprise Site Discovery off.
To stop collecting data, using PowerShell
-
On your client computer, start Windows PowerShell in elevated mode (using admin privileges) and run
IETelemetrySetUp.ps1, using this command:powershell -ExecutionPolicy Bypass .\IETElemetrySetUp.ps1 –IEFeatureOff.Note
Turning off data collection only disables the Enterprise Site Discovery feature – all data already written to WMI stays on your employee’s computer.To stop collecting data, using Group Policy
-
Open your Group Policy editor, go to
Administrative Templates\Windows Components\Internet Explorer\Turn on Site Discovery WMI output, and click Off. -
Go to
Administrative Templates\Windows Components\Internet Explorer\Turn on Site Discovery XML output, and clear the file path location.
Delete already stored data from client computers
You can completely remove the data stored on your employee’s computers.
To delete all existing data
-
On the client computer, start PowerShell in elevated mode (using admin privileges) and run these four commands:
-
Remove-WmiObject -Namespace root/cimv2/IETelemetry IEURLInfo -
Remove-WmiObject -Namespace root/cimv2/IETelemetry IESystemInfo -
Remove-WmiObject -Namespace root/cimv2/IETelemetry IECountInfo -
Remove-Item -Path 'HKCU:\Software\Microsoft\Internet Explorer\WMITelemetry'
-