6.0 KiB
title, description, ms.assetid, ms.reviewer, manager, ms.author, keywords, ms.prod, ms.localizationpriority, ms.mktglfcycl, ms.sitesec, audience, author, ms.topic
| title | description | ms.assetid | ms.reviewer | manager | ms.author | keywords | ms.prod | ms.localizationpriority | ms.mktglfcycl | ms.sitesec | audience | author | ms.topic |
|---|---|---|---|---|---|---|---|---|---|---|---|---|---|
| Create an app to deploy with Windows 10 using Configuration Manager | Microsoft Microsoft Endpoint Configuration Manager supports deploying applications as part of the Windows 10 deployment process. | 2dfb2f39-1597-4999-b4ec-b063e8a8c90c | laurawi | greglin | deployment, task sequence, custom, customize | w10 | medium | deploy | library | itpro | greg-lindsay | article |
Create an application to deploy with Windows 10 using Configuration Manager
Applies to
- Windows 10
Microsoft Endpoint Configuration Manager supports deploying applications as part of the Windows 10 deployment process. In this section, you create an application in Microsoft Endpoint Configuration Manager that you later configure the task sequence to use.
For the purposes of this guide, we will use one server computer: CM01.
- CM01 is a domain member server and Configuration Manager software distribution point. In this guide CM01 is a standalone primary site server. CM01 is running Windows Server 2019. However, an earlier, supported version of Windows Server can also be used.
Note
The reference image used in the Add a Windows 10 operating system image using Configuration Manager already contains some applications, such as Microsoft Office 365 Pro Plus x64. The procedure demonstrated here enables you to add some additional custom applications beyond those included in the reference image.
Example: Create the Adobe Reader application
On CM01:
- Create the D:\Setup folder if it does not already exist.
- Download the Enterprise distribution version of Adobe Acrobat Reader DC (ex: AcroRdrDC2000620034_en_US.exe.exe) to D:\Setup\Adobe on CM01.
- Extract the .exe file that you downloaded to an .msi. The source folder and filename will differ depending on where you downloaded the file and the version of Acrobat Reader. See the following example of how to extract the .exe file:
Set-Location C:\Users\administrator.CONTOSO\Downloads
.\AcroRdrDC2000620034_en_US.exe -sfx_o"d:\Setup\Adobe\" -sfx_ne
Note: the extraction process will create the "Adobe" folder
-
Using File Explorer, copy the D:\Setup\Adobe folder to the D:\Sources\Software\Adobe folder.
-
In the Configuration Manager Console, in the Software Library workspace, expand Application Management.
-
Right-click Applications, point to Folder and then click Create Folder. Assign the name OSD.
-
Right-click the OSD folder, and click Create Application.
-
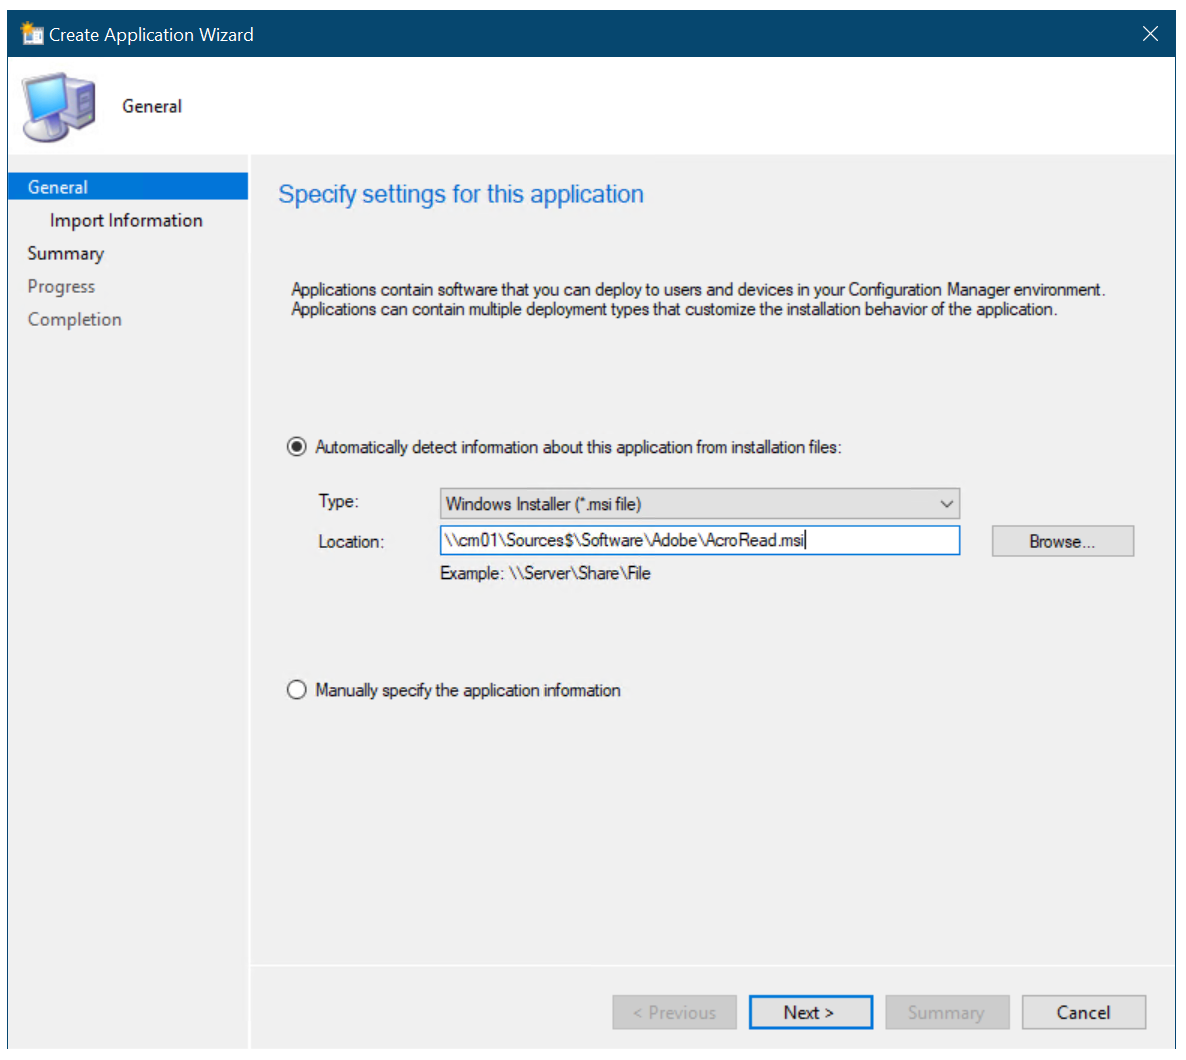
In the Create Application Wizard, on the General page, use the following settings:
- Automatically detect information about this application from installation files
- Type: Windows Installer (*.msi file)
- Location: \\CM01\Sources$\Software\Adobe\AcroRead.msi
The Create Application Wizard
-
Click Next, and wait while Configuration Manager parses the MSI file.
-
On the Import Information page, review the information and then click Next.
-
On the General Information page, name the application Adobe Acrobat Reader DC - OSD Install, click Next twice, and then click Close.
>[!NOTE]
>Because it is not possible to reference an application deployment type in the task sequence, you should have a single deployment type for applications deployed by the task sequence. If you are deploying applications via both the task sequence and normal application deployment, and you have multiple deployment types, you should have two applications of the same software. In this section, you add the "OSD Install" suffix to applications that are deployed via the task sequence. If using packages, you can still reference both package and program in the task sequence.

Add the "OSD Install" suffix to the application name
- In the Applications node, select the Adobe Reader - OSD Install application, and click Properties on the ribbon bar (this is another place to view properties, you can also right-click and select properties).
- On the General Information tab, select the Allow this application to be installed from the Install Application task sequence action without being deployed check box, and click OK.
Next, see Add drivers to a Windows 10 deployment with Windows PE using Configuration Manager.
Related topics
Prepare for Zero Touch Installation of Windows 10 with Configuration Manager
Create a custom Windows PE boot image with Configuration Manager
Add a Windows 10 operating system image using Configuration Manager
Add drivers to a Windows 10 deployment with Windows PE using Configuration Manager
Create a task sequence with Configuration Manager and MDT
Deploy Windows 10 using PXE and Configuration Manager
Refresh a Windows 7 SP1 client with Windows 10 using Configuration Manager
Replace a Windows 7 SP1 client with Windows 10 using Configuration Manager
