13 KiB
title, description, ms.prod, ms.mktglfcycl, ms.sitesec, ms.topic, author, ms.localizationpriority, ms.author, ms.date, ms.reviewer, manager
| title | description | ms.prod | ms.mktglfcycl | ms.sitesec | ms.topic | author | ms.localizationpriority | ms.author | ms.date | ms.reviewer | manager |
|---|---|---|---|---|---|---|---|---|---|---|---|
| Advanced troubleshooting for Stop error 7B or Inaccessible_Boot_Device | Learn how to troubleshoot Stop error 7B or Inaccessible_Boot_Device | w10 | library | troubleshooting | dansimp | medium | dansimp | 12/11/2018 | dansimp |
Advanced troubleshooting for Stop error 7B or Inaccessible_Boot_Device
This article provides steps to troubleshoot Stop error 7B: Inaccessible_Boot_Device. This error may occur after some changes are made to the computer, or immediately after you deploy Windows on the computer.
Causes of the Inaccessible_Boot_Device Stop error
Any one of the following factors may cause the stop error:
-
Missing, corrupted, or misbehaving filter drivers that are related to the storage stack
-
File system corruption
-
Changes to the storage controller mode or settings in the BIOS
-
Using a different storage controller than the one that was used when Windows was installed
-
Moving the hard disk to a different computer that has a different controller
-
A faulty motherboard or storage controller, or faulty hardware
-
In unusual cases: the failure of the TrustedInstaller service to commit newly installed updates because of Component Based Store corruptions
-
Corrupted files in the Boot partition (for example, corruption in the volume that is labeled SYSTEM when you run the
diskpart>list volcommand)
Troubleshoot this error
Start the computer in Windows Recovery Mode (WinRE). To do this, follow these steps.
-
Start the system by using the installation media for the installed version of Windows.
-
On the Install Windows screen, select Next > Repair your computer .
-
On the System Recovery Options screen, select Next > Command Prompt .
Verify that the boot disk is connected and accessible
Step 1
At the WinRE Command prompt, run diskpart, and then run list disk.
A list of the physical disks that are attached to the computer should be displayed and resemble the following display:
  Disk ###  Status         Size     Free     Dyn  Gpt

  --------  -------------  -------  -------  ---  ---

  Disk 0    Online         **size*  GB      0 B        *
If the computer uses a Unified Extensible Firmware Interface (UEFI) startup interface, there will be an asterisk () in the *GPT column.
If the computer uses a basic input/output system (BIOS) interface, there will not be an asterisk in the Dyn column.
Step 2
If the list disk command lists the OS disks correctly, run the list vol command in diskpart.
list vol generates an output that resembles the following display:
  Volume ###  Ltr  Label        Fs     Type        Size     Status     Info

  ----------  ---  -----------  -----  ----------  -------  ---------  --------

  Volume 0         Windows RE   NTFS   Partition    499 MB  Healthy

  Volume 1     C   OSDisk       NTFS   Partition    222 GB  Healthy    Boot

  Volume 2         SYSTEM       FAT32  Partition    499 MB  Healthy    System
Note
If the disk that contains the OS is not listed in the output, you will have to engage the OEM or virtualization manufacturer.
Verify the integrity of Boot Configuration Database
Check whether the Boot Configuration Database (BCD) has all the correct entries. To do this, run bcdedit at the WinRE command prompt.
To verify the BCD entries:
-
Examine the Windows Boot Manager section that has the {bootmgr} identifier. Make sure that the device and path entries point to the correct device and boot loader file.
An example output if the computer is UEFI-based:
device                  partition=\Device\HarddiskVolume2
path                    \EFI\Microsoft\Boot\bootmgfw.efi
An example output if the machine is BIOS based:
Device partition=C:Note
This output may not contain a path.
-
In the Windows Boot Loader that has the {default} identifier, make sure that device , path , osdevice, and systemroot point to the correct device or partition, winload file, OS partition or device, and OS folder.
Note
If the computer is UEFI-based, the bootmgr and winload entires under {default} will contain an .efi extension.

If any of the information is wrong or missing, we recommend that you create a backup of the BCD store. To do this, run bcdedit /export C:\temp\bcdbackup. This command creates a backup in C:\temp\ that is named bcdbackup . To restore the backup, run bcdedit /import C:\temp\bcdbackup. This command overwrites all BCD settings by using the settings in bcdbackup .
After the backup is completed, run the following command to make the changes:
bcdedit /set *{identifier}* option value
For example, if the device under {default} is wrong or missing, run the following command to set it: bcdedit /set {default} device partition=C:
If you want to re-create the BCD completely, or if you get a message that states that "The boot configuration data store could not be opened. The system could not find the file specified, " run bootrec /rebuildbcd.
If the BCD has the correct entries, check whether the winload and bootmgr entries exist in the correct location per the path that is specified in the bcdedit command. By default, bootmgr in the BIOS partition will be in the root of the SYSTEM partition. To see the file, run Attrib -s -h -r.
If the files are missing, and you want to rebuild the boot files, follow these steps:
- Copy all the contents under the SYSTEM partition to another location. Alternatively, you can use the command prompt to navigate to the OS drive, create a new folder, and then copy all the files and folders from the SYSTEM volume, as follows:
D:\> Mkdir  BootBackup
R:\> Copy *.* D:\BootBackup
-
If you are using Windows 10, or if you are troubleshooting by using a Windows 10 ISO at the Windows Pre-Installation Environment command prompt, you can use the bcdboot command to re-create the boot files, as follows:
Bcdboot <**OSDrive* >:\windows /s <**SYSTEMdrive* >: /f ALLFor example: if we assign the
<System Drive>(WinRE drive) the letter R and the<OSdrive>is the letter D, this command would be the following:Bcdboot D:\windows /s R: /f ALLNote
The ALL part of the bcdboot command writes all the boot files (both UEFI and BIOS) to their respective locations.
If you do not have a Windows 10 ISO, you must format the partition and copy bootmgr from another working computer that has a similar Windows build. To do this, follow these steps:
-
Start Notepad .
-
Press Ctrl+O.
-
Navigate to the system partition (in this example, it is R).
-
Right-click the partition, and then format it.
Troubleshooting if this issue occurs after a Windows Update installation
Run the following command to verify the Windows update installation and dates:
Dism /Image:<Specify the OS drive>: /Get-packages
After you run this command, you will see the Install pending and Uninstall Pending packages:
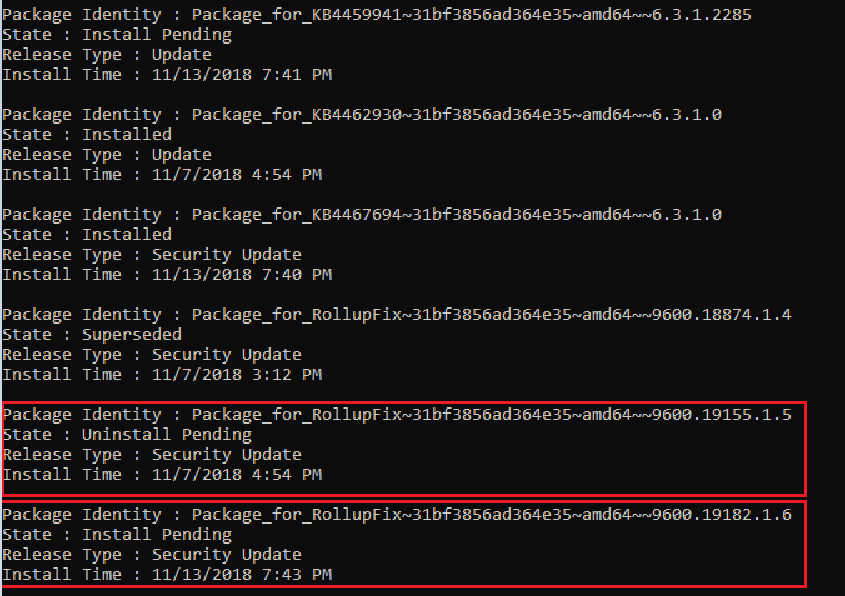
-
Run the
dism /Image:C:\ /Cleanup-Image /RevertPendingActionscommand. Replace C: with the system partition for your computer.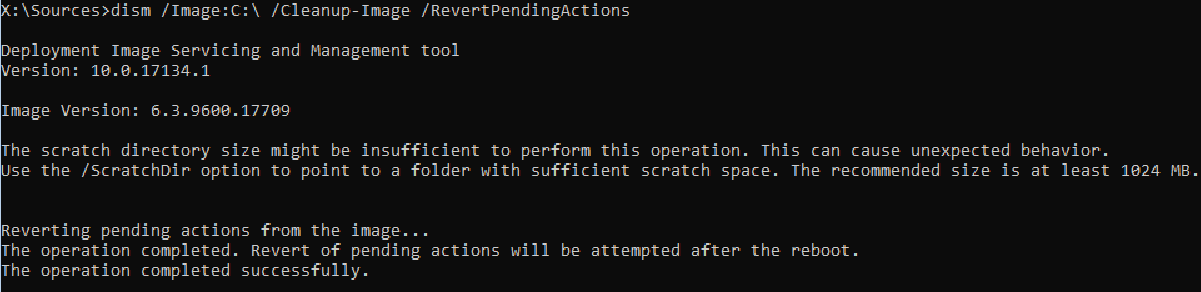
-
Navigate to OSdriveLetter :\Windows\WinSxS , and then check whether the pending.xml file exists. If it does, rename it to pending.xml.old.
-
To revert the registry changes, type regedit at the command prompt to open Registry Editor.
-
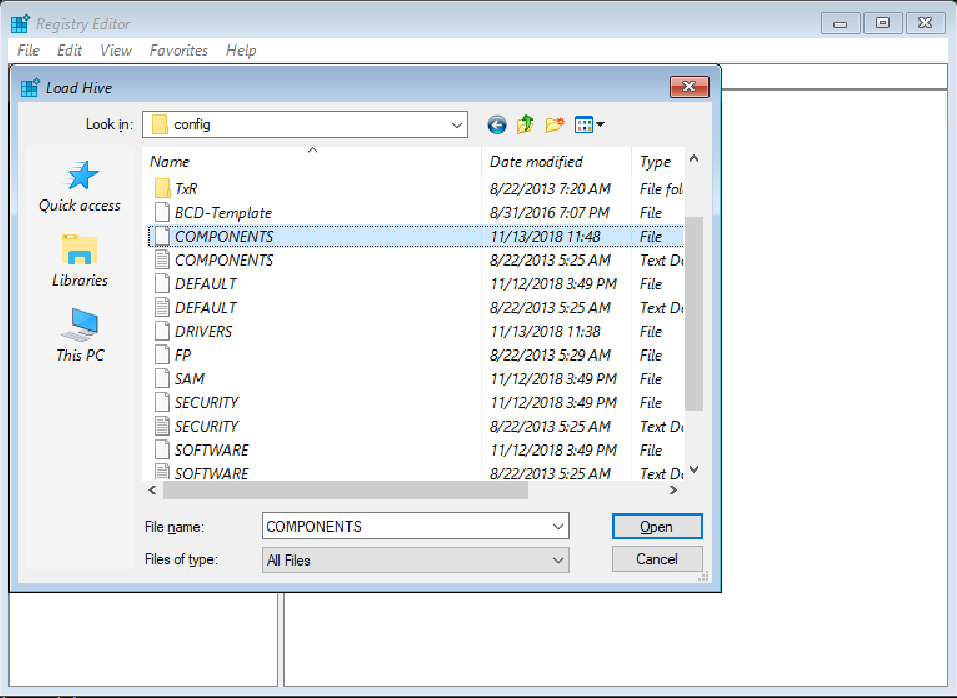
Select HKEY_LOCAL_MACHINE, and then go to File > Load Hive.
-
Navigate to OSdriveLetter:\Windows\System32\config, select the file that is named COMPONENT (with no extension), and then select Open. When you are prompted, enter the name OfflineComponentHive for the new hive
-
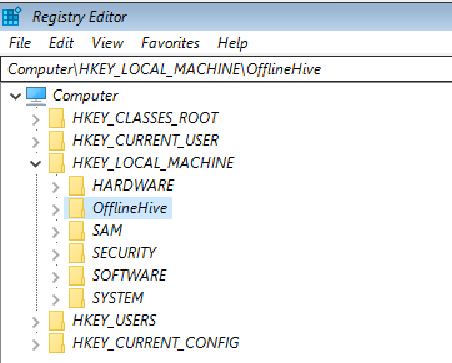
Expand HKEY_LOCAL_MACHINE\OfflineComponentHive, and check whether the PendingXmlIdentifier key exists. Create a backup of the OfflineComponentHive key, and then delete the PendingXmlIdentifier key.
-
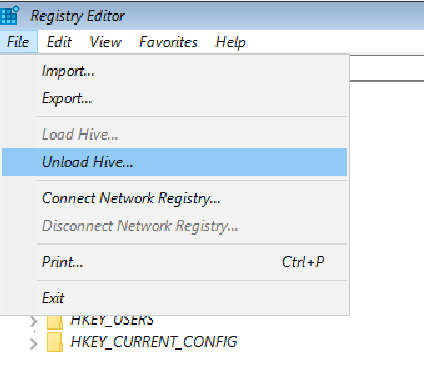
Unload the hive. To do this, highlight OfflineComponentHive, and then select File > Unload hive.
-
Select HKEY_LOCAL_MACHINE, go to File > Load Hive, navigate to OSdriveLetter :\Windows\System32\config, select the file that is named SYSTEM (with no extension), and then select Open . When you are prompted, enter the name OfflineSystemHive for the new hive.
-
Expand HKEY_LOCAL_MACHINE\OfflineSystemHive, and then select the Select key. Check the data for the Default value.
-
If the data in HKEY_LOCAL_MACHINE\OfflineSystemHive\Select\Default is 1 , expand HKEY_LOCAL_MACHINE\OfflineHive\ControlSet001. If it is 2, expand HKEY_LOCAL_MACHINE\OfflineHive\ControlSet002, and so on.
-
Expand Control\Session Manager. Check whether the PendingFileRenameOperations key exists. If it does, back up the SessionManager key, and then delete the PendingFileRenameOperations key.
Verifying boot critical drivers and services
Check services
-
Follow steps 1-10 in the "Troubleshooting if this issue occurs after an Windows Update installation" section. (Step 11 does not apply to this procedure.)
-
Expand Services.
-
Make sure that the following registry keys exist under Services:
-
ACPI
-
DISK
-
VOLMGR
-
PARTMGR
-
VOLSNAP
-
VOLUME
-
If these keys exist, check each one to make sure that it has a value that is named Start and that it is set to 0. If not, set the value to 0.
If any of these keys do not exist, you can try to replace the current registry hive by using the hive from RegBack. To do this, run the following commands:
cd OSdrive:\Windows\System32\config
ren SYSTEM SYSTEM.old
copy OSdrive:\Windows\System32\config\RegBack\SYSTEM OSdrive:\Windows\System32\config\
Check upper and lower filter drivers
Check whether there are any non-Microsoft upper and lower filter drivers on the computer and that they do not exist on another, similar working computer. if they do exist, remove the upper and lower filter drivers:
-
Expand HKEY_LOCAL_MACHINE\OfflineHive\ControlSet001\Control.
-
Look for any UpperFilters or LowerFilters entries.
Note
These filters are mainly related to storage. After you expand the Control key in the registry, you can search for UpperFilters and LowerFilters.
The following are some of the different registry entries in which you may find these filter drivers. These entries are located under ControlSet and are designated as Default :
\Control\Class\{4D36E96A-E325-11CE-BFC1-08002BE10318}
\Control\Class\{4D36E967-E325-11CE-BFC1-08002BE10318}
\Control\Class\{4D36E97B-E325-11CE-BFC1-08002BE10318}
\Control\Class\{71A27CDD-812A-11D0-BEC7-08002BE2092F}
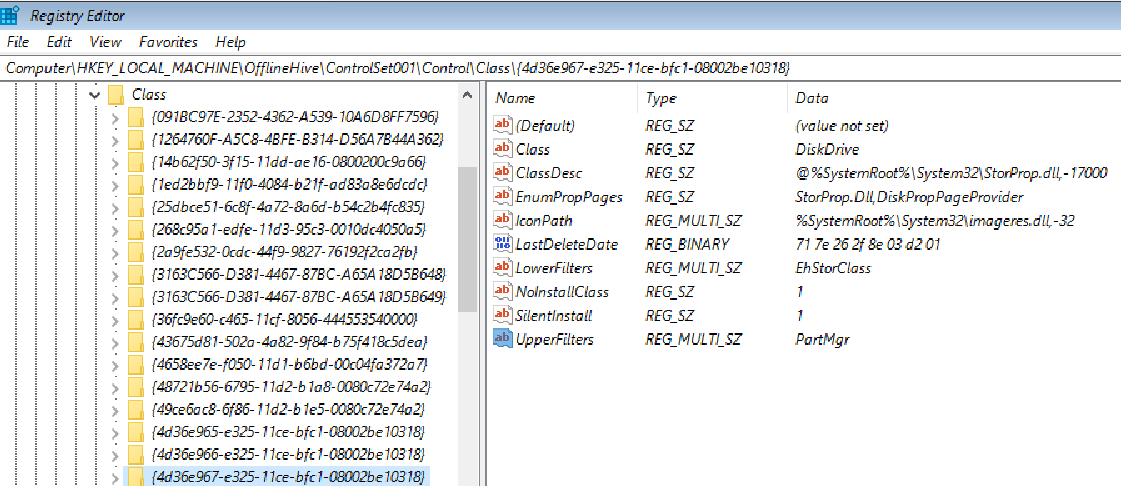
If an UpperFilters or LowerFilters entry is non-standard (for example, it is not a Windows default filter driver, such as PartMgr), remove the entry by double-clicking it in the right pane, and then deleting only that value.
Note
There could be multiple entries.
The reason that these entries may affect us is because there may be an entry in the Services branch that has a START type set to 0 or 1 (indicating that it is loaded at the Boot or Automatic part of the boot process). Also, either the file that is referred to is missing or corrupted, or it may be named differently than what is listed in the entry.
Note
If there actually is a service that is set to 0 or 1 that corresponds to an UpperFilters or LowerFilters entry, setting the service to disabled in the Services registry (as discussed in steps 2 and 3 of the Check services section) without removing the Filter Driver entry causes the computer to crash and generate a 0x7b Stop error.
Running SFC and Chkdsk
If the computer still does not start, you can try to run a chkdisk process on the system drive, and also run System File Checker. To do this, run the following commands at a WinRE command prompt:
-
chkdsk /f /r OsDrive:
-
sfc /scannow /offbootdir=OsDrive:\ /offwindir=OsDrive:\Windows