48 KiB
title, description, keywords, ms.prod, ms.mktglfcycl, ms.sitesec, ms.topic, localizationpriority, ms.pagetype, author
| title | description | keywords | ms.prod | ms.mktglfcycl | ms.sitesec | ms.topic | localizationpriority | ms.pagetype | author |
|---|---|---|---|---|---|---|---|---|---|
| Deploy and manage a full cloud IT solution with Microsoft Education | Learn how to use the new Microsoft Education system to set up a cloud infrastructure for your school, acquire devices and apps, and configure and deploy policies to your Windows 10 devices. | education, Microsoft Education, Microsoft Education system, full cloud IT solution, school, deploy, setup, manage, Windows 10, Intune for Education, Office 365 for Education, Microsoft Store for Education, Azure AD, Set up School PCs | w10 | deploy | library | hero-article | high | edu | CelesteDG |
Get started: Deploy and manage a full cloud IT solution with Microsoft Education
Applies to:
- Office 365 for Education, School Data Sync, Microsoft Intune for Education, Microsoft Store for Education, Windows 10 Creators Update, Set up School PCs
Hello, IT administrators! In this walkthrough, we'll show you how you can quickly and easily use the new Microsoft Education system, consisting of new and existing cloud services and tools, to implement a full IT cloud solution for your school.
What is Microsoft Education?
Microsoft Education consists of these new and existing services and tools from Microsoft:
- Microsoft Intune for Education for simple set up, control, and management of the resources for your school including apps, devices, and settings
- Office 365 for Education provides online apps for work from anywhere and desktop apps for advanced functionality, built for working together and available across devices, and it's free for schools, teachers, and students
- School Data Sync to help automate the process for importing and integrating School Information System (SIS) data that you can use with Office 365
- OneNote Class Notebook to organize course content, create and deliver interactive lessons to some or all students, collaborate and provide private feedback to individual students, and connect with major LMS and SIS partners for assignment workflow
- Learning Tools are moving beyond the OneNote desktop app and is now available in Office Lens, OneNote Online, Word Online, and Word desktop
- Whiteboard to create interactive lessons on the big screen, share and collaborate real-time by connecting to Class Notebook and Classroom
- Windows 10, version 1703 (Creators Update) which brings 3D for everyone and other new and updated Windows features
- Minecraft: Education Edition which provides an open and immersive environment to promote creativity, collaboration, and problem-solving
With Microsoft Education, schools can:
- Use affordable devices and simple setup - Boost creativity and get started instantly with Windows 10 devices that support Windows Ink. Set up devices in minutes and stay in control with the new Intune for Education.
- Collaborate in a modern classroom - Help students become career-ready with Office apps like Word, Excel, PowerPoint, and OneNote. Increase comprehension and outcomes with the most advanced teaching apps like integrated Learning Tools.
- Go beyond the browser with inspiring apps for classroom learning - Inspire with Minecraft: Education Edition and innovative apps from the Microsoft Store for Education.
Go to the Microsoft Education site to learn more. See How to buy to learn about pricing and purchasing options for schools, students, and teachers as well as academic pricing and offers for qualified K-12 and higher education institutions.
What we're doing
In this walkthrough, we'll show you the basics on how to:
- Acquire an Office 365 for Education tenant, if you don't already have one
- Import school, student, teacher, and class data using School Data Sync (SDS)
- Manage apps and settings deployment with Intune for Education
- Acquire additional apps in Microsoft Store for Education
- Use the Set up School PCs app to quickly set up and provision your Windows 10 education devices
- Log in and use the devices
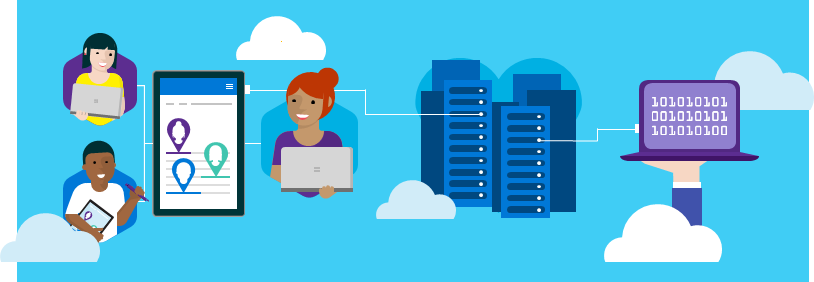
This diagram shows a high-level view of what we cover in this walkthrough. The numbers correspond to the sections in the walkthrough and roughly correspond to the flow of the overall process; but, note that not all sections in this walkthrough are shown in the diagram.
Prerequisites
Complete these tasks before you start the walkthrough:
-
Make sure all the devices that you want to configure, such as student PCs, have the latest Windows 10, version 1703 image installed.
We recommend Windows 10, version 1703 to take advantage of all the new features and functionality that Windows supports. This version of Windows is also compatible with the latest version of the Set up School PCs app and the versions must match in order for Set up School PCs to provision the devices.
If you don't have Windows 10, version 1703 installed on your devices, we recommend upgrading. This process takes a while so start this task before proceeding with this walkthrough.
-
Have an education-verified tenant to qualify for an Office 365 for Education subscription. You also need to be education-verified to use School Data Sync and Intune for Education.
If you don't have an education-verified domain, don't worry. We'll show you the steps on how to do this.
Note
If you need to get education-verified, it may take up to two weeks for the verification process to be completed.
Setup options
To make sure you have a successful experience with deploying and managing a full cloud IT solution with Microsoft Education, select the scenario that best describes your school or how you'd like to get started.
| Get started with Microsoft Education in production environment | Try out Microsoft Education in trial environment | School uses Office 365, try out Intune for Education now |
|---|---|---|
| * My school doesn't use Office 365 for Education | * My school doesn't use Office 365 for Education | * My school uses Office 365 for Education |
| * My school is not an education-verified tenant | * My school is not an education-verified tenant | * My school is an education-verified tenant |
| * I would like to get started with Microsoft Education in a production environment | * I would like to try out Microsoft Education in a trial environment | * I would like to apply the Intune for Education trial code to my school's production environment |
| * Longest, need to start from scratch | * Simplest, but may take longer to start | * Fastest, Office 365 and SDS already set up |
Option 1: Get started with Microsoft Education in a production environment
Trying out Microsoft Education in a production environment means you'll be using real school data as you evaluate the features and tools. This requires more time to get fully set up and going.
To get started with Microsoft Education in a production environment:
-
Go to https://aka.ms/sdssignup and fill out the form to sign up for School Data Sync and receive a free, one-on-one support from Microsoft.
A team from Microsoft will contact you to help get started with Microsoft Education.
If you want a quicker way to evaluate Microsoft Education, you can use a trial environment instead.
Option 2: Try out Microsoft Education in a trial environment
Once you get an Office 365 education-verified tenant, trying out Microsoft Education in a trial environment is an easy way to evaluate all the features and tools. Here, you'll use promo codes and sample files as you follow the walkthrough.
To get started with Microsoft Education in a trial environment, follow these steps.
Wait for your tenant to be education-verified before proceeding with the next step. Verification can take up to two weeks.
- Click https://aka.ms/getsdspromocode to apply a School Data Sync trial promo code to your Office 365 education tenant.
- Follow the instructions in Use School Data Sync to import student data.
- Follow the instructions in Try out Intune for Education.
Option 3: Try out Intune for Education
Already have an Office 365 for Education verified tenant? Just sign in with your global admin credentials to apply the Intune for Education preview trial code to your tenant and follow the rest of the walkthrough.
- Click https://aka.ms/intuneforedupreviewtrial to get started.
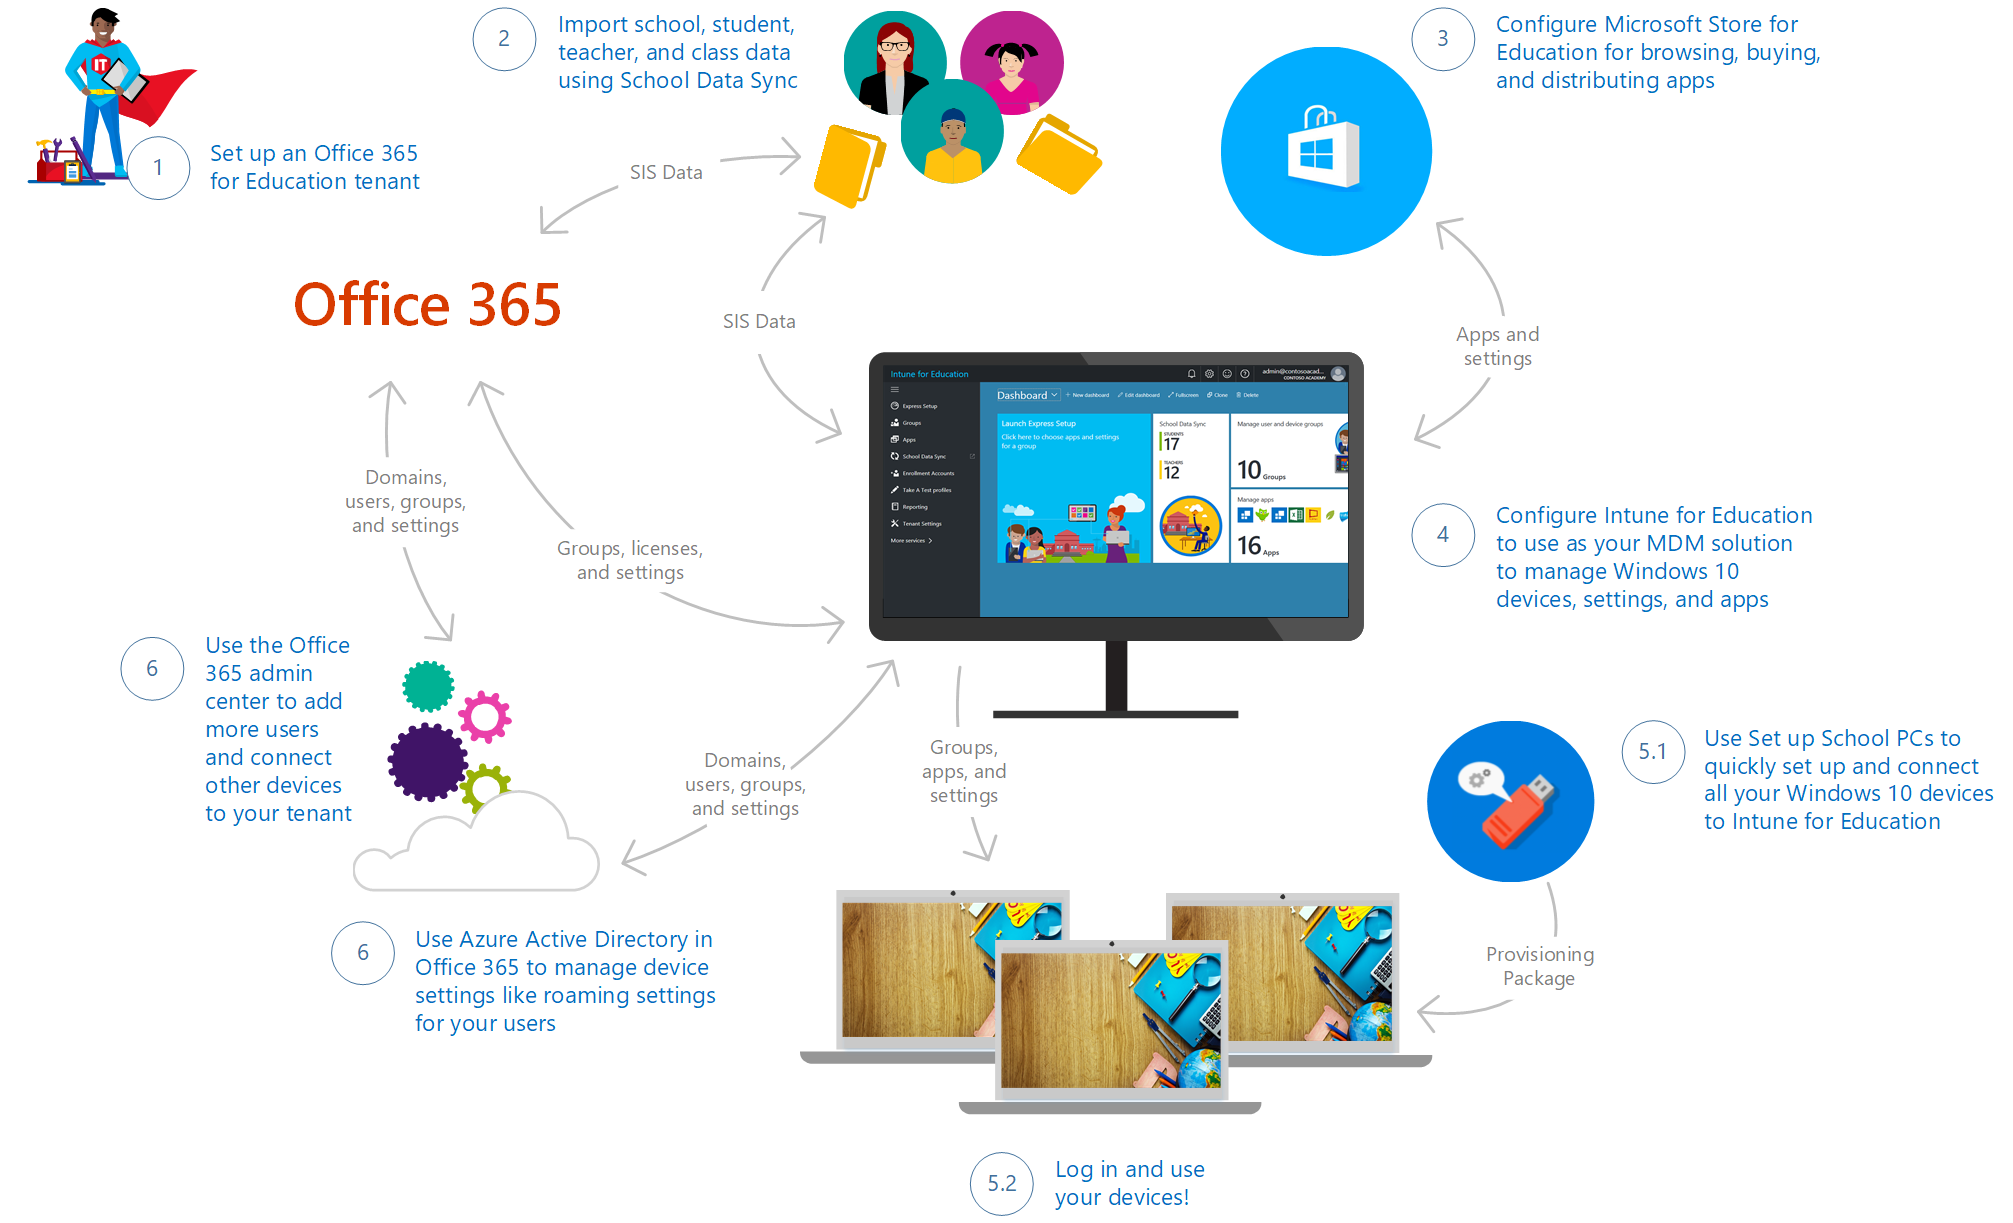
- In the Intune for Education Trial page, click Sign in.
Figure 1 - Intune for Education trial sign in page
- Enter your Office 365 global admin credentials to apply the Intune for Education trial to your tenant.
- Skip ahead and follow the instructions in the walkthrough beginning with 3. Configure Microsoft Store for Education.
1. Set up a new Office 365 for Education tenant
Schools can use Office 365 to save time and be more productive. Built with powerful tools and accessible from any device, setting it up is the first step in getting your school to the cloud.
Don't have an Office 365 for Education verified tenant or just starting out? Follow these steps to set up an Office 365 for Education tenant. Learn more about Office 365 for Education plans and pricing.
- Go to the Office 365 for Education sign up page to sign up for a free subscription for your school.
- Create an account and a user ID and password to use to sign into your account.
Figure 2 - Office 365 account creation

- Save your sign-in info so you can use it to sign into https://portal.office.com (the sign-in page). Click You're ready to go...
- In the Verify eligibility for Microsoft Office 365 for Education screen:
- Add your domain name and follow the steps to confirm ownership of the domain.
- Choose your DNS hosting provider to see step-by-step instructions on how to confirm that you own the domain.
In some cases, you may need to wait several hours for the DNS verification to complete. You can click **I'll verify later** and come back later and log into the Office 365 portal and then go to the **Admin** center and select **Domains** to check the status entry for your domain.

You may need to fill in other information to provide that you qualify for an education tenant. Provide and submit the info to Microsoft to continue verification for your tenant.
As part of setting up a basic cloud infrastructure, you don't need to complete the rest of the Office 365 for Education setup so we will skip the rest of setup for now and start importing school data. You can pick up where you left off with Office 365 for Education setup once you've completed the rest of the steps in the walkthrough. See 6.3 Complete Office 365 for Education setup for info.
2. Use School Data Sync to import student data
School Data Sync (SDS) helps you import Student Information System (SIS) data into Office 365. It helps automate the process for importing and integrating SIS data that you can use with Office 365 and apps like OneNote Class Notebooks.
Follow all the steps in this section to use SDS and sample CSV files in a trial environment. To use SDS in a production environment, see step 2 in Try out Microsoft Education in a production environment instead.
- Go to the O365-EDU-Tools GitHub site.
- Click the green Clone or download button to download the SDS sample files.
Figure 3 - Download the SDS sample files from GitHub

- In the Clone with HTTPS pop-up window, choose Download ZIP and note the location where you're saving the folder.
- Go to the folder where you saved the .zip and unzip the files.
- Open the O365-EDU-Tools-master folder and then open the CSV Samples subfolder. Confirm that you can see the following sample CSV files.
Figure 4 - Sample CSV files

Note
- The sample CSV files uses sample accounts and passwords. If you are using the sample files for testing, remember the accounts and their corresponding passwords. You may be asked to change the password during your first sign in.
- If you are modifying the sample CSV files to use in your organization, change the accounts and passwords to match the user accounts and passwords in your organization.
- If you are using CSV files from your existing production environment, see the detailed instructions in step 5 in the next section.
To learn more about the CSV files that are required and the info you need to include in each file, see CSV files for School Data Sync. If you run into any issues, see School Data Sync errors and troubleshooting.
Use SDS to import student data
- Go to the Microsoft School Data Sync site.
- Click Sign in. You will see the Settings option for Manage School Data Sync.
Figure 5 - Settings for managing SDS

- Turn on School Data Sync. You will get a notification that it is turned on. Click OK.
New menu options will appear on the left of the SDS portal.
Figure 6 - New menu options appear after SDS is turned on

- Click + Add Profile from the sync dashboard or from the menu on the left to start syncing school data.
This opens up the new profile setup wizard within the main page.
Figure 7 - New SDS profile setup wizard

- For the new profile, in the Before you begin... screen:
- Enter a name for your profile, such as ContosoElementarySchool.
- Select a sync method for your profile. For this walkthrough, select CSV Files.
Note that for any sync method that you choose, you can click the **View steps** link to get more information about the steps you need to take depending on the sync method of your choosing.
-
Click Start.
-
In the Sync options screen:
-
Select the domain for the schools/sections. If you have more than one domain, make sure you select the domain that corresponds to the profile you're creating.
-
In the Select school and section properties section, select the properties you want to sync. If you select additional properties, make sure you have these properties and values added in the CSV files. For the walkthrough, we're not changing the default values. These are: - School properties: SIS ID, Name - Section properties: SIS ID, School SIS ID, Section Name
-
In the Select new or existing users section, select either New users or Existing users based on the scenaro that applies to you. - Choose New users if this is a brand new tenant and this is the first time that you're adding users.
Choose the New users option if you are using an unaltered version of the sample CSV files from Download sample school data or if you created your own CSV files with new users.
- Choose **Existing users** if you already have a live production tenant, with teachers and students that already have active accounts in Office 365 (cloud only or synced from on-premise Active Directory).

    Using the **Existing users** option, SDS will not attempt to create new users. Instead, it uses the identity matching options in the next section of the setup wizard to match the students and teachers in your CSV files to the user accounts that already exist in Azure. All additiional details for the students and teachers contained within the CSV files will be written as extension attributes on top of the already existing user objects. You can find more information about these settings on the main SDS deployment page for CSV-based deployments in <a href="http://aka.ms/sdscsv" target="_blank">How to deploy School Data Sync by using CSV files</a>.
- In the Sync option for Section Group Display Name, check the box if you want to allow teachers to overwrite the section names.
- In the License Options section, check the box to select the option.
- Click Next.
**Figure 8** - Sync options for the new profile

- In the Teacher options screen:
- Select the domain for the teachers. SDS uses this to match teachers from your source data to their existing accounts in Office 365/Azure Active Directory. In the walkthrough, the CSV files are our source data.
- In the Select teacher properties section, you can add optional teacher properties to sync. For this walkthrough, you don't have to change the default.
- In the Teacher licenses section, choose the SKU to assign licenses for teachers. For this walkthrough, choose STANDARDWOFFPACK_FACULTY.
- Click Next.
**Figure 9** - Specify options for teacher mapping

- In the Student options screen:
- Select the domain for the students. SDS uses this to match students from your source data to their existing accounts in Office 365/Azure Active Directory. In the walkthrough, the CSV files are our source data.
- In the Select student properties section, you can add optional student properties to sync. For this walkthrough, you don't have to change the default.
- In the Student licenses section, choose the SKU to assign licenses for students. For this walkthrough, choose STANDARDWOFFPACK_STUDENT.
- Click Next.
**Figure 10** - Specify options for student mapping

- In the profile Review page, review the summary and confirm that the values matches with the data you entered. Click Create profile.
You will see a notification that your profile is being created.
- You will see a page for your profile. The status might indicate that it's still being set up.
Figure 11 - SDS profile page

- After the profile name at the top, confirm that the status for your profile now says Ready to sync.
If the status still indicates that the profile is being set up, try refreshing the page until you see the status change to Ready to sync.
Figure 12 - New profile is ready to sync

- On the profile page, below the profile name and profile status, there are four options: Upload Files, Start Sync, Edit, and Delete. Click Upload Files and then follow these steps:
- In the Select data files to be uploaded window, click + Add Files and navigate to the directory where you saved the six CSV files required for data import.
- In the File Explorer window, you will see a folder for the sample CSV files for the UK and six sample CSV files for the US. Select the CSV files that match your region/locale, and then click Open.
- In the Select data files to be uploaded window, confirm that all six CSV files (School.csv, Section.csv, Student.csv, StudentEnrollment.csv, Teacher.csv, and TeacherRoster.csv) are listed and then click Upload.
- After all the files are successfully uploaded, click OK.
- On the profile page, click Start Sync and then follow these steps:
- In the Would you like to start sync for Profile_Name? window, click Start Sync. Profile_Name should match the name you entered for your profile in the Before you begin... screen.
- Confirm that sync successfully started for the file and then click OK.
Note
Sync times, like file download times, can vary widely depending on when you start the sync, how much data you are syncing, the complexity of your data (such as the number of users, schools, and class enrollments), overall system/network load, and other factors. Two people who start a sync at the same time may not have their syncs complete at the same time.
You can refresh the page to confirm that your profile synced successfully.
That's it for importing sample school data using SDS.
3. Configure Microsoft Store for Education
You'll need to configure Microsoft Store for Education to accept the services agreement and make sure your Microsoft Store account is associated with Intune for Education.
Associate your Microsoft Store account with Intune for Education
- Sign into Microsoft Store for Education.
- Accept the Microsoft Store for Business and Education Services Agreement.
This will take you to the Microsoft Store for Education portal.
Figure 13 - Microsoft Store for Education portal

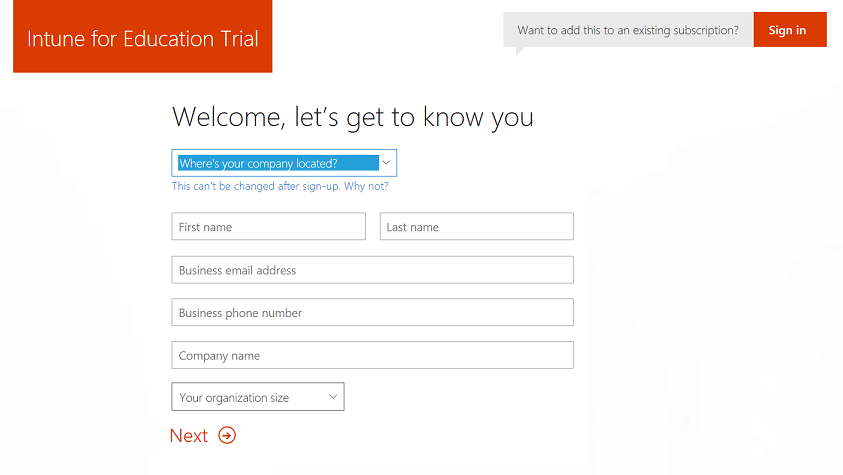
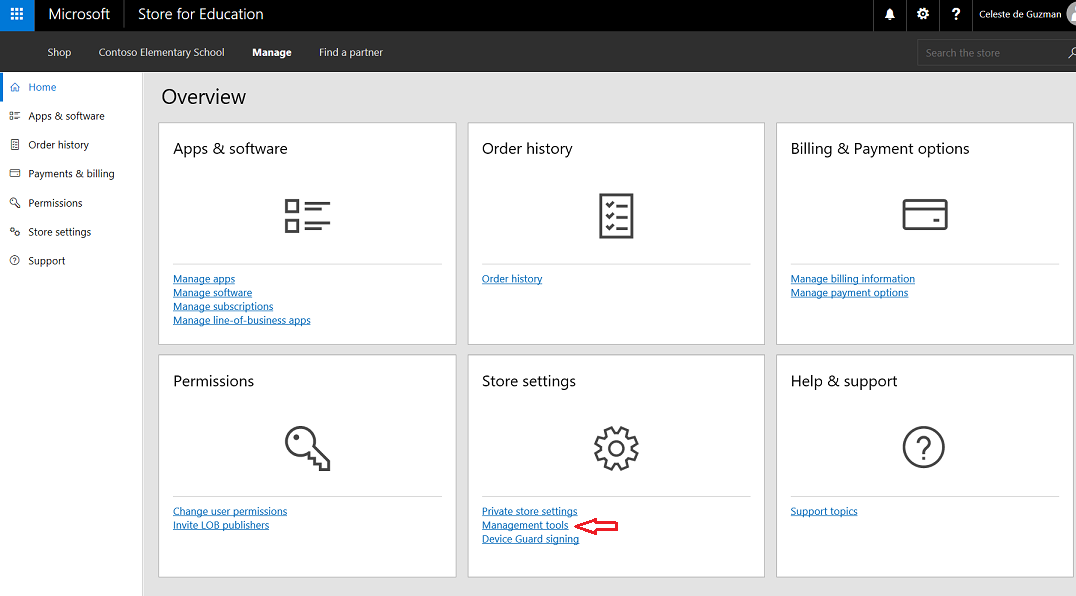
- In the Microsoft Store portal, click Manage to go to the Microsoft Store Overview page.
- Find the Overview page, find the Store settings tile and click Management tools.
Figure 14 - Select management tools from the list of Store settings options
- In the Management tools page, find Microsoft Intune on the list and click Activate to get Intune for Education ready for use with Microsoft Store for Education.
Figure 15 - Activate Intune for Education as the management tool

Your Microsoft Store for Education account is now linked to Intune for Education so let's set that up next.
4. Use Intune for Education to manage groups, apps, and settings
Intune for Education is a streamlined device management solution for educational institutions that can be used to quickly set up and manage Windows 10 devices for your school. It provides a new streamlined UI with the enterprise readiness and resiliency of the Intune service. You can learn more about Intune for Education by reading the Intune for Education documentation.
Example - Set up Intune for Education, buy apps from the Store, and install the apps
In this walkthrough, we'll go through a sample scenario and walk you through the steps to:
- Use express configuration to quickly set up Intune for Education
- Use Intune for Education to buy apps from the Microsoft Store for Education
- Use Intune for Education to install the apps for all users in your tenant
Note that for verified education tenants, Microsoft automatically provisions your app catalog with these apps so you will see them appear on your Intune for Education catalog even before you've bought any apps:
-
Excel
-
Fresh Paint
-
Minecraft: Education Edition
-
OneNote
-
PowerPoint
-
Sway
-
Word
Note
Apps that you own in the Microsoft Store for Education are automatically available in Intune for Education. Any changes you make to your purchases get reflected in Intune for Education.
Intune for Education provides an Express configuration option so you can get going right away. We'll use that option here.
- Log into the Intune for Education console. You will see the Intune for Education dashboard once you're logged in.
Figure 16 - Intune for Education dashboard

- On the dashboard, click Launch Express Configuration, or select the Express configuration option on the menu on the left.
- In the Welcome to Intune for Education screen, click Get started.
Figure 17 - Click Get started to set up Intune for Education

- In the Get school information (optional) screen, it should indicate that SDS is already configured. Click Next.
Figure 18 - SDS is configured

- In the Choose group screen, select All Users. All apps and settings that we select during express setup will apply to this group.
You can choose another group during this step, but note that your experience may vary from what we show in the walkthrough.
- The Next button will appear at the bottom of the screen after you select All Users. Click Next.
Tip
At the top of the screen, did you notice the Choose group button change to a green check mark? This means we are done with that step. If you change your mind or need to make changes, simply click on the button to go back to that step. Try it!
Figure 19 - Click on the buttons to go back to that step

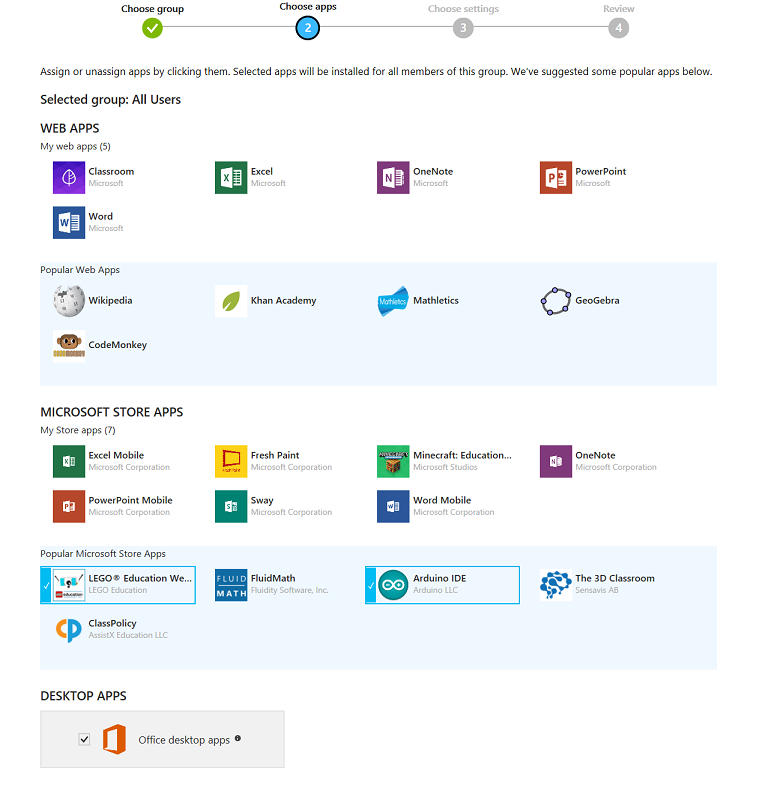
- In the Choose apps screen, you will see a selection of Web apps, Microsoft Store apps, and desktop (Win32) apps. You will also see a list of popular apps from each category.
-
Add or remove apps by clicking on them. A blue checkmark means the app is added and will be installed for all members of the group selected in the Choose group step.
In this walkthrough, it's up to you to select the apps you choose to install. Just remember what they are so that later in the walkthrough you can verify that the apps were installed correctly on the device.
Tip
Web apps are pushed as links in the Windows Start menu under All apps. If you want apps to appear in Microsoft Edge browser tabs, use the Homepages setting for Microsoft Edge through Express configuration or Manage Users and Devices.
Figure 20 - Choose the apps that you want to install for the group
- When you're done choosing apps, click Next at the bottom of the screen.
If you select Microsoft Store apps, you will see a notification that Intune for Education is getting these apps.
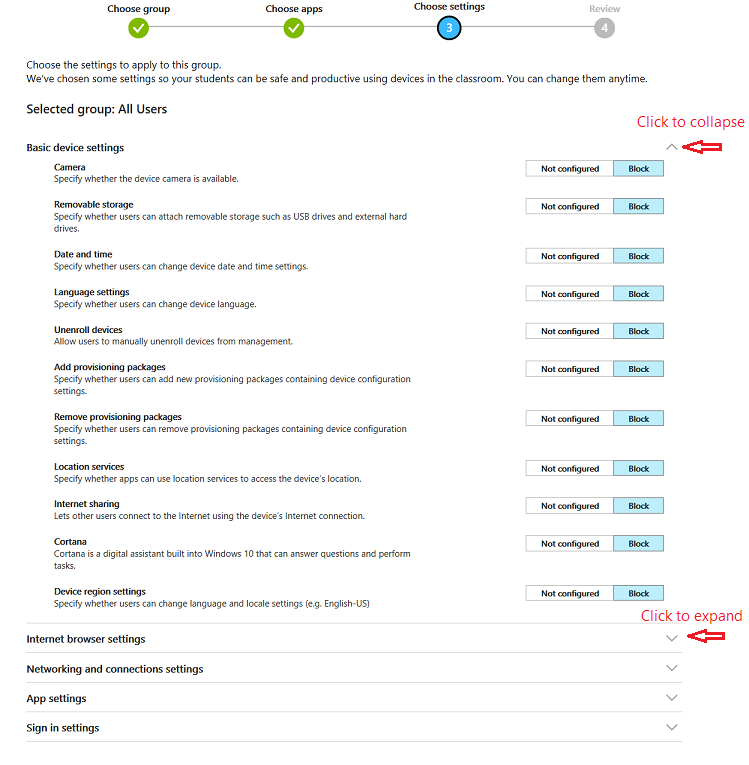
- In the Choose settings screen, we will set the settings to apply to the group. Click the reverse caret (downward-facing arrow) to expand the settings group and get more information about each setting in that settings group.
Figure 21 - Expand the settings group to get more details
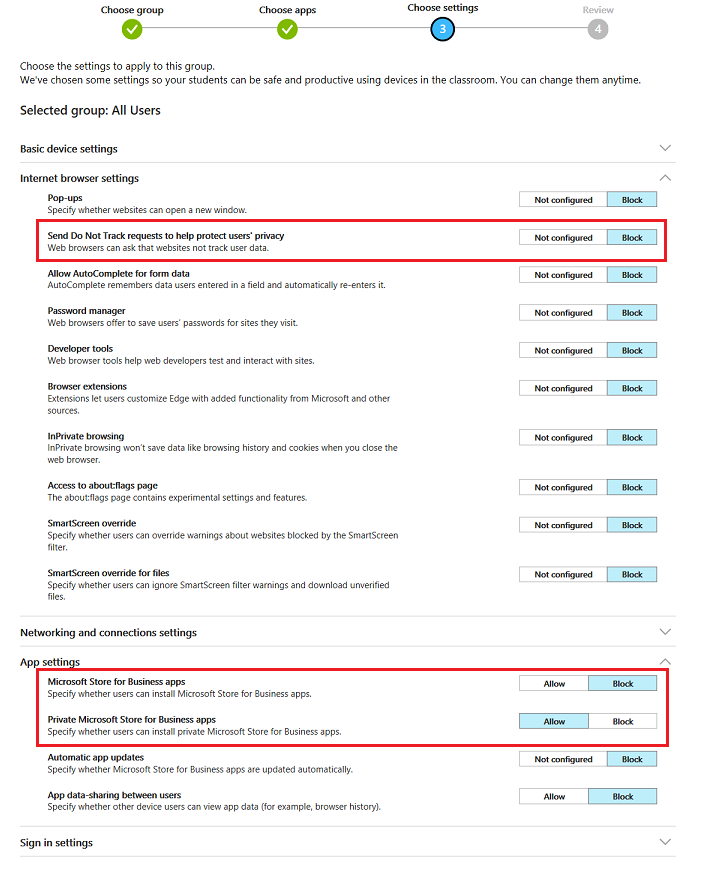
- For this walkthrough, set the following settings:
- In the Internet browser settings group, change the Send Do Not Track requests to help protect users' privacy setting to Block.
- In the App settings group, change the Microsoft Store for Business apps setting to Block, and then set the Private Microsoft Store for Business apps to Allow.
Figure 22 - Set some additional settings
- Click Next. In the Review screen, you will see a summary of the apps and settings you selected to apply.
Figure 23 - Review the group, apps, and settings you configured

- Click Save to end express configuration.
- You will see the You're done! screen which lets you choose one of two options.
Figure 24 - All done with Intune for Education express configuration

- Click All done or click the X on the upper-right corner of the screen to dismiss this screen and go back to the dashboard.
Add apps bought from Microsoft Store for Education
-
Example 1 - Minecraft: Education Edition
If you would like to purchase Minecraft: Education Edition or want to learn how to get, distribute, and manage permissions for Minecraft: Education Edition, see For IT administrators - get Minecraft: Education Edition.
-
Example 2 - Free educational/reference apps
- In the Intune for Education console, click Apps from the menu on the left.
Figure 25 - Click on Apps to see the list of apps for your tenant

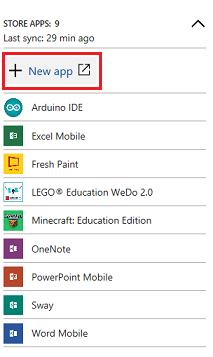
- In the Store apps section, click + New app. This will take you to the Microsoft Store for Education portal and you will already be signed in.
Figure 26 - Select the option to add a new Store app
- In the Microsoft Store page, check some of the categories for suggested apps or search the Store for a free educational or reference app. Find ones that you haven't already installed during express setup for Intune for Education.
For example, these apps are free:
- Duolingo - Learn Languages for Free
- Flashcards Pro
- Khan Academy
- My Study Life
- Find or select the app you want to install and click Get the app.
- In the app's Store page, click the ... button and select Add to private store.
- Repeat steps 3-5 to install another app or move to the next step.
- In the Microsoft Store for Education portal, select Manage > Apps & software > Manage apps to verify that the apps you purchased appear in your inventory.
For example, if you bought Duolingo and Khan Academy, they will show up in your inventory along with the apps that Microsoft automatically provisioned for your education tenant.
Figure 27 - Apps inventory in Microsoft Store for Education
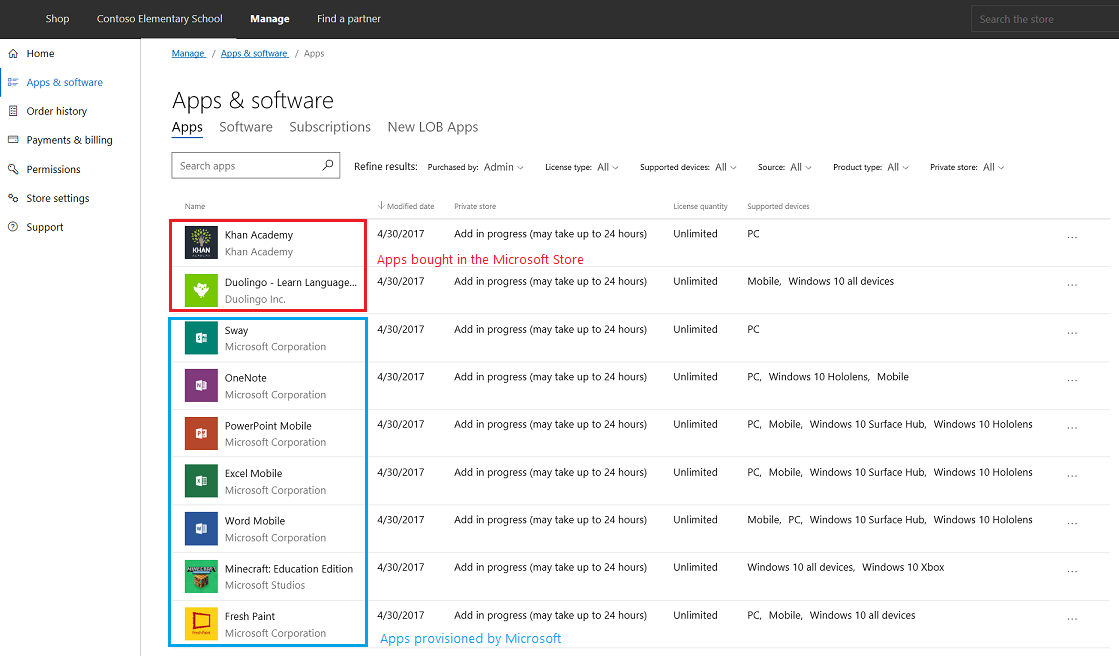
In the Private store column of the Apps & software page, the status for some apps will indicate that it's "In private store" while others will say "Not in private store". We won't go over this in the walkthrough, but you can learn more about this in Distribute apps using your private store.
Note
You'll see in the above screenshot that some apps say that Add is in progress. Sync happens automatically, but it may take up to 24 hours for your organization's private store and 12 hours for Intune for Education to sync all your purchased apps.
Now that you've bought the apps, use Intune for Education to specify the group to install the apps for. Here, we'll show you how to install the apps you bought for all devices used by all users in your tenant.
- In the Intune for Education console, click the Groups option from the menu on the left.
Figure 28 - Groups page in Intune for Education

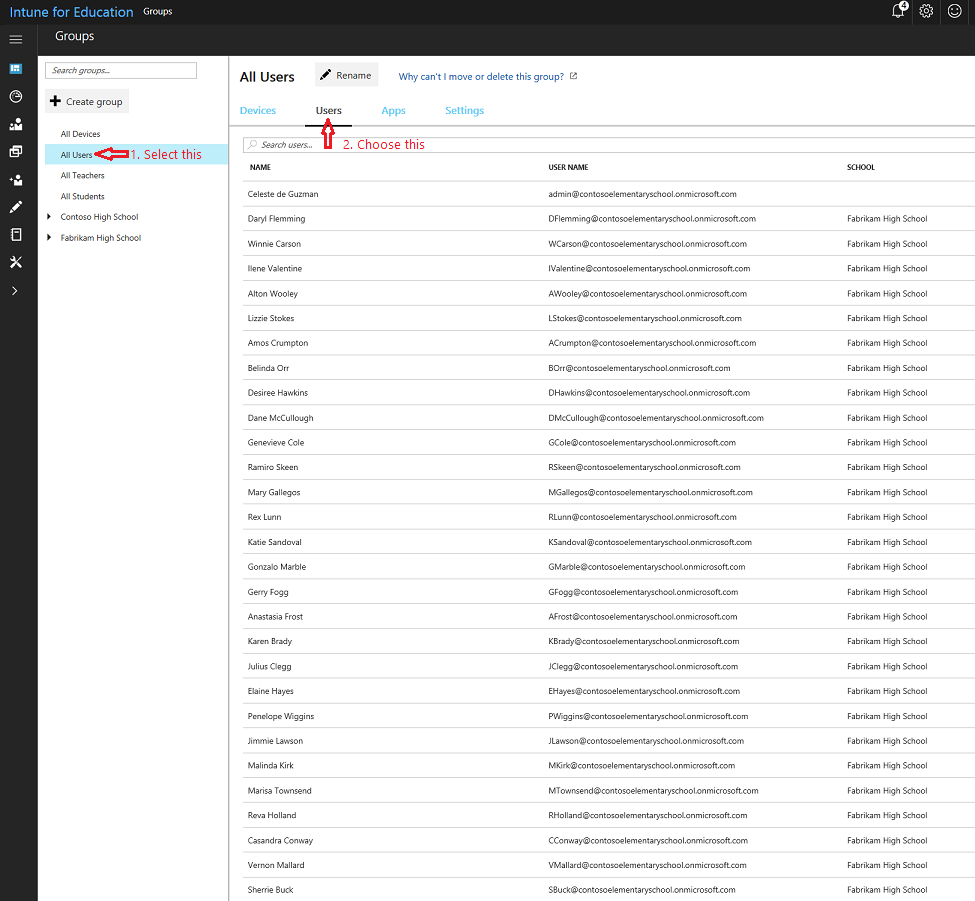
- In the Groups page, select All Users from the list of groups on the left, and then click Users in the taskbar at the top of the All Users page.
Figure 29 - List of all users in the tenant
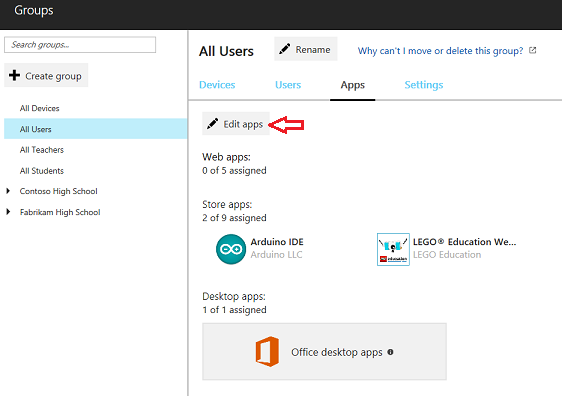
- In the taskbar at the top, select Apps and then click Edit apps to see a list of available apps.
Figure 30 - Edit apps to assign them to users
- Select the apps to deploy to the group. A blue checkmark will appear next to the apps you select.
Figure 31 - Select the apps to deploy to the group

- Once you're done, click Save at the bottom of the page to deploy the selected apps to the group.
- You'll be notified that app assignments are being updated. The updated All Users groups page now include the apps you selected.
Figure 32 - Updated list of assigned apps

You're now done assigning apps to all users in your tenant. It's time to set up your Windows 10 device(s) and check that your cloud infrastructure is correctly set up and your apps are being pushed to your devices from the cloud.
5. Set up Windows 10 devices
5.1 Set up devices using Set up School PCs or Windows OOBE
We recommend using the latest build of Windows 10, version 1703 on your education devices. To set up new Windows 10 devices and enroll them to your education tenant, choose from one of these options:
- Option 1: Use the Set up School PCs app - You can use the app to create a setup file that you can use to quickly set up one or more Windows 10 devices.
- Option 2: Go through Windows OOBE and join the device to Azure AD - You can go through a typical Windows 10 device setup or first-run experience to configure your device.
Option 1: Set up a device using the Set up School PCs app
- Follow the steps in Use the Set up School PCs app to quickly set up one or more student PCs.
- Follow the steps in 5.2 Verify correct device setup.
Option 2: Set up a device using Windows OOBE
- If you don't have a Wi-Fi network configured, make sure you connect the device to the Internet through a wired or Ethernet connection.
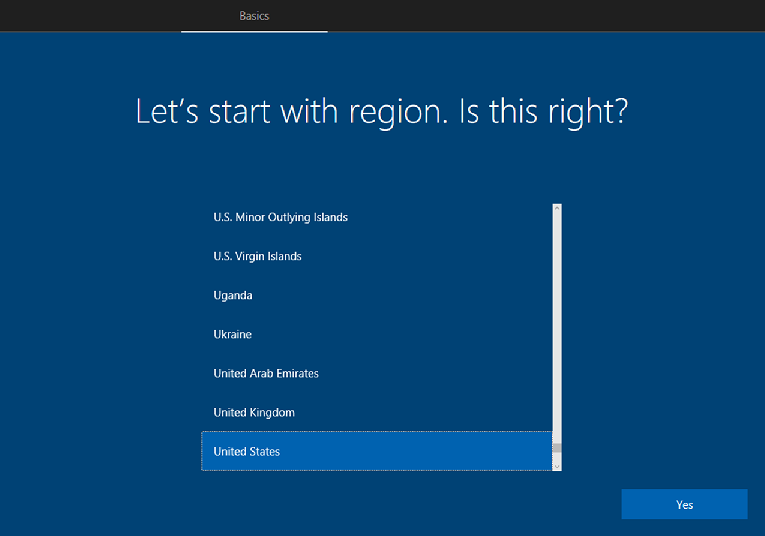
- Go through the Windows device setup experience. On a new or reset device, this starts with the Let's start with region. Is this right? screen.
Figure 33 - Let's start with region
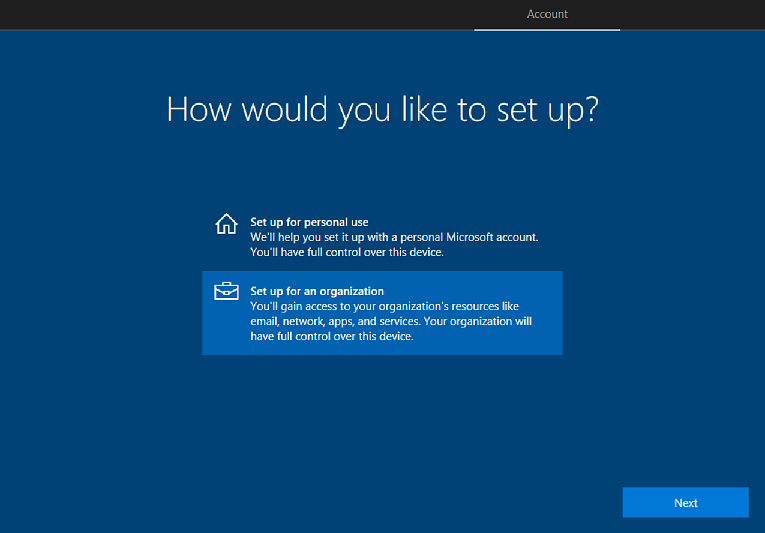
- Continue with setup. In the How would you like to set up? screen, select Set up for an organization.
Figure 34 - Select setup for an organization
- Sign in using the user's account and password. Depending on the user password setting, you may be prompted to update the password.
- Choose privacy settings for the device. Location, speech recognition, diagnostics, and other settings are all on by default. Configure the settings based on the school's policies.
- Click Accept to go through the rest of device setup.
5.2 Verify correct device setup
Verify that the device is set up correctly and boots without any issues.
Verify that the device was set up correctly
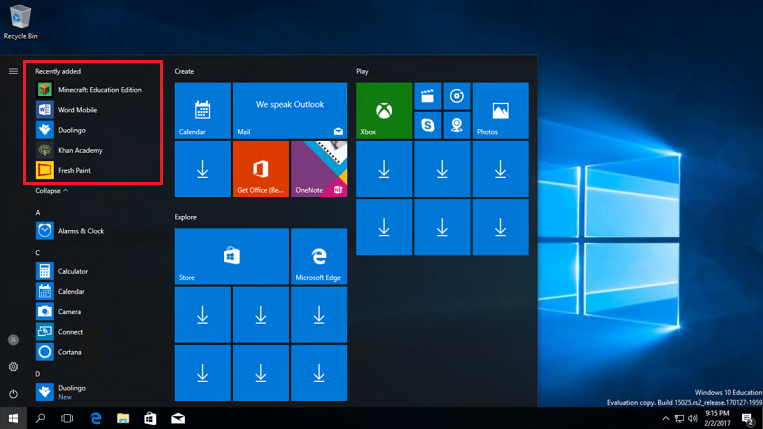
- Confirm that the Start menu contains a simple configuration.
- Confirm that the Store and built-in apps are installed and working. The apps pushed down from Intune for Education will appear under Recently added.
Note
It may take some time before some apps are pushed down to your device from Intune for Education. Check again later if you don't see some of the apps you provisioned for the user.
Figure 35 - Sample list of apps for a user
5.3 Verify the device is Azure AD joined
Let's now verify that the device is joined to your organization's Azure AD and shows up as being managed in Microsoft Intune for Education.
Verify if the device is joined to Azure AD
- Log in to the Intune for Education console.
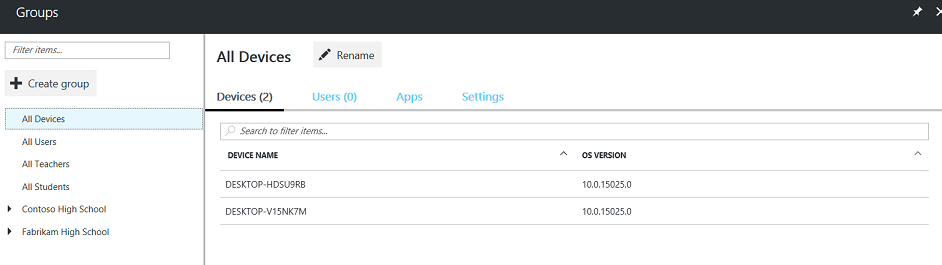
- Select Groups and select All Devices.
- In the All Devices page, see the list of devices and verify that the device you're signed into appears on the list.
Figure 36 - List of all managed devices
- On the Windows 10 education device, click Start and go to Settings.
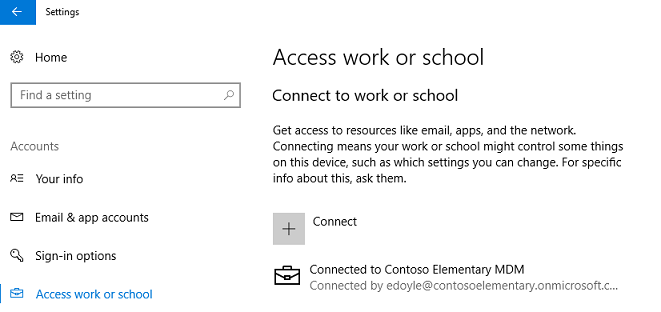
- Select Accounts > Access work or school.
- In the Access work or school page, confirm that the device is connected to the organization's Azure AD.
Figure 37 - Confirm that the Windows 10 device is joined to Azure AD

That's it! You're done! You've completed basic cloud setup, deployment, and management using Microsoft Education. You can continue follow the rest of the walkthrough to finish setup and complete other tasks.
6. Finish setup and other tasks
6.1 Update group settings in Intune for Education
If you need to make changes or updates to any of the apps or settings for the group(s), follow these steps.
- Log in to the Intune for Education console.
- Click Groups and then choose Settings in the taskbar at the top of the page.
- You will see the same settings groups that you saw in express setup for Intune for Education as well as other settings categories such as Windows Defender settings, Device sharing, Edition upgrade, and so on.
Figure 38 - See the list of available settings in Intune for Education

- Keep the default settings or configure the settings according to your school's policies.
For example, you can configure the diagnostic data sent to Microsoft in Basic device settings > Send diagnostic data.
- Click Save or Discard changes.
6.2 Configure Azure settings
After completing the basic setup for your cloud infrastructure and confirming that it is up and running, it's time to prepare for additional devices to be added and enable capabilities for the user to use.
Enable many devices to be added by a single person
When a device is owned by the school, you may need to have a single persion adding many devices to your cloud infrastructure.
Follow the steps in this section to enable a single person to add many devices to your cloud infrastructure.
- Sign in to the Office 365 admin center.
- Click Admin centers and select Azure AD to go to the Azure portal.
- Configure the device settings for the school's Active Directory. From the new Azure portal, https://portal.azure.com, select Azure Active Directory > Users and groups > Device settings.
Figure 39 - Device settings in the new Azure portal

- Find the setting Maximum number of devices per user and change the value to Unlimited.
- Click Save to update device settings.
Enable roaming settings for users
When students move from using one device to another, they may need to have their settings roam with them and be made available on other devices.
Follow the steps in this section to ensure that settings for the each user follow them when they move from one device to another.
- Sign in to the Office 365 admin center.
- Click Admin centers and select Azure AD to go to the Azure portal.
- Configure the device settings for the school's Active Directory. From the new Azure portal, https://portal.azure.com, select Azure Active Directory > Users and groups > Device settings.
- Find the setting Users may sync settings and enterprise app data and change the value to All.
Figure 40 - Enable settings to roam with users

- Click Save to update device settings.
6.3 Complete Office 365 for Education setup
Now that your basic cloud infrastructure is up and running, it's time to complete the rest of the Office 365 for Education setup. You can find detailed information about completing Office 365 setup, services and applications, troubleshooting, and more by reading the Office 365 admin documentation.
6.4 Add more users
After your cloud infrastructure is set up and you have a device management strategy in place, you may need to add more users and you want the same policies to apply to these users. You can add new users to your tenant simply by adding them to the Office 365 groups. Adding new users to Office 365 groups automatically adds them to the corresponding groups in Intune for Education.
See Add users to Office 365 to learn more. Once you're done adding new users, go to the Intune for Education console and verify that the same users were added to the Intune for Education groups as well.
6.5 Connect other devices to your cloud infrastructure
Adding a new device to your cloud-based tenant is easy. For new devices, you can follow the steps in 5. Set up Windows 10 devices. For other devices, such as those personally-owned by teachers who need to connect to the school network to access work or school resources (BYOD), you can follow the steps in this section to get these devices connected.
Note
These steps enable users to get access to the organization's resources, but it also gives the organization some control over the device.
To connect a personal device to your work or school
- On your Windows device, go to Settings > Accounts.
- Select Access work or school and then click Connect in the Connect to work or school page.
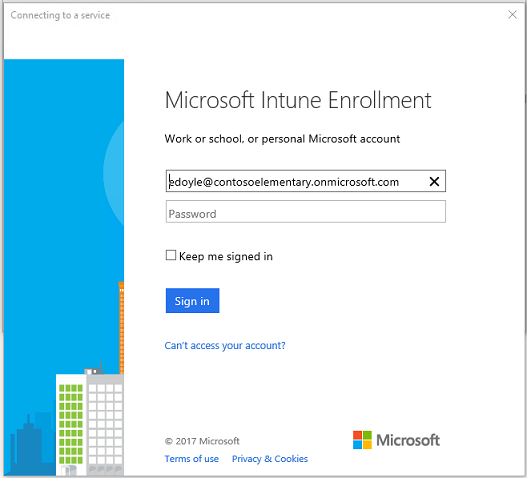
- In the Set up a work or school account window, enter the user's account info.
For example, if a teacher connects their personal device to the school network, they'll see the following screen after typing in their account information.
Figure 41 - Device is now managed by Intune for Education
-
Enter the account password and then click Sign in to authenticate the user.
Depending on the organization's policy, the user may be asked to update the password.
-
After the user's credentails are validated, the window will refresh and will now include an entry that shows the device is now connected to the organization's MDM. This means the device is now enrolled in Intune for Education MDM and the account should have access to the organization's resources.
Figure 42 - Device is connected to organization's MDM
- You can confirm that the new device and user are showing up as Intune for Education-managed by going to the Intune for Education management portal and following the steps in 5.3 Verify the device is Azure AD joined.
It may take several minutes before the new device shows up so check again later.
Get more info
Microsoft Education documentation and resources hub
See the Microsoft Education documentation and resources hub for links to more content for IT admins, teachers, students, and education app developers.
Info related to this walkthrough
For IT admins
To learn more about the services and tools mentioned in this walkthrough, and learn what other tasks you can do, follow these links:
- Working with Microsoft Store for Education
- Resources for anyone who uses Office 365 and Resources for admins in Get started with Office 365 for Education
- School Data Sync deployment options
- Deployment using CSV files: How to deploy School Data Sync by using CSV files and CSV files for School Data Sync
- Deployment using PowerSchool Sync: How to deploy School Data Sync by using PowerSchool Sync and School Data Sync required attributes for PowerSchool Sync
- Deployment using Clever Sync: How to deploy School Data Sync by using Clever Sync and School Data Sync required attributes for Clever sync
- Deployment using OneRoster CSV files: How to deploy School Data Sync by using OneRoster CSV files
For teachers
Whether it's in the classroom, getting the most out of your devices, or learning some of the cool things you can do, we've got teachers covered. Follow these links for more info:
- Resources for anyone who uses Office 365 in Get started with Office 365 for Education
- Windows 10 online resources for teachers