15 KiB
title, keywords, description, search.product, ms.pagetype, ms.prod, ms.mktglfcycl, ms.sitesec, ms.pagetype, ms.localizationpriority, audience, author, ms.author, ms.date, ms.reviewer, manager
| title | keywords | description | search.product | ms.pagetype | ms.prod | ms.mktglfcycl | ms.sitesec | ms.pagetype | ms.localizationpriority | audience | author | ms.author | ms.date | ms.reviewer | manager |
|---|---|---|---|---|---|---|---|---|---|---|---|---|---|---|---|
| Turn on exploit protection to help mitigate against attacks | exploit, mitigation, attacks, vulnerability | Exploit protection in Windows 10 provides advanced configuration over the settings offered in EMET. | eADQiWindows 10XVcnh | security | w10 | manage | library | security | medium | ITPro | levinec | ellevin | 05/09/2019 | dansimp |
Enable exploit protection
Applies to:
Exploit protection helps protect against malware that uses exploits to infect devices and spread. It consists of a number of mitigations that can be applied to either the operating system or individual apps.
Many features from the Enhanced Mitigation Experience Toolkit (EMET) are included in exploit protection.
You can also set mitigations to audit mode. Audit mode allows you to test how the mitigations would work (and review events) without impacting the normal use of the machine.
You can enable each mitigation separately by using any of these methods:
- Windows Security app
- Microsoft Intune
- Mobile Device Management (MDM)
- System Center Configuration Manager (SCCM)
- Group Policy
- PowerShell
They are configured by default in Windows 10.
You can set each mitigation to on, off, or to its default value. Some mitigations have additional options.
You can export these settings as an XML file and deploy them to other machines.
Windows Security app
-
Open the Windows Security app by clicking the shield icon in the task bar or searching the start menu for Defender.
-
Click the App & browser control tile (or the app icon on the left menu bar) and then click Exploit protection.
-
Go to Program settings and choose the app you want to apply mitigations to:
- If the app you want to configure is already listed, click it and then click Edit
- If the app is not listed, at the top of the list click Add program to customize and then choose how you want to add the app:
- Use Add by program name to have the mitigation applied to any running process with that name. You must specify a file with an extension. You can enter a full path to limit the mitigation to only the app with that name in that location.
- Use Choose exact file path to use a standard Windows Explorer file picker window to find and select the file you want.
-
After selecting the app, you'll see a list of all the mitigations that can be applied. Choosing Audit will apply the mitigation in audit mode only. You will be notified if you need to restart the process or app, or if you need to restart Windows.
-
Repeat this for all the apps and mitigations you want to configure.
-
Under the System settings section, find the mitigation you want to configure and select one of the following. Apps that aren't configured individually in the Program settings section will use the settings configured here:
- On by default - The mitigation is enabled for apps that don't have this mitigation set in the app-specific Program settings section
- Off by default - The mitigation is disabled for apps that don't have this mitigation set in the app-specific Program settings section
- Use default - The mitigation is either enabled or disabled, depending on the default configuration that is set up by Windows 10 installation; the default value (On or Off) is always specified next to the Use default label for each mitigation
-
Repeat this for all the system-level mitigations you want to configure. Click Apply when you're done setting up your configuration.
If you add an app to the Program settings section and configure individual mitigation settings there, they will be honored above the configuration for the same mitigations specified in the System settings section. The following matrix and examples help to illustrate how defaults work:
| Enabled in Program settings | Enabled in System settings | Behavior |
|---|---|---|
| [!includeCheck mark yes] | [!includeCheck mark no] | As defined in Program settings |
| [!includeCheck mark yes] | [!includeCheck mark yes] | As defined in Program settings |
| [!includeCheck mark no] | [!includeCheck mark yes] | As defined in System settings |
| [!includeCheck mark no] | [!includeCheck mark yes] | Default as defined in Use default option |
Example 1
Mikael configures Data Execution Prevention (DEP) in the System settings section to be Off by default.
Mikael then adds the app test.exe to the Program settings section. In the options for that app, under Data Execution Prevention (DEP), he enables the Override system settings option and sets the switch to On. There are no other apps listed in the Program settings section.
The result will be that DEP only will be enabled for test.exe. All other apps will not have DEP applied.
Example 2
Josie configures Data Execution Prevention (DEP) in the System settings section to be Off by default.
Josie then adds the app test.exe to the Program settings section. In the options for that app, under Data Execution Prevention (DEP), she enables the Override system settings option and sets the switch to On.
Josie also adds the app miles.exe to the Program settings section and configures Control flow guard (CFG) to On. She doesn't enable the Override system settings option for DEP or any other mitigations for that app.
The result will be that DEP will be enabled for test.exe. DEP will not be enabled for any other app, including miles.exe. CFG will be enabled for miles.exe.
-
Open the Windows Security app by clicking the shield icon in the task bar or searching the start menu for Defender.
-
Click the App & browser control tile (or the app icon on the left menu bar) and then click Exploit protection.
-
Go to Program settings and choose the app you want to apply mitigations to:
- If the app you want to configure is already listed, click it and then click Edit
- If the app is not listed, at the top of the list click Add program to customize and then choose how you want to add the app:
- Use Add by program name to have the mitigation applied to any running process with that name. You must specify a file with an extension. You can enter a full path to limit the mitigation to only the app with that name in that location.
- Use Choose exact file path to use a standard Windows Explorer file picker window to find and select the file you want.
-
After selecting the app, you'll see a list of all the mitigations that can be applied. Choosing Audit will apply the mitigation in audit mode only. You will be notified if you need to restart the process or app, or if you need to restart Windows.
-
Repeat this for all the apps and mitigations you want to configure. Click Apply when you're done setting up your configuration.
Intune
- Sign in to the Azure portal and open Intune.
- Click Device configuration > Profiles > Create profile.
- Name the profile, choose Windows 10 and later and Endpoint protection.
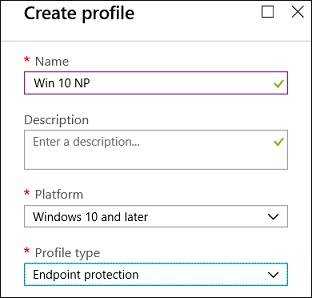
- Click Configure > Windows Defender Exploit Guard > Exploit protection.
- Upload an XML file with the exploit protection settings:
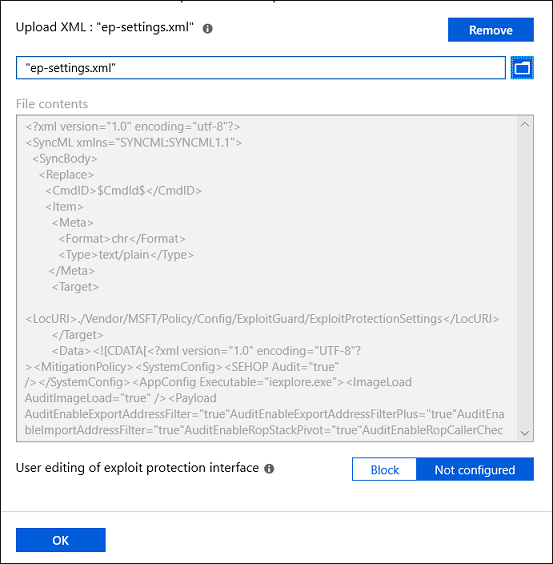
- Click OK to save each open blade and click Create.
- Click the profile Assignments, assign to All Users & All Devices, and click Save.
MDM
Use the ./Vendor/MSFT/Policy/Config/ExploitGuard/ExploitProtectionSettings configuration service provider (CSP) to enable or disable exploit protection mitigations or to use audit mode.
SCCM
- In System Center Configuration Manager, click Assets and Compliance > Endpoint Protection > Windows Defender Exploit Guard.
- Click Home > Create Exploit Guard Policy.
- Enter a name and a description, click Exploit protection, and click Next.
- Browse to the location of the exploit protection XML file and click Next.
- Review the settings and click Next to create the policy.
- After the policy is created, click Close.
Group Policy
-
On your Group Policy management machine, open the Group Policy Management Console, right-click the Group Policy Object you want to configure and click Edit.
-
In the Group Policy Management Editor go to Computer configuration and click Administrative templates.
-
Expand the tree to Windows components > Windows Defender Exploit Guard > Exploit Protection > Use a common set of exploit protection settings.
-
Click Enabled and type the location of the XML file and click OK.
PowerShell
You can use the PowerShell verb Get or Set with the cmdlet ProcessMitigation. Using Get will list the current configuration status of any mitigations that have been enabled on the device - add the -Name cmdlet and app exe to see mitigations for just that app:
Get-ProcessMitigation -Name processName.exe
Important
System-level mitigations that have not been configured will show a status of
NOTSET.For system-level settings,
NOTSETindicates the default setting for that mitigation has been applied.For app-level settings,
NOTSETindicates the system-level setting for the mitigation will be applied.The default setting for each system-level mitigation can be seen in the Windows Security.
Use Set to configure each mitigation in the following format:
Set-ProcessMitigation -<scope> <app executable> -<action> <mitigation or options>,<mitigation or options>,<mitigation or options>
Where:
- <Scope>:
-Nameto indicate the mitigations should be applied to a specific app. Specify the app's executable after this flag.-Systemto indicate the mitigation should be applied at the system level
- <Action>:
-Enableto enable the mitigation-Disableto disable the mitigation
- <Mitigation>:
- The mitigation's cmdlet along with any suboptions (surrounded with spaces). Each mitigation is separated with a comma.
For example, to enable the Data Execution Prevention (DEP) mitigation with ATL thunk emulation and for an executable called testing.exe in the folder C:\Apps\LOB\tests, and to prevent that executable from creating child processes, you'd use the following command:
Set-ProcessMitigation -Name c:\apps\lob\tests\testing.exe -Enable DEP, EmulateAtlThunks, DisallowChildProcessCreation
Important
Separate each mitigation option with commas.
If you wanted to apply DEP at the system level, you'd use the following command:
Set-Processmitigation -System -Enable DEP
To disable mitigations, you can replace -Enable with -Disable. However, for app-level mitigations, this will force the mitigation to be disabled only for that app.
If you need to restore the mitigation back to the system default, you need to include the -Remove cmdlet as well, as in the following example:
Set-Processmitigation -Name test.exe -Remove -Disable DEP
This table lists the PowerShell cmdlets (and associated audit mode cmdlet) that can be used to configure each mitigation.
Mitigation | Applies to | PowerShell cmdlets | Audit mode cmdlet
- | - | - | - Control flow guard (CFG) | System and app-level | CFG, StrictCFG, SuppressExports | Audit not available Data Execution Prevention (DEP) | System and app-level | DEP, EmulateAtlThunks | Audit not available Force randomization for images (Mandatory ASLR) | System and app-level | ForceRelocateImages | Audit not available Randomize memory allocations (Bottom-Up ASLR) | System and app-level | BottomUp, HighEntropy | Audit not available Validate exception chains (SEHOP) | System and app-level | SEHOP, SEHOPTelemetry | Audit not available Validate heap integrity | System and app-level | TerminateOnHeapError | Audit not available Arbitrary code guard (ACG) | App-level only | DynamicCode | AuditDynamicCode Block low integrity images | App-level only | BlockLowLabel | AuditImageLoad Block remote images | App-level only | BlockRemoteImages | Audit not available Block untrusted fonts | App-level only | DisableNonSystemFonts | AuditFont, FontAuditOnly Code integrity guard | App-level only | BlockNonMicrosoftSigned, AllowStoreSigned | AuditMicrosoftSigned, AuditStoreSigned Disable extension points | App-level only | ExtensionPoint | Audit not available Disable Win32k system calls | App-level only | DisableWin32kSystemCalls | AuditSystemCall Do not allow child processes | App-level only | DisallowChildProcessCreation | AuditChildProcess Export address filtering (EAF) | App-level only | EnableExportAddressFilterPlus, EnableExportAddressFilter [1] | Audit not available Import address filtering (IAF) | App-level only | EnableImportAddressFilter | Audit not available Simulate execution (SimExec) | App-level only | EnableRopSimExec | Audit not available Validate API invocation (CallerCheck) | App-level only | EnableRopCallerCheck | Audit not available Validate handle usage | App-level only | StrictHandle | Audit not available Validate image dependency integrity | App-level only | EnforceModuleDepencySigning | Audit not available Validate stack integrity (StackPivot) | App-level only | EnableRopStackPivot | Audit not available
[1]: Use the following format to enable EAF modules for dlls for a process:
Set-ProcessMitigation -Name processName.exe -Enable EnableExportAddressFilterPlus -EAFModules dllName1.dll,dllName2.dll
Customize the notification
See the Windows Security topic for more information about customizing the notification when a rule is triggered and blocks an app or file.