12 KiB
title, description, ms.author, ms.topic, ms.prod, ms.technology, author, ms.localizationpriority, ms.date, ms.reviewer, manager
| title | description | ms.author | ms.topic | ms.prod | ms.technology | author | ms.localizationpriority | ms.date | ms.reviewer | manager |
|---|---|---|---|---|---|---|---|---|---|---|
| Enable ADMX policies in MDM | Use this step-by-step guide to configure a selected set of Group Policy administrative templates (ADMX policies) in Mobile Device Management (MDM). | dansimp | article | w10 | windows | manikadhiman | medium | 11/01/2017 | dansimp |
Enable ADMX policies in MDM
Here's how to configure Group Policy administrative templates (ADMX policies) in Mobile Device Management (MDM).
Starting in Windows 10 version 1703, Mobile Device Management (MDM) policy configuration support was expanded to allow access of selected set of Group Policy administrative templates (ADMX policies) for Windows PCs via the Policy configuration service provider (CSP). Configuring ADMX policies in Policy CSP is different from the typical way you configure a traditional MDM policy.
Summary of steps to enable a policy:
- Find the policy from the list ADMX policies.
- Find the Group Policy related information from the MDM policy description.
- Use the Group Policy Editor to determine whether there are parameters necessary to enable the policy.
- Create the data payload for the SyncML.
See Support Tip: Ingesting Office ADMX policies using Microsoft Intune and Deploying ADMX policies using Microsoft Intune for a walk-through using Intune.
Enable a policy
Note
-
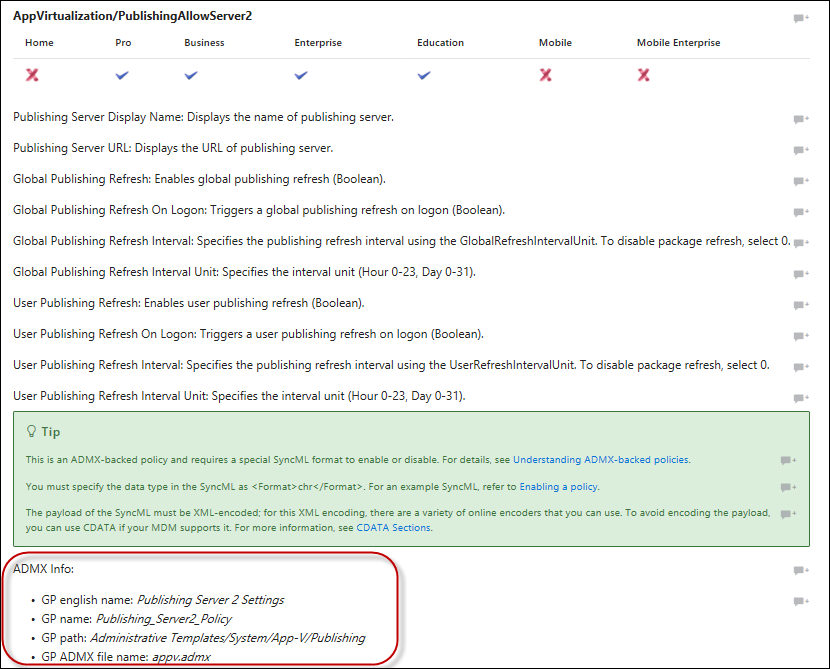
Find the policy from the list ADMX policies. You need the following information listed in the policy description.
- GP English name
- GP name
- GP ADMX file name
- GP path
-
Use the Group Policy Editor to determine whether you need additional information to enable the policy. Run GPEdit.msc
-
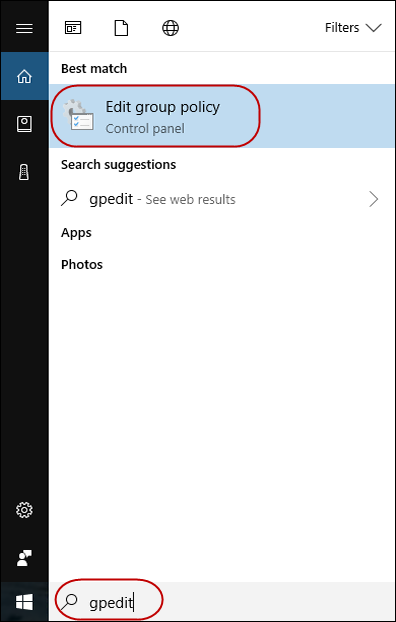
Click Start, then in the text box type gpedit.
-
Under Best match, click Edit group policy to launch it.
-
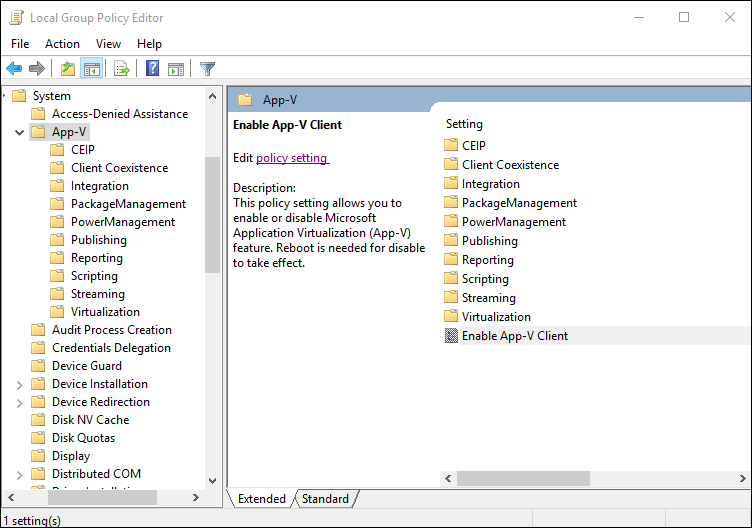
In Local Computer Policy navigate to the policy you want to configure.
In this example, navigate to Administrative Templates > System > App-V.
-
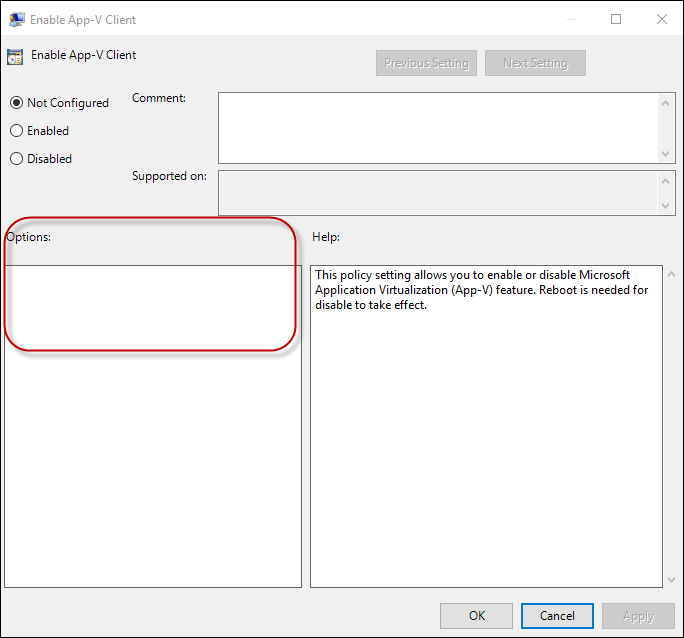
Double-click Enable App-V Client.
The Options section is empty, which means there are no parameters necessary to enable the policy. If the Options section is not empty, follow the procedure in Enable a policy that requires parameters
-
-
Create the SyncML to enable the policy that does not require any parameter.
In this example, you configure Enable App-V Client to Enabled.
Note
The <Data> payload must be XML encoded. To avoid encoding, you can use CData if your MDM supports it. For more information, see CDATA Sections. If you are using Intune, select String as the data type.
<SyncML xmlns="SYNCML:SYNCML1.2">
  <SyncBody>
    <Replace>
      <CmdID>2</CmdID>
      <Item>
        <Meta>
          <Format>chr</Format>
          <Type>text/plain</Type>
        </Meta>
        <Target>
          <LocURI>./Device/Vendor/MSFT/Policy/Config/AppVirtualization/AllowAppVClient </LocURI>
        </Target>
        <Data><Enabled/></Data>
      </Item>
    </Replace>
    <Final/>
  </SyncBody>
</SyncML>
Enable a policy that requires parameters
-
Create the SyncML to enable the policy that requires parameters.
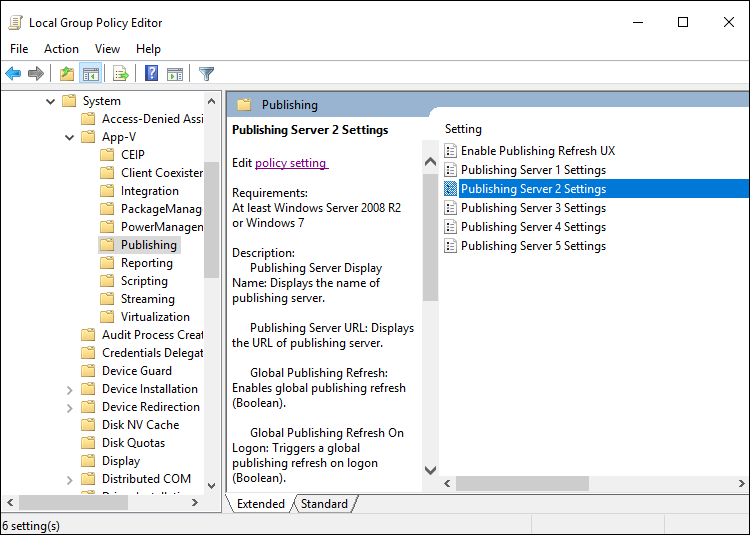
In this example, the policy is in Administrative Templates > System > App-V > Publishing.
-
Double-click Publishing Server 2 Settings to see the parameters you need to configure when you enable this policy.
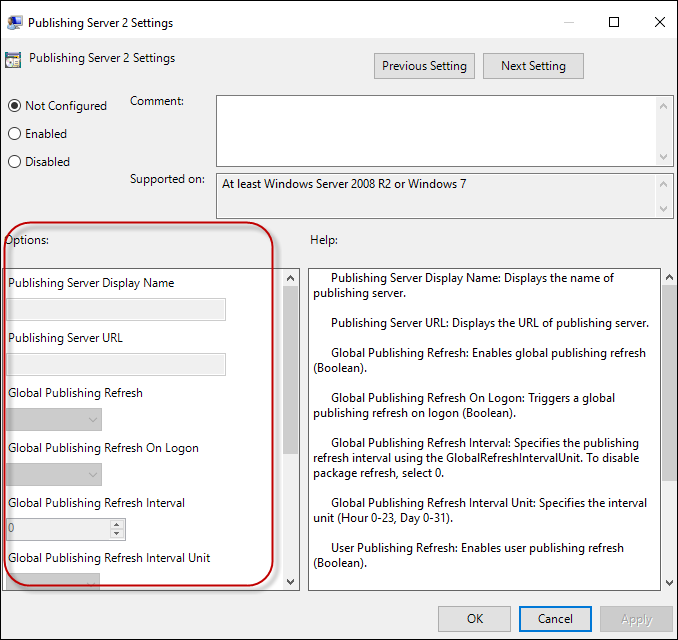
-
Find the variable names of the parameters in the ADMX file.
You can find the ADMX file name in the policy description in Policy CSP. In this example, the filename appv.admx is listed in AppVirtualization/PublishingAllowServer2.
-
Navigate to C:\Windows\PolicyDefinitions (default location of the ADMX files) and open appv.admx.
-
Search for GP name Publishing_Server2_policy.
-
Under policy name="Publishing_Server2_Policy" you can see the <elements> listed. The text id and enum id represents the data id you need to include in the SyncML data payload. They correspond to the fields you see in the Group Policy Editor.
Here is the snippet from appv.admx:
<!-- Publishing Server 2 --> <policy name="Publishing_Server2_Policy" class="Machine" displayName="$(string.PublishingServer2)" explainText="$(string.Publishing_Server_Help)" presentation="$(presentation.Publishing_Server2)" key="SOFTWARE\Policies\Microsoft\AppV\Client\Publishing\Servers\2"> <parentCategory ref="CAT_Publishing" /> <supportedOn ref="windows:SUPPORTED_Windows7" /> <elements> <text id="Publishing_Server2_Name_Prompt" valueName="Name" required="true"/> <text id="Publishing_Server_URL_Prompt" valueName="URL" required="true"/> <enum id="Global_Publishing_Refresh_Options" valueName="GlobalEnabled"> <item displayName="$(string.False)"> <value> <decimal value="0"/> </value> </item> <item displayName="$(string.True)"> <value> <decimal value="1"/> </value> </item> </enum> <enum id="Global_Refresh_OnLogon_Options" valueName="GlobalLogonRefresh"> <item displayName="$(string.False)"> <value> <decimal value="0"/> </value> </item> <item displayName="$(string.True)"> <value> <decimal value="1"/> </value> </item> </enum> <decimal id="Global_Refresh_Interval_Prompt" valueName="GlobalPeriodicRefreshInterval" minValue="0" maxValue="31"/> <enum id="Global_Refresh_Unit_Options" valueName="GlobalPeriodicRefreshIntervalUnit"> <item displayName="$(string.Hour)"> <value> <decimal value="0"/> </value> </item> <item displayName="$(string.Day)"> <value> <decimal value="1"/> </value> </item> </enum> <enum id="User_Publishing_Refresh_Options" valueName="UserEnabled"> <item displayName="$(string.False)"> <value> <decimal value="0"/> </value> </item> <item displayName="$(string.True)"> <value> <decimal value="1"/> </value> </item> </enum> <enum id="User_Refresh_OnLogon_Options" valueName="UserLogonRefresh"> <item displayName="$(string.False)"> <value> <decimal value="0"/> </value> </item> <item displayName="$(string.True)"> <value> <decimal value="1"/> </value> </item> </enum> <decimal id="User_Refresh_Interval_Prompt" valueName="UserPeriodicRefreshInterval" minValue="0" maxValue="31"/> <enum id="User_Refresh_Unit_Options" valueName="UserPeriodicRefreshIntervalUnit"> <item displayName="$(string.Hour)"> <value> <decimal value="0"/> </value> </item> <item displayName="$(string.Day)"> <value> <decimal value="1"/> </value> </item> </enum> </elements> </policy> -
From the <elements> tag, copy all of the text id and enum id and create an XML with data id and value fields. The value field contains the configuration settings that you would enter in the Group Policy Editor.
Here is the example XML for Publishing_Server2_Policy:
<data id="Publishing_Server2_Name_Prompt" value="Name"/> <data id="Publishing_Server_URL_Prompt" value="http://someuri"/> <data id="Global_Publishing_Refresh_Options" value="1"/> <data id="Global_Refresh_OnLogon_Options" value="0"/> <data id="Global_Refresh_Interval_Prompt" value="15"/> <data id="Global_Refresh_Unit_Options" value="0"/> <data id="User_Publishing_Refresh_Options" value="0"/> <data id="User_Refresh_OnLogon_Options" value="0"/> <data id="User_Refresh_Interval_Prompt" value="15"/> <data id="User_Refresh_Unit_Options" value="1"/> -
Create the SyncML to enable the policy. Payload contains <enabled/> and name/value pairs.
Here is the example for AppVirtualization/PublishingAllowServer2:
Note
The <Data> payload must be XML encoded. To avoid encoding, you can use CData if your MDM supports it. For more information, see CDATA Sections. If you are using Intune, select String as the data type.
<?xml version="1.0" encoding="utf-8"?>
   <SyncML xmlns="SYNCML:SYNCML1.2">
     <SyncBody>
       <Replace>
         <CmdID>2</CmdID>
         <Item>
           <Meta>
             <Format>chr</Format>
             <Type>text/plain</Type>
           </Meta>
           <Target>
            <LocURI>./Device/Vendor/MSFT/Policy/Config/AppVirtualization/PublishingAllowServer2</LocURI>
           </Target>
           <Data>
           <![CDATA[<enabled/><data id="Publishing_Server2_Name_Prompt" value="name prompt"/><data
             id="Publishing_Server_URL_Prompt" value="URL prompt"/><data
             id="Global_Publishing_Refresh_Options" value="1"/><data
             id="Global_Refresh_OnLogon_Options" value="0"/><data
             id="Global_Refresh_Interval_Prompt" value="15"/><data
             id="Global_Refresh_Unit_Options" value="0"/><data
             id="User_Publishing_Refresh_Options" value="0"/><data
             id="User_Refresh_OnLogon_Options" value="0"/><data
             id="User_Refresh_Interval_Prompt" value="15"/><data
             id="User_Refresh_Unit_Options" value="1"/>]]>
           </Data>
         </Item>
       </Replace>
       <Final/>
     </SyncBody>
   </SyncML>
Disable a policy
The <Data> payload is <disabled/>. Here is an example to disable AppVirtualization/PublishingAllowServer2.
<SyncML xmlns="SYNCML:SYNCML1.2">
  <SyncBody>
    <Replace>
      <CmdID>2</CmdID>
      <Item>
        <Meta>
          <Format>chr</Format>
          <Type>text/plain</Type>
        </Meta>
        <Target>
          <LocURI>./Device/Vendor/MSFT/Policy/Config/AppVirtualization/PublishingAllowServer2</LocURI>
        </Target>
        <Data><disabled/></Data>
      </Item>
    </Replace>
    <Final/>
  </SyncBody>
</SyncML>
Setting a policy to not configured
The <Data> payload is empty. Here an example to set AppVirtualization/PublishingAllowServer2 to "Not Configured."
<?xml version="1.0" encoding="utf-8"?>
<SyncML xmlns="SYNCML:SYNCML1.2">
  <SyncBody>
    <Delete>
      <CmdID>1</CmdID>
      <Item>
        <Target>
          <LocURI>./Device/Vendor/MSFT/Policy/Config/AppVirtualization/PublishingAllowServer2</LocURI>
        </Target>
      </Item>
    </Delete>
    <Final/>
  </SyncBody>
</SyncML>