16 KiB
title, description, ms.prod, ms.mktglfcycl, author, ms.localizationpriority, ms.author, ms.collection, manager, ms.topic
| title | description | ms.prod | ms.mktglfcycl | author | ms.localizationpriority | ms.author | ms.collection | manager | ms.topic |
|---|---|---|---|---|---|---|---|---|---|
| Configure Windows Update for Business via Group Policy | Walk-through demonstration of how to configure Windows Update for Business settings using Group Policy. | w10 | manage | jaimeo | medium | jaimeo | m365initiative-coredeploy | laurawi | article |
Walkthrough: Use Group Policy to configure Windows Update for Business
Applies to
- Windows 10
- Windows 11
Looking for consumer information? See Windows Update: FAQ
Overview
You can use Group Policy through the Group Policy Management Console (GPMC) to control how Windows Update for Business works. You should consider and devise a deployment strategy for updates before you make changes to the Windows Update for Business settings. See Prepare servicing strategy for Windows client updates for more information.
An IT administrator can set policies for Windows Update for Business by using Group Policy, or they can be set locally (per device). All of the relevant policies are under the path Computer configuration > Administrative Templates > Windows Components > Windows Update.
To manage updates with Windows Update for Business as described in this article, you should prepare with these steps, if you haven't already:
- Create Active Directory security groups that align with the deployment rings you use to phase deployment of updates.
- Allow access to the Windows Update service.
- Download and install ADMX templates appropriate to your Windows 10 version. For more information, see How to create and manage the Central Store for Group Policy Administrative Templates in Windows and Step-By-Step: Managing Windows 10 with Administrative templates.
Set up Windows Update for Business
In this example, one security group is used to manage updates. Typically we would recommend having at least three rings (early testers for pre-release builds, broad deployment for releases, critical devices for mature releases) to deploy.
Follow these steps on a device running the Remote Server Administration Tools or on a domain controller:
Set up a ring
- Start Group Policy Management Console (gpmc.msc).
- Expand Forest > Domains > *<your domain>.
- Right-click <your domain> and select Create a GPO in this domain and link it here.
- In the New GPO dialog box, enter Windows Update for Business - Group 1 as the name of the new Group Policy Object.
- Right-click the "Windows Update for Business - Group 1" object, and then select Edit.
- In the Group Policy Management Editor, go to Computer Configuration > Policies > Administrative Templates > Windows Components > Windows Update. You are now ready to start assigning policies to this ring (group) of devices.
Manage Windows Update offerings
You can control when updates are applied, for example by deferring when an update is installed on a device or by pausing updates for a certain period of time.
Determine which updates you want offered to your devices
Both feature and quality updates are automatically offered to devices that are connected to Windows Update using Windows Update for Business policies. However, you can choose whether you want the devices to additionally receive other Microsoft Updates or drivers that are applicable to that device.
To enable Microsoft Updates use the Group Policy Management Console go to Computer Configuration > Administrative Templates > Windows Components > Windows Update > Configure Automatic Updates and select Install updates for other Microsoft products.
Drivers are automatically enabled because they are beneficial to device systems. We recommend that you allow the driver policy to allow drivers to update on devices (the default), but you can turn this setting off if you prefer to manage drivers manually. If you want to disable driver updates for some reason, use the Group Policy Management Console to go to Computer Configuration > Administrative Templates > Windows Components > Windows Update > Do not include drivers with Windows Updates and enable the policy.
We also recommend that you allow Microsoft product updates as discussed previously.
Set when devices receive feature and quality updates
I want to receive pre-release versions of the next feature update
- Ensure that you are enrolled in the Windows Insider Program for Business. This is a completely free program available to commercial customers to aid them in their validation of feature updates before they are released. Joining the program enables you to receive updates prior to their release as well as receive emails and content related to what is coming in the next updates.
- Use Group Policy Management Console to go to: Computer Configuration > Administrative Templates > Windows Components > Windows Update > Windows Update for Business > Manage preview builds and set the policy to Enable preview builds for any of test devices you want to install pre-release builds.
- Use Group Policy Management Console to go to Computer Configuration > Administrative Templates > Windows Components > Windows Update > Windows Update for Business > Select when Preview Builds and feature updates are received. In the Options pane, use the pulldown menu to select one of the preview builds. We recomment Windows Insider Program Slow for commercial customers using pre-release builds for validation.
- Select OK.
I want to manage which released feature update my devices receive
A Windows Update for Business administrator can defer or pause updates. You can defer feature updates for up to 365 days and defer quality updates for up to 30 days. Deferring simply means that you will not receive the update until it has been released for at least the number of deferral days you specified (offer date = release date + deferral date). You can pause feature or quality updates for up to 35 days from a given start date that you specify.
- To defer or pause a feature update: Computer configuration > Administrative Templates > Windows Components > Windows Update > Windows Update for Business > Select when Preview Builds and feature updates are Received
- Defer or pause a quality update: Computer configuration > Administrative Templates > Windows Components > Windows Update > Windows Update for Business > Select when Quality Updates are Received
Example
In this example, there are three rings for quality updates. The first ring ("pilot") has a deferral period of 0 days. The second ring ("fast") has a deferral of five days. The third ring ("slow") has a deferral of ten days.
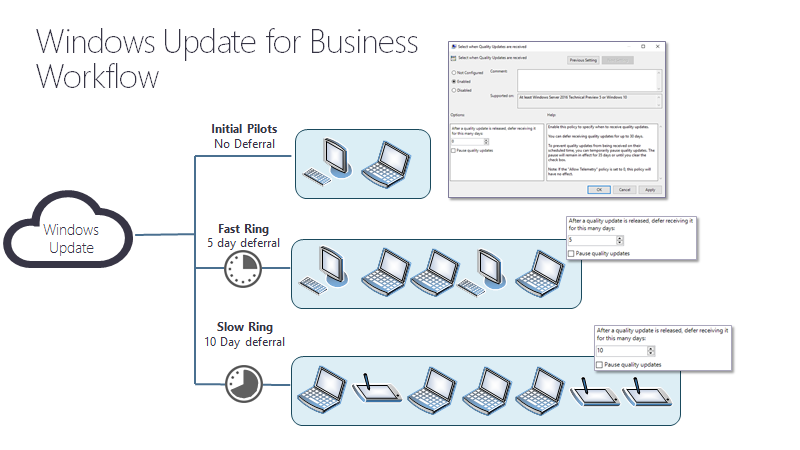
When the quality update is released, it is offered to devices in the pilot ring the next time they scan for updates.
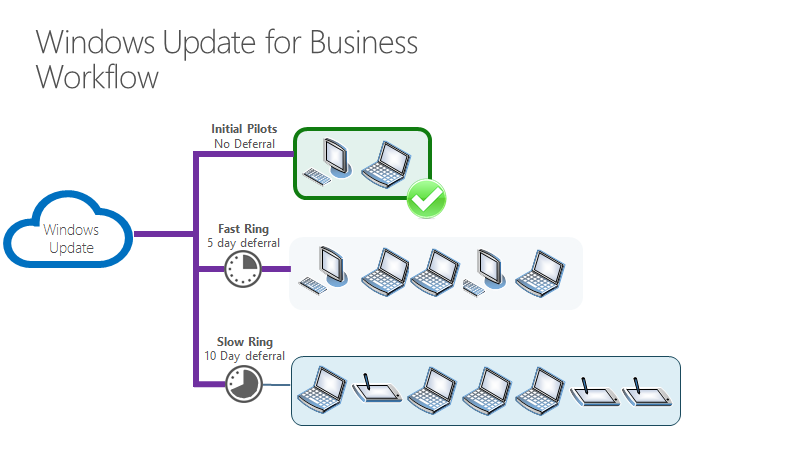
Five days later
The devices in the fast ring are offered the quality update the next time they scan for updates.
Ten days later
Ten days after the quality update is released, it is offered to the devices in the slow ring the next time they scan for updates.
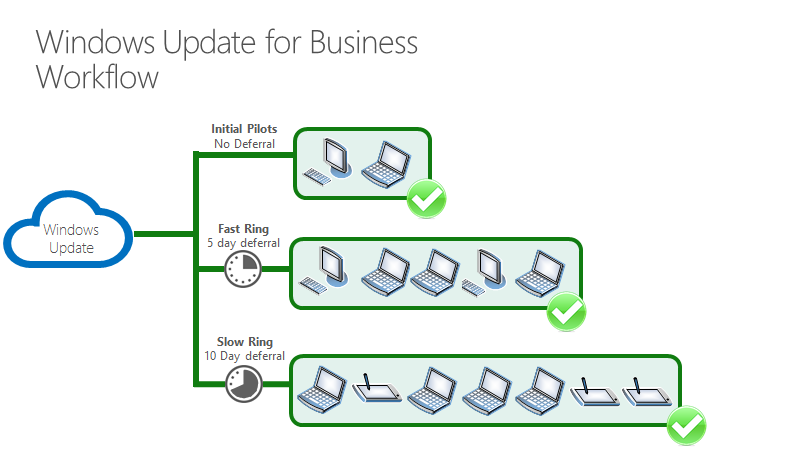
If no problems occur, all of the devices that scan for updates will be offered the quality update within ten days of its release, in three waves.
What if a problem occurs with the update?
In this example, some problem is discovered during the deployment of the update to the "pilot" ring.
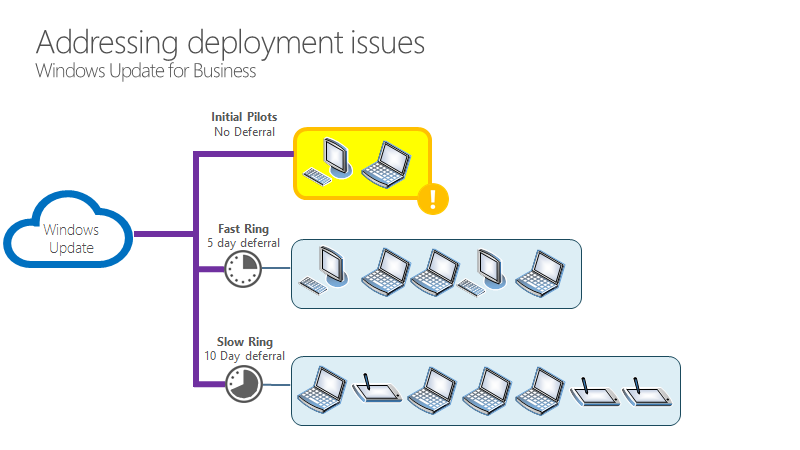
At this point, the IT administrator can set a policy to pause the update. In this example, the admin selects the Pause quality updates check box.
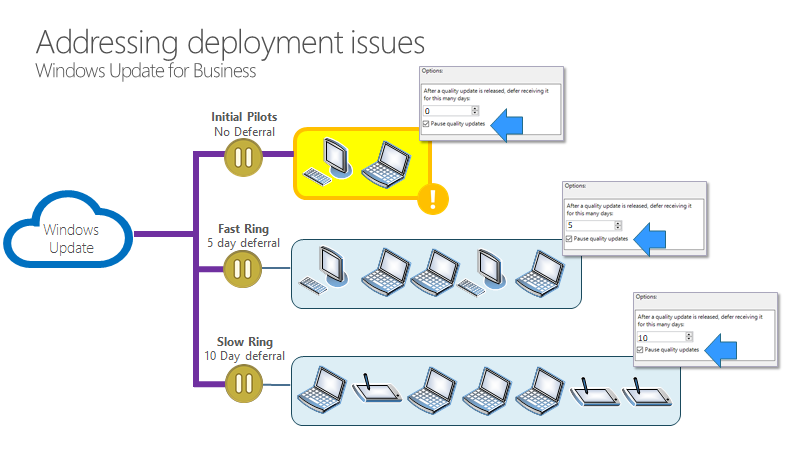
Now all devices are paused from updating for 35 days. When the pause is removed, they will be offered the next quality update, which ideally will not have the same issue. If there is still an issue, the IT admin can pause updates again.
I want to stay on a specific version
If you need a device to stay on a version beyond the point when deferrals on the next version would elapse or if you need to skip a version, use the Select the target feature update version setting instead of using the Specify when Preview Builds and feature updates are received setting for feature update deferrals. When you use this policy, specify the version that you want your devices to use. If you don't update this before the device reaches end of service, the device will automatically be updated once it is 60 days past end of service for its edition.
When you set the target version policy, if you specify a feature update version that is older than your current version or set a value that isn't valid, the device will not receive any feature updates until the policy is updated. When you specify target version policy, feature update deferrals will not be in effect.
Manage how users experience updates
I want to manage when devices download, install, and restart after updates
We recommend that you allow to update automatically--this is the default behavior. If you don't set an automatic update policy, the device will attempt to download, install, and restart at the best times for the user by using built-in intelligence such as intelligent active hours and smart busy check.
For more granular control, you can set the maximum period of active hours the user can set with Computer Configuration > Administrative Templates > Windows Components > Windows Update > Specify active hours range for auto restart.
It's best to refrain from setting the active hours policy because it's enabled by default when automatic updates are not disabled and provides a better experience when users can set their own active hours. If you do want to set active hours, use Computer Configuration > Administrative Templates > Windows Components > Windows Update > Turn off auto-restart for updates during active hours.
To update outside of the active hours, you don't need to set any additional settings: simply don't disable automatic restarts. For even more granular control, consider using automatic updates to schedule the install time, day, or week. To do this, use Computer Configuration > Administrative Templates > Windows Components > Windows Update > Configure Automatic Updates and select Auto download and schedule the install. You can customize this setting to accommodate the time that you want the update to be installed for your devices.
When you set these policies, installation happens automatically at the specified time and the device will restart 15 minutes after installation is complete (unless it's interrupted by the user).
I want to keep devices secure and compliant with update deadlines
We recommend that you use Computer Configuration > Administrative Templates > Windows Components > Windows Update > Specify deadline for automatic updates and restarts for feature and quality updates to ensure that devices stay secure on Windows 10, version 1709 and later. This works by enabling you to specify the number of days that can elapse after an update is offered to a device before it must be installed. Also you can set the number of days that can elapse after a pending restart before the user is forced to restart.
This policies also offers an option to opt out of automatic restarts until a deadline is reached by presenting an "engaged restart experience" until the deadline has actually expired. At that point the device will automatically schedule a restart regardless of active hours.
These notifications are what the user sees depending on the settings you choose:
When Specify deadlines for automatic updates and restarts is set (For Windows 10, version 1709 and later):
-
While restart is pending, before the deadline occurs:
-
For the first few days, the user receives a toast notification
-
After this period, the user receives this dialog:
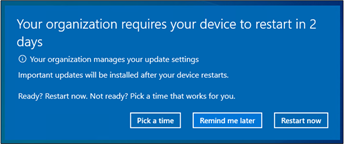
-
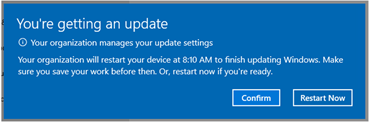
If the user scheduled a restart, or if an auto restart is scheduled, 15 minutes before the scheduled time the user is receives this notification that the restart is about to occur:
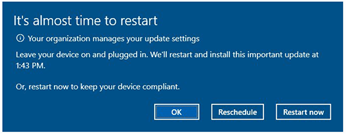
-
-
If the restart is still pending after the deadline passes:
-
Within 12 hours before the deadline passes, the user receives this notification that the deadline is approaching:
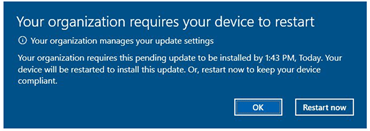
-
Once the deadline has passed, the user is forced to restart to keep their devices in compliance and receives this notification:
-
I want to manage the notifications a user sees
There are additional settings that affect the notifications.
We recommend that you use the default notifications as they aim to provide the best user experience while adjusting for the compliance policies that you have set. If you do have further needs that are not met by the default notification settings, you can use Computer Configuration > Administrative Templates > Windows Components > Windows Update > Display options for update notifications with these values:
0 (default) – Use the default Windows Update notifications 1 – Turn off all notifications, excluding restart warnings 2 – Turn off all notifications, including restart warnings
Note
Option 2 creates a poor experience for personal devices; it's only recommended for kiosk devices where automatic restarts have been disabled.
Still more options are available in Computer Configuration > Administrative Templates > Windows Components > Windows Update > Configure auto-restart restart warning notifications schedule for updates. This setting allows you to specify the period for auto-restart warning reminder notifications (from 2-24 hours; 4 hours is the default) before the update and to specify the period for auto-restart imminent warning notifications (15-60 minutes is the default). We recommend using the default notifications.
I want to manage the update settings a user can access
Every Windows device provides users with a variety of controls they can use to manage Windows Updates. They can access these controls by Search to find Windows Updates or by going selecting Updates and Security in Settings. We provide the ability to disable a variety of these controls that are accessible to users.
Users with access to update pause settings can prevent both feature and quality updates for 7 days. You can prevent users from pausing updates through the Windows Update settings page by using Computer Configuration > Administrative Templates > Windows Components > Windows Update > Remove access to “Pause updates. When you disable this setting, users will see Some settings are managed by your organization and the update pause settings are greyed out.
If you use Windows Server Update Server (WSUS), you can prevent users from scanning Windows Update. To do this, use Computer Configuration > Administrative Templates > Windows Components > Windows Update > Remove access to use all Windows Update features.