* Updated deployment-vdi-windows-defender-antivirus.md * Updated deployment-vdi-windows-defender-antivirus.md * Updated deployment-vdi-windows-defender-antivirus.md * updates for new vdi stuff * Adding important note to solve #3493 * Update windows/security/identity-protection/hello-for-business/hello-hybrid-key-whfb-settings-dir-sync.md Co-Authored-By: Nicole Turner <39884432+nenonix@users.noreply.github.com> * Typo "<"→"<", ">"→">" https://docs.microsoft.com/en-us/windows/application-management/manage-windows-mixed-reality * Issue #2297 * Update windows/security/identity-protection/hello-for-business/hello-identity-verification.md Co-Authored-By: Nicole Turner <39884432+nenonix@users.noreply.github.com> * Clarification * Update windows/security/identity-protection/hello-for-business/hello-identity-verification.md Co-Authored-By: Nicole Turner <39884432+nenonix@users.noreply.github.com> * Update windows/security/identity-protection/hello-for-business/hello-identity-verification.md Co-Authored-By: Trond B. Krokli <38162891+illfated@users.noreply.github.com> * update troubleshoot-np.md * update configure-endpoints-gp.md * Removing a part which is not supported * Name change * update troubleshoot-np.md * removed on-premises added -hello * Added link into Domain controller guide * Line corections * corrected formatting of xml code samples When viewing the page in Win 10/Edge, the xml code samples stretched across the page, running into the side menu. The lack of line breaks also made it hard to read. This update adds line breaks and syntax highlighting, replaces curly double quotes with standard double quotes, and adds a closing tag for <appv:appconnectiongroup>for each code sample * Update windows/security/identity-protection/hello-for-business/hello-identity-verification.md Co-Authored-By: Nicole Turner <39884432+nenonix@users.noreply.github.com> * Update windows/deployment/update/waas-delivery-optimization-reference.md Co-Authored-By: Nicole Turner <39884432+nenonix@users.noreply.github.com> * Update windows/deployment/update/waas-delivery-optimization-reference.md Co-Authored-By: Nicole Turner <39884432+nenonix@users.noreply.github.com> * corrected formating of XML examples The XML samples here present the same formatting problems as in about-the-connection-group-file51.md (see https://github.com/MicrosoftDocs/windows-itpro-docs/pull/3847/) Perhaps we should open an issue to see if we have more versions of this code sample in the docs * corrected formatting of XML example section In the XML example on this page, the whitespace had been stripped out, so there were no spaces between adjacent attribute values or keys. This made it hard to read, though the original formatting allowed for a scroll bar, so the text was not running into the side of the page (compare to https://github.com/MicrosoftDocs/windows-itpro-docs/pull/3847 and https://github.com/MicrosoftDocs/windows-itpro-docs/pull/3850, where the uncorrected formatting forced the text to run into the side menu). * update configure-endpoints-gp.md * Fixed error in registry path and improved description * Update windows/security/identity-protection/hello-for-business/hello-hybrid-key-whfb-settings-dir-sync.md Co-Authored-By: Trond B. Krokli <38162891+illfated@users.noreply.github.com> * Removing extra line in 25 Suggested by * update windows-analytics-azure-portal.md * re: broken links, credential-guard-considerations Context: * #3513, MVA is being retired and producing broken links * #3860 Microsoft Virtual Academy video links This page contains two links to deprecated video content on Microsoft Virtual Academy (MVA). MVA is being retired. In addition, the Deep Dive course the two links point to is already retired, and no replacement course exists. I removed the first link, as I could not find a similar video available describing which credentials are covered by credential guard. I replaced the second link with a video containing similar material, though it is not a "deep dive". Suggestions on handling this problem, as many pages contain similar links, would be appreciated,. * removed link to retired video re: #3867 Context: * #3513, MVA is being retired and producing broken links * #3867, Microsoft Virtual Academy video links This page contains a broken link to deprecated video content on Microsoft Virtual Academy (MVA). MVA is being retired. In addition, the Deep Dive course is already retired, and no replacement course exists. I removed the whole _See Also_ section, as I could not find a video narrowly or deeply addressing how to protect privelaged users with Credential Guard. The most likely candidate is too short and general: https://www.linkedin.com/learning/cism-cert-prep-1-information-security-governance/privileged-account-management * addressing broken mva links, #3817 Context: * #3513, MVA is being retired and producing broken links * #3817, Another broken link This page contains two links to deprecated video content on Microsoft Virtual Academy (MVA). MVA is being retired. In addition, the Deep Dive course the two links point to is already retired, and no replacement course exists. I removed the first link, as we no longer have a video with similar content for a similar audience. The most likely candidate is https://www.linkedin.com/learning/programming-foundations-web-security-2/types-of-credential-attacks, which is more general and for a less technical audience. I removed the second link and the _See Also_ section, as I could not find a similar video narrowly focused on which credentials are covered by Credential Guard. Most of the related material available now describes how to perform a task. * Update deployment-vdi-windows-defender-antivirus.md * typo fix re: #3876; DMSA -> DSMA * Addressing dead MVA links, #3818 This page, like its fellows in the mva-links label, contains links to a retired video course on a website that is retiring soon. The links listed by the user in issue #3818 were also on several other pages, related to Credentials Guard. These links were addressed in the pull requests #3875, #3872, and #3871 Credentials threat & lateral threat link: removed (see PR #3875 for reasoning) Virtualization link: replaced (see #3871 for reasoning) Credentials protected link: removed (see #3872 for reasoning) * Adding notes for known issue in script Solves #3869 * Updated the download link admx files Windows 10 Added link for April 2018 and Oct 2018 ADMX files. * added event logs path Referenced : https://docs.microsoft.com/en-us/windows/security/threat-protection/windows-defender-exploit-guard/event-views-exploit-guard * Update browsers/internet-explorer/ie11-deploy-guide/administrative-templates-and-ie11.md Suggestions applied. Co-Authored-By: JohanFreelancer9 <48568725+JohanFreelancer9@users.noreply.github.com> * Update browsers/internet-explorer/ie11-deploy-guide/administrative-templates-and-ie11.md Co-Authored-By: JohanFreelancer9 <48568725+JohanFreelancer9@users.noreply.github.com> * Update deployment-vdi-windows-defender-antivirus.md * screenshot update * Add files via upload * update 4 scrrenshots * Update deployment-vdi-windows-defender-antivirus.md * Update browsers/internet-explorer/ie11-deploy-guide/administrative-templates-and-ie11.md Co-Authored-By: Nicole Turner <39884432+nenonix@users.noreply.github.com> * Update browsers/internet-explorer/ie11-deploy-guide/administrative-templates-and-ie11.md Co-Authored-By: Nicole Turner <39884432+nenonix@users.noreply.github.com> * Re: #3909 Top link is broken, #3909 > The link here does not work: > Applies to: Microsoft Defender Advanced Threat Protection (Microsoft Defender ATP) The link to the pdf describing MDATP was broken. Thankfully, PR #2897 updated the same link in another page some time ago, so I didn't have to go hunting for an equivalent * CI Update * Updated as per task 3405344 * Updated author * Update windows-analytics-azure-portal.md * added the example query * Updated author fields * Update office-csp.md * update video for testing * update video * Update surface-hub-site-readiness-guide.md line 134 Fixed video link MD formatting * fixing video url * updates from Albert * Bulk replaced author to manikadhiman * Bulk replaced ms.author to v-madhi * Latest content is published (#371) * Added 1903 policy DDF link and fixed a typo * Reverted the DDF version * Latest update (#375) * Update deployment-vdi-windows-defender-antivirus.md * Update deployment-vdi-windows-defender-antivirus.md
17 KiB
title, description, ms.prod, ms.mktglfcycl, ms.sitesec, author, ms.topic, ms.localizationpriority, ms.date, ms.reviewer, manager, ms.author
| title | description | ms.prod | ms.mktglfcycl | ms.sitesec | author | ms.topic | ms.localizationpriority | ms.date | ms.reviewer | manager | ms.author |
|---|---|---|---|---|---|---|---|---|---|---|---|
| Create a provisioning package with multivariant settings (Windows 10) | Create a provisioning package with multivariant settings to customize the provisioned settings for defined conditions. | w10 | deploy | library | dansimp | article | medium | 11/08/2017 | dansimp | dansimp |
Create a provisioning package with multivariant settings
Applies to
- Windows 10
- Windows 10 Mobile
In your organization, you might have different configuration requirements for devices that you manage. You can create separate provisioning packages for each group of devices in your organization that have different requirements. Or, you can create a multivariant provisioning package, a single provisioning package that can work for multiple conditions. For example, in a single provisioning package, you can define one set of customization settings that will apply to devices set up for French and a different set of customization settings for devices set up for Japanese.
To provision multivariant settings, you use Windows Configuration Designer to create a provisioning package that contains all of the customization settings that you want to apply to any of your devices. Next, you manually edit the .XML file for that project to define each set of devices (a Target). For each Target, you specify at least one Condition with a value, which identifies the devices to receive the configuration. Finally, for each Target, you provide the customization settings to be applied to those devices.
Let's begin by learning how to define a Target.
Define a target
In the XML file, you provide an Id, or friendly name, for each Target. Each Target is defined by at least one TargetState which contains at least one Condition. A Condition element defines the matching type between the condition and the specified value.
A Target can have more than one TargetState, and a TargetState can have more than one Condition.

The following table describes the logic for the target definition.
| When all Condition elements are TRUE, TargetState is TRUE. | 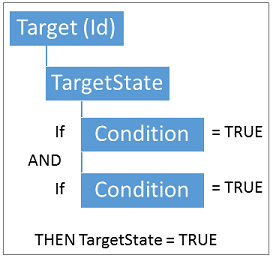 |
| If any of the TargetState elements is TRUE, Target is TRUE, and the Id can be used for setting customizations. | 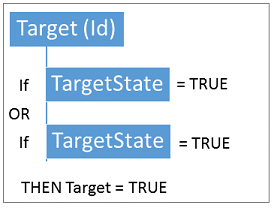 |
Conditions
The following table shows the conditions supported in Windows 10 provisioning for a TargetState:
| Condition Name | Condition priority | Windows 10 Mobile | Windows 10 for desktop editions | Value type | Value description |
|---|---|---|---|---|---|
| MNC | P0 | Supported | Supported | Digit string | Use to target settings based on the Mobile Network Code (MNC) value. |
| MCC | P0 | Supported | Supported | Digit string | Use to target settings based on the Mobile Country Code (MCC) value. |
| SPN | P0 | Supported | Supported | String | Use to target settings based on the Service Provider Name (SPN) value. |
| PNN | P0 | Supported | Supported | String | Use to target settings based on public land mobile network (PLMN) Network Name value. |
| GID1 | P0 | Supported | Supported | Digit string | Use to target settings based on the Group Identifier (level 1) value. |
| ICCID | P0 | Supported | Supported | Digit string | Use to target settings based on the Integrated Circuit Card Identifier (ICCID) value. |
| Roaming | P0 | Supported | N/A | Boolean | Use to specify roaming. Set the value to 1 (roaming) or 0 (non-roaming). |
| UICC | P0 | Supported | N/A | Enumeration | Use to specify the Universal Integrated Circuit Card (UICC) state. Set the value to one of the following: - 0 - Empty - 1 - Ready - 2 - Locked |
| UICCSLOT | P0 | Supported | N/A | Digit string | Use to specify the UICC slot. Set the value one of the following: - 0 - Slot 0 - 1 - Slot 1 |
| ProcessorType | P1 | Supported | Supported | String | Use to target settings based on the processor type. |
| ProcessorName | P1 | Supported | Supported | String | Use to target settings based on the processor name. |
| AoAc ("Always On, Always Connected") | P1 | Supported | Supported | Boolean | Set the value to 0 (false) or 1 (true). If this condition is TRUE, the system supports the S0 low power idle model. |
| PowerPlatformRole | P1 | Supported | Supported | Enumeration | Indicates the preferred power management profile. Set the value based on the POWER_PLATFORM_ROLE enumeration. |
| Architecture | P1 | Supported | Supported | String | Matches the PROCESSOR_ARCHITECTURE environment variable. |
| Server | P1 | Supported | Supported | Boolean | Set the value to 0 (false) or 1 (true) to identify a server. |
| Region | P1 | Supported | Supported | Enumeration | Use to target settings based on country/region, using the 2-digit alpha ISO code per ISO 3166-1 alpha-2. |
| Lang | P1 | Supported | Supported | Enumeration | Use to target settings based on language code, using the 2-digit ISO 639 alpha-2 code. |
The matching types supported in Windows 10 are:
| Matching type | Syntax | Example |
|---|---|---|
| Straight match | Matching type is specified as-is | <Condition Name="ProcessorName" Value="Barton" /> |
| Regular expression (Regex) match | Matching type is prefixed by "Pattern:" | <Condition Name="ProcessorName" Value="Pattern:.Celeron." /> |
| Numeric range match | Matching type is prefixed by "!Range:" | <Condition Name="MNC" Value="!Range:400, 550" /> |
TargetState priorities
You can define more than one TargetState within a provisioning package to apply settings to devices that match device conditions. When the provisioning engine evalues each TargetState, more than one TargetState may fit current device conditions. To determine the order in which the settings are applied, the system assigns a priority to every TargetState.
A setting that matches a TargetState with a lower priority is applied before the setting that matches a TargetState with a higher priority. This means that a setting for the TargetState with the higher priority can overwrite a setting for the TargetState with the lower priority.
Settings that match more than one TargetState with equal priority are applied according to the order that each TargetState is defined in the provisioning package.
The TargetState priority is assigned based on the condition's priority (see the Conditions table for priorities). The priority evaluation rules are as followed:
-
A TargetState with P0 conditions is higher than a TargetState without P0 conditions.
-
A TargetState with both P0 and P1 conditions is higher than a TargetState with only P0 conditions.
-
A TargetState with a greater number of matched P0 conditions is higher than TargetState with fewer matched P0 conditions, regardless of the number of P1 conditions matched.
-
If the number of P0 conditions matched are equivalent, then the TargetState with the most matched P1 conditions has higher priority.
-
If both P0 and P1 conditions are equally matched, then the TargetState with the greatest total number of matched conditions has highest priority.
Create a provisioning package with multivariant settings
Follow these steps to create a provisioning package with multivariant capabilities.
-
Build a provisioning package and configure the customizations you want to apply during certain conditions. For more information, see Create a provisioning package.
-
After you've configured the settings, save the project.
-
Open the project folder and copy the customizations.xml file to any local location.
-
Use an XML or text editor to open the customizations.xml file.
The customizations.xml file holds the package metadata (including the package owner and rank) and the settings that you configured when you created your provisioning package. The Customizations node of the file contains a Common section, which contains the customization settings.
The following example shows the contents of a sample customizations.xml file.
<?xml version="1.0" encoding="utf-8"?> <WindowsCustomizatons> <PackageConfig xmlns="urn:schemas-Microsoft-com:Windows-ICD-Package-Config.v1.0"> <ID>{6aaa4dfa-00d7-4aaa-8adf-73c6a7e2501e}</ID> <Name>My Provisioning Package</Name> <Version>1.0</Version> <OwnerType>OEM</OwnerType> <Rank>50</Rank> </PackageConfig> <Settings xmlns="urn:schemas-microsoft-com:windows-provisioning"> <Customizations> <Common> <Policies> <AllowBrowser>0</AllowBrowser> <AllowCamera>0</AllowCamera> <AllowBluetooth>0</AllowBluetooth> </Policies> <HotSpot> <Enabled>0</Enabled> </HotSpot> </Common> </Customizations> </Settings> </WindowsCustomizatons> -
Edit the customizations.xml file to create a Targets section to describe the conditions that will handle your multivariant settings.
The following example shows the customizations.xml, which has been modified to include several conditions including ProcessorName, ProcessorType, MCC, and MNC.
<?xml version="1.0" encoding="utf-8"?> <WindowsCustomizatons> <PackageConfig xmlns="urn:schemas-Microsoft-com:Windows-ICD-Package-Config.v1.0"> <ID>{6aaa4dfa-00d7-4aaa-8adf-73c6a7e2501e}</ID> <Name>My Provisioning Package</Name> <Version>1.0</Version> <OwnerType>OEM</OwnerType> <Rank>50</Rank> </PackageConfig> <Settings xmlns="urn:schemas-microsoft-com:windows-provisioning"> <Customizations> <Common> <Policies> <AllowBrowser>0</AllowBrowser> <AllowCamera>0</AllowCamera> <AllowBluetooth>0</AllowBluetooth> </Policies> <HotSpot> <Enabled>0</Enabled> </HotSpot> </Common> <Targets> <Target Id="Unique target identifier for desktop"> <TargetState> <Condition Name="ProcessorName" Value="Pattern:.*Celeron.*" /> <Condition Name="ProcessorType" Value="Pattern:.*(I|i)ntel.*" /> </TargetState> <TargetState> <Condition Name="ProcessorName" Value="Barton" /> <Condition Name="ProcessorType" Value="Athlon MP" /> </TargetState> </Target> <Target Id="Mobile target"> <TargetState> <Condition Name="MCC" Value="Range:310, 320" /> <Condition Name="MNC" Value="!Range:400, 550" /> </TargetState> </Target> </Targets> </Customizations> </Settings> </WindowsCustomizatons> -
In the customizations.xml file, create a Variant section for the settings you need to customize. To do this:
a. Define a child TargetRefs element.
b. Within the TargetRefs element, define a TargetRef element. You can define multiple TargetRef elements for each Id that you need to apply to customized settings.
c. Move compliant settings from the Common section to the Variant section.
If any of the TargetRef elements matches the Target, all settings in the Variant are applied.
Note
You can define multiple Variant sections. Settings that reside in the Common section are applied unconditionally on every triggering event.
The following example shows the customizations.xml updated to include a Variant section and the moved settings that will be applied if the conditions for the variant are met.
<?xml version="1.0" encoding="utf-8"?> <WindowsCustomizatons> <PackageConfig xmlns="urn:schemas-Microsoft-com:Windows-ICD-Package-Config.v1.0"> <ID>{6aaa4dfa-00d7-4aaa-8adf-73c6a7e2501e}</ID> <Name>My Provisioning Package</Name> <Version>1.0</Version> <OwnerType>OEM</OwnerType> <Rank>50</Rank> </PackageConfig> <Settings xmlns="urn:schemas-microsoft-com:windows-provisioning"> <Customizations> <Common> </Common> <Targets> <Target Id="Unique target identifier for desktop"> <TargetState> <Condition Name="ProcessorName" Value="Pattern:.*Celeron.*" /> <Condition Name="ProcessorType" Value="Pattern:.*(I|i)ntel.*" /> </TargetState> <TargetState> <Condition Name="ProcessorName" Value="Barton" /> <Condition Name="ProcessorType" Value="Athlon MP" /> </TargetState> </Target> <Target Id="Mobile target"> <TargetState> <Condition Name="MCC" Value="Range:310, 320" /> <Condition Name="MNC" Value="!Range:400, 550" /> </TargetState> </Target> </Targets> <Variant> <TargetRefs> <TargetRef Id="Unique target identifier for desktop" /> <TargetRef Id="Mobile target" /> </TargetRefs> <Settings> <Policies> <AllowBrowser>1</AllowBrowser> <AllowCamera>1</AllowCamera> <AllowBluetooth>1</AllowBluetooth> </Policies> <HotSpot> <Enabled>1</Enabled> </HotSpot> </Settings> </Variant> </Customizations> </Settings> </WindowsCustomizatons> -
Save the updated customizations.xml file and note the path to this updated file. You will need the path as one of the values for the next step.
-
Use the Windows Configuration Designer command-line interface to create a provisioning package using the updated customizations.xml.
For example:
icd.exe /Build-ProvisioningPackage /CustomizationXML:"C:\CustomProject\customizations.xml" /PackagePath:"C:\CustomProject\output.ppkg" /StoreFile:C:\Program Files (x86)\Windows Kits\10\Assessment and Deployment Kit\Imaging and Configuration Designer\x86\Microsoft-Common-Provisioning.dat"
In this example, the StoreFile corresponds to the location of the settings store that will be used to create the package for the required Windows edition.
Note
The provisioning package created during this step will contain the multivariant settings. You can use this package either as a standalone package that you can apply to a Windows device or use it as the base when starting another project.
Events that trigger provisioning
When you install the multivariant provisioning package on a Windows 10 device, the provisioning engine applies the matching condition settings at every event and triggers provisioning.
The following events trigger provisioning on Windows 10 devices:
| Event | Windows 10 Mobile | Windows 10 for desktop editions |
|---|---|---|
| System boot | Supported | Supported |
| Operating system update | Supported | Planned |
| Package installation during device first run experience | Supported | Supported |
| Detection of SIM presence or update | Supported | Supported |
| Package installation at runtime | Supported | Supported |
| Roaming detected | Supported | Not supported |
Related topics
- Provisioning packages for Windows 10
- How provisioning works in Windows 10
- Install Windows Configuration Designer
- Create a provisioning package
- Apply a provisioning package
- Settings changed when you uninstall a provisioning package
- Provision PCs with common settings for initial deployment (simple provisioning)
- Use a script to install a desktop app in provisioning packages
- PowerShell cmdlets for provisioning Windows 10 (reference)
- Windows Configuration Designer command-line interface (reference)