19 KiB
title, description, keywords, ms.prod, ms.mktglfcycl, ms.sitesec, author, ms.author, ms.topic, ms.localizationpriority, ms.date, ms.reviewer, manager
| title | description | keywords | ms.prod | ms.mktglfcycl | ms.sitesec | author | ms.author | ms.topic | ms.localizationpriority | ms.date | ms.reviewer | manager | |
|---|---|---|---|---|---|---|---|---|---|---|---|---|---|
| Start layout XML for mobile editions of Windows 10 (Windows 10) | This topic describes the options for customizing Start layout in LayoutModification.xml for Windows 10 mobile editions. |
|
w10 | manage | library | greg-lindsay | greglin | article | medium | 07/27/2017 | dansimp |
Start layout XML for mobile editions of Windows 10 (reference)
Applies to
- Windows 10
Looking for consumer information? See Customize the Start menu
On Windows 10 Mobile, you can use the XML-based layout to modify the Start screen and provide the most robust and complete Start customization experience.
On Windows 10 Mobile, the customized Start works by:
- Windows 10 performs checks to determine the correct base default layout. The checks include the mobile edition, whether the device is dual SIM, the column width, and whether Cortana is supported for the country/region.
- Windows 10 ensures that it does not overwrite the layout that you have set and will sequence the level checks and read the file layout such that any multivariant settings that you have set is not overwritten.
- Windows 10 reads the LayoutModification.xml file and appends the group to the Start screen.
Default Start layouts
The following diagrams show the default Windows 10, version 1607 Start layouts for single SIM and dual SIM devices with Cortana support, and single SIM and dual SIM devices with no Cortana support.
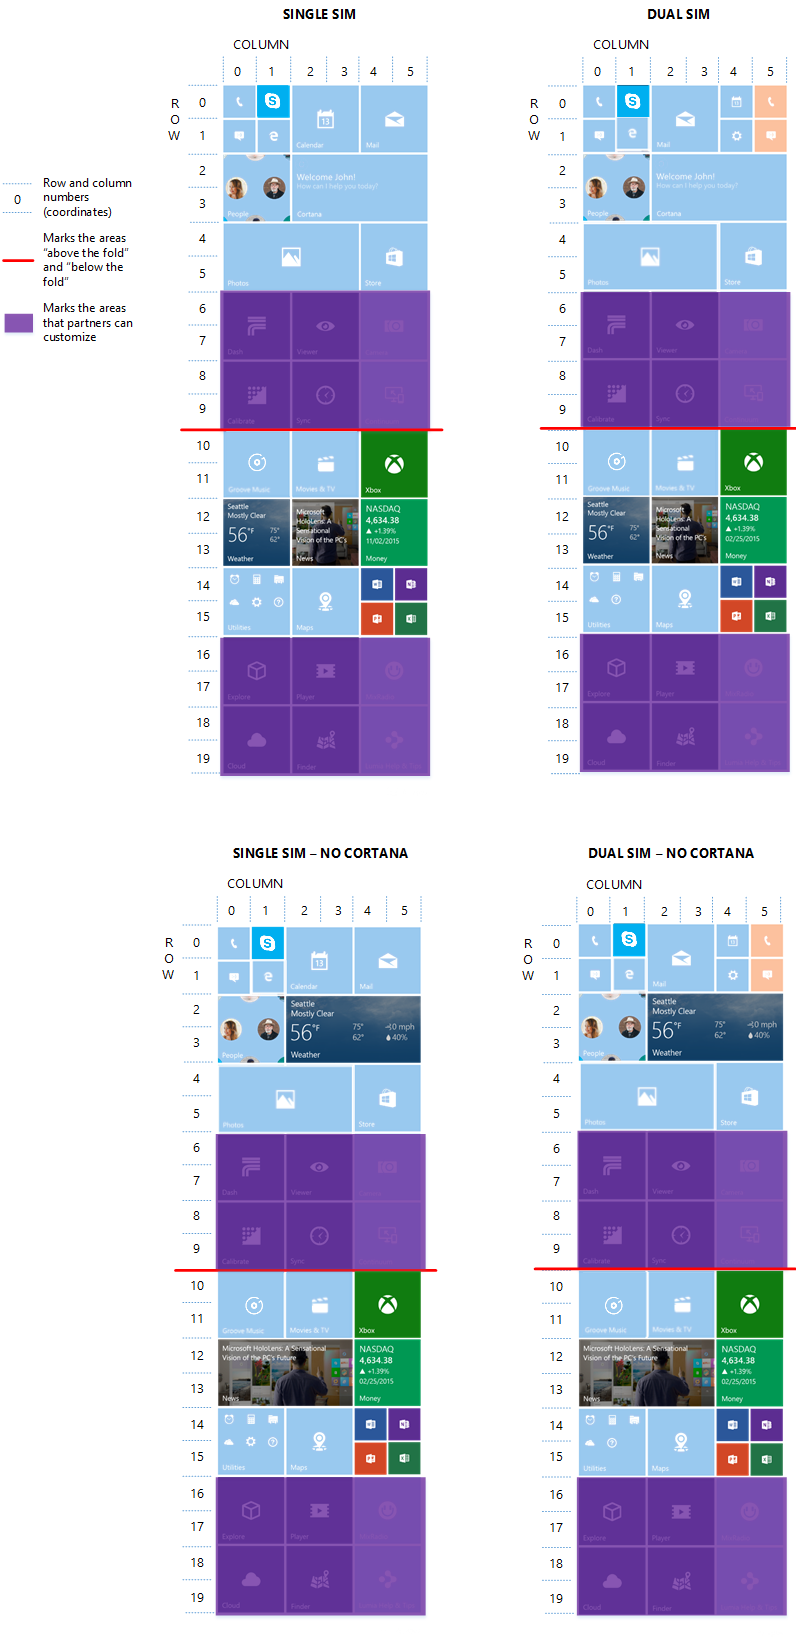
The diagrams show:
- Tile coordinates - These are determined by the row number and the column number.
- Fold - Tiles "above the fold" are visible when users first navigate to the Start screen. Tiles "below the fold" are visible after users scroll up.
- Partner-customizable tiles - OEM and mobile operator partners can customize these areas of the Start screen by prepinning content. The partner configurable slots are:
- Rows 6-9
- Rows 16-19
LayoutModification XML
IT admins can provision the Start layout by creating a LayoutModification.xml file. This file supports several mechanisms to modify or replace the default Start layout and its tiles.
Note
To make sure the Start layout XML parser processes your file correctly, follow these guidelines when writing your LayoutModification.xml file:
- Do not leave spaces or white lines in between each element.
- Do not add comments inside the StartLayout node or any of its children elements.
- Do not add multiple rows of comments.
The following table lists the supported elements and attributes for the LayoutModification.xml file.
| Element | Attributes | Description |
|---|---|---|
| LayoutModificationTemplate | xmlns xmlns:defaultlayout xmlns:start Version |
Use to describe the changes to the default Start layout. |
| DefaultLayoutOverride Parent: LayoutModificationTemplate |
n/a | Use to specify the customized Start layout for mobile devices. |
| StartLayoutCollection Parent: DefaultLayoutOverride |
n/a | Use to contain a collection of Start layouts. |
| StartLayout Parent: StartLayoutCollection |
n/a | Use to specify the tile groups that will be appended to the Start screen. |
| start:Group Parent: StartLayout |
Name | Use to specify the tiles that need to be appended to the default Start layout. |
| start:Tile Parent: start:Group |
AppUserModelID Size Row Column |
Use to specify any Universal Windows app that has a valid AppUserModelID attribute. |
| start:SecondaryTile Parent: start:Group |
AppUserModelID TileID Arguments DisplayName Square150x150LogoUri ShowNameOnSquare150x150Logo ShowNameOnWide310x150Logo Wide310x150LogoUri BackgroundColor ForegroundText IsSuggestedApp Size Row Column |
Use to pin a Web link through a Microsoft Edge secondary tile. |
| start:PhoneLegacyTile Parent: start:Group |
ProductID Size Row Column |
Use to add a mobile app that has a valid ProductID attribute. |
| start:Folder Parent: start:Group |
Name Size Row Column |
Use to add a folder to the mobile device's Start screen. |
| RequiredStartTiles Parent: LayoutModificationTemplate |
n/a | Use to specify the tiles that will be pinned to the bottom of the Start screen even if a restored Start screen does not have the tiles during backup or restore. |
start:Group
start:Group tags specify a group of tiles that will be appended to Start. You can set the Name attribute to specify a name for the Start group.
Note
Windows 10 Mobile only supports one Start group.
For Windows 10 Mobile, start:Group tags can contain the following tags or elements:
- start:Tile
- start:SecondaryTile
- start:PhoneLegacyTile
- start:Folder
Specify Start tiles
To pin tiles to Start, you must use the right kind of tile depending on what you want to pin.
Tile size and coordinates
All tile types require a size (Size) and coordinates (Row and Column) attributes regardless of the tile type that you use when prepinning items to Start.
The following table describes the attributes that you must use to specify the size and location for the tile.
| Attribute | Description |
|---|---|
| Size | Determines how large the tile will be. - 1x1 - small tile - 2x2 - medium tile - 4x2 - wide tile - 4x4 - large tile |
| Row | Specifies the row where the tile will appear. |
| Column | Specifies the column where the tile will appear. |
For example, a tile with Size="2x2", Row="2", and Column="2" results in a tile located at (2,2) where (0,0) is the top-left corner of a group.
start:Tile
You can use the start:Tile tag to pin a Universal Windows app to Start.
To specify an app, you must set the AppUserModelID attribute to the application user model ID that's associated with the corresponding app.
The following example shows how to pin the Microsoft Edge Universal Windows app:
<start:Tile
          AppUserModelID="Microsoft.MicrosoftEdge_8wekyb3d8bbwe!MicrosoftEdge"
          Size="2x2"
          Row="0"
          Column="0"/>
start:SecondaryTile
You can use the start:SecondaryTile tag to pin a Web link through a Microsoft Edge secondary tile.
The following example shows how to create a tile of the Web site's URL using the Microsoft Edge secondary tile:
<start:SecondaryTile
          AppUserModelID="Microsoft.MicrosoftEdge_8wekyb3d8bbwe!MicrosoftEdge"
          TileID="MyWeblinkTile"
          Arguments="http://msn.com"
          DisplayName="MySite"
          Square150x150LogoUri="ms-appx:///Assets/MicrosoftEdgeSquare150x150.png"
          Wide310x150LogoUri="ms-appx:///Assets/MicrosoftEdgeWide310x150.png"
          ShowNameOnSquare150x150Logo="true"
          ShowNameOnWide310x150Logo="false"
          BackgroundColor="#FF112233"
          Size="2x2"
          Row="0"
          Column="4"/>
The following table describes the other attributes that you can use with the start:SecondaryTile tag in addition to Size, Row, and Column.
| Attribute | Required/optional | Description |
|---|---|---|
| AppUserModelID | Required | Must point to Microsoft Edge. |
| TileID | Required | Must uniquely identify your Web site tile. |
| Arguments | Required | Must contain the URL of your Web site. |
| DisplayName | Required | Must specify the text that you want users to see. |
| Square150x150LogoUri | Required | Specifies the logo to use on the 2x2 tile. |
| Wide310x150LogoUri | Optional | Specifies the logo to use on the 4x2 tile. |
| ShowNameOnSquare150x150Logo | Optional | Specifies whether the display name is shown on the 2x2 tile. You can set the value for this attribute to true or false. By default, this is set to false. |
| ShowNameOnWide310x150Logo | Optional | Specifies whether the display name is shown on the 4x2 tile. You can set the value for this attribute to true or false. By default, this is set to false. |
| BackgroundColor | Optional | Specifies the color of the tile. You can specify the value in ARGB hexadecimal (for example, #FF112233) or specify "transparent". |
| ForegroundText | Optional | Specifies the color of the foreground text. Set the value to either "light" or "dark". |
Secondary Microsoft Edge tiles have the same size and location behavior as a Universal Windows app.
start:PhoneLegacyTile
You can use the start:PhoneLegacyTile tag to add a mobile app that has a valid ProductID, which you can find in the app's manifest file. The ProductID attribute must be set to the GUID of the app.
The following example shows how to add a mobile app with a valid ProductID using the start:PhoneLegacyTile tag:
<start:PhoneLegacyTile
          ProductID="{00000000-0000-0000-0000-000000000000}"
          Size="2x2"
          Row="0"
          Column="2"/>
start:Folder
You can use the start:Folder tag to add a folder to the mobile device's Start screen.
You must set these attributes to specify the size and location of the folder: Size, Row, and Column.
Optionally, you can also specify a folder name by using the Name attribute. If you specify a name, set the value to a string.
The position of the tiles inside a folder is relative to the folder. You can add any of the following tile types to the folder:
- Tile - Use to pin a Universal Windows app to Start.
- SecondaryTile - Use to pin a Web link through a Microsoft Edge secondary tile.
- PhoneLegacyTile - Use to pin a mobile app that has a valid ProductID.
The following example shows how to add a medium folder that contains two apps inside it:
<start:Folder
          Name="Contoso apps"
          Size="2x2"
          Row="0"
          Column="2">
          <start:Tile
                 AppUserModelID="Microsoft.BingMaps_8wekyb3d8bbwe!ApplicationID"
                 Size="2x2"
                 Row="0"
                 Column="0"/>
          <start:PhoneLegacyTile
                 ProductID="{00000000-0000-0000-0000-000000000000}"
                 Size="1x1"
                 Row="0"
                 Column="2"/>
          </start:Folder>
RequiredStartTiles
You can use the RequiredStartTiles tag to specify the tiles that will be pinned to the bottom of the Start screen even if a restored Start screen does not have the tiles during backup or restore.
Note
Enabling this Start customization may be disruptive to the user experience.
For Windows 10 Mobile, RequiredStartTiles tags can contain the following tags or elements. These are similar to the tiles supported in start:Group.
- Tile - Use to pin a Universal Windows app to Start.
- SecondaryTile - Use to pin a Web link through a Microsoft Edge secondary tile.
- PhoneLegacyTile - Use to pin a mobile app that has a valid ProductID.
- Folder - Use to pin a folder to the mobile device's Start screen.
Tiles specified within the RequiredStartTiles tag have the following behavior:
- The partner-pinned tiles will begin in a new row at the end of the user-restored Start screen.
- If there’s a duplicate tile between what the user has in their Start screen layout and what the OEM has pinned to the Start screen, only the app or tile shown in the user-restored Start screen layout will be shown and the duplicate tile will be omitted from the pinned partner tiles at the bottom of the Start screen.
The lack of duplication only applies to pinned apps. Pinned Web links may be duplicated.
- If partners have prepinned folders to the Start screen, Windows 10 treats these folders in the same way as appended apps on the Start screen. Duplicate folders will be removed.
- All partner tiles that are appended to the bottom of the user-restored Start screen will be medium-sized. There will be no gaps in the appended partner Start screen layout. Windows 10 will shift tiles accordingly to prevent gaps.
Sample LayoutModification.xml
The following sample LayoutModification.xml shows how you can configure the Start layout for devices running Windows 10 Mobile:
<?xml version="1.0" encoding="utf-8"?>
<LayoutModificationTemplate
    xmlns="http://schemas.microsoft.com/Start/2014/LayoutModification"
    xmlns:defaultlayout="http://schemas.microsoft.com/Start/2014/FullDefaultLayout"
    xmlns:start="http://schemas.microsoft.com/Start/2014/StartLayout"
    Version="1">
    <DefaultLayoutOverride>
      <StartLayoutCollection>
            <defaultlayout:StartLayout>
              <start:Group
                Name="First Group">
                  <start:Tile
                    AppUserModelID="Microsoft.BingFinance_8wekyb3d8bbwe!ApplicationID"
                    Size="2x2"
                    Row="0"
                    Column="0"/>
                  <start:Tile
                    AppUserModelID="Microsoft.BingMaps_8wekyb3d8bbwe!ApplicationID"
                    Size="1x1"
                    Row="0"
                    Column="2"/>
              </start:Group>
            </defaultlayout:StartLayout>
      </StartLayoutCollection>
    </DefaultLayoutOverride>
    <RequiredStartTiles>
         <PhoneLegacyTile ProductID="{b00d3141-1caa-43aa-b0b5-78c1acf778fd}"/>
         <PhoneLegacyTile ProductID="{C3F8E570-68B3-4D6A-BDBB-C0A3F4360A51}"/>
         <PhoneLegacyTile ProductID="{C60904B7-8DF4-4C2E-A417-C8E1AB2E51C7}"/>
         <Tile AppUserModelID="Microsoft.MicrosoftFeedback_8wekyb3d8bbwe!ApplicationID"/>
    </RequiredStartTiles>
</LayoutModificationTemplate>
Use Windows Provisioning multivariant support
The Windows Provisioning multivariant capability allows you to declare target conditions that, when met, supply specific customizations for each variant condition. For Start customization, you can create specific layouts for each variant that you have. To do this, you must create a separate LayoutModification.xml file for each variant that you want to support and then include these in your provisioning package. For more information on how to do this, see Create a provisioning package with multivariant settings.
The provisioning engine chooses the right customization file based on the target conditions that were met, adds the file in the location that's specified for the setting, and then uses the specific file to customize Start. To differentiate between layouts, you can add modifiers to the LayoutModification.xml filename such as "LayoutCustomization1". Regardless of the modifier that you use, the provsioning engine will always output "LayoutCustomization.xml" so that the OS has a consistent file name to query against.
For example, if you want to ensure that there's a specific layout for a certain mobile operator in a certain country/region, you can:
- Create a specific layout customization file and then name it LayoutCustomization1.xml.
- Include the file as part of your provisioning package.
- Create your multivariant target and reference the XML file within the target condition in the main customization XML file.
The following example shows what the overall customization file might look like with multivariant support for Start:
<?xml version="1.0" encoding="utf-8"?>
<WindowsCustomizatons>
  <PackageConfig xmlns="urn:schemas-Microsoft-com:Windows-ICD-Package-Config.v1.0">
    <ID>{6aaa4dfa-00d7-4aaa-8adf-73c6a7e2501e}</ID>
    <Name>My Provisioning Package</Name>
    <Version>1.0</Version>
    <OwnerType>OEM</OwnerType>
    <Rank>50</Rank>
  </PackageConfig>
  <Settings xmlns="urn:schemas-microsoft-com:windows-provisioning">
    <Customizations>
      <Targets>
        <Target Id="Operator XYZ">
          <TargetState>
            <Condition Name="MCC" Value="Range:310, 320" />
            <Condition Name="MNC" Value="!Range:400, 550" />
          </TargetState>
        </Target>
        <Target Id="Processor ABC">
          <TargetState>
          <TargetState>
            <Condition Name="ProcessorName" Value="Pattern:.*Celeron.*" />
            <Condition Name="ProcessorType" Value="Pattern:.*I|intel.*" />
          </TargetState>
          </TargetState>
        </Target>
      </Targets>
      <Common>
        <Settings>
          <Policies>
            <AllowBrowser>1</AllowBrowser>
            <AllowCamera>1</AllowCamera>
            <AllowBluetooth>1</AllowBluetooth>
          </Policies>
          <HotSpot>
            <Enabled>1</Enabled>
          </HotSpot>
        </Settings>
      </Common>
      <Variant>
        <TargetRefs>
          <TargetRef Id="Operator XYZ" />
        </TargetRefs>
        <Settings>
          <StartLayout>c:\users\<userprofile>\appdata\local\Microsoft\Windows\Shell\LayoutCustomization1.XML</StartLayout>
          <HotSpot>
            <Enabled>1</Enabled>
          </HotSpot>
        </Settings>
      </Variant>
    </Customizations>
  </Settings>
</WindowsCustomizatons>
When the condition is met, the provisioning engine takes the XML file and places it in the location that Windows 10 has set and then the Start subsystem reads the file and applies the specific customized layout.
You must repeat this process for all variants that you want to support so that each variant can have a distinct layout for each of the conditions and targets that need to be supported. For example, if you add a Language condition, you can create a Start layout that has it's own localized group or folder titles.
Add the LayoutModification.xml file to the image
Once you have created your LayoutModification.xml file to customize devices that will run Windows 10 Mobile, you can use Windows ICD to add the XML file to the device:
- In the Available customizations pane, expand Runtime settings, select Start and then click the StartLayout setting.
- In the middle pane, click Browse to open File Explorer.
- In the File Explorer window, navigate to the location where you saved your LayoutModification.xml file.
- Select the file and then click Open.
This should set the value of StartLayout. The setting appears in the Selected customizations pane.
Related topics
- Manage Windows 10 Start layout options
- Configure Windows 10 taskbar
- Customize Windows 10 Start and taskbar with Group Policy
- Customize Windows 10 Start and taskbar with ICD and provisioning packages
- Customize Windows 10 Start with mobile device management (MDM)
- Changes to Group Policy settings for Windows 10 Start
- Start layout XML for desktop editions of Windows 10 (reference)