4.7 KiB
title, description, manager, ms.author, ms.prod, ms.localizationpriority, author, ms.topic, ms.technology, ms.date
| title | description | manager | ms.author | ms.prod | ms.localizationpriority | author | ms.topic | ms.technology | ms.date |
|---|---|---|---|---|---|---|---|---|---|
| Assign applications using roles in MDT (Windows 10) | This article will show you how to add applications to a role in the MDT database and then assign that role to a computer. | aaroncz | frankroj | windows-client | medium | frankroj | article | itpro-deploy | 11/28/2022 |
Assign applications using roles in MDT
This article will show you how to add applications to a role in the MDT database and then assign that role to a computer. For the purposes of this article, the application we're adding is Adobe Reader XI. In addition to using computer-specific entries in the database, you can use roles in MDT to group settings together.
Create and assign a role entry in the database
-
On MDT01, using Deployment Workbench, in the MDT Production deployment share, expand Advanced Configuration and then expand Database.
-
In the Database node, right-click Role, select New, and create a role entry with the following settings:
- Role name: Standard PC
- Applications / Lite Touch Applications:
- Install - Adobe Reader XI - x86

Figure 12. The Standard PC role with the application added
Associate the role with a computer in the database
After creating the role, you can associate it with one or more computer entries.
-
Using Deployment Workbench, expand MDT Production, expand Advanced Configuration, expand Database, and select Computers.
-
In the Computers node, double-click the PC00075 entry, and add the following setting:
- Roles: Standard PC
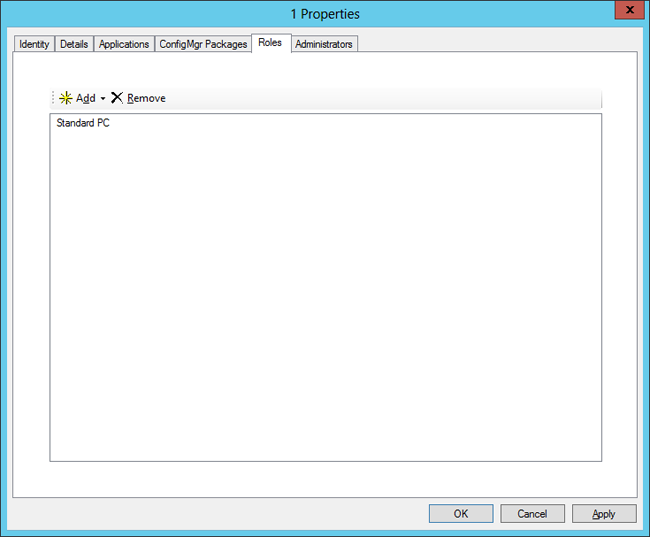
Figure 13. The Standard PC role added to PC00075 (having ID 1 in the database).
Verify database access in the MDT simulation environment
When the database is populated, you can use the MDT simulation environment to simulate a deployment. The applications aren't installed, but you can see which applications would be installed if you did a full deployment of the computer.
-
On PC0001, log on as CONTOSO\MDT_BA.
-
Modify the C:\MDT\CustomSettings.ini file to look like below:
[Settings] Priority=CSettings, CRoles, RApplications, Default [Default] _SMSTSORGNAME=Contoso OSInstall=Y UserDataLocation=AUTO TimeZoneName=Pacific Standard Time AdminPassword=P@ssw0rd JoinDomain=contoso.com DomainAdmin=CONTOSO\MDT_JD DomainAdminPassword=P@ssw0rd MachineObjectOU=OU=Workstations,OU=Computers,OU=Contoso,DC=contoso,DC=com SLShare=\\MDT01\Logs$ ScanStateArgs=/ue:*\* /ui:CONTOSO\* USMTMigFiles001=MigApp.xml USMTMigFiles002=MigUser.xml HideShell=YES ApplyGPOPack=NO SkipAppsOnUpgrade=NO SkipAdminPassword=YES SkipProductKey=YES SkipComputerName=NO SkipDomainMembership=YES SkipUserData=NO SkipLocaleSelection=YES SkipTaskSequence=NO SkipTimeZone=YES SkipApplications=NO SkipBitLocker=YES SkipSummary=YES SkipCapture=YES SkipFinalSummary=NO EventService=http://MDT01:9800 [CSettings] SQLServer=MDT01 Instance=SQLEXPRESS Database=MDT Netlib=DBNMPNTW SQLShare=Logs$ Table=ComputerSettings Parameters=UUID, AssetTag, SerialNumber, MacAddress ParameterCondition=OR [CRoles] SQLServer=MDT01 Instance=SQLEXPRESS Database=MDT Netlib=DBNMPNTW SQLShare=Logs$ Table=ComputerRoles Parameters=UUID, AssetTag, SerialNumber, MacAddress ParameterCondition=OR [RApplications] SQLServer=MDT01 Instance=SQLEXPRESS Database=MDT Netlib=DBNMPNTW SQLShare=Logs$ Table=RoleApplications Parameters=Role Order=Sequence -
Using an elevated Windows PowerShell prompt (run as Administrator), run the following commands. Press Enter after each command:
Set-Location C:\MDT
.\Gather.ps1
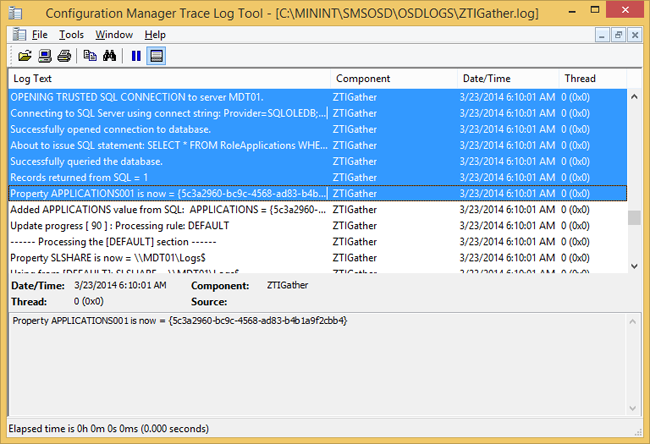
Figure 14. ZTIGather.log displaying the application GUID belonging to the Adobe Reader XI application that would have been installed if you deployed this machine.