27 KiB
title, description, ms.prod, ms.mktglfcycl, ms.sitesec, author, localizationpriority
| title | description | ms.prod | ms.mktglfcycl | ms.sitesec | author | localizationpriority |
|---|---|---|---|---|---|---|
| Manage Windows 10 updates using System Center Configuration Manager (Windows 10) | System Center Configuration Manager provides maximum control over quality and feature updates for Windows 10. | w10 | manage | library | jdeckerMS | high |
Manage Windows 10 updates using System Center Configuration Manager
Applies to
- Windows 10
- Windows 10 Mobile
Looking for consumer information? See Windows Update: FAQ
System Center Configuration Manager provides maximum control over quality and feature updates for Windows 10. Unlike other servicing tools, Configuration Manager has capabilities that extend beyond servicing, such as application deployment, antivirus management, software metering, and reporting, and provides a secondary deployment method for LTSB clients. Configuration Manager can effectively control bandwidth usage and content distribution through a combination of BranchCache and distribution points. Microsoft encourages organizations currently using Configuration Manager for Windows update management to continue doing so for Windows 10 client computers.
You can use Configuration Manager to service Windows 10 devices in two ways. The first option is to use Windows 10 Servicing Plans to deploy Windows 10 feature updates automatically based on specific criteria, similar to an Automatic Deployment Rule for software updates. The second option is to use a task sequence to deploy feature updates, along with anything else in the installation.
Note
This topic focuses on updating and upgrading Windows 10 after it has already been deployed. To use Configuration Manager to upgrade your systems from the Windows 8.1, Windows 8, or Windows 7 operating system, see Upgrade to Windows 10 with System Center Configuration Manager.
Windows 10 servicing dashboard
The Windows 10 servicing dashboard gives you a quick-reference view of your active servicing plans, compliance for servicing plan deployment, and other key information about Windows 10 servicing. For details about what each tile on the servicing dashboard represents, see Manage Windows as a service using System Center Configuration Manager.
For the Windows 10 servicing dashboard to display information, you must adhere to the following requirements:
-
Heartbeat discovery. Enable heartbeat discovery for the site receiving Windows 10 servicing information. Configuration for heartbeat discovery can be found in Administration\Overview\Hierarchy Configuration\Discovery Methods.
-
Windows Server Update Service (WSUS). System Center Configuration Manager must have the Software update point site system role added and configured to receive updates from a WSUS 4.0 server with the hotfix KB3095113 installed.
-
Service connection point. Add the Service connection point site system role in Online, persistent connection mode.
-
Upgrade classification. Select Upgrade from the list of synchronized software update classifications.
To configure Upgrade classification
-
Go to Administration\Overview\Site Configuration\Sites, and then select your site from the list.
-
On the Ribbon, in the Settings section, click Configure Site Components, and then click Software Update Point.
- In the Software Update Point Component Properties dialog box, on the Classifications tab, click Upgrades.
-
When you have met all these requirements and deployed a servicing plan to a collection, you’ll receive information on the Windows 10 servicing dashboard.
Enable CBB clients in Windows 10, version 1511
When you use System Center Configuration Manager to manage Windows 10 servicing, you must first set the Defer Updates or Upgrades policy on the clients that should be on the Current Branch for Business (CBB) servicing branch so that you can use CBB servicing plans from Configuration Manager. You can do this either manually or through Group Policy. If you don’t set this policy, Configuration Manager discovers all clients, as it would in Current Branch (CB) mode.
To use Group Policy to configure a client for the CBB servicing branch
Note
In this example, a specific organizational unit (OU) called Windows 10 – Current Branch for Business Machines contains the Windows 10 devices that should be configured for CBB. You can also use a security group to filter the computers to which the policy should be applied.
-
On a PC running the Remote Server Administration Tools or on a domain controller, open Group Policy Management Console (GPMC).
-
Expand Forest\Domains\Your_Domain.
-
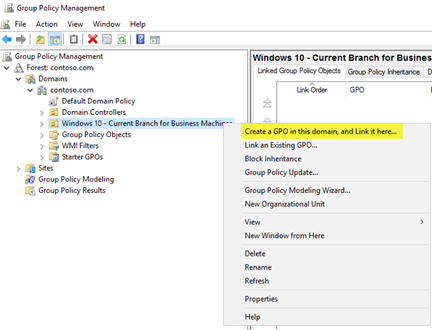
Right-click the Windows 10 – Current Branch for Business Machines OU, and then click Create a GPO in this domain, and Link it here.
-
In the New GPO dialog box, type Enable Current Branch for Business for the name of the new GPO.
Note
In this example, you’re linking the GPO to a specific OU. This is not a requirement. You can link the Windows Update for Business GPOs to any OU or the top-level domain, whichever is appropriate for your Active Directory Domain Services (AD DS) structure.
-
Right-click the Enable Current Branch for Business GPO, and then click Edit.
-
In the Group Policy Management Editor, go to Computer Configuration\Policies\Administrative Templates\Windows Components\Windows Update.
-
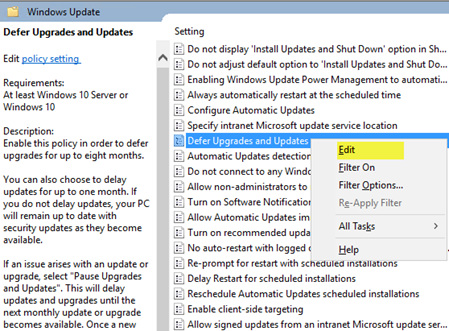
Right-click the Defer Upgrades and Updates setting, and then click Edit.
-
Enable the policy, and then click OK.
Note
The additional options in this setting are only for Windows Update for Business, so be sure not to configure them when using System Center Configuration Manager for Windows 10 servicing.
-
Close the Group Policy Management Editor.
This policy will now be deployed to every device in the Windows 10 – Current Branch for Business Machines OU.
Enable CBB clients in Windows 10, version 1607
When you use Configuration Manager to manage Windows 10 servicing, you must first set the Select when Feature Updates are received policy on the clients that should be on the CBB servicing branch so that you can use CBB servicing plans from Configuration Manager. You can do this either manually or through Group Policy. If you don’t set this policy, Configuration Manager discovers all clients, as it would in CB mode.
Note
System Center Configuration Manager version 1606 is required to manage devices running Windows 10, version 1607.
To use Group Policy to configure a client for the CBB servicing branch
Note
In this example, a specific organizational unit (OU) called Windows 10 – Current Branch for Business Machines contains the Windows 10 devices that should be configured for CBB. You can also use a security group to filter the computers to which the policy should be applied.
-
On a PC running the Remote Server Administration Tools or on a domain controller, open GPMC.
-
Expand Forest\Domains\Your_Domain.
-
Right-click the Windows 10 – Current Branch for Business Machines OU, and then click Create a GPO in this domain, and Link it here.
-
In the New GPO dialog box, type Enable Current Branch for Business for the name of the new GPO.
Note
In this example, you’re linking the GPO to a specific OU. This is not a requirement. You can link the Windows Update for Business GPOs to any OU or the top-level domain, whichever is appropriate for your Active Directory Domain Services (AD DS) structure.
-
Right-click the Enable Current Branch for Business GPO, and then click Edit.
-
In the Group Policy Management Editor, go to Computer Configuration\Policies\Administrative Templates\Windows Components\Windows Update\Defer Windows Updates.
-
Right-click the Select when Feature Updates are received setting, and then click Edit.
-
Enable the policy, select the CBB branch readiness level, and then click OK.
-
Close the Group Policy Management Editor.
This policy will now be deployed to every device in the Windows 10 – Current Branch for Business Machines OU.
Create collections for deployment rings
Regardless of the method by which you deploy Windows 10 feature updates to your environment, you must start the Windows 10 servicing process by creating collections of computers that represent your deployment rings. In this example, you create two collections: Windows 10 – All Current Branch for Business and Ring 4 Broad business users. You’ll use the Windows 10 – All Current Branch for Business collection for reporting and deployments that should go to all CBB clients. You’ll use the Ring 4 Broad business users collection as a deployment ring for the first CBB users.
Note
The following procedures use the groups from Table 1 in Build deployment rings for Windows 10 updates as examples.
To create collections for deployment rings
-
In the Configuration Manager console, go to Assets and Compliance\Overview\Device Collections.
-
On the Ribbon, in the Create group, click Create Device Collection.
-
In the Create Device Collection Wizard, in the name box, type Windows 10 – All Current Branch for Business.
-
Click Browse to select the limiting collection, and then click All Systems.
-
In Membership rules, click Add Rule, and then click Query Rule.
-
Name the rule CBB Detection, and then click Edit Query Statement.
-
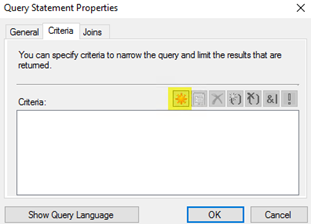
On the Criteria tab, click the New icon.
-
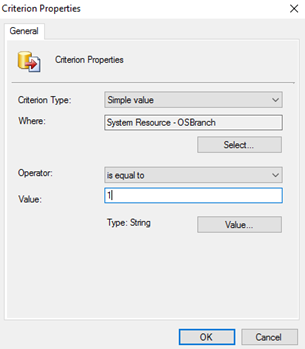
In the Criterion Properties dialog box, leave the type as Simple Value, and then click Select.
-
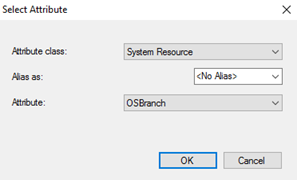
In the Select Attribute dialog box, from the Attribute class list, select System Resource. From the Attribute list, select OSBranch, and then click OK.
Note
Configuration Manager discovers clients’ servicing branch and stores that value in the OSBranch attribute, which you will use to create collections based on servicing branch. The values in this attribute can be 0 (Current Branch), 1 (Current Branch for Business), or 2 (Long-Term Servicing Branch).
-
Leave Operator set to is equal to; in the Value box, type 1. Click OK.
-
Now that the OSBranch attribute is correct, verify the operating system version.
-
On the Criteria tab, click the New icon again to add criteria.
-
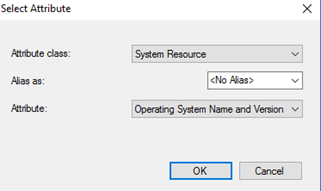
In the Criterion Properties dialog box, click Select.
-
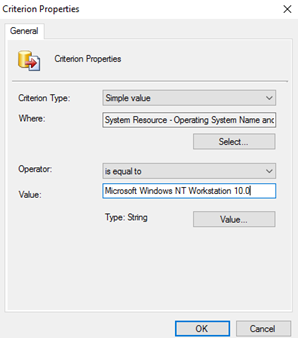
From the Attribute class list, select System Resource. From the Attribute list, select Operating System Name and Version, and then click OK.
-
In the Value box, type Microsoft Windows NT Workstation 10.0, and then click OK.
-
In the Query Statement Properties dialog box, you see two values. Click OK, and then click OK again to continue to the Create Device Collection Wizard.
-
Click Summary, and then click Next.
-
Close the wizard.
Important
Windows Insider PCs are discovered the same way as CB or CBB devices. If you have Windows Insider PCs that you use Configuration Manager to manage, then you should create a collection of those PCs and exclude them from this collection. You can create the membership for the Windows Insider collection either manually or by using a query where the operating system build doesn’t equal any of the current CB or CBB build numbers. You would have to update each periodically to include new devices or new operating system builds.
After you have updated the membership, this new collection will contain all managed clients on the CBB servicing branch. You will use this collection as a limiting collection for future CBB-based collections and the Ring 4 Broad broad business users collection. Complete the following steps to create the Ring 4 Broad business users device collection, which you’ll use as a CBB deployment ring for servicing plans or task sequences.
-
In the Configuration Manager console, go to Assets and Compliance\Overview\Device Collections.
-
On the Ribbon, in the Create group, click Create Device Collection.
-
In the Create Device Collection Wizard, in the name box, type Ring 4 Broad business users.
-
Click Browse to select the limiting collection, and then click Windows 10 – All Current Branch for Business.
-
In Membership rules, click Add Rule, and then click Direct Rule.
-
In the Create Direct Membership Rule Wizard dialog box, click Next.
-
In the Value field, type all or part of the name of a device to add, and then click Next.
-
Select the computer that will be part of the Ring 4 Broad business users deployment ring, and then click Next.
-
Click Next, and then click Close.
-
In the Create Device Collection Wizard dialog box, click Summary.
-
Click Next, and then click Close.
Use Windows 10 servicing plans to deploy Windows 10 feature updates
There are two ways to deploy Windows 10 feature updates with System Center Configuration Manager. The first is to use servicing plans, which provide an automated method to update devices consistently in their respective deployment rings, similar to Automatic Deployment Rules for software updates.
To configure Windows feature updates for CBB clients in the Ring 4 Broad business users deployment ring using a servicing plan
-
In the Configuration Manager console, go to Software Library\Overview\Windows 10 Servicing, and then click Servicing Plans.
-
On the Ribbon, in the Create group, click Create Servicing Plan.
-
Name the plan Ring 4 Broad business users Servicing Plan, and then click Next.
-
On the Servicing Plan page, click Browse. Select the Ring 4 Broad business users collection, which you created in the Create collections for deployment rings section, click OK, and then click Next.
Important
Microsoft added a new protection feature to Configuration Manager that prevents accidental installation of high-risk deployments such as operating system upgrades on site systems. If you select a collection (All Systems in this example) that has a site system in it, you may receive the following message.
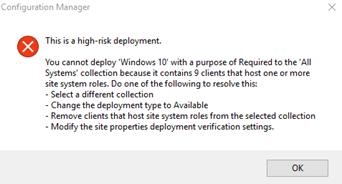
For details about how to manage the settings for high-risk deployments in Configuration Manager, see Settings to manage high-risk deployments for System Center Configuration Manager.
-
On the Deployment Ring page, select the Business Ready (Current Branch for Business) readiness state, leave the delay at 0 days, and then click Next.
Doing so deploys CBB feature updates to the broad business users deployment ring immediately after they are released to CBB.
On the Upgrades page, you specify filters for the feature updates to which this servicing plan is applicable. For example, if you wanted this plan to be only for Windows 10 Enterprise, you could select Title, and then type Enterprise.
-
For this example, on the Upgrades page, click Next to leave the criterion blank.
-
On the Deployment Schedule page, click Next to keep the default values of making the content available immediately and requiring installation by the 7-day deadline.
-
On the User Experience page, from the Deadline behavior list, select Software Installation and System restart (if necessary). From the Device restart behavior list, select Workstations, and then click Next.
Doing so allows installation and restarts after the 7-day deadline on workstations only.
-
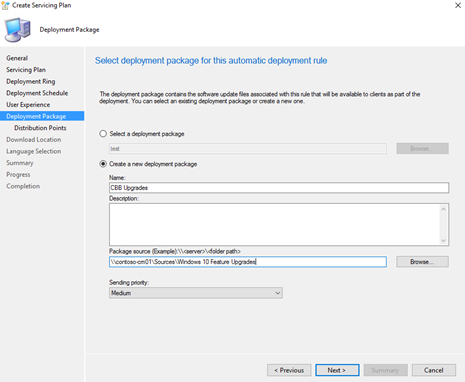
On the Deployment Package page, select Create a new deployment package. In Name, type CBB Upgrades, select a share for your package source location, and then click Next.
In this example, \contoso-cm01\Sources\Windows 10 Feature Upgrades is a share on the Configuration Manager server that contains all the Windows 10 feature updates.
-
On the Distribution Points page, from the Add list, select Distribution Point.

Select the distribution points that serve the clients to which you’re deploying this servicing plan, and then click OK.
-
Click Summary, click Next to complete the servicing plan, and then click Close.
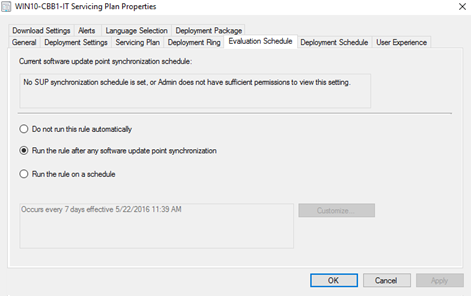
You have now created a servicing plan for the Ring 4 Broad business users deployment ring. By default, this rule is evaluated each time the software update point is synchronized, but you can modify this schedule by viewing the service plan’s properties on the Evaluation Schedule tab.
Use a task sequence to deploy Windows 10 updates
There are times when deploying a Windows 10 feature update requires the use of a task sequence—for example:
- LTSB feature updates. With the LTSB servicing branch, feature updates are never provided to the Windows clients themselves. Instead, feature updates must be installed like a traditional in-place upgrade.
- Additional required tasks. When deploying a feature update requires additional steps (e.g., suspending disk encryption, updating applications), you must use task sequences to orchestrate the additional steps. Servicing plans do not have the ability to add steps to their deployments.
Each time Microsoft releases a new Windows 10 build, it releases a new .iso file containing the latest build, as well. Regardless of the scenario that requires a task sequence to deploy the Windows 10 upgrade, the base process is the same. Start by creating an Operating System Upgrade Package in the Configuration Manager console:
-
In the Configuration Manager console, go to Software Library\Overview\Operating Systems\Operating System Upgrade Packages.
-
On the Ribbon, in the Create group, click Add Operating System Upgrade Package.
-
On the Data Source page, type the path of the extracted .iso file of the new version of Windows 10 you’re deploying, and then click Next.
In this example, the Windows 10 Enterprise 1607 installation media is deployed to \contoso-cm01\Sources\Operating Systems\Windows 10 Enterprise\Windows 10 Enterprise - Version 1607.
Note
System Center Configuration Manager version 1606 is required to manage machines running Windows 10, version 1607.
-
On the General page, in the Name field, type the name of the folder (Windows 10 Enterprise - Version 1607 in this example). Set the Version to 1607, and then click Next.
-
On the Summary page, click Next to create the package.
-
On the Completion page, click Close.
Now that the operating system upgrade package has been created, the content in that package must be distributed to the correct distribution points so that the clients can access the content. Complete the following steps to distribute the package content to distribution points:
-
In the Configuration Manager console, go to Software Library\Overview\Operating Systems\Operating System Upgrade Packages, and then select the Windows 10 Enterprise – Version 1607 software upgrade package.
-
On the Ribbon, in the Deployment group, click Distribute Content.
-
In the Distribute Content Wizard, on the General page, click Next.
-
On the Content Destination page, click Add, and then click Distribution Point.
-
In the Add Distribution Points dialog box, select the distribution point that will serve the clients receiving this package, and then click OK.
-
On the Content Destination page, click Next.
-
On the Summary page, click Next to distribute the content to the selected distribution point.
-
On the Completion page, click Close.
Now that the upgrade package has been created and its contents distributed, create the task sequence that will use it. Complete the following steps to create the task sequence, using the previously created deployment package:
-
In the Configuration Manager console, go to Software Library\Overview\Operating Systems\Task Sequences.
-
On the Ribbon, in the Create group, click Create Task Sequence.
-
In the Create Task Sequence Wizard, on the Create a new task sequence page, select Upgrade an operating system from upgrade package, and then click Next.
-
On the Task Sequence Information page, in Task sequence name, type Upgrade Windows 10 Enterprise – Version 1607, and then click Next.
-
On the Upgrade the Windows Operating system page, click Browse, select the deployment package you created in the previous steps, and then click OK.
-
Click Next.
-
On the Include Updates page, select Available for installation – All software updates, and then click Next.
-
On the Install Applications page, click Next.
-
On the Summary page, click Next to create the task sequence.
-
On the Completion page, click Close.
With the task sequence created, you’re ready to deploy it. If you’re using this method to deploy most of your Windows 10 feature updates, you may want to create deployment rings to stage the deployment of this task sequence, with delays appropriate for the respective deployment ring. In this example, you deploy the task sequence to the Ring 4 Broad business users collection.
Important
This process deploys a Windows 10 operating system feature update to the affected devices. If you’re testing, be sure to select the collection to which you deploy this task sequence carefully.
To deploy your task sequence
-
In the Configuration Manager console, go to Software Library\Overview\Operating Systems\Task Sequences, and then select the Upgrade Windows 10 Enterprise – Version 1607 task sequence.
-
On the Ribbon, in the Deployment group, click Deploy.
-
In the Deploy Software Wizard, on the General page, click Browse. Select the target collection, click OK, and then click Next.
-
On the Deployment Settings page, for purpose, select Required, and then click Next.
-
On the Scheduling page, select the Schedule when this deployment will become available check box (it sets the current time by default). For Assignment schedule, click New.
-
In the Assignment Schedule dialog box, click Schedule.
-
In the Custom Schedule dialog box, select the desired deadline, and then click OK.
-
In the Assignment Schedule dialog box, click OK, and then click Next.
-
On the User Experience page, in the When the scheduled assignment time is reached, allow the following activities to be performed outside of the maintenance window section, select Software Installation and System restart (if required to complete the installation), and then click Next.
-
Use the defaults for the remaining settings.
-
Click Summary, and then click Next to deploy the task sequence.
-
Click Close.
Steps to manage updates for Windows 10
|  | [Learn about updates and servicing branches](waas-overview.md) |
|  | [Prepare servicing strategy for Windows 10 updates](waas-servicing-strategy-windows-10-updates.md) |
|  | [Build deployment rings for Windows 10 updates](waas-deployment-rings-windows-10-updates.md) |
|  | [Assign devices to servicing branches for Windows 10 updates](waas-servicing-branches-windows-10-updates.md) |
|  | [Optimize update delivery for Windows 10 updates](waas-optimize-windows-10-updates.md) |
|  | [Manage updates using Windows Update for Business](waas-manage-updates-wufb.md) or [Manage Windows 10 updates using Windows Server Update Services](waas-manage-updates-wsus.md) or Manage Windows 10 updates using System Center Configuration Manager (this topic) |
See also
Manage Windows as a service using System Center Configuration Manager
Related topics
- Update Windows 10 in the enterprise
- Overview of Windows as a service
- Prepare servicing strategy for Windows 10 updates
- Build deployment rings for Windows 10 updates
- Assign devices to servicing branches for Windows 10 updates
- Optimize update delivery for Windows 10 updates
- Configure Delivery Optimization for Windows 10 updates
- Configure BranchCache for Windows 10 updates
- Manage updates for Windows 10 Mobile Enterprise and Windows 10 IoT Mobile
- Manage updates using Windows Update for Business
- Configure Windows Update for Business
- Integrate Windows Update for Business with management solutions
- Walkthrough: use Group Policy to configure Windows Update for Business
- Walkthrough: use Intune to configure Windows Update for Business
- Manage Windows 10 updates using Windows Server Update Services
- Manage device restarts after updates