24 KiB
title, description, ms.assetid, ms.reviewer, manager, ms.author, ms.topic, ms.prod, ms.technology, author, ms.date
| title | description | ms.assetid | ms.reviewer | manager | ms.author | ms.topic | ms.prod | ms.technology | author | ms.date |
|---|---|---|---|---|---|---|---|---|---|---|
| Enable offline upgrades to Windows 10 for Windows Embedded 8.1 Handheld devices | Overview of how to enable offline updates using Microsoft Endpoint Configuration Manager. | ED3DAF80-847C-462B-BDB1-486577906772 | dansimp | dansimp | article | w10 | windows | manikadhiman | 06/26/2017 |
Enable offline upgrades to Windows 10 for Windows Embedded 8.1 Handheld devices
Like any Windows devices, Windows 10 Mobile devices use Microsoft Update by default to download updates over the Internet. However, in some enterprise environments, devices may not be able to access the Internet to retrieve their updates. There are also situations where network restrictions or other enterprise policies require that devices download updates from an internal location. This article describes how to enable offline updates using Microsoft Endpoint Configuration Manager.
The following table describes the update path to Windows 10 Mobile.
| Starting SKU | Upgrade to Windows 10 Mobile |
|---|---|
Windows Mobile 6.5 |
No |
Windows Phone 8 |
No |
Windows Phone 8.1 |
Yes |
To configure the mobile device management (MDM) service provider and enable mobile devices to download updates from a predefined internal location, an IT administrator or device administrator must perform a series of manual and automated steps:
- Prepare a test device that can connect to the Internet to download the released update packages.
- After the updates are downloaded and before pressing the install button, retrieve an XML file on the device that contains all the metadata about each update package.
- Check the status code in the XML file.
- Check for registry dependencies.
- Using a script that we provide, parse the XML file to extract download URLs for the update packages.
- Download the update packages using the download URLs.
- Place the downloaded packages on an internal share that is accessible to devices you are updating.
- Create two additional XML files that define the specific updates to download and the specific locations from which to download the updates, and deploy them onto the production device.
- Start the update process from the devices.
As a part of the update process, Windows runs data migrators to bring forward configured settings and data on the device. For instance, if the device was configured with a maintenance time or other update policy in Windows Embedded 8.1 Handheld, these settings are automatically migrated to Windows 10 as part of the update process. If the handheld device was configured for assigned access lockdown, then this configuration is also migrated to Windows 10 as part of the update process. This includes ProductId and AumId conversion for all internal apps (including buttonremapping apps).
Be aware that the migrators do not take care of the following:
- Third-party apps provided by OEMs.
- Deprecated first-party apps, such as Bing News.
- Deprecated system or application settings, such as Microsoft.Game and Microsoft.IE.
In the event of an Enterprise Reset, these migrated settings are automatically persisted.
After the upgrade to Windows 10 is complete, if you decide to push down a new wehlockdown.xml, you need to take the following steps to ensure that the updated settings are persisted through an Enterprise Reset:
- Delete the TPK*ppkg and push down a new ppkg with your new configuration to the persistent folder.
- Push down a new ppkg with your new configuration with higher priority. (Be aware that in ICD, Owner=Microsoft, Rank=0 is the lowest priority, and vice versa. With this step, the old assigned access lockdown configuration is overwritten.)
Requirements:
- The test device must be same as the other production devices that are receiving the updates.
- The test device must be enrolled with Microsoft Endpoint Configuration Manager.
- The test device must be connected to the Internet.
- The test device must have an SD card with at least 0.5 GB of free space.
- Ensure that the settings app and PhoneUpdate applet are available through Assigned Access.
The following diagram shows a high-level overview of the process.

Step 1: Prepare a test device to download updates from Microsoft Update
Define the baseline update set that you want to apply to other devices. Use a device that is running the most recent image as the test device.
Trigger the device to check for updates either manually or using Microsoft Endpoint Configuration Manager.
Check for updates manually
- On the device, go to Settings > Phone updates > Check for updates.
- Sync the device, go to Settings > Workplace > Enrolled, and then select the refresh icon. Repeat as needed.
- Follow the prompts to download the updates, but do not select the Install button.
Note
There is a bug in all OS versions up to GDR2 where the Cloud Solution Provider (CSP) does not set the assigned value. There is no way to change or set this until GDR2 is deployed onto the device.
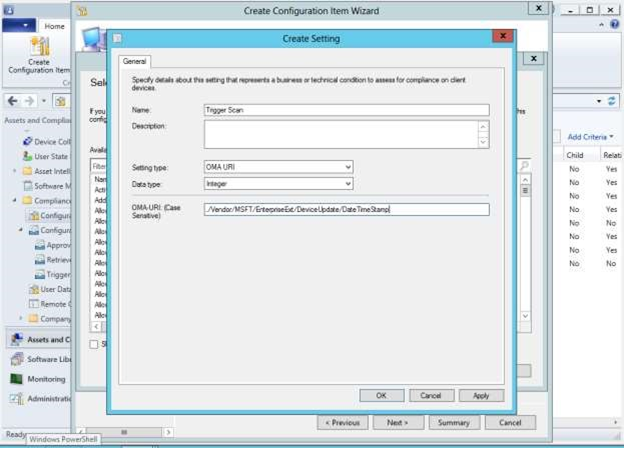
Check for updates by using Microsoft Endpoint Configuration Manager
-
Remotely trigger a scan of the test device by deploying a Trigger Scan configuration baseline.
-
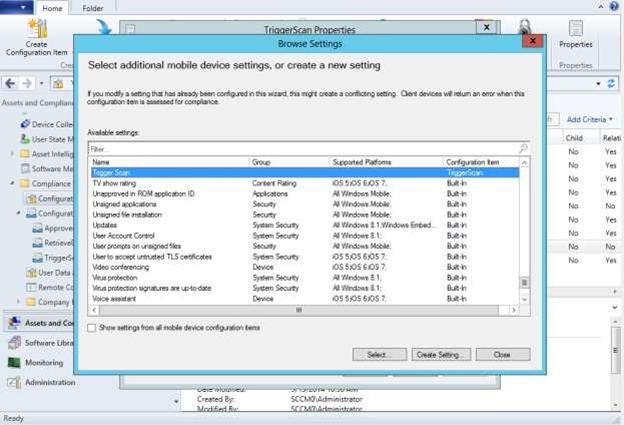
Set the value of this OMA-URI by going to Configuration Item, and then selecting the newly created Trigger Scan settings from the previous step.
-
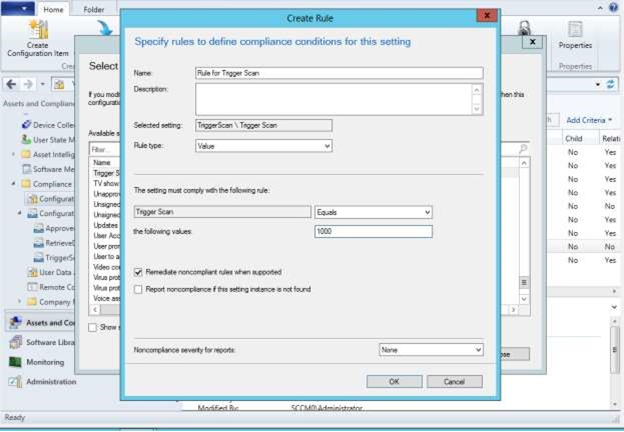
Ensure that the value that is specified for this URI is greater than the value on the device(s), and that the Remediate noncompliant rules when supported option is selected. For the first time, any value that is greater than 0 will work, but for subsequent configurations, ensure that you specify an incremented value.
-
Create a configuration baseline for Trigger Scan and Deploy. We recommend that this configuration baseline be deployed after the Controlled Updates baseline has been applied to the device. (The corresponding files are deployed on the device through a device sync session.)
-
Follow the prompts for downloading the updates, but do not install the updates on the device.
Step 2: Retrieve the device update report XML from the device
After updates are downloaded (but not installed on the device), the process generates an XML file that contains information about the packages it downloaded. You must retrieve this XML file.
There are two ways to retrieve this file from the device; one pre-GDR1 and one post-GDR1.
Pre-GDR1: Parse a compliance log from the device in ConfigMgr
-
Use ConfigMgr to create a configuration item to look at the registry entry ./Vendor/MSFT/EnterpriseExt/DeviceUpdate/ApprovedUpdatesXml.
Note
In Microsoft Endpoint Configuration Manager, you may see an error about exceeding the file limit when using ApprovedUpdatesXml, but the process still completes even if the file is large.
If the XML file is greater than 32 KB, you can also use ./Vendor/MSFT/FileSystem/<filename>.
-
Set a baseline for this configuration item with a “dummy” value (such as zzz), and ensure that you do not remediate it.
The dummy value is not set; it is only used for comparison.
-
After the report XML is sent to the device, Microsoft Endpoint Manager displays a compliance log that contains the report information. The log can contain significant amount of data.
-
Parse this log for the report XML content.
For a step-by-step walkthrough, see Retrieve a device update report using Microsoft Endpoint Manager logs.
Post-GDR1: Retrieve the report xml file using an SD card
- Use ConfigMgr to create a configuration item to set a registry value for ./Vendor/MSFT/EnterpriseExt/DeviceUpdate/CopyUpdateReportToSDCard.
- The value that you define for this configuration item is defined by the relative path to the SD card, which includes the filename of the XML file (such as SDCardRoot\Update\DUReport.xml).
- Remove the SD card from device and copy the XML file to your PC.
Step 3: Check the status code in the XML file
Make sure that the status code is set to 0000-0000 (success).
Step 4: Check for registry dependencies
Remove any registry dependencies in the XML file.
Step 5: Extract download URLs from the report XML
Use the example PowerShell script to extract the download URLs from the XML file or parse it manually.
Step 6: Retrieve update packages using download URLs
Use a script or manually download each update package to a PC or an internal share.
Step 7: Place the update packages on an accessible share
Put all the update packages into an internal share that is accessible to all the devices that need these updates. Ensure that the internal share can support multiple devices trying to access the updates at the same time.
Step 8: Create two XML files for production devices to select updates and download locations
Here are the two files.
| Term | Description |
|---|---|
DUControlledUpdates.xml |
This is the same file as the report XML retrieved in Step 2 with a different name. This file tells the device the specific update packages to download. See Appendix for example |
DUCustomContentUris.xml |
This file maps the update packages in DUControlledUpdates.xml to the internal share location. |
For a walkthrough of these steps, see Deploy controlled updates. Ensure that the Trigger Scan configuration baseline has NOT been deployed.
Deploy controlled updates
The deployment process has three parts:
- Create a configuration item for DUControlledUpdates.xml.
- Create a configuration item for DUCustomContentURIs.xml.
- Create a configuration item for approved updates.
Create a configuration item for DUControlledUpdates.xml
-
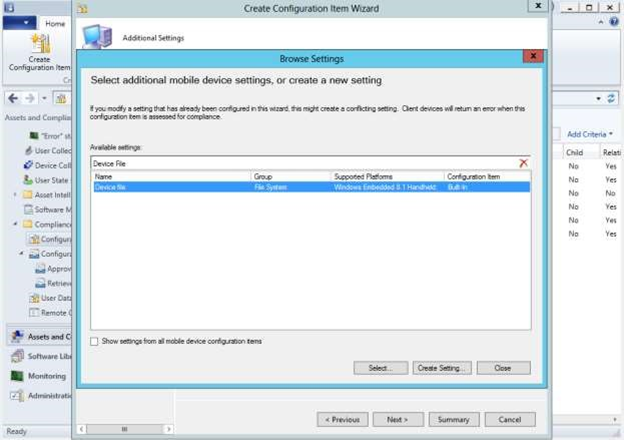
Create a configuration item. In the Browse Settings window, select Device File as a filter, and then select Select.
-
Browse to the DUControlledUpdates.xml that was created from the test device, and then specify the file path and name on the device as
NonPersistent\DUControlledUpdates.xml.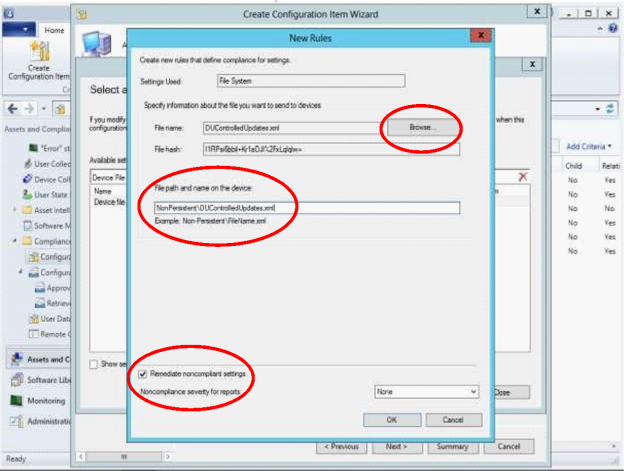
-
Select Remediate noncompliant settings, and then select OK.
Create a configuration item for DUCustomContentURIs.xml
-
Create a configuration item and specify the file path and name on the device as
NonPersistent\DUCustomContentURIs.xml -
Select Remediate noncompliant settings.
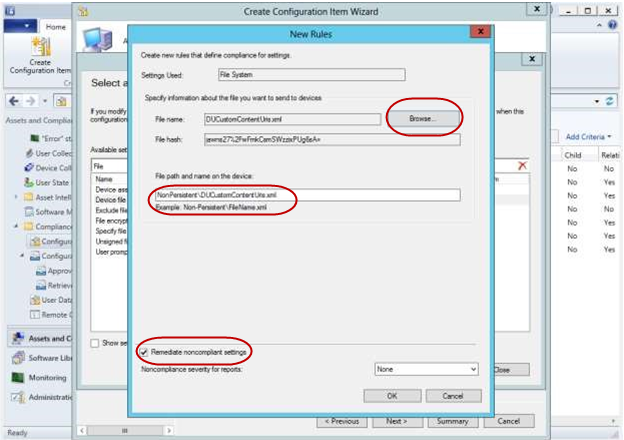
-
Select OK.
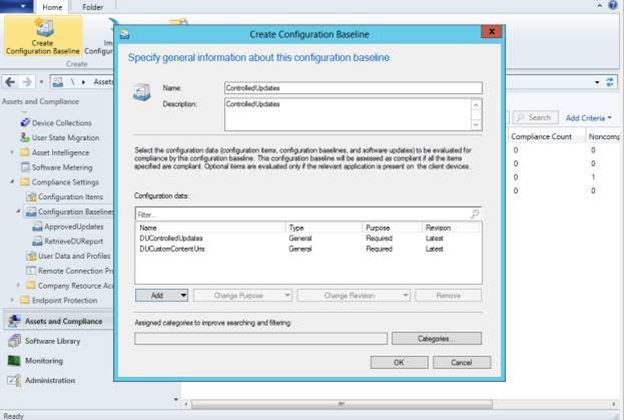
Create a configuration baseline for approved updates
-
Create a configuration baseline item and give it a name (such as ControlledUpdates).
-
Add the DUControlledUpdates and DUCustomContentURIs configuration items, and then select OK.
-
Deploy the configuration baseline to the appropriate device or device collection.
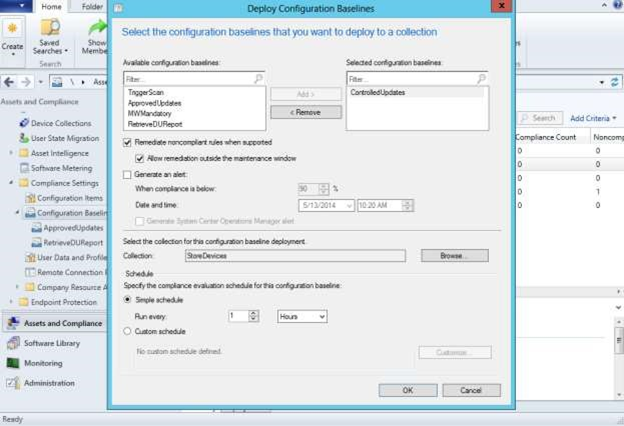
-
Select OK.
Step 7: Trigger the other devices to scan, download, and install updates
Now that the other "production" or "in-store" devices have the necessary information to download updates from an internal share, the devices are ready for updates.
Update unmanaged devices
If the update policy of the device is not managed or restricted by Microsoft Endpoint Configuration Manager, an update process can be initiated on the device in one of the following ways:
- A periodic scan that the device automatically performs.
- Manually through Settings > Phone Update > Check for Updates.
Update managed devices
If the update policy of the device is managed or restricted by MDM, an update process can be initiated on the device in one of the following ways:
-
Trigger the device to scan for updates through Microsoft Endpoint Configuration Manager.
Ensure that the trigger scan has successfully executed, and then remove the trigger scan configuration baseline.
Note
Ensure that the PhoneUpdateRestriction Policy is set to a value of 0 so that the device doesn't perform an automatic scan.
-
Trigger the device to scan as part of a Maintenance Window defined by the IT Admin in Microsoft Endpoint Configuration Manager.
After the updates are installed, the IT Admin can use the DUReport generated in the production devices to determine whether the device successfully installed the list of updates. If the device did not, error codes are provided in the DUReport.xml. To retrieve the device update report from a device, perform the same steps defined in Step 2.
Example PowerShell script
param (
# [Parameter (Mandatory=$true, HelpMessage="Input File")]
        [String]$inputFile,

# [Parameter (Mandatory=$true, HelpMessage="Download Cache Location")]
        [String]$downloadCache,

# [Parameter (Mandatory=$true, HelpMessage="Local Cache URL")]
        [String]$localCacheURL
       )

#DownloadFiles Function
function DownloadFiles($inputFile, $downloadCache, $localCacheURL)
{
    $customContentURIFileCreationError = "Not able to create Custom Content URI File"
#Read the Input File
    $report = [xml](Get-Content $inputFile)

# this is where the document will be saved
    $customContentURLFile = "$downloadCache\DUCustomContentUris.xml"
    New-Item -Path $customContentURLFile -ItemType File -force -ErrorAction SilentlyContinue -ErrorVariable NewItemError > $null
    if ($NewItemError -ne "")
    {
       PrintMessageAndExit $customContentURIFileCreationError
    }

# get an XMLTextWriter to create the XML
    $XmlWriter = New-Object System.XMl.XmlTextWriter($customContentURLFile,$Null)

# choose a pretty formatting:
    $xmlWriter.Formatting = 'Indented'
    $xmlWriter.Indentation = 1
    $XmlWriter.IndentChar = "`t"

# write the header
    $xmlWriter.WriteStartDocument()
    $xmlWriter.WriteStartElement('CustomContentUrls')
    foreach ($update in $report.UpdateData.coreUpdateMetadata.updateSet.update)
    {
        if (!$update.destinationFilePath -or !$update.contentUrl)
        {
            continue;
        }

        $destFilePath = $update.destinationFilePath.Trim();
        $contentUrl = $update.contentUrl.Trim();

        Write-Host "Pre-Processing Line: $destFilePath#$contentUrl"
        if (($destFilePath -ne "") -and ($destFilePath.Contains("\")) -and ($contentUrl -ne "") -and ($contentUrl.Contains("/")) )
        {
            $isBundle = $update.isBundle
            $revisionId = $update.revisionId
            $updateId = $update.updateId
            $revisionNum = $update.revisionNum

            $fileName = $destFilePath.Substring($destFilePath.LastIndexOf("\") + 1);
#Write-Host "Processing Line: $destFilePath#$contentUrl"
            if ($fileName -ne "")
            {
                $destination = $downloadCache + "\" + $fileName;
                Try
                {
                    $wc = New-Object System.Net.WebClient
                    $wc.DownloadFile($contentUrl, $destination)
                    Write-Host "Successfull Download: $contentUrl#$destination";

                    $XmlWriter.WriteStartElement('contentUrl')
                    $XmlWriter.WriteAttributeString('isBundle', $isBundle)
                    $XmlWriter.WriteAttributeString('revisionId', $revisionId)
                    $XmlWriter.WriteAttributeString('updateId', $updateId)
                    $XmlWriter.WriteAttributeString('revisionNum', $revisionNum)
                    $XmlWriter.WriteRaw($localCacheURL + $fileName)
                    $xmlWriter.WriteEndElement()
                }
                Catch [ArgumentNullException]
                {
                    Write-Host "Content URL is null";
                }
                Catch [WebException]
                {
                    Write-Host "Invalid Content URL: $contentUrl";
                }
                Catch
                {
                    Write-Host "Exception in Download: $contentUrl";
                }
            }
            else
            {
                Write-Host "Ignored Input Line: $contentUrl"
            }
        }
        else
        {
            Write-Host "Ignored Input Line: $contentUrl"
        }
    }

# close the "CustomContentUrls" node
    $xmlWriter.WriteEndElement()

# finalize the document
    $xmlWriter.WriteEndDocument()
    $xmlWriter.Flush()
    $xmlWriter.Close()

    Write-Host "Successfully Created Custom Content URL File: $customContentURLFile"
}

#PrintMessage Function
function PrintMessageAndExit($ErrorMessage)
{
    Write-Host $ErrorMessage
    exit 1
}

#PrintMessage Function
function PrintUsageAndExit()
{
    Write-Host "Usage: Download.ps1 -inputFile <InputFilePath> -downloadCache <CachePath> -localCacheURL <URL>"
    exit 1
}

if (($inputFile -eq "") -or ($downloadCache -eq "") -or ($localCacheURL -eq ""))
{
    PrintUsageAndExit
}
if (!$localCacheURL.EndsWith("/"))
{
    $localCacheURL = $localCacheURL + "/";
}
$inputFileErrorString = "Input File does not exist";
$downloadCacheErrorString = "Download Cache does not exist";
$downloadCacheAddError = "Access Denied in creating the Download Cache Folder";
$downloadCacheRemoveError = "Not able to delete files from Download Cache"
$downloadCacheClearWarningString = "Download Cache not empty. Do you want to Clear";

#Check if Input File Exist
$inputFileExists = Test-Path $inputFile;
if(!$inputFileExists)
{
    PrintMessageAndExit($inputFileErrorString)
}

#Check if Download Cache Exist
$downloadCacheExists = Test-Path $downloadCache;
if(!$downloadCacheExists)
{
    PrintMessageAndExit($downloadCacheErrorString)
}

$downloadCacheFileCount = (Get-ChildItem $downloadCache).Length;
if ($downloadCacheFileCount -ne 0)
{
#Clear the directory
    Remove-Item $downloadCache -Recurse -Force -Confirm -ErrorVariable RemoveItemError -ErrorAction SilentlyContinue > $null
    if ($RemoveItemError -ne "")
    {
        PrintMessageAndExit $downloadCacheRemoveError
    }

    $childItem = Get-ChildItem $downloadCache -ErrorAction SilentlyContinue > $null
    $downloadCacheFileCount = ($childItem).Length;
    if ($downloadCacheFileCount -ne 0)
    {
        PrintMessageAndExit $downloadCacheRemoveError
    }

#Create a new directory
    New-Item -Path $downloadCache -ItemType Directory -ErrorAction SilentlyContinue -ErrorVariable NewItemError > $null
    if ($NewItemError -ne "")
    {
       PrintMessageAndExit $downloadCacheAddError
    }
}

DownloadFiles $inputFile $downloadCache $localCacheURL
Retrieve a device update report using Microsoft Endpoint Manager logs
For pre-GDR1 devices Use this procedure for pre-GDR1 devices:
-
Trigger a device scan by going to Settings > Phone Update > Check for Updates.
Since the DUReport settings have not been remedied, you should see a non-compliance.
-
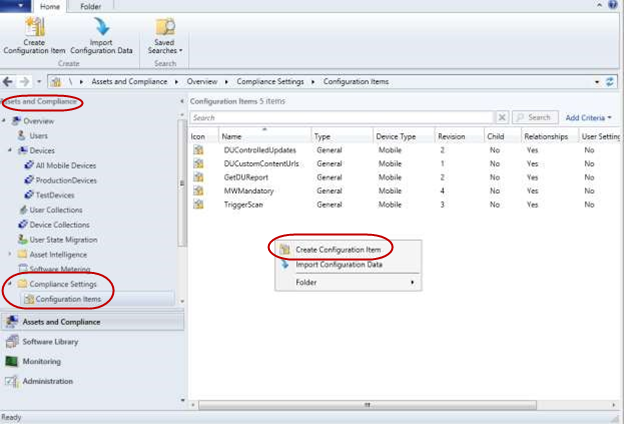
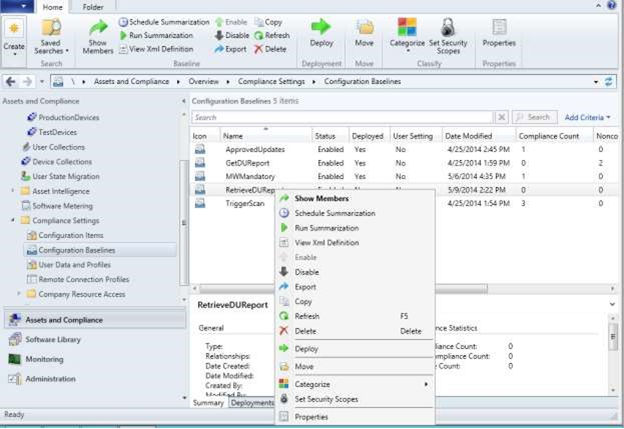
In Microsoft Endpoint Configuration Manager, under Assets and Compliance > Compliance Settings, right-click Configuration Items.
-
Select Create Configuration Item.
-
Enter a filename (such as GetDUReport), and then select Mobile Device.
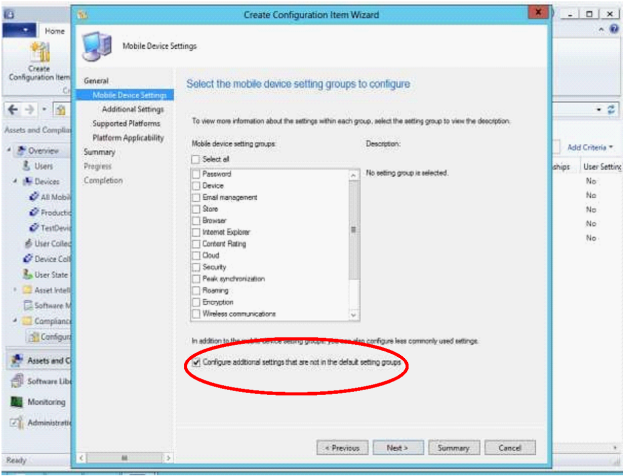
-
On the Mobile Device Settings page, select Configure Additional Settings that are not in the default settings group, and then select Next.
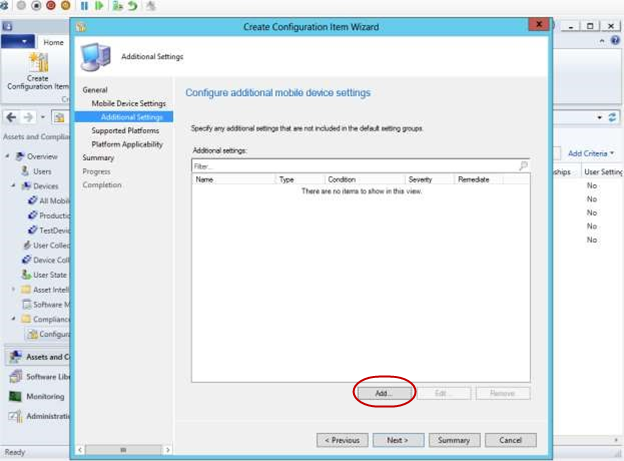
-
On the Additional Settings page, select Add.
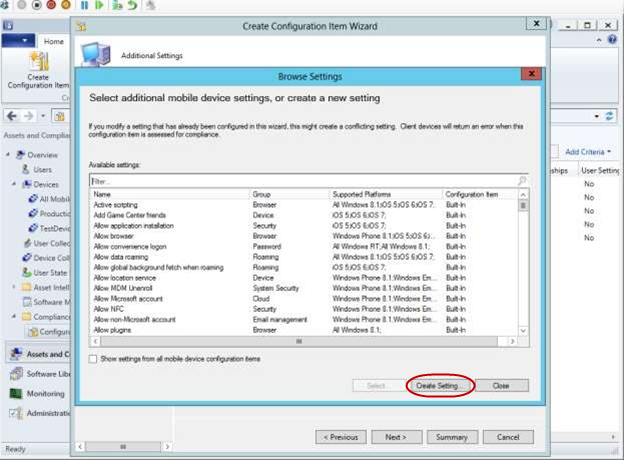
-
On the Browse Settings page, select Create Setting.
-
Enter a unique Name. For Setting type, select OMA-URI, and for Data type, select String.
-
In the OMA-URI text box, enter
./Vendor/MSFT/EnterpriseExt/DeviceUpdate/UpdatesResultXml, and then select OK.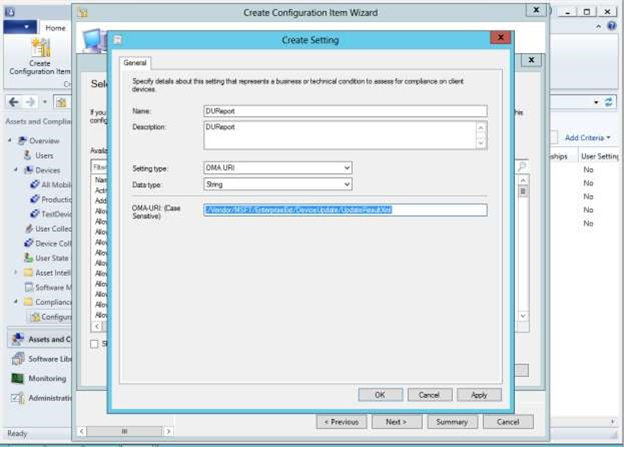
-
On the Browse Settings page, select Close.
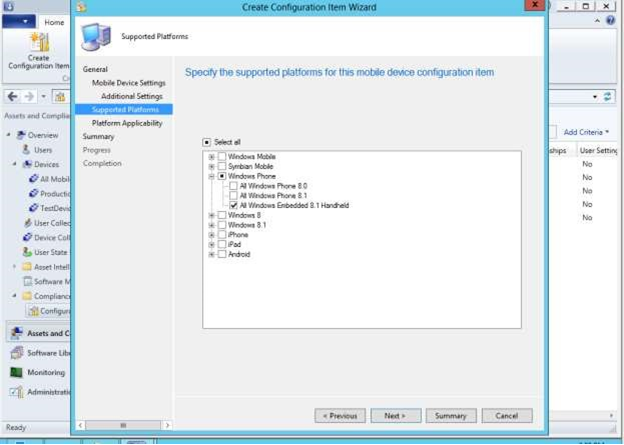
-
On the Create Configuration Item Wizard page, select All Windows Embedded 8.1 Handheld as the supported platform, and then select Next.
-
Close the Create Configuration Item Wizard page.
-
Right-click on the newly create configuration item, and then select the Compliance Rules tab.
-
Select the new created mobile device setting (such as DUReport), and then select Select.
-
Enter a dummy value (such as zzz) that is different from the one on the device.
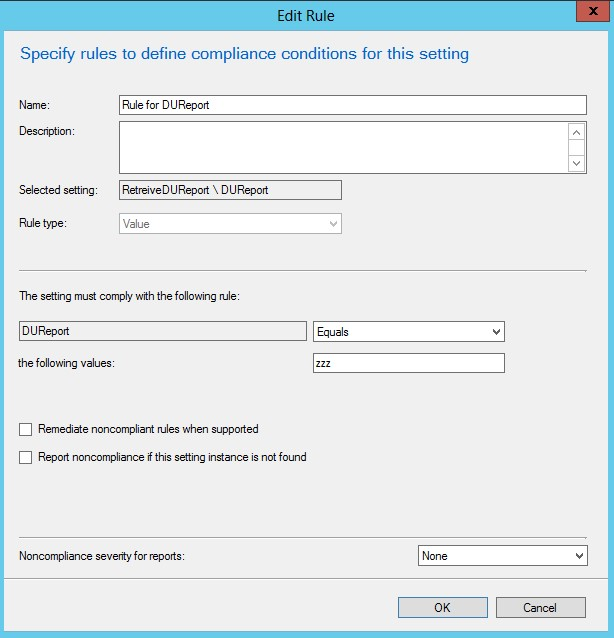
-
Disable remediation by deselecting the Remediate noncompliant rules when supported option.
-
Select OK to close the Edit Rule page.
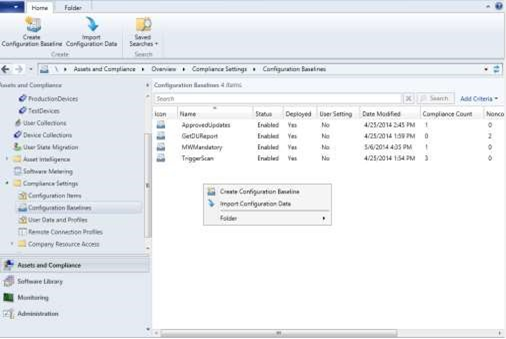
-
Create a new configuration baseline. Under Assets and Compliance > Compliance Settings, right-click Configuration Baselines.
-
Select Create Configuration Item.
-
Enter a baseline name (such as RetrieveDUReport).
-
Add the configuration item that you just created. Select Add, and then select the configuration item that you just created (such as DUReport).

-
Select OK, and then select OK again to complete the configuration baseline.
-
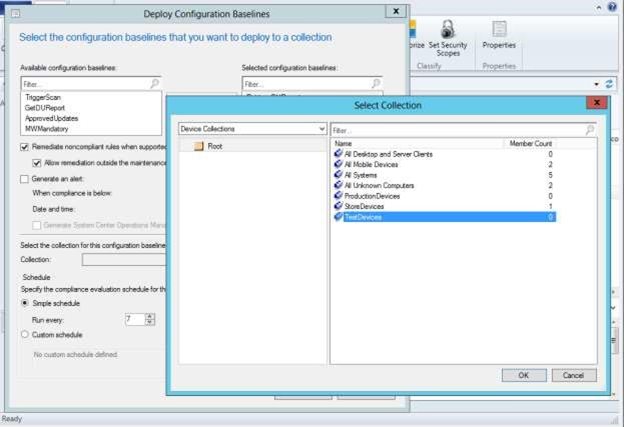
Deploy the newly created configuration baseline to the appropriate device collection. Right-click on the configuration baseline that you created, and then select Deploy.
-
Select Remediate noncompliant rules when supported.
-
Select the appropriate device collection and define the schedule.
-
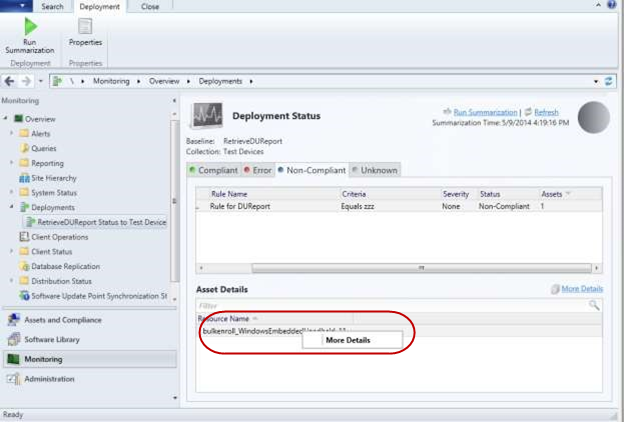
To view the DUReport content, select the appropriate deployment for the configuration baseline that you created. Right-click on the deployment, and then select View Status.
-
Select Run Summarization, and then select Refresh. The test device(s) should be listed on the Non-Compliant tab.
-
Under Asset Details, right-click on the test device, and then select Mode Details.
-
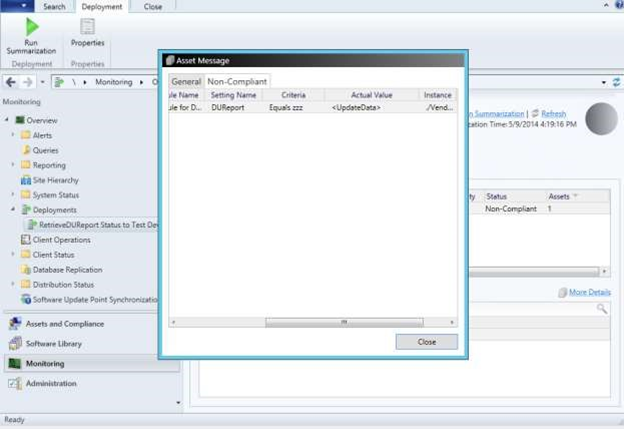
On the Non-compliant tab, you can see the DUReport, but you cannot retrieve the content from here.
-
To retrieve the DUReport, open C:\Program Files\SMS_CCM\SMS_DM.log.
-
In the log file, search from the bottom for "./Vendor/MSFT/EnterpriseExt/DeviceUpdate/UpdatesResultXml" RuleExression="Equals zzz," where zzz is the dummy value. Just above this, copy the information for UpdateData and use this information to create the DUControlledUpdates.xml.