13 KiB
title, description, keywords, ms.prod, ms.mktglfcycl, ms.sitesec, ms.topic, ms.localizationpriority, ms.pagetype, author, ms.author, ms.date
| title | description | keywords | ms.prod | ms.mktglfcycl | ms.sitesec | ms.topic | ms.localizationpriority | ms.pagetype | author | ms.author | ms.date |
|---|---|---|---|---|---|---|---|---|---|---|---|
| Use School Data Sync to import student data | Learn how to use the new Microsoft Education system to set up a cloud infrastructure for your school, acquire devices and apps, and configure and deploy policies to your Windows 10 devices. | education, Microsoft Education, full cloud IT solution, school, deploy, setup, manage, Windows 10, Intune for Education, Office 365 for Education, School Data Sync, Microsoft Teams, Microsoft Store for Education, Azure AD, Set up School PCs | w10 | deploy | library | get-started | high | edu | CelesteDG | celested | 07/10/2017 |
Use School Data Sync to import student data
School Data Sync (SDS) helps you import Student Information System (SIS) data into Office 365. It helps automate the process for importing and integrating SIS data that you can use with Office 365 and apps like OneNote Class Notebooks.
Follow all the steps in this section to use SDS and sample CSV files in a trial environment. To use SDS in a production environment, see step 2 in Try out Microsoft Education in a production environment instead.
You can watch the video to see how this is done, or follow the step-by-step guide.
You can watch the descriptive audio version here: Microsoft Education: Use School Data Sync to import student data (DA)
Download sample school data
- Go to the O365-EDU-Tools GitHub site.
- Click the green Clone or download button to download the SDS sample files.
Figure 1 - Download the SDS sample files from GitHub

- In the Clone with HTTPS pop-up window, choose Download ZIP and note the location where you're saving the folder.
- Go to the folder where you saved the .zip and unzip the files.
- Open the O365-EDU-Tools-master folder and then open the CSV Samples subfolder. Confirm that you can see the following sample CSV files.
Figure 2 - Sample CSV files

Note
- The sample CSV files uses sample accounts and passwords. If you are using the sample files for testing, remember the accounts and their corresponding passwords. You may be asked to change the password during your first sign in.
- If you are modifying the sample CSV files to use in your organization, change the accounts and passwords to match the user accounts and passwords in your organization.
- If you are using CSV files from your existing production environment, see the detailed instructions in step 5 in the next section.
To learn more about the CSV files that are required and the info you need to include in each file, see CSV files for School Data Sync. If you run into any issues, see School Data Sync errors and troubleshooting.
Use SDS to import student data
- If you haven't done so already, go to the SDS portal, https://sds.microsoft.com.
- Click Sign in. You will see the Settings option for Manage School Data Sync.
Figure 3 - Settings for managing SDS

- Turn on School Data Sync. You will get a notification that it is turned on. Click OK.
New menu options will appear on the left of the SDS portal.
Figure 4 - New menu options appear after SDS is turned on

- Click + Add Profile from the sync dashboard or from the menu on the left to start syncing school data.
This opens up the new profile setup wizard within the main page.
Figure 5 - New SDS profile setup wizard

-
For the new profile, in the How do you want to connect to your school? screen:
-
Enter a name for your profile, such as Contoso_Elementary_Profile.
-
Select a sync method for your profile. For this walkthrough, select Upload CSV Files.
-
Select the type of CSV files that you're using. For this walkthrough, select CSV files: SDS Format.
-
Click Start.
-
In the Sync options screen:
-
In the Select new or existing users section, you can select either Existing users or New users based on the scenaro that applies to you. For this walkthrough, select New users.
-
In the Import data section: 1. Click Upload Files to bring up the Select data files to be uploaded window. 2. In the Select data files to be uploaded window, click + Add Files and navigate to the directory where you saved the six CSV files required for data import. 3. In the File Explorer window, you will see a folder for the sample CSV files for the UK and six sample CSV files for the US. Select the CSV files that match your region/locale, and then click Open. 4. In the Select data files to be uploaded window, confirm that all six CSV files (School.csv, Section.csv, Student.csv, StudentEnrollment.csv, Teacher.csv, and TeacherRoster.csv) are listed and then click Upload.
Note
After you click Upload, the status in the Select data files to be uploaded window will indicate that files are being uploaded and verified.
5. After all the files are successfully uploaded, click **OK**.
- Select the domain for the schools/sections. This domain will be used for the Section email addresses created during setup. If you have more than one domain, make sure you select the appropriate domain for the sync profile and subsequent sections being created.
- In the Select school and section properties section, ensure the attributes that have been automatically selected for you align to your CSV files. If you select additional properties, or deselect any properties, make sure you have the properties and values contained within the CSV files. For the walkthrough, you don't have to change the default.
- In the Sync option for Section Group Display Name, check the box if you want to allow teachers to overwrite the section names. Otherwise, SDS will always reset the display name value for sections to the value contained within the CSV files.
- In the Student enrollment option section: * If you want to sync your student roster data immediately, leave the box unchecked. * If you prefer to sync student enrollment/rostering data at a later date, check this box and then pick a date by clicking the empty box and selecting the appropriate date in the calendar when you would like to begin syncing your student roster data. Some schools prefer to delay syncing student roster data so they don't expose rosters before the start of the new term, semester, or school year.
- In the License Options section, check the box for Intune for Education to allow students and teachers to receive the Intune for Education license. This will also create the SDS dynamic groups and security groups, which will be used within Intune for Education.
- Click Next.
**Figure 6** - Sync options for the new profile

- In the Teacher options screen:
- Select the domain for the teachers. SDS appends the selected domain suffix to the teacher's username attribute contained in the CSV file, to build the UserPrincipalName for each user in Office 365/Azure Active Directory during the account creation process. The teacher will log in to Office 365 with the UserPrincipalName once the account is created.
- In the Select teacher properties section, make sure the attributes that have been automatically selected for you align to your CSV files. If you select additional properties or deselect any properties, make sure you have the corresponding properties and values contained within the CSV files. For this walkthrough, you don't have to change the default.
- In the Teacher licenses section, choose the SKU to assign licenses for teachers. For example, STANDARDWOFFPACK_FACULTY.
- Click Next.
**Figure 7** - Specify options for teacher mapping

- In the Student options screen:
- Select the domain for the students. SDS appends the selected domain suffix to the student's username attribute contained in the CSV file, to build the UserPrincipalName for each user in Office 365/Azure Active Directory during the account creation process. The student will log in to Office 365 with the UserPrincipalName once the account is created.
- In the Select student properties section, make sure the attributes that have been automatically selected for you align to your CSV files. If you select additional properties or deselect any properties, make sure you have the corresponding properties and values contained within the CSV files. For this walkthrough, you don't have to change the default.
- In the Student licenses section, choose the SKU to assign licenses for students. For example, STANDARDWOFFPACK_STUDENT.
- Click Next.
**Figure 8** - Specify options for student mapping

- In the profile Review page, review the summary and confirm that the options selected are correct.
- Click Create profile. You will see a notification that your profile is being submitted and then you will see a page for your profile.
Figure 9 - SDS profile page

- After the profile is created and the status indicates as Setting up, refresh the page until you see the status change to Sync in progress. Beneath the Sync in progress status, you will see which of the 5 sync stages SDS is working on:
- Stage 1 - Validating data
- Stage 2 - Processing schools and sections
- Stage 3 - Processing students and teachers
- Stage 4 - Adding students and teachers into sections
- Stage 5 - Setting up security groups
If you don't see a Sync in progress status on the sync profile, and receive an error message instead, this indicates that SDS has encountered data issues during the pre-sync validation check and has not started syncing your data. This gives you the opportunity to fix the errors identified by the pre-sync validation checks before continuing. Once you've fixed any errors or if you prefer to continue with the errors and begin syncing your data anyway, click the Resume sync button to start the sync process.
Once you've completed all five sync stages, your profile status will update one final time. * If you haven't encountered any errors, you will see a green check mark which states Everything is ok, and the profile status will change to Sync complete. Ready for more data. * If SDS encountered sync errors, you will see a red status icon that indicates an error, and a profile status of Sync complete. Profile contains multiple errors. Download the available error report to identify and fix your sync errors. Once complete, upload new files as needed and re-sync your data until errors are resolved.
Here are some examples of what the sync status can look like:
Figure 10 - New profile: Sync in progress

Figure 11 - New profile: Sync complete - no errors
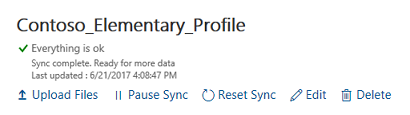
Figure 12 - New profile: Sync complete - with errors

Sync times, like file download times, can vary widely depending on when you start the sync, how much data you are syncing, the complexity of your data (such as the number of users, schools, and class enrollments), overall system/network load, and other factors. Two people who start a sync at the same time may not have their syncs complete at the same time.
You can refresh the page to confirm that your profile synced successfully.
That's it for importing sample school data using SDS.
[!div class="step-by-step"] << Set up an Office 365 education tenant Enable Microsoft Teams for your school >>
Related topic
Get started: Deploy and manage a full cloud IT solution with Microsoft Education