5.7 KiB
title, description, ms.prod, ms.mktglfcycl, ms.sitesec, ms.pagetype, ms.localizationpriority, author, ms.author, ms.date, ms.reviewer, manager, ms.custom
| title | description | ms.prod | ms.mktglfcycl | ms.sitesec | ms.pagetype | ms.localizationpriority | author | ms.author | ms.date | ms.reviewer | manager | ms.custom |
|---|---|---|---|---|---|---|---|---|---|---|---|---|
| Enable hardware-based isolation for Microsoft Edge (Windows 10) | Learn about the Windows Defender Application Guard modes (Standalone or Enterprise-managed) and how to install Application Guard in your enterprise. | w10 | manage | library | security | medium | denisebmsft | deniseb | 02/19/2019 | dansimp | asr |
Prepare to install Windows Defender Application Guard
Applies to:
Review system requirements
See System requirements for Windows Defender Application Guard to review the hardware and software installation requirements for Windows Defender Application Guard.
Note
Windows Defender Application Guard is not supported on VMs and VDI environment. For testing and automation on non-production machines, you may enable WDAG on a VM by enabling Hyper-V nested virtualization on the host.
Prepare for Windows Defender Application Guard
Before you can install and use Windows Defender Application Guard, you must determine which way you intend to use it in your enterprise. You can use Application Guard in either Standalone or Enterprise-managed mode.
Standalone mode
Applies to:
- Windows 10 Enterprise edition, version 1709 or higher
- Windows 10 Pro edition, version 1803
Employees can use hardware-isolated browsing sessions without any administrator or management policy configuration. In this mode, you must install Application Guard and then the employee must manually start Microsoft Edge in Application Guard while browsing untrusted sites. For an example of how this works, see the Application Guard in standalone mode testing scenario.
Enterprise-managed mode
Applies to:
- Windows 10 Enterprise edition, version 1709 or higher
You and your security department can define your corporate boundaries by explicitly adding trusted domains and by customizing the Application Guard experience to meet and enforce your needs on employee devices. Enterprise-managed mode also automatically redirects any browser requests to add non-enterprise domain(s) in the container.
The following diagram shows the flow between the host PC and the isolated container.

Install Application Guard
Application Guard functionality is turned off by default. However, you can quickly install it on your employee's devices through the Control Panel, PowerShell, or your mobile device management (MDM) solution.
To install by using the Control Panel
-
Open the Control Panel, click Programs, and then click Turn Windows features on or off.
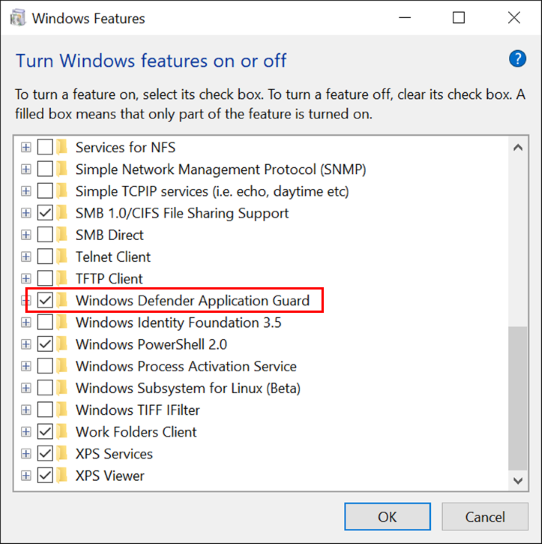
-
Select the check box next to Windows Defender Application Guard and then click OK.
Application Guard and its underlying dependencies are all installed.

To install by using PowerShell
Note
Ensure your devices have met all system requirements prior to this step. PowerShell will install the feature without checking system requirements. If your devices don't meet the system requirements, Application Guard may not work. This step is recommended for enterprise managed scenarios only.
-
Click the Search or Cortana icon in the Windows 10 taskbar and type PowerShell.
-
Right-click Windows PowerShell, and then click Run as administrator.
Windows PowerShell opens with administrator credentials.
-
Type the following command:
Enable-WindowsOptionalFeature -online -FeatureName Windows-Defender-ApplicationGuard -
Restart the device.
Application Guard and its underlying dependencies are all installed.
To install by using Intune
Important
Make sure your organization's devices meet requirements and are enrolled in Intune.
:::image type="complex" source="images/MDAG-EndpointMgr-newprofile.jpg" alt-text="Endpoint protection profile":::
:::image-end:::
-
Go to https://endpoint.microsoft.com and sign in.
-
Choose Devices > Configuration profiles > + Create profile, and do the following:
a. In the Platform list, select Windows 10 and later.
b. In the Profile list, select Endpoint protection.
c. Choose Create.
-
Specify the following settings for the profile:
-
Name and Description
-
In the Select a category to configure settings section, choose Microsoft Defender Application Guard.
-
In the Application Guard list, choose Enabled for Edge.
-
Choose your preferences for Clipboard behavior, External content, and the remaining settings.
-
-
Choose OK, and then choose OK again.
-
Review your settings, and then choose Create.
-
Choose Assignments, and then do the following:
a. On the Include tab, in the Assign to list, choose an option.
b. If you have any devices or users you want to exclude from this endpoint protection profile, specify those on the Exclude tab.
c. Click Save.
After the profile is created, any devices to which the policy should apply will have Windows Defender Application Guard enabled. Users might have to restart their devices in order for protection to be in place.