6.2 KiB
title, description, keywords, ms.assetid, ms.prod, ms.mktglfcycl, ms.sitesec, ms.pagetype, ms.localizationpriority, audience, ms.collection, author, ms.reviewer, ms.author, manager, ms.date, ms.technology
| title | description | keywords | ms.assetid | ms.prod | ms.mktglfcycl | ms.sitesec | ms.pagetype | ms.localizationpriority | audience | ms.collection | author | ms.reviewer | ms.author | manager | ms.date | ms.technology |
|---|---|---|---|---|---|---|---|---|---|---|---|---|---|---|---|---|
| Deploy WDAC policies using Mobile Device Management (MDM) (Windows) | You can use an MDM like Microsoft Intune to configure Windows Defender Application Control (WDAC). Learn how with this step-by-step guide. | security, malware | 8d6e0474-c475-411b-b095-1c61adb2bdbb | m365-security | deploy | library | security | medium | ITPro | M365-security-compliance | jsuther1974 | isbrahm | dansimp | dansimp | 04/29/2020 | windows-sec |
Deploy WDAC policies using Mobile Device Management (MDM)
Applies to:
- Windows 10
- Windows 11
- Windows Server 2016 and above
Note
Some capabilities of Windows Defender Application Control are only available on specific Windows versions. Learn more about the Windows Defender Application Control feature availability.
You can use a Mobile Device Management (MDM) solution, like Microsoft Endpoint Manager (MEM) Intune, to configure Windows Defender Application Control (WDAC) on client machines. Intune includes native support for WDAC which can be a helpful starting point, but customers may find the available circle-of-trust options too limiting. To deploy a custom policy through Intune and define your own circle of trust, you can configure a profile using Custom OMA-URI. If your organization uses another MDM solution, check with your solution provider for WDAC policy deployment steps.
Use Intune's built-in policies
Intune's built-in WDAC support allows you to configure Windows client computers to only run:
- Windows components
- 3rd party hardware and software kernel drivers
- Microsoft Store-signed apps
- [Optional] Reputable apps as defined by the Intelligent Security Graph (ISG)
Note
Intune's built-in policies use the pre-1903 single-policy format version of the DefaultWindows policy. You can use Intune's custom OMA-URI feature to deploy your own multiple-policy format WDAC policies and leverage features available on Windows 10 1903+ or Windows 11 as described later in this topic.
Note
Intune currently uses the AppLocker CSP to deploy its built-in policies. The AppLocker CSP will always request a reboot when applying WDAC policies. You can use Intune's custom OMA-URI feature with the ApplicationControl CSP to deploy your own WDAC policies rebootlessly.
To use Intune's built-in WDAC policies, configure Endpoint Protection for Windows 10 (and later).
Deploy WDAC policies with custom OMA-URI
Note
Policies deployed through Intune custom OMA-URI are subject to a 350,000 byte limit. Customers should create WDAC policies that use signature-based rules, the Intelligent Security Graph, and managed installers where practical. Customers whose devices are running 1903+ builds of Windows are also encouraged to use multiple policies which allow more granular policy.
Deploy custom WDAC policies on Windows 10 1903+
Beginning with Windows 10 1903, custom OMA-URI policy deployment can use the ApplicationControl CSP, which has support for multiple policies and rebootless policies.
The steps to use Intune's custom OMA-URI functionality are:
-
Know a generated policy's GUID, which can be found in the policy xml as
<PolicyID> -
Convert the policy XML to binary format using the ConvertFrom-CIPolicy cmdlet in order to be deployed. The binary policy may be signed or unsigned.
-
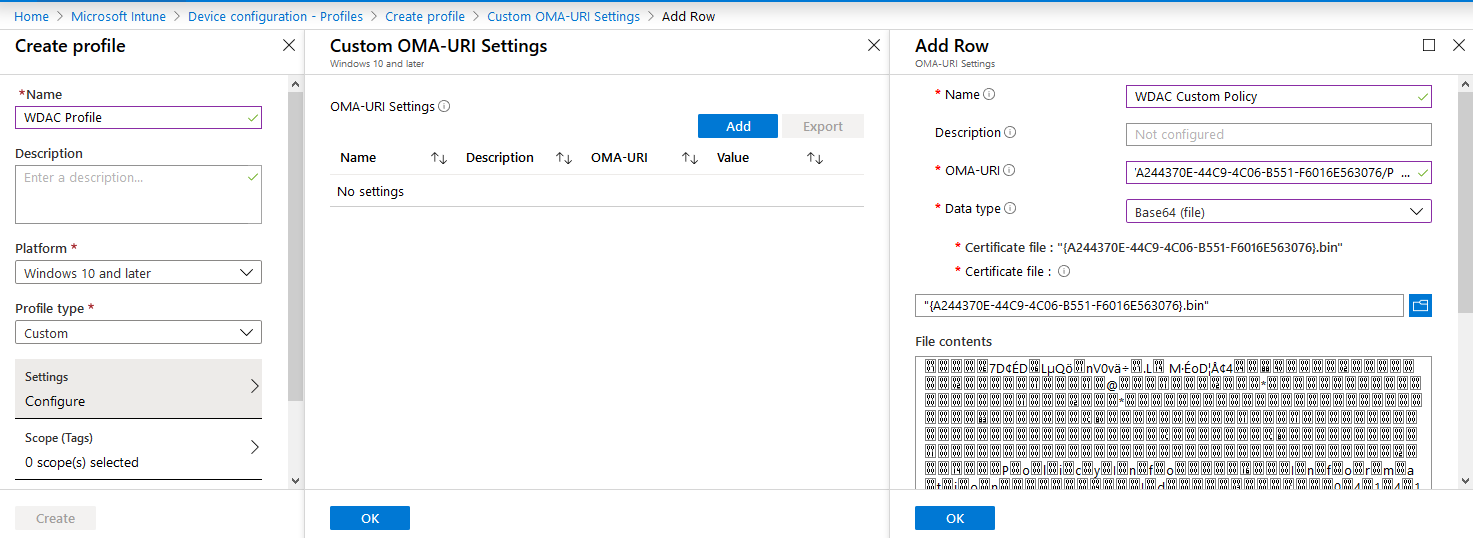
Open the Microsoft Intune portal and create a profile with custom settings.
-
Specify a Name and Description and use the following values for the remaining custom OMA-URI settings:
- OMA-URI: ./Vendor/MSFT/ApplicationControl/Policies/Policy GUID/Policy
- Data type: Base64
- Certificate file: upload your binary format policy file. You do not need to upload a Base64 file, as Intune will convert the uploaded .bin file to Base64 on your behalf.
[!div class="mx-imgBorder"]
Note
For the Policy GUID value, do not include the curly brackets.
Remove WDAC policies on Windows 10 1903+
Upon deletion, policies deployed through Intune via the ApplicationControl CSP are removed from the system but stay in effect until the next reboot. In order to disable WDAC enforcement, first replace the existing policy with a new version of the policy that will "Allow *", like the rules in the example policy at %windir%\schemas\CodeIntegrity\ExamplePolicies\AllowAll.xml. Once the updated policy is deployed, you can then delete the policy from the Intune portal. This will prevent anything from being blocked and fully remove the WDAC policy on the next reboot.
For pre-1903 systems
Deploying policies
The steps to use Intune's Custom OMA-URI functionality to leverage the AppLocker CSP and deploy a custom WDAC policy to pre-1903 systems are:
-
Convert the policy XML to binary format using the ConvertFrom-CIPolicy cmdlet in order to be deployed. The binary policy may be signed or unsigned.
-
Open the Microsoft Intune portal and create a profile with custom settings.
-
Specify a Name and Description and use the following values for the remaining custom OMA-URI settings:
- OMA-URI: ./Vendor/MSFT/AppLocker/ApplicationLaunchRestrictions/Grouping/CodeIntegrity/Policy)
- Data type: Base64
- Certificate file: upload your binary format policy file
Note
Deploying policies via the AppLocker CSP will force a reboot during OOBE.
Removing policies
Policies deployed through Intune via the AppLocker CSP cannot be deleted through the Intune console. In order to disable WDAC policy enforcement, either deploy an audit-mode policy or use a script to delete the existing policy.