13 KiB
title, description, ms.prod, author, ms.author, manager, ms.reviewer, ms.collection, ms.topic, localizationpriority, ms.date, appliesto, ms.technology
| title | description | ms.prod | author | ms.author | manager | ms.reviewer | ms.collection | ms.topic | localizationpriority | ms.date | appliesto | ms.technology | |||
|---|---|---|---|---|---|---|---|---|---|---|---|---|---|---|---|
| Deploy certificates to cloud Kerberos trust and key trust users to enable RDP | Learn how to deploy certificates to a cloud Kerberos trust and key trust user to enable remote desktop with supplied credentials. | windows-client | paolomatarazzo | paoloma | aaroncz | erikdau |
|
how-to | medium | 11/15/2022 |
|
itpro-security |
Deploy certificates to cloud Kerberos trust and key trust users for RDP authentication
This document describes Windows Hello for Business functionalities or scenarios that apply to:
✅ Deployment type: hybrid
✅ Trust type: cloud Kerberos trust, key trust
✅ Device registration type: Azure AD join, Hybrid Azure AD join
Windows Hello for Business supports using a certificate as the supplied credential when establishing a remote desktop connection to a server or other device. This document discusses three approaches for cloud Kerberos trust and key trust deployments, where authentication certificates can be deployed to an existing Windows Hello for Business user:
- Deploy certificates to hybrid joined devices using an on-premises Active Directory Certificate Services enrollment policy
- Deploy certificates to hybrid or Azure AD-joined devices using Simple Certificate Enrollment Protocol (SCEP) and Intune
- Work with non-Microsoft enterprise certificate authorities
Deploy certificates via Active Directory Certificate Services (AD CS)
Note
This process is applicable to hybrid Azure AD joined devices only.
To deploy certificates using an on-premises Active Directory Certificate Services enrollment policy, you must first create a certificate template and then deploy certificates based on that template.
Expand the following sections to learn more about the process.
Create a Windows Hello for Business certificate template
Follow these steps to create a certificate template:
-
Sign in to your issuing certificate authority (CA) and open Server Manager
-
Select Tools > Certification Authority. The Certification Authority Microsoft Management Console (MMC) opens
-
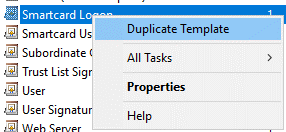
In the MMC, expand the CA name and right-click Certificate Templates > Manage
-
The Certificate Templates console opens. All of the certificate templates are displayed in the details pane
-
Right-click the Smartcard Logon template and select Duplicate Template
-
On the Compatibility tab:
- Clear the Show resulting changes check box
- Select Windows Server 2012 or Windows Server 2012 R2 from the Certification Authority list
- Select Windows Server 2012 or Windows Server 2012 R2 from the Certification Recipient list
-
On the General tab:
- Specify a Template display name, for example WHfB Certificate Authentication
- Set the validity period to the desired value
- Take note of the Template name for later, which should be the same as the Template display name minus spaces (WHfBCertificateAuthentication in this example)
-
On the Extensions tab, verify the Application Policies extension includes Smart Card Logon
-
On the Subject Name tab:
- Select the Build from this Active Directory information button if it is not already selected
- Select Fully distinguished name from the Subject name format list if Fully distinguished name is not already selected
- Select the User Principal Name (UPN) check box under Include this information in alternative subject name
-
On the Request Handling tab:
- Set the Purpose to Signature and smartcard logon and select Yes when prompted to change the certificate purpose
- Select the Renew with same key check box
- Select Prompt the user during enrollment
-
On the Cryptography tab:
- Set the Provider Category to Key Storage Provider
- Set the Algorithm name to RSA
- Set the minimum key size to 2048
- Select Requests must use one of the following providers
- Select Microsoft Software Key Storage Provider
- Set the Request hash to SHA256
-
On the Security tab, add the security group that you want to give Enroll access to. For example, if you want to give access to all users, select the Authenticated users group, and then select Enroll permissions for them
-
Select OK to finalize your changes and create the new template. Your new template should now appear in the list of Certificate Templates
-
Close the Certificate Templates console
-
Open an elevated command prompt and change to a temporary working directory
-
Execute the following command, replacing
<TemplateName>with the Template name you took note of earlier in step 7ccertutil -dstemplate <TemplateName> > <TemplateName.txt> -
Open the text file created by the command above.
- Delete the last line of the output from the file that reads
CertUtil: -dsTemplate command completed successfully. - Modify the line that reads
pKIDefaultCSPs = "1,Microsoft Software Key Storage Provider"to
pKIDefaultCSPs = "1,Microsoft Passport Key Storage Provider"
- Delete the last line of the output from the file that reads
-
Save the text file
-
Update the certificate template by executing the following command:
certutil -dsaddtemplate <TemplateName.txt> -
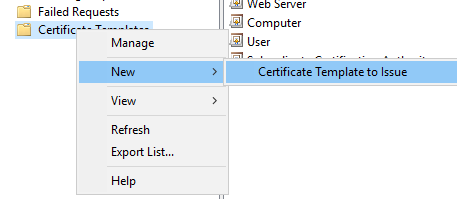
In the Certificate Authority console, right-click Certificate Templates, select New > Certificate Template to Issue
-
From the list of templates, select the template you previously created (WHFB Certificate Authentication) and select OK. It can take some time for the template to replicate to all servers and become available in this list.
-
After the template replicates, in the MMC, right-click in the Certification Authority list, select All Tasks > Stop Service. Right-click the name of the CA again, select All Tasks > Start Service


Request a certificate
-
Sign in to a client that is hybrid Azure AD joined, ensuring that the client has line of sight to a domain controller and the issuing CA
-
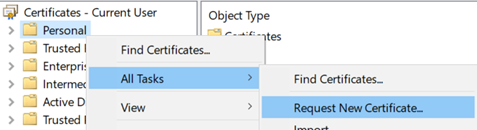
Open the Certificates - Current User Microsoft Management Console (MMC) -
%windir%\system32\certmgr.msc -
In the left pane of the MMC, right-click Personal > All Tasks > Request New Certificate…
-
On the Certificate Enrollment screen, select Next
-
Under Select Certificate Enrollment Policy, select Active Directory Enrollment Policy > Next
-
Under Request Certificates, select the check-box for the certificate template you created in the previous section (WHfB Certificate Authentication) and then select Enroll
-
After a successful certificate request, select Finish on the Certificate Installation Results screen

Deploy certificates via Microsoft Intune
Note
This process is applicable to both Azure AD joined and hybrid Azure AD joined devices that are managed via Intune.
Deploying a certificate to Azure AD joined or hybrid Azure AD joined devices may be achieved using the Simple Certificate Enrollment Protocol (SCEP) or PFX via Intune. For guidance deploying the required infrastructure, refer to Configure infrastructure to support SCEP certificate profiles with Microsoft Intune.
Next you should deploy the root CA certificate (and any other intermediate certificate authority certificates) to Azure AD Joined Devices using a Trusted root certificate profile with Intune. For guidance, refer to Create trusted certificate profiles in Microsoft Intune.
Once these requirements are met, a policy can be configured in Intune that provisions certificates for the users on the targeted device.
Create a SCEP profile in Intune
Proceed as follows:
- Sign in to the Microsoft Endpoint Manager admin center
- Navigate to Devices > Configuration Profiles > Create profile
- Enter the following properties:
- For Platform, select Windows 10 and later
- For Profile, select SCEP Certificate
- Click Create
- In Basics, enter the following parameters:
- Name: Enter a descriptive name for the profile. Name your profiles so you can easily identify them later. For example, a good profile name is SCEP profile for entire company
- Description: Enter a description for the profile. This setting is optional, but recommended
- Select Next
- In the Configuration settings, complete the following:
-
For Certificate Type, choose User
-
For Subject name format, set it to CN={{UserPrincipalName}}
-
Under Subject alternative name, select User principal name (UPN) from the drop-down menu and set the value to CN={{UserPrincipalName}}
-
For Certificate validity period, set a value of your choosing
-
For Key storage provider (KSP), choose Enroll to Windows Hello for Business, otherwise fail (Windows 10 and later)
-
For Key usage, choose Digital Signature
-
For Key size (bits), choose 2048
-
For Hash algorithm, choose SHA-2
-
Under Root Certificate, click +Root Certificate and select the trusted certificate profile you created earlier for the Root CA Certificate.
-
Under Extended key usage, add the following:
Name Object Identifier Predefined Values Smart Card Logon 1.3.6.1.4.1.311.20.2.2 Smart Card Logon Client Authentication 1.3.6.1.5.5.7.3.2 Client Authentication -
For Renewal threshold (%), set a value of your choosing.
-
For SCEP Server URLs, provide the public endpoint that you configured during the deployment of your SCEP infrastructure.
-
Click Next
-
- In Assignments, target the devices or users who should receive a certificate and click Next
- In Applicability Rules, provide additional issuance restrictions if required and click Next
- In Review + create, click Create
Request a certificate
Once the configuration profile has been created, targeted clients will receive the profile from Intune on their next refresh cycle. You should find a new certificate in the user store. To validate the certificate is present, do the following steps:- Open the Certificates - Current User console (%windir%\system32\certmgr.msc)
- In the left pane of the MMC, expand Personal and select Certificates
- In the right-hand pane of the MMC, check for the new certificate
Note
This infrastructure may also deploy the same certificates to co-managed or modern-managed Hybrid Azure Active Directory-Joined devices using Intune Policies.
Using non-Microsoft Enterprise Certificate Authorities
If you are using a non-Microsoft PKI, the certificate templates published to the on-premises Active Directory may not be available. For guidance with integration of Intune/SCEP with non-Microsoft PKI deployments, refer to Use third-party certification authorities (CA) with SCEP in Microsoft Intune.
As an alternative to using SCEP or if none of the previously covered solutions will work in your environment, you can manually generate Certificate Signing Requests (CSR) for submission to your PKI. To assist with this approach, you can use the Generate-CertificateRequest PowerShell commandlet.
The Generate-CertificateRequest commandlet will generate an .inf file for a pre-existing Windows Hello for Business key. The .inf can be used to generate a certificate request manually using certreq.exe. The commandlet will also generate a .req file, which can be submitted to your PKI for a certificate.
RDP Sign-in with Windows Hello for Business Certificate Authentication
After adding the certificate using an approach from any of the previous sections, you can RDP to any Windows device or server in the same Forest as the user's Active Directory account, provided the PKI certificate chain for the issuing certificate authority is deployed to that target server.
- Open the Remote Desktop Client (
%windir%\system32\mstsc.exe) on the client where the authentication certificate has been deployed - Attempt an RDP session to a target server
- Use the certificate credential protected by your Windows Hello for Business gesture to authenticate