* Updated deployment-vdi-windows-defender-antivirus.md * Updated deployment-vdi-windows-defender-antivirus.md * Updated deployment-vdi-windows-defender-antivirus.md * updates for new vdi stuff * Adding important note to solve #3493 * Update windows/security/identity-protection/hello-for-business/hello-hybrid-key-whfb-settings-dir-sync.md Co-Authored-By: Nicole Turner <39884432+nenonix@users.noreply.github.com> * Typo "<"→"<", ">"→">" https://docs.microsoft.com/en-us/windows/application-management/manage-windows-mixed-reality * Issue #2297 * Update windows/security/identity-protection/hello-for-business/hello-identity-verification.md Co-Authored-By: Nicole Turner <39884432+nenonix@users.noreply.github.com> * Clarification * Update windows/security/identity-protection/hello-for-business/hello-identity-verification.md Co-Authored-By: Nicole Turner <39884432+nenonix@users.noreply.github.com> * Update windows/security/identity-protection/hello-for-business/hello-identity-verification.md Co-Authored-By: Trond B. Krokli <38162891+illfated@users.noreply.github.com> * update troubleshoot-np.md * update configure-endpoints-gp.md * Removing a part which is not supported * Name change * update troubleshoot-np.md * removed on-premises added -hello * Added link into Domain controller guide * Line corections * corrected formatting of xml code samples When viewing the page in Win 10/Edge, the xml code samples stretched across the page, running into the side menu. The lack of line breaks also made it hard to read. This update adds line breaks and syntax highlighting, replaces curly double quotes with standard double quotes, and adds a closing tag for <appv:appconnectiongroup>for each code sample * Update windows/security/identity-protection/hello-for-business/hello-identity-verification.md Co-Authored-By: Nicole Turner <39884432+nenonix@users.noreply.github.com> * Update windows/deployment/update/waas-delivery-optimization-reference.md Co-Authored-By: Nicole Turner <39884432+nenonix@users.noreply.github.com> * Update windows/deployment/update/waas-delivery-optimization-reference.md Co-Authored-By: Nicole Turner <39884432+nenonix@users.noreply.github.com> * corrected formating of XML examples The XML samples here present the same formatting problems as in about-the-connection-group-file51.md (see https://github.com/MicrosoftDocs/windows-itpro-docs/pull/3847/) Perhaps we should open an issue to see if we have more versions of this code sample in the docs * corrected formatting of XML example section In the XML example on this page, the whitespace had been stripped out, so there were no spaces between adjacent attribute values or keys. This made it hard to read, though the original formatting allowed for a scroll bar, so the text was not running into the side of the page (compare to https://github.com/MicrosoftDocs/windows-itpro-docs/pull/3847 and https://github.com/MicrosoftDocs/windows-itpro-docs/pull/3850, where the uncorrected formatting forced the text to run into the side menu). * update configure-endpoints-gp.md * Fixed error in registry path and improved description * Update windows/security/identity-protection/hello-for-business/hello-hybrid-key-whfb-settings-dir-sync.md Co-Authored-By: Trond B. Krokli <38162891+illfated@users.noreply.github.com> * Removing extra line in 25 Suggested by * update windows-analytics-azure-portal.md * re: broken links, credential-guard-considerations Context: * #3513, MVA is being retired and producing broken links * #3860 Microsoft Virtual Academy video links This page contains two links to deprecated video content on Microsoft Virtual Academy (MVA). MVA is being retired. In addition, the Deep Dive course the two links point to is already retired, and no replacement course exists. I removed the first link, as I could not find a similar video available describing which credentials are covered by credential guard. I replaced the second link with a video containing similar material, though it is not a "deep dive". Suggestions on handling this problem, as many pages contain similar links, would be appreciated,. * removed link to retired video re: #3867 Context: * #3513, MVA is being retired and producing broken links * #3867, Microsoft Virtual Academy video links This page contains a broken link to deprecated video content on Microsoft Virtual Academy (MVA). MVA is being retired. In addition, the Deep Dive course is already retired, and no replacement course exists. I removed the whole _See Also_ section, as I could not find a video narrowly or deeply addressing how to protect privelaged users with Credential Guard. The most likely candidate is too short and general: https://www.linkedin.com/learning/cism-cert-prep-1-information-security-governance/privileged-account-management * addressing broken mva links, #3817 Context: * #3513, MVA is being retired and producing broken links * #3817, Another broken link This page contains two links to deprecated video content on Microsoft Virtual Academy (MVA). MVA is being retired. In addition, the Deep Dive course the two links point to is already retired, and no replacement course exists. I removed the first link, as we no longer have a video with similar content for a similar audience. The most likely candidate is https://www.linkedin.com/learning/programming-foundations-web-security-2/types-of-credential-attacks, which is more general and for a less technical audience. I removed the second link and the _See Also_ section, as I could not find a similar video narrowly focused on which credentials are covered by Credential Guard. Most of the related material available now describes how to perform a task. * Update deployment-vdi-windows-defender-antivirus.md * typo fix re: #3876; DMSA -> DSMA * Addressing dead MVA links, #3818 This page, like its fellows in the mva-links label, contains links to a retired video course on a website that is retiring soon. The links listed by the user in issue #3818 were also on several other pages, related to Credentials Guard. These links were addressed in the pull requests #3875, #3872, and #3871 Credentials threat & lateral threat link: removed (see PR #3875 for reasoning) Virtualization link: replaced (see #3871 for reasoning) Credentials protected link: removed (see #3872 for reasoning) * Adding notes for known issue in script Solves #3869 * Updated the download link admx files Windows 10 Added link for April 2018 and Oct 2018 ADMX files. * added event logs path Referenced : https://docs.microsoft.com/en-us/windows/security/threat-protection/windows-defender-exploit-guard/event-views-exploit-guard * Update browsers/internet-explorer/ie11-deploy-guide/administrative-templates-and-ie11.md Suggestions applied. Co-Authored-By: JohanFreelancer9 <48568725+JohanFreelancer9@users.noreply.github.com> * Update browsers/internet-explorer/ie11-deploy-guide/administrative-templates-and-ie11.md Co-Authored-By: JohanFreelancer9 <48568725+JohanFreelancer9@users.noreply.github.com> * Update deployment-vdi-windows-defender-antivirus.md * screenshot update * Add files via upload * update 4 scrrenshots * Update deployment-vdi-windows-defender-antivirus.md * Update browsers/internet-explorer/ie11-deploy-guide/administrative-templates-and-ie11.md Co-Authored-By: Nicole Turner <39884432+nenonix@users.noreply.github.com> * Update browsers/internet-explorer/ie11-deploy-guide/administrative-templates-and-ie11.md Co-Authored-By: Nicole Turner <39884432+nenonix@users.noreply.github.com> * Re: #3909 Top link is broken, #3909 > The link here does not work: > Applies to: Microsoft Defender Advanced Threat Protection (Microsoft Defender ATP) The link to the pdf describing MDATP was broken. Thankfully, PR #2897 updated the same link in another page some time ago, so I didn't have to go hunting for an equivalent * CI Update * Updated as per task 3405344 * Updated author * Update windows-analytics-azure-portal.md * added the example query * Updated author fields * Update office-csp.md * update video for testing * update video * Update surface-hub-site-readiness-guide.md line 134 Fixed video link MD formatting * fixing video url * updates from Albert * Bulk replaced author to manikadhiman * Bulk replaced ms.author to v-madhi * Latest content is published (#371) * Added 1903 policy DDF link and fixed a typo * Reverted the DDF version * Latest update (#375) * Update deployment-vdi-windows-defender-antivirus.md * Update deployment-vdi-windows-defender-antivirus.md
14 KiB
title, description, ms.assetid, ms.reviewer, manager, ms.author, keywords, ms.prod, ms.mktglfcycl, ms.localizationpriority, ms.sitesec, ms.pagetype, author, ms.date, ms.topic
| title | description | ms.assetid | ms.reviewer | manager | ms.author | keywords | ms.prod | ms.mktglfcycl | ms.localizationpriority | ms.sitesec | ms.pagetype | author | ms.date | ms.topic |
|---|---|---|---|---|---|---|---|---|---|---|---|---|---|---|
| Build a distributed environment for Windows 10 deployment (Windows 10) | In this topic, you will learn how to replicate your Windows 10 deployment shares to facilitate the deployment of Windows 10 in remote or branch locations. | a6cd5657-6a16-4fff-bfb4-44760902d00c | laurawi | greglin | replication, replicate, deploy, configure, remote | w10 | deploy | medium | library | mdt | greg-lindsay | 07/27/2017 | article |
Build a distributed environment for Windows 10 deployment
Applies to
- Windows 10
In this topic, you will learn how to replicate your Windows 10 deployment shares to facilitate the deployment of Windows 10 in remote or branch locations. If you work in a distributed environment, replicating the deployment shares is an important part of the deployment solution. With images reaching 5 GB in size or more, you can't deploy machines in a remote office over the wire. You need to replicate the content, so that the clients can do local deployments.
We will use four machines for this topic: DC01, MDT01, MDT02, and PC0006. DC01 is a domain controller, MDT01 is a Windows Server 2012 R2 standard server, and PC0006 is a blank machine to which you will deploy Windows 10. You will configure a second deployment server (MDT02) for a remote site (Stockholm) by replicating the deployment share in the original site (New York). MDT01, MDT02, and PC0006 are members of the domain contoso.com for the fictitious Contoso Corporation. For more details on the setup for this topic, please see Deploy Windows 10 with the Microsoft Deployment Toolkit.
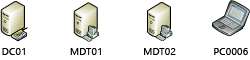
Figure 1. The machines used in this topic.
Replicate deployment shares
Replicating the content between MDT01 (New York) and MDT02 (Stockholm) can be done in a number of different ways. The most common content replication solutions with Microsoft Deployment Toolkit (MDT) use either the Linked Deployment Shares (LDS) feature or Distributed File System Replication (DFS-R). Some organizations have used a simple robocopy script for replication of the content.
Note Robocopy has options that allow for synchronization between folders. It has a simple reporting function; it supports transmission retry; and, by default, it will only copy/remove files from the source that are newer than files on the target.
Linked deployment shares in MDT
LDS is a built-in feature in MDT for replicating content. However, LDS works best with strong connections such as LAN connections with low latency. For most WAN links, DFS-R is the better option.
Why DFS-R is a better option
DFS-R is not only very fast and reliable, but it also offers central monitoring, bandwidth control, and a great delta replication engine. DFS-R will work equally well whether you have 2 sites or 90. When using DFS-R for MDT, we recommend running your deployment servers on Windows Server 2008 R2 or higher. From that version on, you can configure the replication target(s) as read-only, which is exactly what you want for MDT. This way, you can have your master deployment share centralized and replicate out changes as they happen. DFS-R will quickly pick up changes at the central deployment share in MDT01 and replicate the delta changes to MDT02.
Set up Distributed File System Replication (DFS-R) for replication
Setting up DFS-R for replication is a quick and straightforward process. You prepare the deployment servers and then create a replication group. To complete the setup, you configure some replication settings.
Prepare MDT01 for replication
-
On MDT01, using Server Manager, click Add roles and features.
-
On the Select installation type page, select Role-based or feature-based installation.
-
On the Select destination server page, select MDT01.contoso.com and click Next.
-
On the Select server roles page, expand File and Storage Services (Installed) and expand File and iSCSI Services (Installed).
-
In the Roles list, select DFS Replication. In the Add Roles and Features Wizard dialog box, select Add Features, and then click Next.

Figure 2. Adding the DFS Replication role to MDT01.
-
On the Select features page, accept the default settings, and click Next.
-
On the Confirm installation selections page, click Install.
-
On the Installation progress page, click Close.
Prepare MDT02 for replication
- On MDT02, using Server Manager, click Add roles and features.
- On the Select installation type page, select Role-based or feature-based installation.
- On the Select destination server page, select MDT02.contoso.com and click Next.
- On the Select server roles page, expand File and Storage Services (Installed) and expand File and iSCSI Services (Installed).
- In the Roles list, select DFS Replication. In the Add Roles and Features Wizard dialog box, select Add Features, and then click Next.
- On the Select features page, accept the default settings, and click Next.
- On the Confirm installation selections page, click Install.
- On the Installation progress page, click Close.
Create the MDTProduction folder on MDT02
-
On MDT02, using File Explorer, create the E:\MDTProduction folder.
-
Share the E:\MDTProduction folder as MDTProduction$. Use the default permissions.
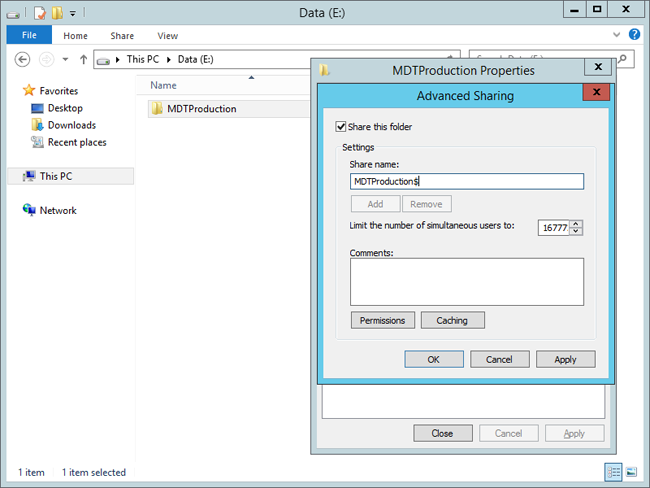
Figure 3. Sharing the E:\MDTProduction folder on MDT02.
Configure the deployment share
When you have multiple deployment servers sharing the same content, you need to configure the Bootstrap.ini file with information about which server to connect to based on where the client is located. In MDT, that can be done by using the DefaultGateway property.
-
On MDT01, using Notepad, navigate to the E:\MDTProduction\Control folder and modify the Boostrap.ini file to look like this:
[Settings]
Priority=DefaultGateway, Default
[DefaultGateway]
192.168.1.1=NewYork
192.168.2.1=Stockholm
[NewYork]
DeployRoot=\\MDT01\MDTProduction$
[Stockholm]
DeployRoot=\\MDT02\MDTProduction$
[Default]
UserDomain=CONTOSO
UserID=MDT_BA
SkipBDDWelcome=YES
Note
The DeployRoot value needs to go into the Bootstrap.ini file, but you can use the same logic in the CustomSettings.ini file. For example, you can redirect the logs to the local deployment server (SLSHARE), or have the User State Migration Tool (USMT) migration store (UDDIR) local. To learn more about USMT, see Refresh a Windows 7 computer with Windows 10 and Replace a Windows 7 computer with a Windows 10 computer. -
Save the Bootstrap.ini file.
-
Using the Deployment Workbench, right-click the MDT Production deployment share and select Update Deployment Share.
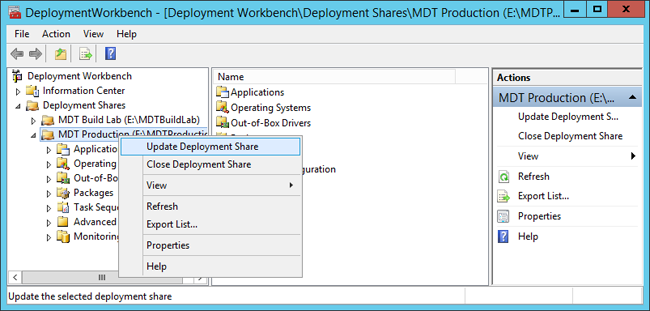
Figure 4. Updating the MDT Production deployment share.
-
Use the default settings for the Update Deployment Share Wizard.
-
After the update is complete, use the Windows Deployment Services console. In the Boot Images node, right-click the MDT Production x64 boot image and select Replace Image.
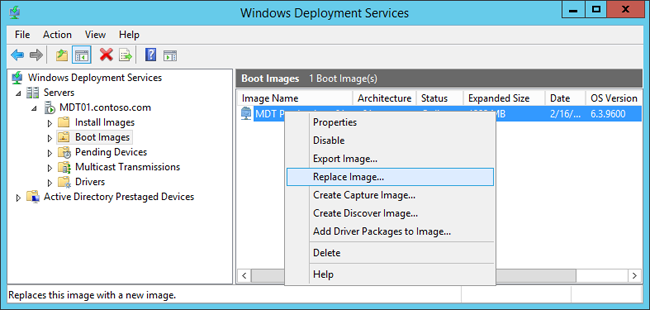
Figure 5. Replacing the updated boot image in WDS.
-
Browse and select the E:\MDTProduction\Boot\LiteTouchPE_x64.wim boot image, and then complete Replace Boot Image Wizard using the default settings.
Replicate the content
Once the MDT01 and MDT02 servers are prepared, you are ready to configure the actual replication.
Create the replication group
-
On MDT01, using DFS Management, right-click Replication, and select New Replication Group.
-
On the Replication Group Type page, select Multipurpose replication group, and click Next.
-
On the Name and Domain page, assign the MDTProduction name, and click Next.
-
On the Replication Group Members page, click Add, add MDT01 and MDT02, and then click Next.
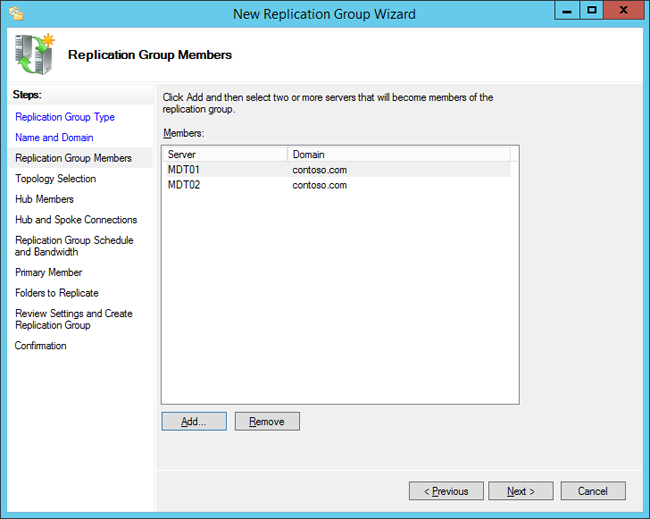
Figure 6. Adding the Replication Group Members.
-
On the Topology Selection page, select the Full mesh option and click Next.
-
On the Replication Group Schedule and Bandwidth page, accept the default settings and click Next.
-
On the Primary Member page, select MDT01 and click Next.
-
On the Folders to Replicate page, click Add, type in E:\MDTProduction as the folder to replicate, click OK, and then click Next.
-
On the Local Path of MDTProduction on the Other Members page, select MDT02, and click Edit.
-
On the Edit page, select the Enabled option, type in E:\MDTProduction as the local path of folder, select the Make the selected replicated folder on this member read-only check box, click OK, and then click Next.
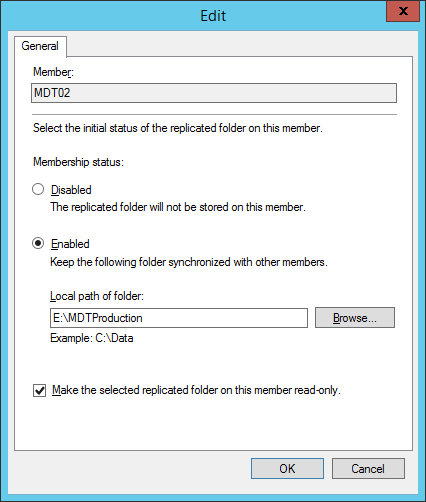
Figure 7. Configure the MDT02 member.
-
On the Review Settings and Create Replication Group page, click Create.
-
On the Confirmation page, click Close.
Configure replicated folders
-
On MDT01, using DFS Management, expand Replication and then select MDTProduction.
-
In the middle pane, right-click the MDT01 member and select Properties.
-
On the MDT01 (MDTProduction) Properties page, configure the following and then click OK:
-
In the Staging tab, set the quota to 20480 MB.
-
In the Advanced tab, set the quota to 8192 MB. In this scenario the size of the deployment share is known, but you might need to change the values for your environment. A good rule of thumb is to get the size of the 16 largest files and make sure they fit in the staging area. Here is a Windows PowerShell example that calculates the size of the 16 largest files in the E:\MDTProduction deployment share:
(Get-ChildItem E:\MDTProduction -Recurse | Sort-Object Length -Descending | Select-Object -First 16 | Measure-Object -Property Length -Sum).Sum /1GB
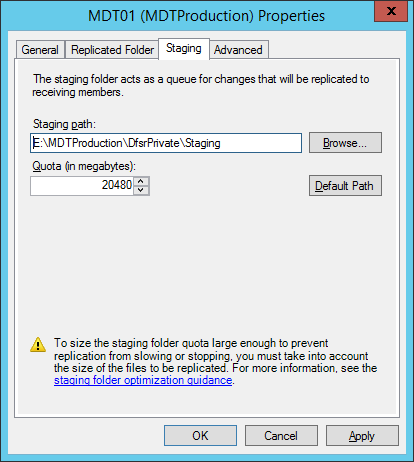
Figure 8. Configure the Staging settings.
-
-
In the middle pane, right-click the MDT02 member and select Properties.
-
On the MDT02 (MDTProduction) Properties page, configure the following and then click OK:
- In the Staging tab, set the quota to 20480 MB.
- In the Advanced tab, set the quota to 8192 MB.
Note It will take some time for the replication configuration to be picked up by the replication members (MDT01 and MDT02). The time for the initial sync will depend on the WAN link speed between the sites. After that, delta changes are replicated quickly.
Verify replication
- On MDT02, wait until you start to see content appear in the E:\MDTProduction folder.
- Using DFS Management, expand Replication, right-click MDTProduction, and select Create Diagnostics Report.
- In the Diagnostics Report Wizard, on the Type of Diagnostics Report or Test page, select Health report and click Next.
- On the Path and Name page, accept the default settings and click Next.
- On the Members to Include page, accept the default settings and click Next.
- On the Options page, accept the default settings and click Next.
- On the Review Settings and Create Report page, click Create.
- Open the report in Internet Explorer, and if necessary, select the Allow blocked content option.
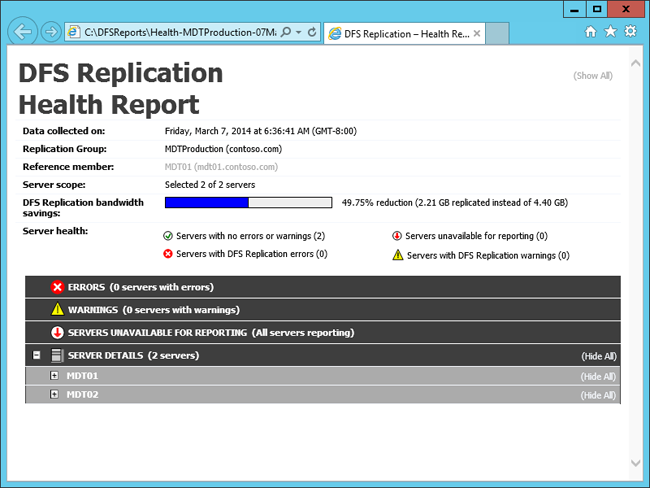
Figure 9. The DFS Replication Health Report.
Configure Windows Deployment Services (WDS) in a remote site
Like you did in the previous topic for MDT01, you need to add the MDT Production Lite Touch x64 Boot image to Windows Deployment Services on MDT02. For the following steps, we assume that WDS has already been installed on MDT02.
- On MDT02, using the WDS console, right-click Boot Images and select Add Boot Image.
- Browse to the E:\MDTProduction\Boot\LiteTouchPE_x64.wim file and add the image with the default settings.
Deploy the Windows 10 client to the remote site
Now you should have a solution ready for deploying the Windows 10 client to the remote site, Stockholm, connecting to the MDT Production deployment share replica on MDT02.
- Create a virtual machine with the following settings:
- Name: PC0006
- Location: C:\VMs
- Generation: 2
- Memory: 2048 MB
- Hard disk: 60 GB (dynamic disk)
- Start the PC0006 virtual machine, and press Enter to start the Pre-Boot Execution Environment (PXE) boot. The machine will now load the Windows PE boot image from the WDS server.
- After Windows Preinstallation Environment (Windows PE) has booted, complete the Windows Deployment Wizard using the following settings:
- Password: P@ssw0rd
- Select a task sequence to execute on this computer:
- Windows 10 Enterprise x64 RTM Custom Image
- Computer Name: PC0006
- Applications: Select the Install - Adobe Reader XI - x86 application
- The setup will now start and do the following:
- Install the Windows 10 Enterprise operating system.
- Install the added application.
- Update the operating system via your local Windows Server Update Services (WSUS) server.
Related topics
Get started with the Microsoft Deployment Toolkit (MDT)
Create a Windows 10 reference image
Deploy a Windows 10 image using MDT
Refresh a Windows 7 computer with Windows 10