6.1 KiB
title, description, keywords, ms.prod, ms.mktglfcycl, author
| title | description | keywords | ms.prod | ms.mktglfcycl | author |
|---|---|---|---|---|---|
| Optional - Create a code signing certificate for code integrity policies (Windows 10) | This article describes how to create a code signing certificate for code integrity policies, one of the main features that are part of Device Guard in Windows 10. | virtualization, security, malware | w10 | deploy | brianlic-msft |
Optional: Create a code signing certificate for code integrity policies
Applies to
- Windows 10
- Windows Server 2016
As you deploy code integrity policies (part of Device Guard), you might need to sign catalog files or code integrity policies internally. To do this, you will either need a publicly issued code signing certificate or an internal CA. If you have purchased a code signing certificate, you can skip this topic and instead follow other topics listed in Deploy Device Guard: deploy code integrity policies.
If you have not purchased a certificate but have an internal CA, complete these steps to create a code signing certificate:
-
Open the Certification Authority Microsoft Management Console (MMC) snap-in, and then select your issuing CA.
-
When connected, right-click Certificate Templates, and then click Manage to open the Certification Templates Console.
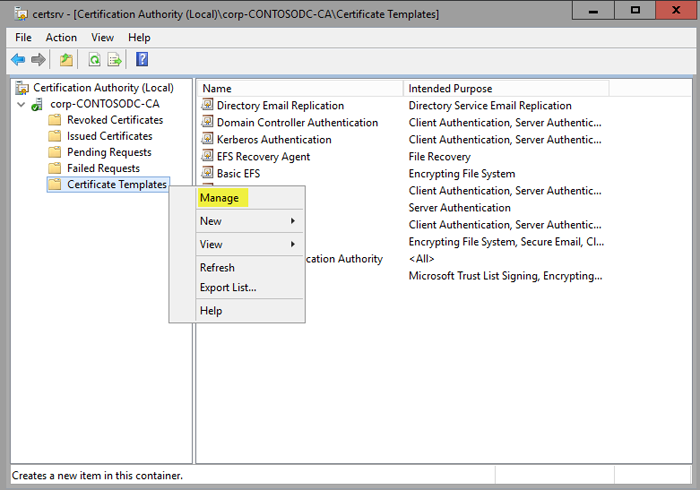
Figure 1. Manage the certificate templates
-
In the navigation pane, right-click the Code Signing certificate, and then click Duplicate Template.
-
On the Compatibility tab, clear the Show resulting changes check box. Select Windows Server 2012 from the Certification Authority list, and then select Windows 8 / Windows Server 2012 from the Certificate recipient list.
-
On the General tab, specify the Template display name and Template name. This example uses the name DG Catalog Signing Certificate.
-
On the Request Handling tab, select the Allow private key to be exported check box.
-
On the Extensions tab, select the Basic Constraints check box, and then click Edit.
-
In the Edit Basic Constraints Extension dialog box, select Enable this extension, as shown in Figure 2.
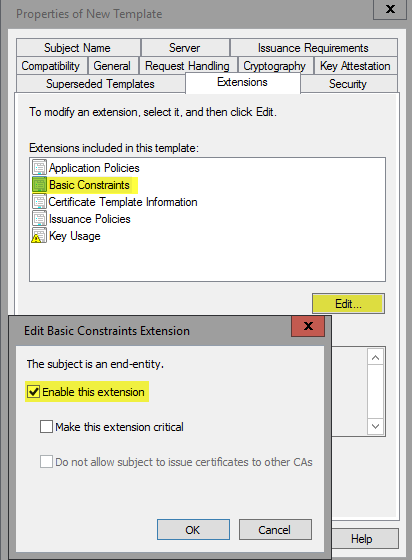
Figure 2. Select constraints on the new template
-
If a certificate manager is required to approve any issued certificates, on the Issuance Requirements tab, select CA certificate manager approval.
-
On the Subject Name tab, select Supply in the request.
-
On the Security tab, verify that whatever account will be used to request the certificate has the right to enroll the certificate.
-
Click OK to create the template, and then close the Certificate Template Console.


When this certificate template has been created, you must publish it to the CA published template store. To do so, complete the following steps:
-
In the Certification Authority MMC snap-in, right-click Certification Templates, point to New, and then click Certificate Template to Issue, as shown in Figure 3.
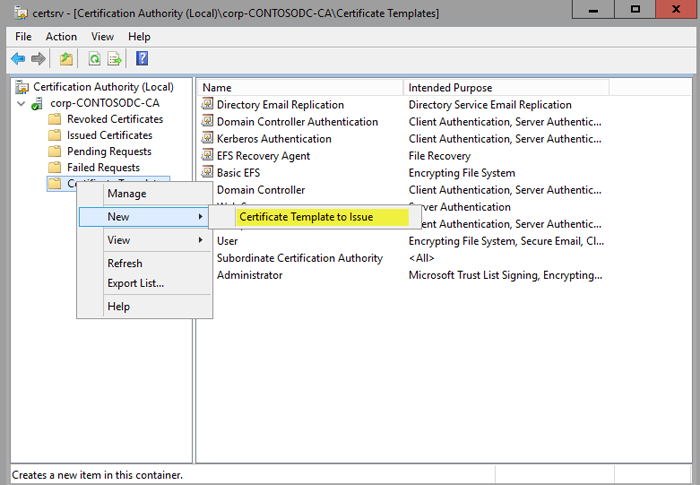
Figure 3. Select the new certificate template to issue
A list of available templates to issue appears, including the template you just created.
-
Select the DG Catalog signing certificate, and then click OK.

Now that the template is available to be issued, you must request one from the computer running Windows 10 on which you create and sign catalog files. To begin, open the MMC, and then complete the following steps:
-
In MMC, from the File menu, click Add/Remove Snap-in. Double-click Certificates, and then select My user account.
-
In the Certificates snap-in, right-click the Personal store folder, point to All Tasks, and then click Request New Certificate.
-
Click Next twice to get to the certificate selection list.
-
In the Request Certificate list, select your newly created code signing certificate, and then select the blue text that requests additional information, as shown in Figure 4.
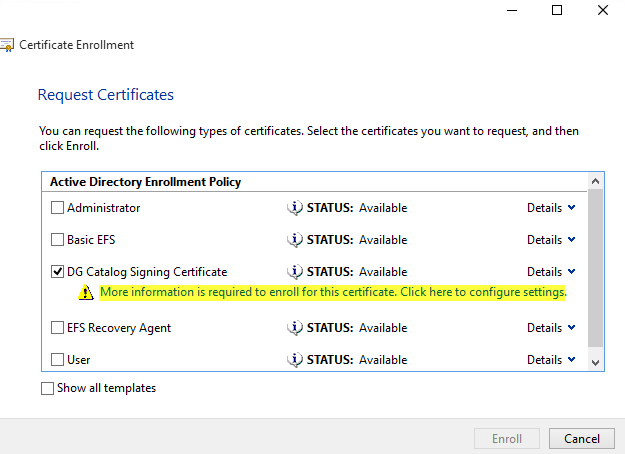
Figure 4. Get more information for your code signing certificate
-
In the Certificate Properties dialog box, for Type, select Common name. For Value, select ContosoDGSigningCert, and then click Add. When added, click OK.
-
Enroll and finish.

Note
If a certificate manager is required to approve any issued certificates and you selected to require management approval on the template, the request will need to be approved in the CA before it will be issued to the client.
This certificate must be installed in the user’s personal store on the computer that will be signing the catalog files and code integrity policies. If the signing is going to be taking place on the computer on which you just requested the certificate, exporting the certificate to a .pfx file will not be required because it already exists in your personal store. If you are signing on another computer, you will need to export the .pfx certificate with the necessary keys and properties. To do so, complete the following steps:
-
Right-click the certificate, point to All Tasks, and then click Export.
-
Click Next, and then select Yes, export the private key.
-
Choose the default settings, and then select Export all extended properties.
-
Set a password, select an export path, and then select DGCatSigningCert.pfx as the file name.
When the certificate has been exported, import it into the personal store for the user who will be signing the catalog files or code integrity policies on the specific computer that will be signing them.