17 KiB
title, description, ms.assetid, ms.reviewer, manager, ms.author, keywords, ms.prod, ms.mktglfcycl, ms.sitesec, author, ms.localizationpriority, ms.topic
| title | description | ms.assetid | ms.reviewer | manager | ms.author | keywords | ms.prod | ms.mktglfcycl | ms.sitesec | author | ms.localizationpriority | ms.topic | |||||
|---|---|---|---|---|---|---|---|---|---|---|---|---|---|---|---|---|---|
| Prepare a device for kiosk configuration (Windows 10) | Some tips for device settings on kiosks. | 428680AE-A05F-43ED-BD59-088024D1BFCC | dansimp | dansimp |
|
w10 | manage | library | dansimp | medium | article |
Prepare a device for kiosk configuration
Applies to
- Windows 10 Pro, Enterprise, and Education
Warning
For kiosks in public-facing environments with auto sign-in enabled, you should use a user account with the least privileges, such as a local standard user account.
Assigned access can be configured via Windows Management Instrumentation (WMI) or configuration service provider (CSP) to run its applications under a domain user or service account, rather than a local account. However, use of domain user or service accounts introduces risks that might allow an attacker subverting the assigned access application to gain access to sensitive domain resources that have been inadvertently left accessible to any domain account. We recommend that customers proceed with caution when using domain accounts with assigned access, and consider the domain resources potentially exposed by the decision to do so.
Important
User account control (UAC) must be turned on to enable kiosk mode.
Kiosk mode is not supported over a remote desktop connection. Your kiosk users must sign in on the physical device that is set up as a kiosk.
Configuration recommendations
For a more secure kiosk experience, we recommend that you make the following configuration changes to the device before you configure it as a kiosk:
| Recommendation | How to |
|---|---|
| Hide update notifications (New in Windows 10, version 1809) |
Go to Group Policy Editor > Computer Configuration > Administrative Templates\Windows Components\Windows Update\Display options for update notifications -or- Use the MDM setting Update/UpdateNotificationLevel from the Policy/Update configuration service provider -or- Add the following registry keys as type DWORD (32-bit) in the path of HKLM\SOFTWARE\Policies\Microsoft\Windows\WindowsUpdate: \SetUpdateNotificationLevel with a value of 1, and \UpdateNotificationLevel with a value of 1 to hide all notifications except restart warnings, or value of 2 to hide all notifications, including restart warnings. |
| Enable and schedule automatic updates | Go to Group Policy Editor > Computer Configuration > Administrative Templates\Windows Components\Windows Update\Configure Automatic Updates, and select option 4 (Auto download and schedule the install)-or- Use the MDM setting Update/AllowAutoUpdate from the Policy/Update configuration service provider, and select option 3 (Auto install and restart at a specified time)Note: Installations can take from between 30 minutes and 2 hours, depending on the device, so you should schedule updates to occur when a block of 3-4 hours is available. To schedule the automatic update, configure Schedule Install Day, Schedule Install Time, and Schedule Install Week. |
| Enable automatic restart at the scheduled time | Go to Group Policy Editor > Computer Configuration > Administrative Templates\Windows Components\Windows Update\Always automatically restart at the scheduled time |
| Replace "blue screen" with blank screen for OS errors | Add the following registry key as DWORD (32-bit) type with a value of 1:HKLM\SYSTEM\CurrentControlSet\Control\CrashControl\DisplayDisabled |
| Put device in Tablet mode. | If you want users to be able to use the touch (on screen) keyboard, go to Settings > System > Tablet mode and choose On. Do not turn on this setting if users will not interact with the kiosk, such as for a digital sign. |
| Hide Ease of access feature on the sign-in screen. | See how to disable the Ease of Access button in the registry. |
| Disable the hardware power button. | Go to Power Options > Choose what the power button does, change the setting to Do nothing, and then Save changes. |
| Remove the power button from the sign-in screen. | Go to Computer Configuration > Windows Settings > Security Settings > Local Policies >Security Options > Shutdown: Allow system to be shut down without having to log on and select Disabled. |
| Disable the camera. | Go to Settings > Privacy > Camera, and turn off Let apps use my camera. |
| Turn off app notifications on the lock screen. | Go to Group Policy Editor > Computer Configuration > Administrative Templates\System\Logon\Turn off app notifications on the lock screen. |
| Disable removable media. | Go to Group Policy Editor > Computer Configuration > Administrative Templates\System\Device Installation\Device Installation Restrictions. Review the policy settings available in Device Installation Restrictions for the settings applicable to your situation. NOTE: To prevent this policy from affecting a member of the Administrators group, in Device Installation Restrictions, enable Allow administrators to override Device Installation Restriction policies. |
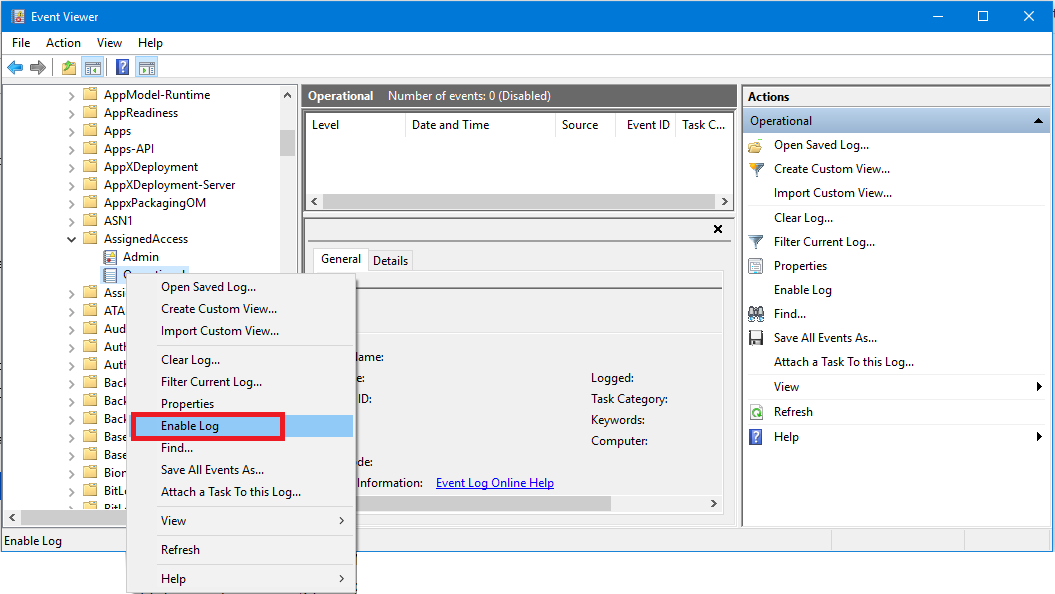
Enable logging
Logs can help you troubleshoot issues kiosk issues. Logs about configuration and runtime issues can be obtained by enabling the Applications and Services Logs\Microsoft\Windows\AssignedAccess\Operational channel, which is disabled by default.
Automatic logon
In addition to the settings in the table, you may want to set up automatic logon for your kiosk device. When your kiosk device restarts, whether from an update or power outage, you can sign in the assigned access account manually or you can configure the device to sign in to the assigned access account automatically. Make sure that Group Policy settings applied to the device do not prevent automatic sign in.
Note
If you are using a Windows 10 and later device restriction CSP to set "Preferred Azure AD tenant domain", this will break the "User logon type" auto-login feature of the Kiosk profile.
Tip
If you use the kiosk wizard in Windows Configuration Designer or XML in a provisioning package to configure your kiosk, you can set an account to sign in automatically in the wizard or XML.
How to edit the registry to have an account sign in automatically
-
Open Registry Editor (regedit.exe).
Note
If you are not familiar with Registry Editor, learn how to modify the Windows registry.
-
Go to
HKEY_LOCAL_MACHINE\SOFTWARE\Microsoft\Windows NT\CurrentVersion\Winlogon
-
Set the values for the following keys.
-
AutoAdminLogon: set value as 1.
-
DefaultUserName: set value as the account that you want signed in.
-
DefaultPassword: set value as the password for the account.
Note
If DefaultUserName and DefaultPassword aren't there, add them as New > String Value.
-
DefaultDomainName: set value for domain, only for domain accounts. For local accounts, do not add this key.
-
-
Close Registry Editor. The next time the computer restarts, the account will sign in automatically.
Tip
You can also configure automatic sign-in using the Autologon tool from Sysinternals.
Note
If you are also using Custom Logon with HideAutoLogonUI enabled, you might experience a black screen after a password expires. We recommend that you consider setting the password to never expire.
Interactions and interoperability
The following table describes some features that have interoperability issues we recommend that you consider when running assigned access.
Note
Where applicable, the table notes which features are optional that you can configure for assigned access.
| Feature | Description | ||||||||||||||||||||||
|---|---|---|---|---|---|---|---|---|---|---|---|---|---|---|---|---|---|---|---|---|---|---|---|
Accessibility |
Assigned access does not change Ease of Access settings. We recommend that you use Keyboard Filter to block the following key combinations that bring up accessibility features:
|
||||||||||||||||||||||
Assigned access Windows PowerShell cmdlets |
In addition to using the Windows UI, you can use the Windows PowerShell cmdlets to set or clear assigned access. For more information, see Assigned access Windows PowerShell reference. |
||||||||||||||||||||||
Key sequences blocked by assigned access |
When in assigned access, some key combinations are blocked for assigned access users. Alt+F4, Alt+Shift+TaB, Alt+Tab are not blocked by Assigned Access, it is recommended you use Keyboard Filter to block these key combinations. Ctrl+Alt+Delete is the key to break out of Assigned Access. If needed, you can use Keyboard Filter to configure a different key combination to break out of assigned access by setting BreakoutKeyScanCode as described in WEKF_Settings.
Keyboard Filter settings apply to other standard accounts. |
||||||||||||||||||||||
Key sequences blocked by Keyboard Filter |
If Keyboard Filter is turned ON then some key combinations are blocked automatically without you having to explicitly block them. For more information, see the Keyboard Filter reference topic. Keyboard Filter is only available on Windows 10 Enterprise or Windows 10 Education. |
||||||||||||||||||||||
Power button |
Customizations for the Power button complement assigned access, letting you implement features such as removing the power button from the Welcome screen. Removing the power button ensures the user cannot turn off the device when it is in assigned access. For more information on removing the power button or disabling the physical power button, see Custom Logon. |
||||||||||||||||||||||
Unified Write Filter (UWF) |
UWFsettings apply to all users, including those with assigned access. For more information, see Unified Write Filter. |
||||||||||||||||||||||
WEDL_AssignedAccess class |
Although you can use this class to configure and manage basic lockdown features for assigned access, we recommend that you use the Windows PowerShell cmdlets instead. If you need to use assigned access API, see WEDL_AssignedAccess. |
||||||||||||||||||||||
Welcome Screen |
Customizations for the Welcome screen let you personalize not only how the Welcome screen looks, but for how it functions. You can disable the power or language button, or remove all user interface elements. There are many options to make the Welcome screen your own. For more information, see Custom Logon. |
Testing your kiosk in a virtual machine (VM)
Customers sometimes use virtual machines (VMs) to test configurations before deploying those configurations to physical devices. If you use a VM to test your single-app kiosk configuration, you need to know how to connect to the VM properly.
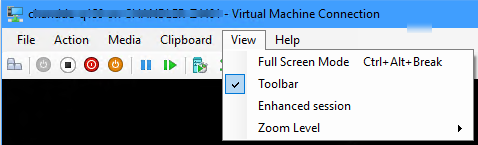
A single-app kiosk configuration runs an app above the lock screen. It doesn't work when it's accessed remotely, which includes enhanced sessions in Hyper-V.
When you connect to a VM configured as a single-app kiosk, you need a basic session rather than an enhanced session. In the following image, notice that Enhanced session is not selected in the View menu; that means it's a basic session.
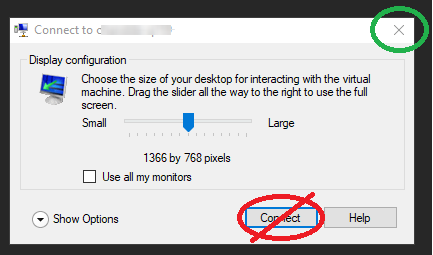
To connect to a VM in a basic session, do not select Connect in the connection dialog, as shown in the following image, but instead, select the X button in the upper-right corner to cancel the dialog.