11 KiB
title, description, keywords, ms.prod, ms.mktglfcycl, ms.sitesec, ms.pagetype, author
| title | description | keywords | ms.prod | ms.mktglfcycl | ms.sitesec | ms.pagetype | author | |||
|---|---|---|---|---|---|---|---|---|---|---|
| Set up Take a Test on multiple PCs | Learn how to set up and use the Take a Test app on multiple PCs. |
|
w10 | plan | library | edu | jdeckerMS |
Set up Take a Test on multiple PCs
Applies to:
- Windows 10
Many schools use online testing for formative and summative assessments. It's critical that students use a secure browser that prevents them from using other computer or Internet resources during the test. The Take a Test app in Windows 10, Version 1607, creates the right environment for taking a test:
- A Microsoft Edge browser window opens, showing just the test and nothing else.
- The clipboard is cleared.
- Students aren’t able to go to other websites.
- Students can’t open or access other apps.
- Students can't share, print, or record their screens.
- Students can’t change settings, extend their display, see notifications, get updates, or use autofill features.
- Cortana is turned off.
How you use Take a Test
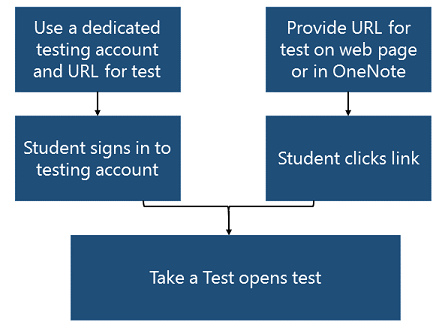
- Use a test URL and a dedicated testing account - A user signs in to the account and the Take a Test app automatically launches the pre-configured assessment URL in Microsoft Edge in a single-app, kiosk mode. A student will never have access to the desktop in this configuration. We recommend this configuration for high stakes testing.
- Put a test URL with an included prefix on a web page or OneNote for students to click - This allows teachers and test administrators an easier way to deploy assessments. We recommend this method for lower stakes assessments.
Set up a dedicated test account
To configure a dedicated test account on multiple PCs, you can use:
- Mobile device management (MDM) or Microsoft System Center Configuration Manager
- A provisioning package created in Windows Imaging and Configuration Designer (ICD)
- Group Policy to deploy a scheduled task that runs a Powershell script
Set up test account in MDM or Configuration Manager
-
Launch your management console.
-
Create a policy to set up single app kiosk mode, using the following values:
- Custom OMA-DM URI = ./Vendor/MSFT/AssignedAccess/KioskModeApp
- String value = {"Account":"redmond\kioskuser","AUMID":” Microsoft.Windows.SecureAssessmentBrowser_cw5n1h2txyewy!App "}
Account can be in one of the following formats:
- username
- domain\username
- computer name\username
- username@tenant.com
-
Create a policy to configure the assessment URL, using the following values:
- Custom OMA-DM URI = ./Vendor/MSFT/SecureAssessment/LaunchURI
- String value = assessment URL
See Assessment URLs
-
Create a policy that associates the assessment URL to the account, using the following values:
- Custom OMA-DM URI = ./Vendor/MSFT/SecureAssessment/TesterAccount
- String value = Enter the account that you specified in step 2, using the same account format.
-
To take the test, the student signs in to the test account.
Set up test account in a provisioning package
Prerequisite: You must first download the Windows ADK for Windows 10, Version 1607, and install Windows Imaging and Configuration Designer (ICD).
**Create a provisioning package to set up a test account
-
Open Windows ICD (by default, %windir%\Program Files (x86)\Windows Kits\10\Assessment and Deployment Kit\Imaging and Configuration Designer\x86\ICD.exe).
-
Select Advanced provisioning.
-
Name your project, and click Next.
-
Select All Windows desktop editions, and click Next.
-
Click Finish.
-
Go to Runtime settings > AssignedAccess > AssignedAccessSettings.
-
Enter {"Account":"redmond\kioskuser","AUMID":” Microsoft.Windows.SecureAssessmentBrowser_cw5n1h2txyewy!App "}, using the account that you want to set up, as shown in the following image.

Account can be in one of the following formats:
- username
- domain\username
- computer name\username
- username@tenant.com
-
Go to Runtime settings > TakeATest.
-
Enter the test URL in LaunchURI.
-
Enter the test account from step 7 in TesterAccount. On the File menu, select Save.
-
On the Export menu, select Provisioning package.
-
Change Owner to IT Admin, which will set the precedence of this provisioning package higher than provisioning packages applied to this device from other sources, and then select Next.
-
Optional. In the Provisioning package security window, you can choose to encrypt the package and enable package signing.
-
Enable package encryption - If you select this option, an auto-generated password will be shown on the screen.
-
Enable package signing - If you select this option, you must select a valid certificate to use for signing the package. You can specify the certificate by clicking Select and choosing the certificate you want to use to sign the package.
-
-
Click Next to specify the output location where you want the provisioning package to go when it's built. By default, Windows ICD uses the project folder as the output location.
Optionally, you can click Browse to change the default output location.
-
Click Next.
-
Click Build to start building the package. The provisioning package doesn't take long to build. The project information is displayed in the build page and the progress bar indicates the build status.
If you need to cancel the build, click Cancel. This cancels the current build process, closes the wizard, and takes you back to the Customizations Page.
-
If your build fails, an error message will show up that includes a link to the project folder. You can scan the logs to determine what caused the error. Once you fix the issue, try building the package again.
If your build is successful, the name of the provisioning package, output directory, and project directory will be shown.
- If you choose, you can build the provisioning package again and pick a different path for the output package. To do this, click Back to change the output package name and path, and then click Next to start another build.
- If you are done, click Finish to close the wizard and go back to the Customizations Page.
Apply the provisioning package
-
Select the provisioning package that you want to apply, double-click the file, and then allow admin privileges.
-
Consent to allow the package to be installed.
After you allow the package to be installed, the settings will be applied to the device
Learn how to apply a provisioning package in audit mode or OOBE.
Set up test account in Group Policy
To set up a test account using Group Policy, first create a Powershell script that configures the test account and test URL, and then create a scheduled task to run the script.
Create a Powershell script
This sample Powershell script configures the test account and the test URL. Edit the sample to:
- Use your test account for $obj.LaunchURI
- Use your test URL for $obj.TesterAccount
- Use your test account for -UserName
$obj = get-wmiobject -namespace root/cimv2/mdm/dmmap -class MDM_SecureAssessment -filter "InstanceID='SecureAssessment' AND ParentID='./Vendor/MSFT'";
$obj.LaunchURI='http://www.foo.com';
$obj.TesterAccount='TestAccount';
$obj.put()
Set-AssignedAccess -AppUserModelId Microsoft.Windows.SecureAssessmentBrowser_cw5n1h2txyewy!App -UserName TestAccount
Create a scheduled task in Group Policy
- Open the Group Policy Management Console.
- Right-click the Group Policy object (GPO) that should contain the new preference item, and then click Edit.
- In the console tree under Computer Configuration or User Configuration, go to Preferences > Control Panel Settings.
- Right-click Scheduled Tasks, point to New, and select Scheduled Task.
- In the New Scheduled Task Properties dialog box, click Change User or Group.
- In the Select User or Group dialog box, click Advanced.
- In the Advanced dialog box, click Find Now.
- Select System in the search results
- Go back to the Properties dialog box and select Run with highest privileges under Security options.
- Specify the operating system in the Configure for field.
- Navigate to the Actions tab.
- Create a new Action.
- Configure the action to Start a program.
- In the Program/script field, enter powershell.
- In the Add arguments field, enter -file “”.
- Click OK.
- Navigate to the Triggers tab and create a new trigger.
- Specify the trigger to be On a schedule.
- Specify the trigger to be One time.
- Specify the time the trigger should start.
- Click OK.
- In the Settings tab, select Run task as soon as possible after a scheduled start is missed.
- Click OK.
Provide link to test
Anything hosted on the web can be presented in a locked down manner, not just assessments. To lock down online content, just embed a URL with a specific prefix and devices will be locked down when users follow the link. We recommend using this method for lower stakes assessments.
- Create a link to the test URL. Use ms-edu-secureassessment: before the URL and !enforceLockdown after the URL.
ms-edu-secureassessment:<URL>!enforceLockdown
Note
: You may want to remove !enforceLockdown for tests that utilizes our lockdown API that checks for running processes before locking down. Removing !enforceLockdown will result in the app not locking down immediately which allows you to close apps that are not allowed to run during lockdown. The test web application may lock down the device once you have closed the apps.
- Distribute the link. You can use the web, email, OneNote, or any other method of your choosing.
- To take the test, the student clicks on the link and provides user consent.
Assessment URLs
This assessment URL uses our lockdown API:
- SBAC/AIR: http://mobile.tds.airast.org/launchpad/.
Related topics
Set up Take a Test on a single PC