18 KiB
title, description, ms.prod, ms.mktglfcycl, ms.sitesec, ms.pagetype, author
| title | description | ms.prod | ms.mktglfcycl | ms.sitesec | ms.pagetype | author |
|---|---|---|---|---|---|---|
| Get started with Upgrade Analytics (Windows 10) | Explains how to get started with Upgrade Analytics. | w10 | deploy | library | deploy | greg-lindsay |
Get started with Upgrade Analytics
This topic explains how to obtain and set up Upgrade Analytics components. If you haven’t done so already, see Upgrade Analytics requirements for information about requirements for using Upgrade Analytics. Also, check out the Upgrade Analytics blog for new announcements and helpful tips for using Upgrade Analytics.
You can use Upgrade Analytics to plan and manage your upgrade project end to end. After you’ve established communications between user computers and Microsoft, Upgrade Analytics collects computer, application, and driver data for analysis. This data is used to identify compatibility issues that can block your upgrade and to suggest fixes that are known to Microsoft.
To enable system, application, and driver data to be shared with Microsoft, you must configure user computers to send data. For information about what telemetry data Microsoft collects and how that data is used and protected by Microsoft, see the following topics:
- Configure Windows telemetry in your organization
- Manage connections from Windows operating system components to Microsoft services
- Windows 7, Windows 8, and Windows 8.1 appraiser telemetry events and fields
To configure Upgrade Analytics, you’ll need to:
- Add the Upgrade Analytics solution to a workspace in the Operations Management Suite portal
- Establish communications and enable data sharing between your organization and Microsoft
Each task is explained in detail in the following sections.
Add Upgrade Analytics to Operations Management Suite
Upgrade Analytics is offered as a solution in the Microsoft Operations Management Suite (OMS), a collection of cloud based services for managing your on-premises and cloud environments. For more information about OMS, see Operations Management Suite overview.
If you are already using OMS, you’ll find Upgrade Analytics in the Solutions Gallery. Select the Upgrade Analytics tile in the gallery and then click Add on the solution's details page. Upgrade Analytics is now visible in your workspace.
If you are not using OMS:
-
Go to the Upgrade Analytics page on Microsoft.com and click Sign up to kick off the onboarding process.
-
Sign in to Operations Management Suite (OMS). You can use either a Microsoft Account or a Work or School account to create a workspace. If your company is already using Azure Active Directory (Azure AD), use a Work or School account when you sign in to OMS. Using a Work or School account allows you to use identities from your Azure AD to manage permissions in OMS.
-
Create a new OMS workspace. Enter a name for the workspace, select the workspace region, and provide the email address that you want associated with this workspace. Select Create.
-
If your organization already has an Azure subscription, you can link it to your workspace. Note that you may need to request access from your organization’s Azure administrator.
If your organization does not have an Azure subscription, create a new one or select the default OMS Azure subscription from the list. Your workspace opens.
-
To add the Upgrade Analytics solution to your workspace, go to the Solutions Gallery. Select the Upgrade Analytics tile in the gallery and then select Add on the solution’s details page. The solution is now visible on your workspace. Note that you may need to scroll to find Upgrade Analytics.
-
Click the Upgrade Analytics tile to configure the solution. The Settings Dashboard opens.
Enable data sharing between your organization and Upgrade Analytics
After you’ve signed in to Operations Management Suite and added the Upgrade Analytics solution to your workspace, complete the following tasks to establish communication and enable data sharing between user computers, Microsoft secure data centers, and Upgrade Analytics.
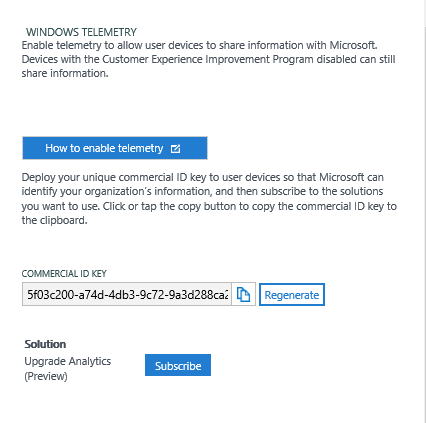
Generate your commercial ID key
Microsoft uses a unique commercial ID to map information from user computers to your OMS workspace. Generate your commercial ID key in OMS and then deploy it to user computers.
-
On the Settings Dashboard, navigate to the Windows telemetry panel.
-
On the Windows telemetry panel, copy and save your commercial ID key. You’ll need to insert this key into the Upgrade Analytics deployment script later so it can be deployed to user computers.
Important
Regenerate a commercial ID key only if your original ID key can no longer be used. Regenerating a commercial ID key resets the data in your workspace for all solutions that use the ID. Additionally, you’ll need to deploy the new commercial ID key to user computers again.
Subscribe to Upgrade Analytics
For Upgrade Analytics to receive and display upgrade readiness data from Microsoft, subscribe your OMS workspace to Upgrade Analytics.
-
On the Windows telemetry panel, click Subscribe. The button changes to Unsubscribe. Unsubscribe from the Upgrade Analytics solution if you no longer want to receive upgrade-readiness information from Microsoft. Note that user computer data will continue to be shared with Microsoft for as long as the opt-in keys are set on user computers and the proxy allows the traffic.
-
Click Overview on the Settings Dashboard to return to your OMS workspace portal. The Upgrade Analytics tile now displays summary data. Click the tile to open Upgrade Analytics.
Whitelist select endpoints
To enable data sharing, whitelist the following endpoints. Note that you may need to get approval from your security group to do this.
Note: The compatibility update KB runs under the computer’s system account and does not support user authenticated proxies.
| Endpoint | Function |
|---|---|
https://v10.vortex-win.data.microsoft.com/collect/v1 |
Connected User Experience and Telemetry component endpoint. User computers send data to Microsoft through this endpoint. |
https://settings-win.data.microsoft.com/settings |
Enables the compatibility update KB to send data to Microsoft. |
https://go.microsoft.com/fwlink/?LinkID=544713https://compatexchange1.trafficmanager.net/CompatibilityExchangeService.svc/extended |
This service provides driver information about whether there will be a driver available post-upgrade for the hardware on the system. |
https://vortex.data.microsoft.com/health/keepalive https://settings.data.microsoft.com/qos https://compatexchange1.trafficmanager.net/CompatibilityExchangeService.svc |
These endpoints are used to validate that user computers are sharing data with Microsoft. |
Deploy the compatibility update and related KBs
The compatibility update KB scans your computers and enables application usage tracking. If you don’t already have these KBs installed, you can download the applicable version from the Microsoft Update Catalog or deploy it using Windows Server Update Services (WSUS) or your software distribution solution, such as System Center Configuration Manager.
| Operating System | KBs |
|---|---|
| Windows 8.1 | KB 2976978 Performs diagnostics on the Windows 8.1 systems that participate in the Windows Customer Experience Improvement Program. These diagnostics help determine whether compatibility issues may be encountered when the latest Windows operating system is installed. For more information about this KB, see https://support.microsoft.com/kb/2976978 KB 3150513 Provides updated configuration and definitions for compatibility diagnostics performed on the system. For more information about this KB, see https://support.microsoft.com/kb/3150513 NOTE: KB2976978 must be installed before you can download and install KB3150513. |
| Windows 7 SP1 | KB2952664 Performs diagnostics on the Windows 7 SP1 systems that participate in the Windows Customer Experience Improvement Program. These diagnostics help determine whether compatibility issues may be encountered when the latest Windows operating system is installed. For more information about this KB, see https://support.microsoft.com/kb/2952664 KB 3150513 Provides updated configuration and definitions for compatibility diagnostics performed on the system. For more information about this KB, see https://support.microsoft.com/kb/3150513 NOTE: KB2952664 must be installed before you can download and install KB3150513. |
IMPORTANT: Restart user computers after you install the compatibility update KBs for the first time.
If you are planning to enable IE Site Discovery, you will need to install a few additional KBs.
| Site discovery | KB |
|---|---|
| Review site discovery | KB3080149 Updates the Diagnostic and Telemetry tracking service to existing devices. This update is only necessary on Windows 7 and Windows 8.1 devices. For more information about this KB, see https://support.microsoft.com/kb/3150513 Install the latest Windows Monthly Rollup. This functionality has been included in Internet Explorer 11 starting with the July 2016 Cumulative Update. |
Automate data collection
To ensure that user computers are receiving the most up to date data from Microsoft, we recommend that you establish the following data sharing and analysis processes.
- Enable automatic updates for the compatibility update and related KBs. These KBs are updated frequently to include the latest application and driver issue information as we discover it during testing.
- Schedule the Upgrade Analytics deployment script to automatically run so that you don’t have to manually initiate an inventory scan each time the compatibility update KBs are updated. Computers are re-scanned only when the compatibility KBs are updated, so if your inventory changes significantly between KB releases you won’t see the changes in Upgrade Analytics until you run the script again.
- Schedule monthly user computer scans to view monthly active computer and usage information.
Run the Upgrade Analytics deployment script
To automate many of the steps outlined above and to troubleshoot data sharing issues, you can run the Upgrade Analytics deployment script, developed by Microsoft.
The following guidance applies to version 11.30.16 or later of the Upgrade Analytics deployment script. If you are using an older version, please download the latest from Download Center.
The Upgrade Analytics deployment script does the following:
-
Sets commercial ID key + CommercialDataOptIn + RequestAllAppraiserVersions keys.
-
Verifies that user computers can send data to Microsoft.
-
Checks whether the computer has a pending restart.
-
Verifies that the latest version of KB package 10.0.x is installed (version 10.0.14348 or later is required, but version 10.0.14913 or later is recommended).
-
If enabled, turns on verbose mode for troubleshooting.
-
Initiates the collection of the telemetry data that Microsoft needs to assess your organization’s upgrade readiness.
-
If enabled, displays the script’s progress in a cmd window, providing you immediate visibility into issues (success or fail for each step) and/or writes to log file.
To run the Upgrade Analytics deployment script:
-
Download the Upgrade Analytics deployment script and extract UpgradeAnalytics.zip. Inside, there are two folders: Pilot and Deployment. The Pilot folder contains advanced logging that can help troubleshoot issues and is inteded to be run from an elevated command prompt. The Deployment folder offers a lightweight script intended for broad deployment through ConfigMgr or other software deployment system. We recommend manually running the Pilot version of the script on 5-10 machines to verify that everything is configured correctly. Once you have confirmed that data is flowing successfully, proceed to run the Deployment version throughout your organization.
-
Edit the following parameters in RunConfig.bat:
-
Provide a storage location for log information. You can store log information on a remote file share or a local directory. If the script is blocked from creating the log file for the given path, it creates the log files in the drive with the Windows directory. Example: %SystemDrive%\UADiagnostics
-
Input your commercial ID key. This can be found in your OMS workspace under Settings -> Connected Sources -> Windows Telemetry.
-
By default, the script sends log information to both the console and the log file. To change the default behavior, use one of the following options:
logMode = 0 log to console only
-
> *logMode = 1 log to file and console*
> *logMode = 2 log to file only*
-
To enable Internet Explorer data collection, set AllowIEData to IEDataOptIn. By default, AllowIEData is set to Disable. Then use one of the following options to determine what Internet Explorer data can be collected:
IEOptInLevel = 0 Internet Explorer data collection is disabled
IEOptInLevel = 1 Data collection is enabled for sites in the Local intranet + Trusted sites + Machine local zones
IEOptInLevel = 2 Data collection is enabled for sites in the Internet + Restricted sites zones
IEOptInLevel = 3 Data collection is enabled for all sites
-
After you finish editing the parameters in RunConfig.bat, you are ready to run the script. If you are using the Pilot version, run RunConfig.bat from an elevated command prompt. If you are using the Deployment version, use ConfigMgr or other software deployment service to run RunConfig.bat as system.
The deployment script displays the following exit codes to let you know if it was successful, or if an error was encountered.
| Exit code | Meaning |
|---|---|
| 0 | Success |
| 1 | Unexpected error occurred while executing the script |
| 2 | Error when logging to console. $logMode = 0. |
| 3 | Error when logging to console and file. $logMode = 1. |
| 4 | Error when logging to file. $logMode = 2. |
| 5 | Error when logging to console and file. $logMode = unknown. |
| 6 | The commercialID parameter is set to unknown. Modify the script. |
| 7 | Function -CheckCommercialId: Unexpected failure. |
| 8 | Failure to create registry key path: HKLM:\SOFTWARE\Microsoft\Windows\CurrentVersion\Policies\DataCollection. |
| 9 | Error when writing CommercialId to registry. |
| 10 | Error when writing CommercialDataOptIn to registry. |
| 11 | Function -SetupCommercialId: Unexpected failure. |
| 12 | Can’t connect to Microsoft – Vortex. Check your network/proxy settings. |
| 13 | Can’t connect to Microsoft – setting. Check your network/proxy settings. |
| 14 | Can’t connect to Microsoft – compatexchange. Check your network/proxy settings. |
| 15 | Error connecting to Microsoft. Check your network/proxy settings. |
| 16 | Machine requires reboot. |
| 17 | Function -CheckRebootRequired: Unexpected failure. |
| 18 | Outdated compatibility update KB package. Update via Windows Update/WSUS. |
| 19 | This machine doesn’t have the proper KBs installed. Make sure you have recent compatibility update KB downloaded. |
| 20 | Error writing RequestAllAppraiserVersions registry key. |
| 21 | Function – SetRequestAllAppraiserVersions: Unexpected failure. |
| 22 | RunAppraiser failed with unexpected exception. |
| 23 | Error finding system variable %WINDIR%. |
| 24 | SetIEDataOptIn failed when writing IEDataOptIn to registry. |
| 25 | SetIEDataOptIn failed with unexpected exception. |
| 26 | The operating system is LTSB SKU. The script does not support LTSB SKUs. |
| 27 | The operating system is Server SKU. The script does not support Server SKUs. |
Seeing data from computers in Upgrade Analytics
After data is sent from computers to Microsoft, it generally takes 48 hours for the data to populate in Upgrade Analytics. The compatibility update KB takes several minutes to run. If the KB does not get a chance to finish running or if the computers are inaccessible (turned off or sleeping for example), data will take longer to populate in Upgrade Analytics. For this reason, you can expect most your computers to be populated in OMS in about 1-2 weeks after deploying the KB and configuration to user computers.