13 KiB
title, description, ms.assetid, ms.prod, ms.mktglfcycl, ms.sitesec, ms.pagetype, author
| title | description | ms.assetid | ms.prod | ms.mktglfcycl | ms.sitesec | ms.pagetype | author |
|---|---|---|---|---|---|---|---|
| Configure Windows Defender in Windows 10 (Windows 10) | IT professionals can configure definition updates and cloud-based protection in Windows Defender in Windows 10 through Microsoft Active Directory and Windows Server Update Services (WSUS). | 22649663-AC7A-40D8-B1F7-5CAD9E49653D | W10 | manage | library | security | jasesso |
Configure Windows Defender in Windows 10
Applies to
- Windows 10
IT professionals can configure definition updates and cloud-based protection in Windows Defender in Windows 10 through Microsoft Active Directory and Windows Server Update Services (WSUS).
Configure definition updates
It is important to update definitions regularly to ensure that your endpoints are protected. Definition updates can be configured to suit the requirements of your organization.
Windows Defender supports the same updating options (such as using multiple definition sources) as other Microsoft endpoint protection products; for more information, see Configuring Definition Updates.
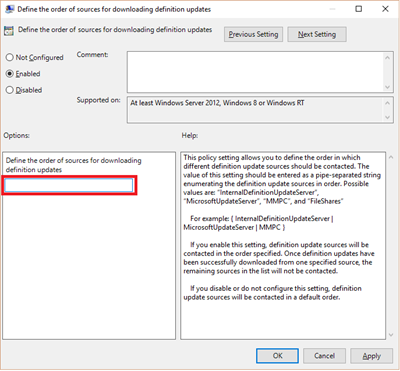
When you configure multiple definition sources in Windows Defender, you can configure the fallback order using the following values through Group Policy settings:
- InternalDefinitionUpdateServer - WSUS
- MicrosoftUpdateServer - Microsoft Update
- MMPC - Microsoft Malware Protection Center definitions page
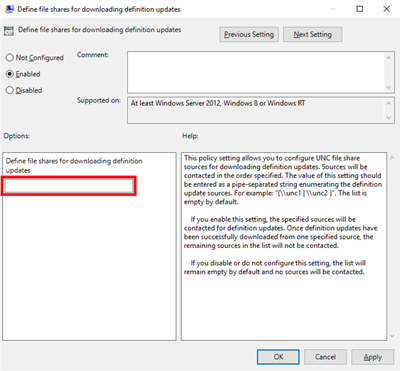
- FileShares - file share
Read about deploying administrative template files for Windows Defender in the article Description of the Windows Defender Group Policy administrative template settings.
You can also manage your Windows Defender update configuration settings through System Center Configuration Manager. See How to Configure Definition Updates for Endpoint Protection in Configuration Manager for details.
Definition update logic
You can update Windows Defender definitions in four ways depending on your business requirements:
- WSUS, the managed server. You can manage the distribution of updates that are released through Microsoft Update to computers in your enterprise environment; read more on the Windows Server Update Services website.
- Microsoft Update, the unmanaged server. You can use this method to get regular updates from Microsoft Update.
- The Microsoft Malware Protection Center definitions page, as an alternate download location. You can use this method if you want to download the latest definitions.
- File share, where the definition package is downloaded. You can retrieve definition updates from a file share. The file share must be provisioned on a regular basis with the update files.
Update Windows Defender definitions through Active Directory and WSUS
This section details how to update Windows Defender definitions for Windows 10 endpoints through Active Directory and WSUS.
| Method | Instructions |
|---|---|
WSUS |
See [Software Updates and Windows Server Update Services Definition Updates](https://technet.microsoft.com/library/gg398036.aspx) in the [Configuring Definition Updates](https://technet.microsoft.com/library/gg412502.aspx) topic that also applies to Windows Defender. |
Microsoft Update |
Set the following fallback order Group Policy to enable Microsoft Update:
|
[Microsoft Malware Protection Center definitions page](http://www.microsoft.com/security/portal/definitions/adl.aspx) |
Set the following fallback order Group Policy to enable Windows Defender to download updated signatures:
|
File share |
|
Windows Defender offers improved cloud-based protection and threat intelligence for endpoint protection clients using the Microsoft Active Protection Service. Read more about the Microsoft Active Protection Service community in Join the Microsoft Active Protection Service community.
You can enable or disable the Microsoft Active Protection Service using Group Policy settings and administrative template files.
More information on deploying administrative template files for Windows Defender is available in the article Description of the Windows Defender Group Policy administrative template settings.
The Microsoft Active Protection Service can be configured with the following Group Policy settings:
-
Open the Group Policy Editor.
-
In the Local Computer Policy tree, expand Computer Configuration, then Administrative Templates, then Windows Components, then Windows Defender.
-
Click on MAPS.
-
Double-click on Join Microsoft MAPS.
-
Select your configuration option from the Join Microsoft MAPS list.
Note: Any settings modified on an endpoint will be overridden by the administrator's policy setting. Use the Windowsdefender.adm Group Policy template file to control the policy settings for Windows Defender in Windows 10:
Policy setting: Configure Microsoft SpyNet Reporting
Registry key name: HKEY_LOCAL_MACHINE\SOFTWARE\Policies\Microsoft\Windows Defender\SpyNet\SpyNetReporting
Policy description: Adjusts membership in Microsoft Active Protection Service
You can also configure preferences using the following PowerShell parameters:
- Turn Microsoft Active Protection Service off: Set-MpPreference -MAPSReporting 0
- Turn Microsoft Active Protection Service on: Set-MpPreference -MAPSReporting 2
Read more about this in:
Note: Any information that Windows Defender collects is encrypted in transit to our servers, and then stored in secure facilities. Microsoft takes several steps to avoid collecting any information that directly identifies you, such as your name, email address, or account ID. Read more about how to manage your privacy settings in Setting your preferences for Windows 10 services.
Opt-in to Microsoft Update
You can use Microsoft Update to keep definitions on mobile computers running Windows Defender in Windows 10 up to date when they are not connected to the corporate network. If the mobile computer doesn't have a Windows Server Update Service (WSUS) connection, the signatures will still come from Microsoft Update. This means that signatures can be pushed down (via Microsoft Update) even if WSUS overrides Windows Update.
You need to opt-in to Microsoft Update on the mobile computer before it can retrieve the definition updates from Microsoft Update.
There are two ways you can opt-in to Microsoft Update in Windows Defender for Windows 10:
- Use a VBScript to create a script, then run it on each computer in your network.
- Manually opt-in every computer on your network through the Settings menu.
You can create a VBScript and run it on each computer on your network; this is an efficient way to opt-in to Microsoft Update.
Use a VBScript to opt in to Microsoft Update
- Use the instructions in the MSDN article Opt-In to Microsoft Update to create the VBScript.
- Run the VBScript you created on each computer in your network.
You can manually opt-in each individual computer on your network to receive Microsoft Update.
Manually opt-in to Microsoft Update
- Open Windows Update in Update & security settings on the computer you want to opt-in.
- Click Advanced options.
- Select the checkbox for Give me updates for other Microsoft products when I update Windows.
Schedule updates for Microsoft Update
Opting-in to Microsoft Update means that your system administrator can schedule updates to your mobile computer, so that it keeps up-to-date with the latest software versions and security definitions, even when you’re on the road.
For more information on scheduling updates, see Configure definition updates.