16 KiB
title, description, ms.prod, ms.mktglfcycl, ms.localizationpriority, ms.author, author, manager, audience, ms.collection, ms.topic, ms.date, ms.reviewer, ms.technology
| title | description | ms.prod | ms.mktglfcycl | ms.localizationpriority | ms.author | author | manager | audience | ms.collection | ms.topic | ms.date | ms.reviewer | ms.technology | ||
|---|---|---|---|---|---|---|---|---|---|---|---|---|---|---|---|
| Enable virtualization-based protection of code integrity | This article explains the steps to opt in to using HVCI on Windows devices. | windows-client | deploy | medium | vinpa | vinaypamnani-msft | aaroncz | ITPro |
|
conceptual | 12/16/2021 | itpro-security |
Enable virtualization-based protection of code integrity
Applies to
- Windows 10
- Windows 11
This topic covers different ways to enable Hypervisor-protected code integrity (HVCI) on Windows 10 and Windows 11. Some applications, including device drivers, may be incompatible with HVCI. This incompatibility can cause devices or software to malfunction and in rare cases may result in a blue screen. Such issues may occur after HVCI has been turned on or during the enablement process itself. If these issues occur, see Troubleshooting for remediation steps.
Note
Because it makes use of Mode Based Execution Control, HVCI works better with Intel Kaby Lake or AMD Zen 2 CPUs and newer. Processors without MBEC will rely on an emulation of this feature, called Restricted User Mode, which has a bigger impact on performance.
HVCI Features
- HVCI protects modification of the Control Flow Guard (CFG) bitmap.
- HVCI also ensures that your other trusted processes, like Credential Guard, have got a valid certificate.
- Modern device drivers must also have an EV (Extended Validation) certificate and should support HVCI.
How to turn on HVCI in Windows 10 and Windows 11
To enable HVCI on Windows 10 and Windows 11 devices with supporting hardware throughout an enterprise, use any of these options:
- Windows Security app
- Microsoft Intune (or another MDM provider)
- Group Policy
- Microsoft Configuration Manager
- Registry
Windows Security app
HVCI is labeled Memory integrity in the Windows Security app and it can be accessed via Settings > Update & Security > Windows Security > Device security > Core isolation details > Memory integrity. For more information, see KB4096339.
Enable HVCI using Intune
Enabling in Intune requires using the Code Integrity node in the VirtualizationBasedTechnology CSP. You can configure the settings in Windows by using the settings catalog.
Enable HVCI using Group Policy
-
Use Group Policy Editor (gpedit.msc) to either edit an existing GPO or create a new one.
-
Navigate to Computer Configuration > Administrative Templates > System > Device Guard.
-
Double-click Turn on Virtualization Based Security.
-
Click Enabled and under Virtualization Based Protection of Code Integrity, select Enabled with UEFI lock to ensure HVCI can't be disabled remotely or select Enabled without UEFI lock.
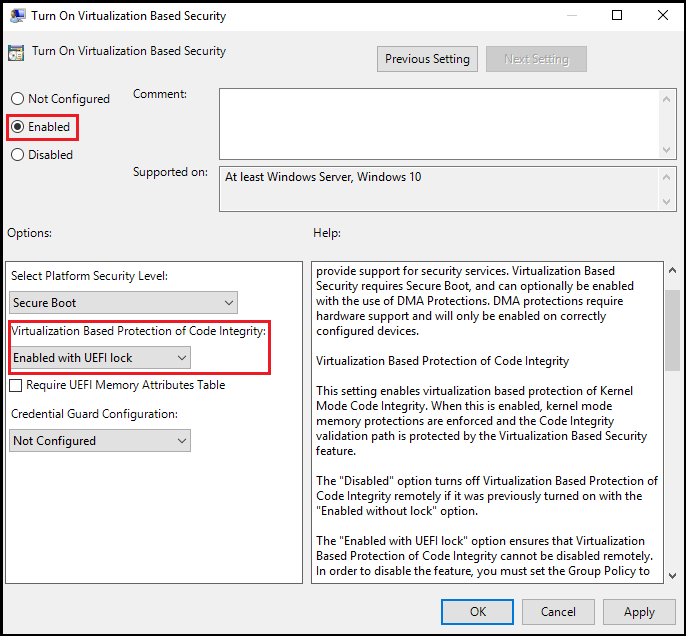
-
Click Ok to close the editor.
To apply the new policy on a domain-joined computer, either restart or run gpupdate /force in an elevated command prompt.
Use registry keys to enable virtualization-based protection of code integrity
Set the following registry keys to enable HVCI. These keys provide exactly the same set of configuration options provided by Group Policy.
Important
Among the commands that follow, you can choose settings for Secure Boot and Secure Boot with DMA. In most situations, we recommend that you choose Secure Boot. This option provides Secure Boot with as much protection as is supported by a given computer’s hardware. A computer with input/output memory management units (IOMMUs) will have Secure Boot with DMA protection. A computer without IOMMUs will simply have Secure Boot enabled.
In contrast, with Secure Boot with DMA, the setting will enable Secure Boot—and VBS itself—only on a computer that supports DMA, that is, a computer with IOMMUs. With this setting, any computer without IOMMUs will not have VBS or HVCI protection, although it can still have Windows Defender Application Control enabled.
All drivers on the system must be compatible with virtualization-based protection of code integrity; otherwise, your system may fail. We recommend that you enable these features on a group of test computers before you enable them on users' computers.
For Windows 10 version 1607 and later and for Windows 11 version 21H2
Recommended settings (to enable virtualization-based protection of Code Integrity policies, without UEFI Lock):
reg add "HKLM\SYSTEM\CurrentControlSet\Control\DeviceGuard" /v "EnableVirtualizationBasedSecurity" /t REG_DWORD /d 1 /f

reg add "HKLM\SYSTEM\CurrentControlSet\Control\DeviceGuard" /v "RequirePlatformSecurityFeatures" /t REG_DWORD /d 1 /f

reg add "HKLM\SYSTEM\CurrentControlSet\Control\DeviceGuard" /v "Locked" /t REG_DWORD /d 0 /f

reg add "HKLM\SYSTEM\CurrentControlSet\Control\DeviceGuard\Scenarios\HypervisorEnforcedCodeIntegrity" /v "Enabled" /t REG_DWORD /d 1 /f

reg add "HKLM\SYSTEM\CurrentControlSet\Control\DeviceGuard\Scenarios\HypervisorEnforcedCodeIntegrity" /v "Locked" /t REG_DWORD /d 0 /f
If you want to customize the preceding recommended settings, use the following settings.
To enable VBS
reg add "HKLM\SYSTEM\CurrentControlSet\Control\DeviceGuard" /v "EnableVirtualizationBasedSecurity" /t REG_DWORD /d 1 /f
To enable VBS and require Secure boot only (value 1)
reg add "HKLM\SYSTEM\CurrentControlSet\Control\DeviceGuard" /v "RequirePlatformSecurityFeatures" /t REG_DWORD /d 1 /f
To enable VBS with Secure Boot and DMA (value 3)
reg add "HKLM\SYSTEM\CurrentControlSet\Control\DeviceGuard" /v "RequirePlatformSecurityFeatures" /t REG_DWORD /d 3 /f
To enable VBS without UEFI lock (value 0)
reg add "HKLM\SYSTEM\CurrentControlSet\Control\DeviceGuard" /v "Locked" /t REG_DWORD /d 0 /f
To enable VBS with UEFI lock (value 1)
reg add "HKLM\SYSTEM\CurrentControlSet\Control\DeviceGuard" /v "Locked" /t REG_DWORD /d 1 /f
To enable virtualization-based protection of Code Integrity policies
reg add "HKLM\SYSTEM\CurrentControlSet\Control\DeviceGuard\Scenarios\HypervisorEnforcedCodeIntegrity" /v "Enabled" /t REG_DWORD /d 1 /f
To enable virtualization-based protection of Code Integrity policies without UEFI lock (value 0)
reg add "HKLM\SYSTEM\CurrentControlSet\Control\DeviceGuard\Scenarios\HypervisorEnforcedCodeIntegrity" /v "Locked" /t REG_DWORD /d 0 /f
To enable virtualization-based protection of Code Integrity policies with UEFI lock (value 1)
reg add "HKLM\SYSTEM\CurrentControlSet\Control\DeviceGuard\Scenarios\HypervisorEnforcedCodeIntegrity" /v "Locked" /t REG_DWORD /d 1 /f
For Windows 10 version 1511 and earlier
Recommended settings (to enable virtualization-based protection of Code Integrity policies, without UEFI Lock):
reg add "HKLM\SYSTEM\CurrentControlSet\Control\DeviceGuard" /v "EnableVirtualizationBasedSecurity" /t REG_DWORD /d 1 /f

reg add "HKLM\SYSTEM\CurrentControlSet\Control\DeviceGuard" /v "RequirePlatformSecurityFeatures" /t REG_DWORD /d 1 /f

reg add "HKLM\SYSTEM\CurrentControlSet\Control\DeviceGuard" /v "HypervisorEnforcedCodeIntegrity" /t REG_DWORD /d 1 /f

reg add "HKLM\SYSTEM\CurrentControlSet\Control\DeviceGuard" /v "Unlocked" /t REG_DWORD /d 1 /f
If you want to customize the preceding recommended settings, use the following settings.
To enable VBS (it is always locked to UEFI)
reg add "HKLM\SYSTEM\CurrentControlSet\Control\DeviceGuard" /v "EnableVirtualizationBasedSecurity" /t REG_DWORD /d 1 /f
To enable VBS and require Secure boot only (value 1)
reg add "HKLM\SYSTEM\CurrentControlSet\Control\DeviceGuard" /v "RequirePlatformSecurityFeatures" /t REG_DWORD /d 1 /f
To enable VBS with Secure Boot and DMA (value 3)
reg add "HKLM\SYSTEM\CurrentControlSet\Control\DeviceGuard" /v "RequirePlatformSecurityFeatures" /t REG_DWORD /d 3 /f
To enable virtualization-based protection of Code Integrity policies (with the default, UEFI lock)
reg add "HKLM\SYSTEM\CurrentControlSet\Control\DeviceGuard" /v "HypervisorEnforcedCodeIntegrity" /t REG_DWORD /d 1 /f
To enable virtualization-based protection of Code Integrity policies without UEFI lock
reg add "HKLM\SYSTEM\CurrentControlSet\Control\DeviceGuard" /v "Unlocked" /t REG_DWORD /d 1 /f
Validate enabled Windows Defender Device Guard hardware-based security features
Windows 10, Windows 11, and Windows Server 2016 have a WMI class for related properties and features: Win32_DeviceGuard. This class can be queried from an elevated Windows PowerShell session by using the following command:
Get-CimInstance –ClassName Win32_DeviceGuard –Namespace root\Microsoft\Windows\DeviceGuard
Note
Mode Based Execution Control property will only be listed as available starting with Windows 10 version 1803 and Windows 11 version 21H2.
The output of this command provides details of the available hardware-based security features and those features that are currently enabled.
AvailableSecurityProperties
This field helps to enumerate and report state on the relevant security properties for Windows Defender Device Guard.
| Value | Description |
|---|---|
| 0. | If present, no relevant properties exist on the device. |
| 1. | If present, hypervisor support is available. |
| 2. | If present, Secure Boot is available. |
| 3. | If present, DMA protection is available. |
| 4. | If present, Secure Memory Overwrite is available. |
| 5. | If present, NX protections are available. |
| 6. | If present, SMM mitigations are available. |
| 7. | If present, MBEC/GMET is available. |
| 8. | If present, APIC virtualization is available. |
InstanceIdentifier
A string that is unique to a particular device. Valid values are determined by WMI.
RequiredSecurityProperties
This field describes the required security properties to enable virtualization-based security.
| Value | Description |
|---|---|
| 0. | Nothing is required. |
| 1. | If present, hypervisor support is needed. |
| 2. | If present, Secure Boot is needed. |
| 3. | If present, DMA protection is needed. |
| 4. | If present, Secure Memory Overwrite is needed. |
| 5. | If present, NX protections are needed. |
| 6. | If present, SMM mitigations are needed. |
| 7. | If present, MBEC/GMET is needed. |
SecurityServicesConfigured
This field indicates whether the Windows Defender Credential Guard or HVCI service has been configured.
| Value | Description |
|---|---|
| 0. | No services are configured. |
| 1. | If present, Windows Defender Credential Guard is configured. |
| 2. | If present, HVCI is configured. |
| 3. | If present, System Guard Secure Launch is configured. |
| 4. | If present, SMM Firmware Measurement is configured. |
SecurityServicesRunning
This field indicates whether the Windows Defender Credential Guard or HVCI service is running.
| Value | Description |
|---|---|
| 0. | No services running. |
| 1. | If present, Windows Defender Credential Guard is running. |
| 2. | If present, HVCI is running. |
| 3. | If present, System Guard Secure Launch is running. |
| 4. | If present, SMM Firmware Measurement is running. |
Version
This field lists the version of this WMI class. The only valid value now is 1.0.
VirtualizationBasedSecurityStatus
This field indicates whether VBS is enabled and running.
| Value | Description |
|---|---|
| 0. | VBS isn't enabled. |
| 1. | VBS is enabled but not running. |
| 2. | VBS is enabled and running. |
PSComputerName
This field lists the computer name. All valid values for computer name.
Another method to determine the available and enabled Windows Defender Device Guard features is to run msinfo32.exe from an elevated PowerShell session. When you run this program, the Windows Defender Device Guard properties are displayed at the bottom of the System Summary section.
:::image type="content" alt-text="Windows Defender Device Guard properties in the System Summary." source="../images/dg-fig11-dgproperties.png" lightbox="../images/dg-fig11-dgproperties.png":::
Troubleshooting
A. If a device driver fails to load or crashes at runtime, you may be able to update the driver using Device Manager.
B. If you experience software or device malfunction after using the above procedure to turn on HVCI, but you're able to sign in to Windows, you can turn off HVCI by renaming or deleting the SIPolicy.p7b file from <OS Volume>\Windows\System32\CodeIntegrity\ and then restart your device.
C. If you experience a critical error during boot or your system is unstable after using the above procedure to turn on HVCI, you can recover using the Windows Recovery Environment (Windows RE). To boot to Windows RE, see Windows RE Technical Reference. After logging in to Windows RE, you can turn off HVCI by renaming or deleting the SIPolicy.p7b file from <OS Volume>\Windows\System32\CodeIntegrity\ and then restart your device.
How to turn off HVCI
-
Run the following command from an elevated prompt to set the HVCI registry key to off:
reg add "HKLM\SYSTEM\CurrentControlSet\Control\DeviceGuard\Scenarios\HypervisorEnforcedCodeIntegrity" /v "Enabled" /t REG_DWORD /d 0 /f -
Restart the device.
-
To confirm HVCI has been successfully disabled, open System Information and check Virtualization-based security Services Running, which should now have no value displayed.
HVCI deployment in virtual machines
HVCI can protect a Hyper-V virtual machine, just as it would a physical machine. The steps to enable Windows Defender Application Control are the same from within the virtual machine.
WDAC protects against malware running in the guest virtual machine. It doesn't provide extra protection from the host administrator. From the host, you can disable WDAC for a virtual machine:
Set-VMSecurity -VMName <VMName> -VirtualizationBasedSecurityOptOut $true
Requirements for running HVCI in Hyper-V virtual machines
- The Hyper-V host must run at least Windows Server 2016 or Windows 10 version 1607.
- The Hyper-V virtual machine must be Generation 2, and running at least Windows Server 2016 or Windows 10.
- HVCI and nested virtualization can be enabled at the same time. To enable the Hyper-V role on the virtual machine, you must first install the Hyper-V role in a Windows nested virtualization environment.
- Virtual Fibre Channel adapters aren't compatible with HVCI. Before attaching a virtual Fibre Channel Adapter to a virtual machine, you must first opt out of virtualization-based security using
Set-VMSecurity. - The AllowFullSCSICommandSet option for pass-through disks isn't compatible with HVCI. Before configuring a pass-through disk with AllowFullSCSICommandSet, you must first opt out of virtualization-based security using
Set-VMSecurity.