4.1 KiB
title, description, keywords, ms.prod, ms.mktglfcycl, ms.sitesec, author
| title | description | keywords | ms.prod | ms.mktglfcycl | ms.sitesec | author | |||
|---|---|---|---|---|---|---|---|---|---|
| Set up Take a Test on multiple PCs | Learn how to set up and use the Take a Test app on multiple PCs. |
|
W10 | plan | library | jdeckerMS |
Set up Take a Test on multiple PCs
Applies to:
- Windows 10 Insider Preview
[Some information relates to pre-released product which may be substantially modified before it's commercially released. Microsoft makes no warranties, express or implied, with respect to the information provided here. ]
Many schools use online testing for formative and summative assessments. It's critical that students use a secure browser that prevents them from using other computer or Internet resources during the test. The Take a Test app in Windows 10, Version 1607, creates the right environment for taking a test:
- A Microsoft Edge browser window opens, showing just the test and nothing else.
- Students aren’t able to go to other websites.
- Students can’t open or access other apps.
- Students can't share, print, or record their screens.
- Students can’t copy or paste.
- Students can’t change settings, extend their display, see notifications, get updates, or use autofill features.
- Cortana is turned off.
Tip! To exit Take a Test, press Ctrl+Alt+Delete.
Take a Test is included in Windows 10 Education. To add Take a Test to other editions of Windows 10, see Add the Take a Test app to Windows 10
How you use Take a Test
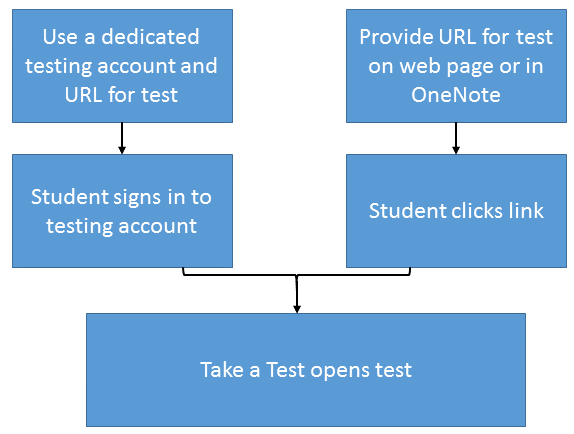
- Use a test URL and a dedicated testing account - A user logs into the account and the Take a Test app automatically launches the pre-configured assessment URL in Microsoft Edge in a single-app, kiosk mode. A student will never have access to the desktop in this configuration. We recommend this configuration for high stakes testing.
- Put a test URL with an included prefix on a web page or OneNote for students to click - This allows teachers and test administrators an easier way to deploy assessments. We recommend this method for lower stakes assessments.
Set up a dedicated test account
- To configure a dedicated test account on a single PC, use Settings.
- To configure a dedicated test account on multiple PCs, you can use:
- Mobile device management (MDM) or Microsoft System Center Configuration Manager
- A provisioning package created in Windows Imaging and Configuration Designer (ICD)
- Group Policy to deploy a scheduled task that runs a Powershell script
Set up a test account on a single PC
-
Sign into the device with an administrator account.
-
Go to Settings > Accounts > Work or school access (final name needs to be updated, still TBD) > Set up an account for taking tests.
-
Select an account to use as the dedicated testing account.
Note
: If you don't have an account on the device, you can create a new account. To do this, go to Settings > Accounts > Other Users > Add someone else to this PC > I don’t have this person’s sign-in information > Add a user without a Microsoft account.
-
Specify an assessment URL. For
-
Click Save.
-
To take the test, log into the selected account.
Set up test account in MDM or Configuration Manager
Set up test account in a provisioning package
Set up test account in Group Policy
Create a Powershell script
Create a scheduled task in Group Policy
Provide link to test
Add the Take a Test app to Windows 10
Add Take a Test on a single PC
Deploy Take a Test to multiple PCs
Assessment URLs
This assessment URL utses our lockdown API:
- SBAC/AIR: http://mobile.tds.airast.org/launchpad/.