7.7 KiB
title, ms.reviewer, description, keywords, search.product, ms.prod, ms.mktglfcycl, ms.sitesec, ms.pagetype, ms.author, author, ms.localizationpriority, manager, audience, ms.collection, ms.topic
| title | ms.reviewer | description | keywords | search.product | ms.prod | ms.mktglfcycl | ms.sitesec | ms.pagetype | ms.author | author | ms.localizationpriority | manager | audience | ms.collection | ms.topic |
|---|---|---|---|---|---|---|---|---|---|---|---|---|---|---|---|
| Use Microsoft Defender Advanced Threat Protection APIs | Use the exposed data and actions using a set of programmatic APIs that are part of the Microsoft Intelligence Security Graph. | apis, graph api, supported apis, actor, alerts, machine, user, domain, ip, file, advanced hunting, query | eADQiWindows 10XVcnh | w10 | deploy | library | security | macapara | mjcaparas | medium | dansimp | ITPro | M365-security-compliance | article |
Use Microsoft Defender ATP APIs
Applies to: Microsoft Defender Advanced Threat Protection (Microsoft Defender ATP)
- Want to experience Microsoft Defender ATP? Sign up for a free trial.
This page describes how to create an application to get programmatic access to Microsoft Defender ATP on behalf of a user.
If you need programmatic access Microsoft Defender ATP without a user, refer to Access Microsoft Defender ATP with application context.
If you are not sure which access you need, read the Introduction page.
Microsoft Defender ATP exposes much of its data and actions through a set of programmatic APIs. Those APIs will enable you to automate work flows and innovate based on Microsoft Defender ATP capabilities. The API access requires OAuth2.0 authentication. For more information, see OAuth 2.0 Authorization Code Flow.
In general, you’ll need to take the following steps to use the APIs:
- Create an AAD application
- Get an access token using this application
- Use the token to access Microsoft Defender ATP API
This page explains how to create an AAD application, get an access token to Microsoft Defender ATP and validate the token.
Note
When accessing Microsoft Defender ATP API on behalf of a user, you will need the correct Application permission and user permission. If you are not familiar with user permissions on Microsoft Defender ATP, see Manage portal access using role-based access control.
Tip
If you have the permission to perform an action in the portal, you have the permission to perform the action in the API.
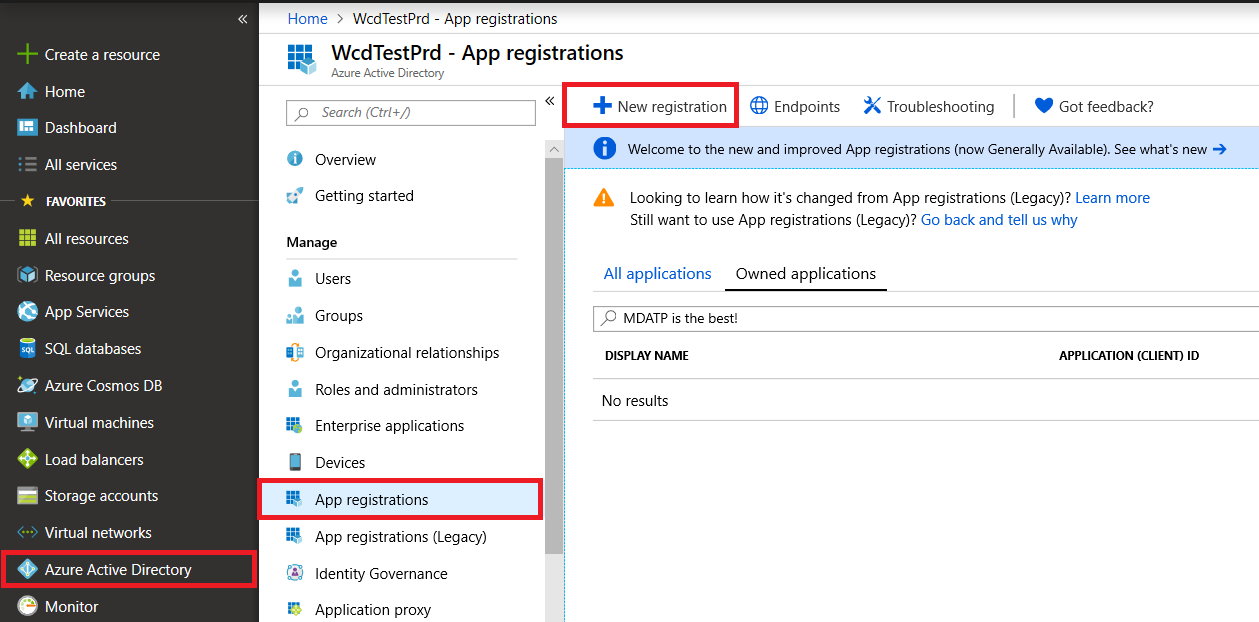
Create an app
-
Log on to Azure with user that has Global Administrator role.
-
Navigate to Azure Active Directory > App registrations > New registration.
-
In the registration from, enter the following information then click Register.
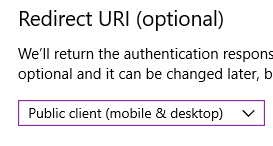
- Name: -Your application name-
- Application type: Public client
-
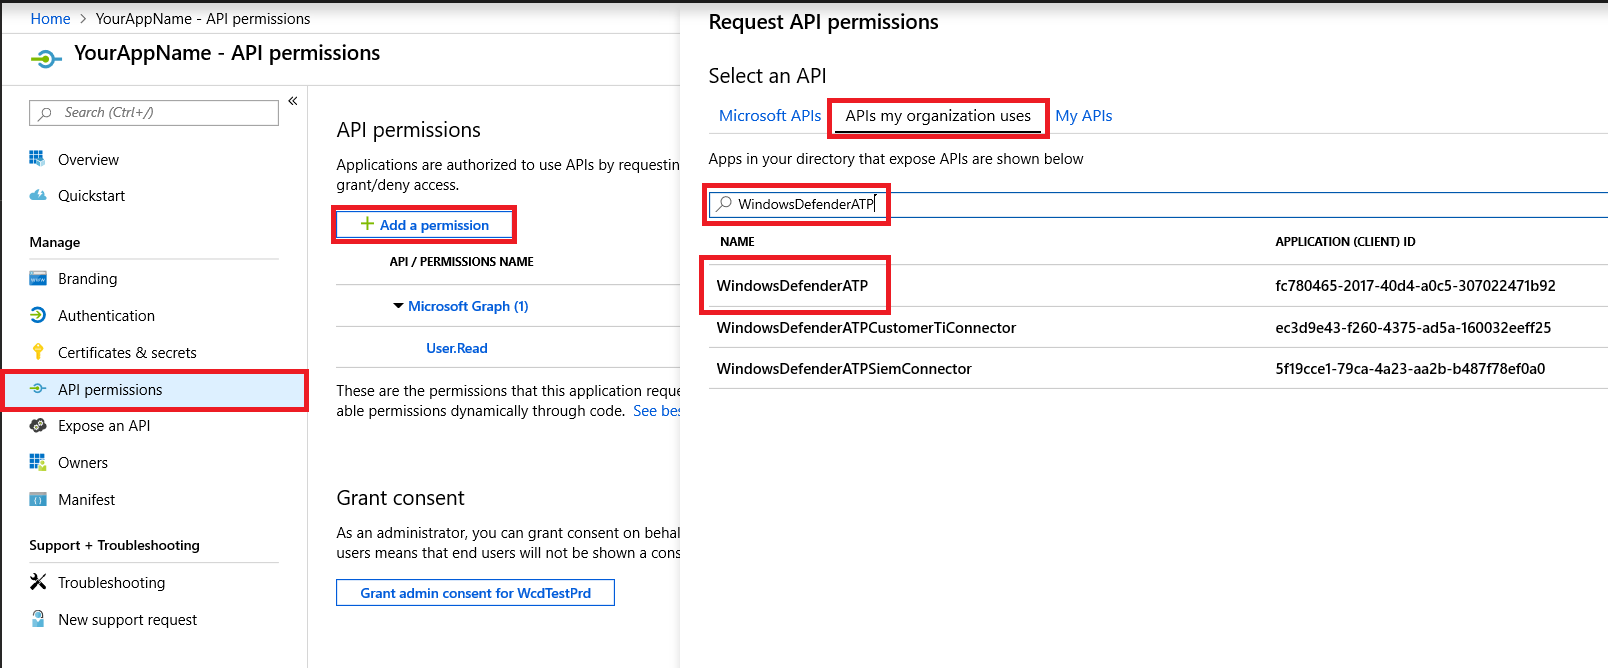
Allow your Application to access Microsoft Defender ATP and assign it 'Read alerts' permission:
-
On your application page, click API Permissions > Add permission > APIs my organization uses > type WindowsDefenderATP and click on WindowsDefenderATP.
-
Note: WindowsDefenderATP does not appear in the original list. You need to start writing its name in the text box to see it appear.
-
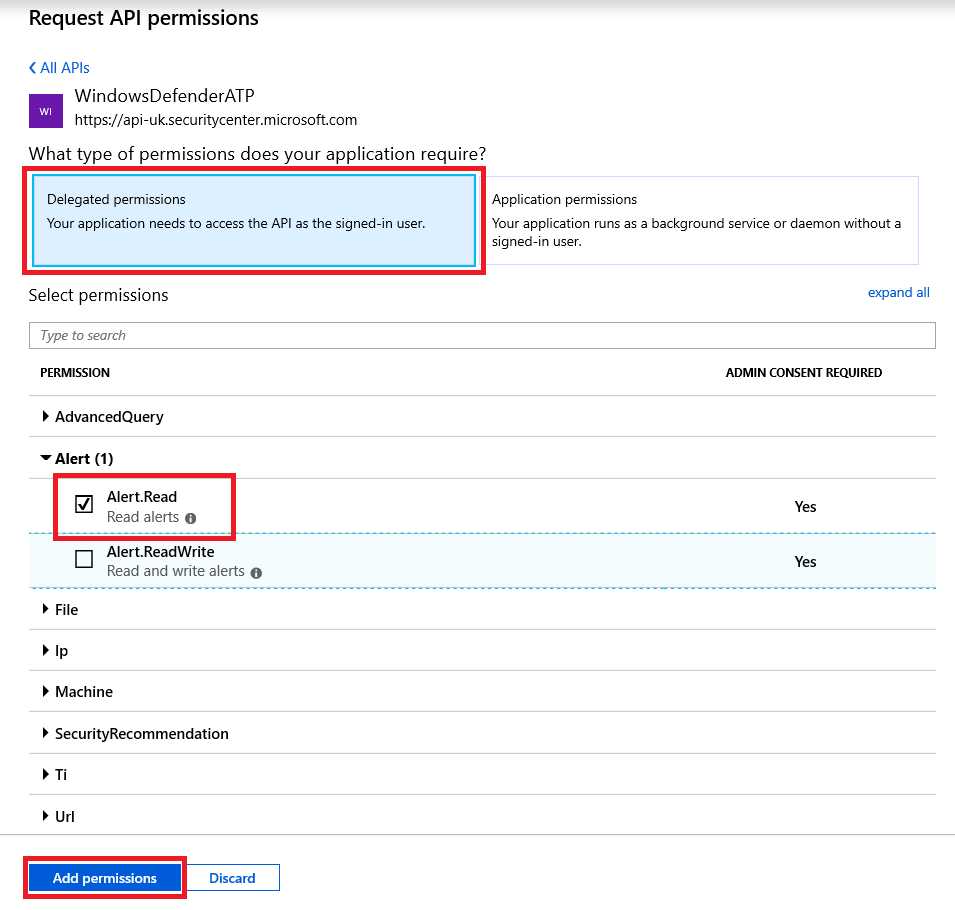
Choose Delegated permissions > Alert.Read > Click on Add permissions
-
Important note: You need to select the relevant permissions. 'Read alerts' is only an example!
For instance,
- To run advanced queries, select 'Run advanced queries' permission
- To isolate a machine, select 'Isolate machine' permission
- To determine which permission you need, please look at the Permissions section in the API you are interested to call.
-
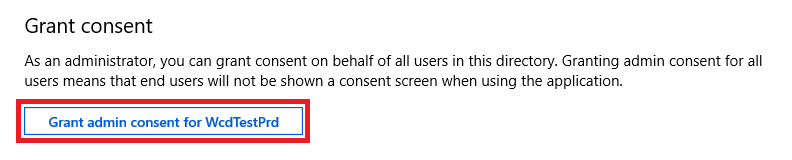
Click Grant consent
Note: Every time you add permission you must click on Grant consent for the new permission to take effect.
-
-
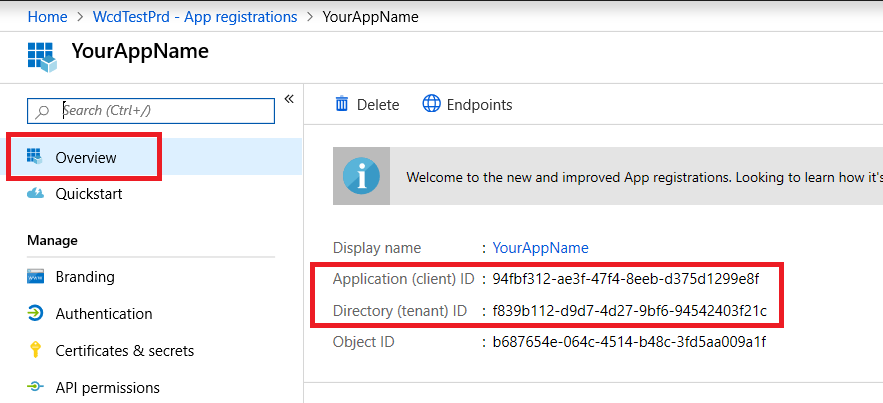
Write down your application ID and your tenant ID:
- On your application page, go to Overview and copy the following:
Get an access token
For more details on AAD token, refer to AAD tutorial
Using C#
-
Copy/Paste the below class in your application.
-
Use AcquireUserTokenAsync method with the your application ID, tenant ID, user name and password to acquire a token.
namespace WindowsDefenderATP
{
    using System.Net.Http;
    using System.Text;
    using System.Threading.Tasks;
    using Newtonsoft.Json.Linq;

    public static class WindowsDefenderATPUtils
    {
        private const string Authority = "https://login.windows.net";

        private const string WdatpResourceId = "https://api.securitycenter.windows.com";

        public static async Task<string> AcquireUserTokenAsync(string username, string password, string appId, string tenantId)
        {
            using (var httpClient = new HttpClient())
            {
                var urlEncodedBody = $"resource={WdatpResourceId}&client_id={appId}&grant_type=password&username={username}&password={password}";

                var stringContent = new StringContent(urlEncodedBody, Encoding.UTF8, "application/x-www-form-urlencoded");

                using (var response = await httpClient.PostAsync($"{Authority}/{tenantId}/oauth2/token", stringContent).ConfigureAwait(false))
                {
                    response.EnsureSuccessStatusCode();

                    var json = await response.Content.ReadAsStringAsync().ConfigureAwait(false);

                    var jObject = JObject.Parse(json);

                    return jObject["access_token"].Value<string>();
                }
            }
        }
    }
}
Validate the token
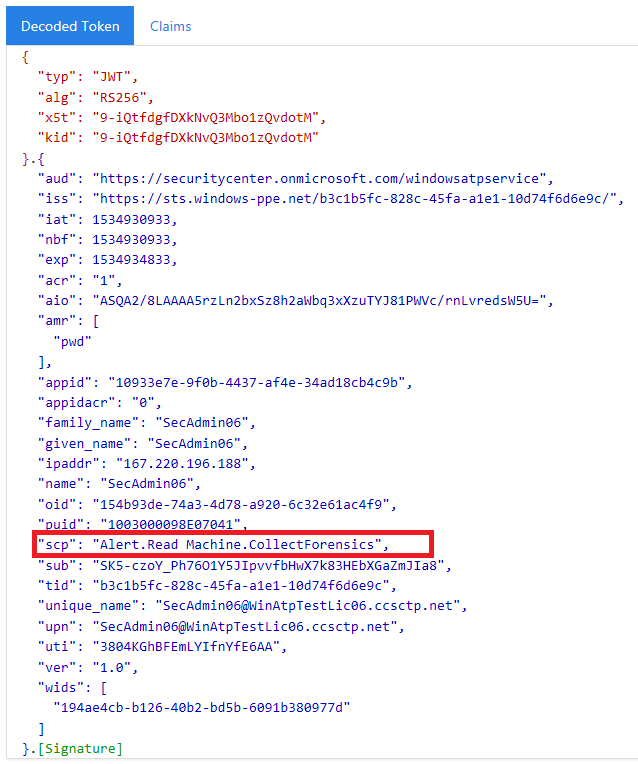
Sanity check to make sure you got a correct token:
- Copy/paste into JWT the token you got in the previous step in order to decode it
- Validate you get a 'scp' claim with the desired app permissions
- In the screen shot below you can see a decoded token acquired from the app in the tutorial:
Use the token to access Microsoft Defender ATP API
-
Choose the API you want to use - Supported Microsoft Defender ATP APIs
-
Set the Authorization header in the HTTP request you send to "Bearer {token}" (Bearer is the Authorization scheme)
-
The Expiration time of the token is 1 hour (you can send more then one request with the same token)
-
Example of sending a request to get a list of alerts using C#
var httpClient = new HttpClient();

var request = new HttpRequestMessage(HttpMethod.Get, "https://api.securitycenter.windows.com/api/alerts");

request.Headers.Authorization = new AuthenticationHeaderValue("Bearer", token);

var response = httpClient.SendAsync(request).GetAwaiter().GetResult();

// Do something useful with the response