29 KiB
title, description, ms.assetid, keywords, ms.prod, ms.mktglfcycl, ms.sitesec, author, ms.author, ms.topic, ms.localizationpriority, ms.date
| title | description | ms.assetid | keywords | ms.prod | ms.mktglfcycl | ms.sitesec | author | ms.author | ms.topic | ms.localizationpriority | ms.date | |||||
|---|---|---|---|---|---|---|---|---|---|---|---|---|---|---|---|---|
| Set up a kiosk or digital signage on Windows 10 Pro, Enterprise, or Education (Windows 10) | A single-use device such as a digital sign is easy to set up in Windows 10 for desktop editions (Pro, Enterprise, and Education). | 428680AE-A05F-43ED-BD59-088024D1BFCC |
|
w10 | manage | library | jdeckerms | jdecker | article | medium | 06/05/2018 |
Set up a kiosk or digital signage on Windows 10 Pro, Enterprise, or Education
Applies to
- Windows 10 Pro, Enterprise, and Education
Some desktop devices in an enterprise serve a special purpose, such as a PC in the lobby that customers can use to view your product catalog or a PC displaying visual content as a digital sign. A single-use, kiosk device is easy to set up in Windows 10. (For kiosks that run more than one more app, see Create a Windows 10 kiosk that runs multiple apps.)
Choose a method for configuring your kiosks and digitals signs
Which type of app will your kiosk run? Your kiosk can run a Universal Windows Platform (UWP) app or a Classic Windows desktop application. When the kiosk account signs in, the kiosk app will launch automatically. If the kiosk app is closed, it will automatically restart.
Tip
For digital signage, simply select a digital sign player as your kiosk app. You can also use the Kiosk Browser app (new in Windows 10, version 1803) and configure it to show your online content.
Which type of user account will be the kiosk account? The kiosk account can be a local standard user account, a local administrator account, a domain account, or an Azure Active Directory (Azure AD) account, depending on the method that you use to configure the kiosk.
Warning
For kiosks in public-facing environments with auto sign-in enabled, you should use a user account with least privilege, such as a local standard user account.
Assigned access can be configured via Windows Management Instrumentation (WMI) or configuration service provider (CSP) to run its applications under a domain user or service account, rather than a local account. However, use of domain user or service accounts introduces risks that an attacker subverting the assigned access application might gain access to sensitive domain resources that have been inadvertently left accessible to any domain account. We recommend that customers proceed with caution when using domain accounts with assigned access, and consider the domain resources potentially exposed by the decision to do so.
Which edition of Windows 10 will the kiosk run? All of the configuration methods work for Windows 10 Enterprise and Education; some of the methods work for Windows 10 Pro. Kiosk mode is not available on Windows 10 Home.
Methods for kiosks and digital signs running a UWP app
| Choose this method | For this edition | For this kiosk account type |
|---|---|---|
| Local settings (for 1 or a few devices) | Pro, Ent, Edu | Local standard user |
| PowerShell | Pro, Ent, Edu | Local standard user |
| Provisioning | Pro (version 1709), Ent, Edu | Local standard user, Active Directory |
| Intune or other mobile device management (MDM) | Pro (version 1709), Ent, Edu | Local standard user, Azure AD |
Methods for kiosks and digital signs running a Classic Windows app
| Choose this method | For this edition | For this kiosk account type |
|---|---|---|
| Provisioning | Ent, Edu | Local standard user, Active Directory |
| ShellLauncher | Ent, Edu | Local standard user or administrator, Active Directory, Azure AD |
Other settings to lock down
For a more secure kiosk experience, we recommend that you make the following configuration changes to the device before you configure it as a kiosk:
| Recommendation | How to |
|---|---|
| Replace "blue screen" with blank screen for OS errors | Add the following registry key as DWORD (32-bit) type with a value of 1:HKLM\SYSTEM\CurrentControlSet\Control\CrashControl\DisplayDisabledLearn how to modify the Windows registry You must restart the device after changing the registry. |
| Put device in Tablet mode. | If you want users to be able to use the touch (on screen) keyboard, go to Settings > System > Tablet mode and choose On. Do not turn on this setting if users will not interact with the kiosk, such as for a digital sign. |
| Hide Ease of access feature on the logon screen. | Go to Control Panel > Ease of Access > Ease of Access Center, and turn off all accessibility tools. |
| Disable the hardware power button. | Go to Power Options > Choose what the power button does, change the setting to Do nothing, and then Save changes. |
| Remove the power button from the sign-in screen. | Go to Computer Configuration > Windows Settings > Security Settings > Local Policies >Security Options > Shutdown: Allow system to be shut down without having to log on and select Disabled. |
| Disable the camera. | Go to Settings > Privacy > Camera, and turn off Let apps use my camera. |
| Turn off app notifications on the lock screen. | Go to Group Policy Editor > Computer Configuration > Administrative Templates\System\Logon\Turn off app notifications on the lock screen. |
| Disable removable media. | Go to Group Policy Editor > Computer Configuration > Administrative Templates\System\Device Installation\Device Installation Restrictions. Review the policy settings available in Device Installation Restrictions for the settings applicable to your situation. NOTE: To prevent this policy from affecting a member of the Administrators group, in Device Installation Restrictions, enable Allow administrators to override Device Installation Restriction policies. |
In addition to the settings in the table, you may want to set up automatic logon for your kiosk device. When your kiosk device restarts, whether from an update or power outage, you can log on the assigned access account manually or you can configure the device to log on to the assigned access account automatically. Make sure that Group Policy settings applied to the device do not prevent automatic logon.
How to edit the registry to have an account automatically logged on
-
Open Registry Editor (regedit.exe).
[!NOTE] If you are not familiar with Registry Editor, learn how to modify the Windows registry.
-
Go to
HKEY_LOCAL_MACHINE\SOFTWARE\Microsoft\WindowsNT\CurrentVersion\Winlogon
-
Set the values for the following keys.
-
AutoAdminLogon: set value as 1.
-
DefaultUserName: set value as the account that you want logged in.
-
DefaultPassword: set value as the password for the account.
Note
If DefaultUserName and DefaultPassword aren't there, add them as New > String Value.
- DefaultDomainName: set value for domain, only for domain accounts. For local accounts, do not add this key.
-
-
Close Registry Editor. The next time the computer restarts, the account will be logged on automatically.
## Set up a kiosk or digital sign in local SettingsTip
You can also configure automatic logon using the Autologon tool from Sysinternals.
App type: UWP
OS edition: Windows 10 Pro, Ent, Edu
Account type: Local standard user
You can use Settings to quickly configure one or a few devices as a kiosk. (Using Settings isn't practical for configuring a lot of devices, but it would work.) When you set up a kiosk (also known as assigned access) in Settings, you must select a local standard user account. Learn how to create a local standard user account.
When your kiosk is a local device that is not managed by Active Directory or Azure Active Directory, there is a default setting that enables automatic sign-in after a restart. That means that when the device restarts, the last signed-in user will be signed in automatically. If the last signed-in user is the kiosk account, the kiosk app will be launched automatically after the device restarts.
If you want the kiosk account signed in automatically and the kiosk app launched when the device restarts, there is nothing you need to do.
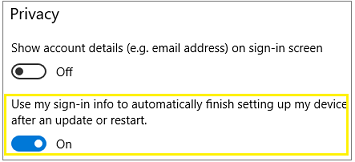
If you do not want the kiosk account signed in automatically when the device restarts, you must change the default setting before you configure the device as a kiosk. Sign in with the account that you will assign as the kiosk account, go to Settings > Accounts > Sign-in options, and toggle the Use my sign-in info to automatically finish setting up my device after an update or restart setting to Off. After you change the setting, you can apply the kiosk configuration to the device.
To set up assigned access in PC settings
-
Go to Start > Settings > Accounts > Other people.
-
Choose Set up assigned access.
-
Choose an account.
-
Choose an app. Only apps that can run above the lock screen will be available in the list of apps to choose from. For more information, see Guidelines for choosing an app for assigned access.
-
Close Settings – your choices are saved automatically, and will be applied the next time that user account logs on.
To remove assigned access, choose Turn off assigned access and sign out of the selected account.
## Set up a kiosk or digital sign using Windows PowerShellApp type: UWP
OS edition: Windows 10 Pro, Ent, Edu
Account type: Local standard user
You can use any of the following PowerShell cmdlets to set up assigned access on multiple devices.
To open PowerShell on Windows 10, search for PowerShell and find Windows PowerShell Desktop app in the results. Run PowerShell as administrator.
Set-AssignedAccess -AppUserModelId <AUMID> -UserName <username>
Set-AssignedAccess -AppUserModelId <AUMID> -UserSID <usersid>
Set-AssignedAccess -AppName <CustomApp> -UserName <username>
Set-AssignedAccess -AppName <CustomApp> -UserSID <usersid>
Note
To set up assigned access using
-AppName, the user account that you specify for assigned access must have logged on at least once.
Learn how to get the AppName (see Parameters).
To remove assigned access, using PowerShell, run the following cmdlet.
Clear-AssignedAccess
App type: UWP or Classic Windows
OS edition: Windows 10 Pro (version 1709) for UWP only; Ent, Edu for both app types
Account type: Local standard user, Active Directory
Important
When Exchange Active Sync (EAS) password restrictions are active on the device, the autologon feature does not work. This behavior is by design. For more informations, see How to turn on automatic logon in Windows.
When you use the Provision kiosk devices wizard in Windows Configuration Designer, you can configure the kiosk to run either a Universal Windows app or a Classic Windows application.
Install Windows Configuration Designer, then open Windows Configuration Designer and select Provision kiosk devices. After you name your project, and click Next, configure the settings as shown in the following table.
|  Enable device setup if you want to configure settings on this page. **If enabled:** Enter a name for the device. (Optional) Select a license file to upgrade Windows 10 to a different edition. [See the permitted upgrades.](https://technet.microsoft.com/itpro/windows/deploy/windows-10-edition-upgrades) Toggle **Configure devices for shared use** off. This setting optimizes Windows 10 for shared use scenarios and isn't necessary for a kiosk scenario. You can also select to remove pre-installed software from the device. |  |
|   Enable network setup if you want to configure settings on this page. **If enabled:** Toggle **On** or **Off** for wireless network connectivity. If you select **On**, enter the SSID, the network type (**Open** or **WPA2-Personal**), and (if **WPA2-Personal**) the password for the wireless network. |  |
|   Enable account management if you want to configure settings on this page. **If enabled:** You can enroll the device in Active Directory, enroll in Azure Active Directory, or create a local administrator account on the device To enroll the device in Active Directory, enter the credentials for a least-privileged user account to join the device to the domain. Before you use a Windows Configuration Designer wizard to configure bulk Azure AD enrollment, [set up Azure AD join in your organization](https://docs.microsoft.com/azure/active-directory/active-directory-azureadjoin-setup). The **maximum number of devices per user** setting in your Azure AD tenant determines how many times the bulk token that you get in the wizard can be used. To enroll the device in Azure AD, select that option and enter a friendly name for the bulk token you will get using the wizard. Set an expiration date for the token (maximum is 30 days from the date you get the token). Click **Get bulk token**. In the **Let's get you signed in** window, enter an account that has permissions to join a device to Azure AD, and then the password. Click **Accept** to give Windows Configuration Designer the necessary permissions. **Warning:** You must run Windows Configuration Designer on Windows 10 to configure Azure Active Directory enrollment using any of the wizards. To create a local administrator account, select that option and enter a user name and password. **Important:** If you create a local account in the provisioning package, you must change the password using the **Settings** app every 42 days. If the password is not changed during that period, the account might be locked out and unable to sign in. |  |
|   You can provision the kiosk app in the **Add applications** step. You can install multiple applications, both Classic Windows (Win32) apps and Universal Windows Platform (UWP) apps, in a provisioning package. The settings in this step vary according to the application that you select. For help with the settings, see [Provision PCs with apps](provisioning-packages/provision-pcs-with-apps.md) **Warning:** If you click the plus button to add an application, you must specify an application for the provisioning package to validate. If you click the plus button in error, select any executable file in **Installer Path**, and then a **Cancel** button becomes available, allowing you to complete the provisioning package without an application. |  |
|   To provision the device with a certificate for the kiosk app, click **Add a certificate**. Enter a name for the certificate, and then browse to and select the certificate to be used. |  |
|   You can create a local standard user account that will be used to run the kiosk app. If you toggle **No**, make sure that you have an existing user account to run the kiosk app. If you want to create an account, enter the user name and password, and then toggle **Yes** or **No** to automatically sign in the account when the device starts. In **Configure the kiosk mode app**, enter the name of the user account that will run the kiosk mode app. Select the type of app to run in kiosk mode, and then enter the path or filename (for a Classic Windows app) or the AUMID (for a Universal Windows app). For a Classic Windows app, you can use the filename if the path to the file is in the PATH environment variable, otherwise the full path is required. |  |
|   On this step, select your options for tablet mode, the user experience on the Welcome and shutdown screens, and the timeout settings. |  |
|  You can set a password to protect your provisioning package. You must enter this password when you apply the provisioning package to a device. |  |
Note
If you want to use the advanced editor in Windows Configuration Designer, specify the user account and app (by AUMID) in Runtime settings > AssignedAccess > AssignedAccessSettings
Tip
You can also use an XML file to configure both multi-app and single-app kiosks.
Important
When you build a provisioning package, you may include sensitive information in the project files and in the provisioning package (.ppkg) file. Although you have the option to encrypt the .ppkg file, project files are not encrypted. You should store the project files in a secure location and delete the project files when they are no longer needed.
Learn how to apply a provisioning package.
Set up a kiosk or digital sign in Intune or other MDM service
App type: UWP
OS edition: Windows 10 Pro (version 1709), Ent, Edu
Account type: Local standard user, Azure AD
Microsoft Intune and other MDM services enable kiosk configuration through the AssignedAccess configuration service provider (CSP). Assigned Access has a KioskModeApp setting. In the KioskModeApp setting, you enter the user account name and AUMID for the app to run in kiosk mode.
The following steps explain how to configure a kiosk in Microsoft Intune. For other MDM services, see the documentation for your provider.
To configure kiosk in Microsoft Intune
- In the Microsoft Azure portal, search for Intune or go to More services > Intune.
- Select Device configuration.
- Select Profiles.
- Select Create profile.
- Enter a friendly name for the profile.
- Select Windows 10 and later for the platform.
- Select Kiosk (Preview) for the profile type.
- Enter a friendly name for the kiosk configuration.
- Select Kiosk - 1 setting available.
- Select Add to add a kiosk configuration.
- Enter a friendly name for the kiosk configuration, and then in Kiosk Mode, select Single full-screen app kiosk.
- Select either Select a managed app to choose a kiosk app that is managed by Intune, or Enter UWP app AUMID to specify the kiosk app by AUMID, and then select the app or enter the AUMID as appropriate.
- For the user account, select either Autologon to create a user account for the kiosk that will sign in automatically, or Local user account to configure an existing user account to run the kiosk. Local user account can be a local standard user account on the device or an Azure Active Directory account.
- Select OK, and then select Create.
- Assign the profile to a device group to configure the devices in that group as kiosks.
App type: Classic Windows
OS edition: Windows 10 Ent, Edu
Account type: Local standard user or administrator, Active Directory, Azure AD
Using Shell Launcher, you can configure a kiosk device that runs a Classic Windows application as the user interface. The application that you specify replaces the default shell (explorer.exe) that usually runs when a user logs on.
Note
In Windows 10, version 1803, you can configure Shell Launcher using the ShellLauncher node of the Assigned Access CSP.
You can also configure a kiosk device that runs a Classic Windows application by using the Provision kiosk devices wizard.
Warning
- Windows 10 doesn’t support setting a custom shell prior to OOBE. If you do, you won’t be able to deploy the resulting image.
- Shell Launcher doesn't support a custom shell with an application that launches a different process and exits. For example, you cannot specify write.exe in Shell Launcher. Shell Launcher launches a custom shell and monitors the process to identify when the custom shell exits. Write.exe creates a 32-bit wordpad.exe process and exits. Because Shell Launcher is not aware of the newly created wordpad.exe process, Shell Launcher will take action based on the exit code of Write.exe, such as restarting the custom shell.
Requirements
-
A domain or local user account.
-
A Classic Windows application that is installed for that account. The app can be your own company application or a common app like Internet Explorer.
See the technical reference for the shell launcher component.
Configure Shell Launcher
To set a Classic Windows application as the shell, you first turn on the Shell Launcher feature, and then you can set your custom shell as the default using PowerShell.
To turn on Shell Launcher in Windows features
-
Go to Control Panel > Programs and features > Turn Windows features on or off.
-
Expand Device Lockdown.
-
Select Shell Launcher and OK.
Alternatively, you can turn on Shell Launcher using Windows Configuration Designer in a provisioning package, using SMISettings > ShellLauncher, or the Deployment Image Servicing and Management (DISM.exe) tool.
To turn on Shell Launcher using DISM
-
Open a command prompt as an administrator.
-
Enter the following command.
Dism /online /Enable-Feature /all /FeatureName:Client-EmbeddedShellLauncher
To set your custom shell
Modify the following PowerShell script as appropriate. The comments in the sample script explain the purpose of each section and tell you where you will want to change the script for your purposes. Save your script with the extension .ps1, open Windows PowerShell as administrator, and run the script on the kiosk device.
# Check if shell launcher license is enabled
function Check-ShellLauncherLicenseEnabled
{
    [string]$source = @"
using System;
using System.Runtime.InteropServices;

static class CheckShellLauncherLicense
{
    const int S_OK = 0;

    public static bool IsShellLauncherLicenseEnabled()
    {
        int enabled = 0;

        if (NativeMethods.SLGetWindowsInformationDWORD("EmbeddedFeature-ShellLauncher-Enabled", out enabled) != S_OK) {
            enabled = 0;
        }

        return (enabled != 0);
    }

    static class NativeMethods
    {
        [DllImport("Slc.dll")]
        internal static extern int SLGetWindowsInformationDWORD([MarshalAs(UnmanagedType.LPWStr)]string valueName, out int value);
    }

}
"@

    $type = Add-Type -TypeDefinition $source -PassThru

    return $type[0]::IsShellLauncherLicenseEnabled()
}

[bool]$result = $false

$result = Check-ShellLauncherLicenseEnabled
"`nShell Launcher license enabled is set to " + $result
if (-not($result))
{
    "`nThis device doesn't have required license to use Shell Launcher"
    exit
}

$COMPUTER = "localhost"
$NAMESPACE = "root\standardcimv2\embedded"

# Create a handle to the class instance so we can call the static methods.
try {
    $ShellLauncherClass = [wmiclass]"\\$COMPUTER\${NAMESPACE}:WESL_UserSetting"
    } catch [Exception] {
    write-host $_.Exception.Message;
    write-host "Make sure Shell Launcher feature is enabled"
    exit
    }


# This well-known security identifier (SID) corresponds to the BUILTIN\Administrators group.

$Admins_SID = "S-1-5-32-544"

# Create a function to retrieve the SID for a user account on a machine.

function Get-UsernameSID($AccountName) {

    $NTUserObject = New-Object System.Security.Principal.NTAccount($AccountName)
    $NTUserSID = $NTUserObject.Translate([System.Security.Principal.SecurityIdentifier])

    return $NTUserSID.Value

}

# Get the SID for a user account named "Cashier". Rename "Cashier" to an existing account on your system to test this script.

$Cashier_SID = Get-UsernameSID("Cashier")

# Define actions to take when the shell program exits.

$restart_shell = 0
$restart_device = 1
$shutdown_device = 2

# Examples. You can change these examples to use the program that you want to use as the shell.

# This example sets the command prompt as the default shell, and restarts the device if the command prompt is closed.

$ShellLauncherClass.SetDefaultShell("cmd.exe", $restart_device)

# Display the default shell to verify that it was added correctly.

$DefaultShellObject = $ShellLauncherClass.GetDefaultShell()

"`nDefault Shell is set to " + $DefaultShellObject.Shell + " and the default action is set to " + $DefaultShellObject.defaultaction

# Set Internet Explorer as the shell for "Cashier", and restart the machine if Internet Explorer is closed.

$ShellLauncherClass.SetCustomShell($Cashier_SID, "c:\program files\internet explorer\iexplore.exe www.microsoft.com", ($null), ($null), $restart_shell)

# Set Explorer as the shell for administrators.

$ShellLauncherClass.SetCustomShell($Admins_SID, "explorer.exe")

# View all the custom shells defined.

"`nCurrent settings for custom shells:"
Get-WmiObject -namespace $NAMESPACE -computer $COMPUTER -class WESL_UserSetting | Select Sid, Shell, DefaultAction

# Enable Shell Launcher

$ShellLauncherClass.SetEnabled($TRUE)

$IsShellLauncherEnabled = $ShellLauncherClass.IsEnabled()

"`nEnabled is set to " + $IsShellLauncherEnabled.Enabled

# Remove the new custom shells.

$ShellLauncherClass.RemoveCustomShell($Admins_SID)

$ShellLauncherClass.RemoveCustomShell($Cashier_SID)

# Disable Shell Launcher

$ShellLauncherClass.SetEnabled($FALSE)

$IsShellLauncherEnabled = $ShellLauncherClass.IsEnabled()

"`nEnabled is set to " + $IsShellLauncherEnabled.Enabled
Sign out of assigned access
To exit the assigned access (kiosk) app, press Ctrl + Alt + Del, and then sign in using another account. When you press Ctrl + Alt + Del to sign out of assigned access, the kiosk app will exit automatically. If you sign in again as the assigned access account or wait for the login screen timeout, the kiosk app will be re-launched. The assigned access user will remain signed in until an admin account opens Task Manager > Users and signs out the user account.
If you press Ctrl + Alt + Del and do not sign in to another account, after a set time, assigned access will resume. The default time is 30 seconds, but you can change that in the following registry key:
HKEY_LOCAL_MACHINE\SOFTWARE\Microsoft\Windows\CurrentVersion\Authentication\LogonUI
To change the default time for assigned access to resume, add IdleTimeOut (DWORD) and enter the value data as milliseconds in hexadecimal.