55 KiB
title, description, ms.date, appliesto, ms.topic
| title | description | ms.date | appliesto | ms.topic | |
|---|---|---|---|---|---|
| Use Certificates to enable SSO for Azure AD join devices | If you want to use certificates for on-premises single-sign on for Azure Active Directory-joined devices, then follow these additional steps. | 08/19/2018 |
|
article |
Using Certificates for AADJ On-premises Single-sign On
[!INCLUDE hello-hybrid-key-trust]
If you plan to use certificates for on-premises single-sign on, then follow these additional steps to configure the environment to enroll Windows Hello for Business certificates for Azure AD-joined devices.
Important
Ensure you have performed the configurations in Azure AD-joined devices for On-premises Single-Sign On before you continue.
Steps you'll perform include:
- Prepare Azure AD Connect
- Prepare the Network Device Enrollment Services Service Account
- Prepare Active Directory Certificate Services
- Install the Network Device Enrollment Services Role
- Configure Network Device Enrollment Services to work with Microsoft Intune
- Download, Install and Configure the Intune Certificate Connector
- Create and Assign a Simple Certificate Enrollment Protocol (SCEP) Certificate Profile
Requirements
You need to install and configure additional infrastructure to provide Azure AD-joined devices with on-premises single-sign on.
- An existing Windows Server 2012 R2 or later Enterprise Certificate Authority
- A Windows Server 2012 R2 domain joined server that hosts the Network Device Enrollment Services role
High Availability
The Network Device Enrollment Services (NDES) server role acts as a certificate registration authority. Certificate registration servers enroll certificates on behalf of the user. Users request certificates from the NDES service rather than directly from the issuing certificate authority.
The architecture of the NDES server prevents it from being clustered or load balanced for high availability. To provide high availability, you need to install more than one identically configured NDES servers, and use Microsoft Intune to load balance then (in round-robin fashion).
The Network Device Enrollment Service (NDES) server role can issue up to three unique certificate templates. The server role accomplishes this by mapping the purpose of the certificate request to a configured certificate template. The certificate request purpose has three options:
- Signature
- Encryption
- Signature and Encryption
If you need to deploy more than three types of certificates to the Azure AD joined device, you need additional NDES servers. Alternatively, consider consolidating certificate templates to reduce the number of certificate templates.
Network Requirements
All communication occurs securely over port 443.
Prepare Azure AD Connect
Successful authentication to on-premises resources using a certificate requires the certificate to provide a hint about the on-premises domain. The hint can be the user's Active Directory distinguished name as the subject of the certificate, or the hint can be the user's user principal name where the suffix matches the Active Directory domain name.
Most environments change the user principal name suffix to match the organization's external domain name (or vanity domain), which prevents the user principal name as a hint to locate a domain controller. Therefore, the certificate needs the user's on-premises distinguished name in the subject to properly locate a domain controller.
To include the on-premises distinguished name in the certificate's subject, Azure AD Connect must replicate the Active Directory distinguishedName attribute to the Azure Active Directory onPremisesDistinguishedName attribute. Azure AD Connect version 1.1.819 includes the proper synchronization rules needed for these attributes.
Verify Azure Active Directory Connect version
Sign-in to computer running Azure AD Connect with access equivalent to local administrator.
-
Open Synchronization Services from the Azure AD Connect folder.
-
In the Synchronization Service Manager, select Help and then select About.
-
If the version number isn't 1.1.819 or later, then upgrade Azure AD Connect to the latest version.
Verify the onPremisesDistinguishedName attribute is synchronized
The easiest way to verify that the onPremisesDistingushedNamne attribute is synchronized is to use the Graph Explorer for Microsoft Graph.
-
Open a web browser and navigate to Graph Explorer.
-
Select Sign in to Graph Explorer and provide Azure credentials.
Note
To successfully query the Graph API, adequate permissions must be granted.
-
Select Modify permissions (Preview). Scroll down and locate User.Read.All (or any other required permission) and select Consent. You'll now be prompted for delegated permissions consent.
-
In the Graph Explorer URL, enter
https://graph.microsoft.com/v1.0/users/[userid]?$select=displayName,userPrincipalName,onPremisesDistinguishedName, where [userid] is the user principal name of a user in Azure Active Directory. Select Run query.
Note
Because the v1.0 endpoint of the Graph API only provides a limited set of parameters, we will use the $select Optional OData query parameter. For convenience, it is possible to switch the API version selector from v1.0 to beta before performing the query. This will provide all available user information, but remember, beta endpoint queries should not be used in production scenarios.
Request
GET https://graph.microsoft.com/v1.0/users/{id | userPrincipalName}?$select=displayName,userPrincipalName,onPremisesDistinguishedName
- In the returned results, review the JSON data for the onPremisesDistinguishedName attribute. Ensure the attribute has a value and that the value is accurate for the given user. If the onPremisesDistinguishedName attribute isn't synchronized the value will be null.
Response
HTTP/1.1 200 OK
Content-type: application/json

{
    "@odata.context": "https://graph.microsoft.com/v1.0/$metadata#users(displayName,userPrincipalName,onPremisesDistinguishedName)/$entity",
    "displayName": "Nestor Wilke",
    "userPrincipalName": "NestorW@contoso.com",
    "onPremisesDistinguishedName" : "CN=Nestor Wilke,OU=Operations,DC=contoso,DC=com"
}
Prepare the Network Device Enrollment Services (NDES) Service Account
Create the NDES Servers global security group
The deployment uses the NDES Servers security group to assign the NDES service the proper user right assignments.
Sign-in to a domain controller or management workstation with access equivalent to domain administrator.
-
Open Active Directory Users and Computers.
-
Expand the domain node from the navigation pane.
-
Right-click the Users container. Hover over New and select Group.
-
Type NDES Servers in the Group Name text box.
-
Select OK.
Add the NDES server to the NDES Servers global security group
Sign-in to a domain controller or management workstation with access equivalent to domain administrator.
-
Open Active Directory Users and Computers.
-
Expand the domain node from the navigation pane.
-
Select Computers from the navigation pane. Right-click the name of the NDES server that will host the NDES server role. Select Add to a group.
-
Type NDES Servers in Enter the object names to select. Select OK. Select OK on the Active Directory Domain Services success dialog.
Note
For high-availability, you should have more than one NDES server to service Windows Hello for Business certificate requests. You should add additional Windows Hello for Business NDES servers to this group to ensure they receive the proper configuration.
Create the NDES Service Account
The Network Device Enrollment Services (NDES) role runs under a service account. Typically, it's preferential to run services using a Group Managed Service Account (GMSA). While the NDES role can be configured to run using a GMSA, the Intune Certificate Connector wasn't designed nor tested using a GMSA and is considered an unsupported configuration. The deployment uses a normal services account.
Sign-in to a domain controller or management workstation with access equivalent to domain administrator.
-
In the navigation pane, expand the node that has your domain name. Select Users.
-
Right-click the Users container. Hover over New and then select User. Type NDESSvc in Full Name and User logon name. Select Next.
-
Type a secure password in Password. Confirm the secure password in Confirm Password. Clear User must change password at next logon. Select Next.
-
Select Finish.
Important
Configuring the service's account password to Password never expires may be more convenient, but it presents a security risk. Normal service account passwords should expire in accordance with the organizations user password expiration policy. Create a reminder to change the service account's password two weeks before it will expire. Share the reminder with others that are allowed to change the password to ensure the password is changed before it expires.
Create the NDES Service User Rights Group Policy object
The Group Policy object ensures the NDES Service account has the proper user right to assign all the NDES servers in the NDES Servers group. As you add new NDES servers to your environment and this group, the service account automatically receives the proper user rights through the Group Policy.
Sign-in a domain controller or management workstations with Domain Admin equivalent credentials.
-
Start the Group Policy Management Console (gpmc.msc)
-
Expand the domain and select the Group Policy Object node in the navigation pane.
-
Right-click Group Policy object and select New.
-
Type NDES Service Rights in the name box and select OK.
-
In the content pane, right-click the NDES Service Rights Group Policy object and select Edit.
-
In the navigation pane, expand Policies under Computer Configuration.
-
Expand Windows Settings > Security Settings > Local Policies. Select User Rights Assignments.
-
In the content pane, double-click Allow log on locally. Select Define these policy settings and select OK. Select Add User or Group.... In the Add User or Group dialog box, select Browse. In the Select Users, Computers, Service Accounts, or Groups dialog box, type Administrators;Backup Operators;DOMAINNAME\NDESSvc;Users where DOMAINNAME is the NetBios name of the domain (Example CONTOSO\NDESSvc) in User and group names. Select OK twice.
-
In the content pane, double-click Log on as a batch job. Select Define these policy settings and select OK. Select Add User or Group.... In the Add User or Group dialog box, select Browse. In the Select Users, Computers, Service Accounts, or Groups dialog box, type Administrators;Backup Operators;DOMAINNAME\NDESSvc;Performance Log Users where DOMAINNAME is the NetBios name of the domain (Example CONTOSO\NDESSvc) in User and group names. Select OK twice.
-
In the content pane, double-click Log on as a service. Select Define these policy settings and select OK. Select Add User or Group.... In the Add User or Group dialog box, select Browse. In the Select Users, Computers, Service Accounts, or Groups dialog box, type NT SERVICE\ALL SERVICES;DOMAINNAME\NDESSvc where DOMAINNAME is the NetBios name of the domain (Example CONTOSO\NDESSvc) in User and group names. Select OK three times.
-
Close the Group Policy Management Editor.
Configure security for the NDES Service User Rights Group Policy object
The best way to deploy the NDES Service User Rights Group Policy object is to use security group filtering. This enables you to easily manage the computers that receive the Group Policy settings by adding them to a group.
Sign-in to a domain controller or management workstation with access equivalent to domain administrator.
-
Start the Group Policy Management Console (gpmc.msc)
-
Expand the domain and select the Group Policy Object node in the navigation pane.
-
Double-click the NDES Service User Rights Group Policy object.
-
In the Security Filtering section of the content pane, select Add. Type NDES Servers or the name of the security group you previously created and select OK.
-
Select the Delegation tab. Select Authenticated Users and select Advanced.
-
In the Group or User names list, select Authenticated Users. In the Permissions for Authenticated Users list, clear the Allow check box for the Apply Group Policy permission. Select OK.
Deploy the NDES Service User Rights Group Policy object
The application of the NDES Service User Rights Group Policy object uses security group filtering. This enables you to link the Group Policy object at the domain, ensuring the Group Policy object is within scope to all computers. However, the security group filtering ensures only computers included in the NDES Servers global security group receive and apply the Group Policy object, which results in providing the NDESSvc service account with the proper user rights.
Sign-in to a domain controller or management workstation with access equivalent to domain administrator.
-
Start the Group Policy Management Console (gpmc.msc)
-
In the navigation pane, expand the domain and right-click the node that has your Active Directory domain name and select Link an existing GPO
-
In the Select GPO dialog box, select NDES Service User Rights or the name of the Group Policy object you previously created and select OK.
Important
Linking the NDES Service User Rights Group Policy object to the domain ensures the Group Policy object is in scope for all computers. However, not all computers will have the policy settings applied to them. Only computers that are members of the NDES Servers global security group receive the policy settings. All others computers ignore the Group Policy object.
Prepare Active Directory Certificate Authority
You must prepare the public key infrastructure and the issuing certificate authority to support issuing certificates using Microsoft Intune and the Network Devices Enrollment Services (NDES) server role. In this task, you'll
- Configure the certificate authority to let Intune provide validity periods
- Create an NDES-Intune Authentication Certificate template
- Create an Azure AD joined Windows Hello for Business authentication certificate template
- Publish certificate templates
Configure the certificate authority to let Intune provide validity periods
When deploying certificates using Microsoft Intune, you have the option of providing the validity period in the SCEP certificate profile rather than relying on the validity period in the certificate template. If you need to issue the same certificate with different validity periods, it may be advantageous to use the SCEP profile, given the limited number of certificates a single NDES server can issue.
Note
Skip this step if you do not want to enable Microsoft Intune to specify the validity period of the certificate. Without this configuration, the certificate request uses the validity period configured in the certificate template.
Sign-in to the issuing certificate authority with access equivalent to local administrator.
-
Open an elevated command prompt and type the following command:
certutil -setreg Policy\EditFlags +EDITF_ATTRIBUTEENDDATE -
Restart the Active Directory Certificate Services service.
Create an NDES-Intune authentication certificate template
NDES uses a server authentication certificate to authenticate the server endpoint, which encrypts the communication between it and the connecting client. The Intune Certificate Connector uses a client authentication certificate template to authenticate to the certificate registration point.
Sign-in to the issuing certificate authority or management workstations with Domain Admin equivalent credentials.
-
Open the Certificate Authority management console.
-
Right-click Certificate Templates and select Manage.
-
In the Certificate Template Console, right-click the Computer template in the details pane and select Duplicate Template.
-
On the General tab, type NDES-Intune Authentication in Template display name. Adjust the validity and renewal period to meet your enterprise's needs.
Note
If you use different template names, you'll need to remember and substitute these names in different portions of the lab.
-
On the Subject tab, select Supply in the request.
-
On the Cryptography tab, validate the Minimum key size is 2048.
-
On the Security tab, select Add.
-
Select Object Types, then in the window that appears, choose Computers and select OK.
-
Type NDES server in the Enter the object names to select text box and select OK.
-
Select NDES server from the Group or users names list. In the Permissions for section, select the Allow check box for the Enroll permission. Clear the Allow check box for the Enroll and Autoenroll permissions for all other items in the Group or users names list if the check boxes aren't already cleared. Select OK.
-
Select on the Apply to save changes and close the console.
Create an Azure AD joined Windows Hello for Business authentication certificate template
During Windows Hello for Business provisioning, Windows requests an authentication certificate from Microsoft Intune, which requests the authentication certificate on behalf of the user. This task configures the Windows Hello for Business authentication certificate template. You use the name of the certificate template when configuring the NDES Server.
Sign in a certificate authority or management workstations with Domain Admin equivalent credentials.
-
Open the Certificate Authority management console.
-
Right-click Certificate Templates and select Manage.
-
Right-click the Smartcard Logon template and choose Duplicate Template.
-
On the Compatibility tab, clear the Show resulting changes check box. Select Windows Server 2012 or Windows Server 2012 R2 from the Certification Authority list. Select Windows Server 2012 or Windows Server 2012 R2 from the Certification Recipient list.
-
On the General tab, type AADJ WHFB Authentication in Template display name. Adjust the validity and renewal period to meet your enterprise's needs.
Note
If you use different template names, you'll need to remember and substitute these names in different portions of the deployment.
-
On the Cryptography tab, select Key Storage Provider from the Provider Category list. Select RSA from the Algorithm name list. Type 2048 in the Minimum key size text box. Select SHA256 from the Request hash list.
-
On the Extensions tab, verify the Application Policies extension includes Smart Card Logon.
-
On the Subject tab, select Supply in the request.
-
On the Request Handling tab, select Signature and encryption from the Purpose list. Select the Renew with same key check box. Select Enroll subject without requiring any user input.
-
On the Security tab, select Add. Type NDESSvc in the Enter the object names to select text box and select OK.
-
Select NDESSvc from the Group or users names list. In the Permissions for NDES Servers section, select the Allow check box for Read and Enroll. Clear the Allow check box for the Enroll and Autoenroll permissions for all other entries in the Group or users names section if the check boxes aren't already cleared. Select OK.
-
Close the console.
Publish certificate templates
The certificate authority may only issue certificates for certificate templates that are published to that certificate authority. If you have more than one certificate authority and you want that certificate authority to issue certificates based on a specific certificate template, then you must publish the certificate template to all certificate authorities that are expected to issue the certificate.
Important
Ensure you publish the AADJ WHFB Authentication certificate templates to the certificate authority that Microsoft Intune uses by way of the NDES servers. The NDES configuration asks you to choose a certificate authority from which it requests certificates. You need to publish that certificate templates to that issuing certificate authority. The NDES-Intune Authentication certificate is directly enrolled and can be published to any certificate authority.
Sign in to the certificate authority or management workstations with an enterprise admin -equivalent credential.
-
Open the Certificate Authority management console.
-
Expand the parent node from the navigation pane.
-
Select Certificate Templates in the navigation pane.
-
Right-click the Certificate Templates node. Select New, and select Certificate Template to issue.
-
In the Enable Certificates Templates window, select the NDES-Intune Authentication and AADJ WHFB Authentication templates you created in the previous steps. Select OK to publish the selected certificate templates to the certificate authority.
-
Close the console.
Install and Configure the NDES Role
This section includes the following articles:
- Install the Network Device Enrollment Service Role
- Configure the NDES service account
- Configure the NDES role and Certificate Templates
- Create a Web Application Proxy for the Internal NDES URL.
- Enroll for an NDES-Intune Authentication Certificate
- Configure the Web Server Certificate for NDES
- Verify the configuration
Install the Network Device Enrollment Services Role
Install the Network Device Enrollment Service role on a computer other than the issuing certificate authority.
Sign-in to the certificate authority or management workstations with an Enterprise Admin equivalent credential.
-
Open Server Manager on the NDES server.
-
Select Manage. Select Add Roles and Features.
-
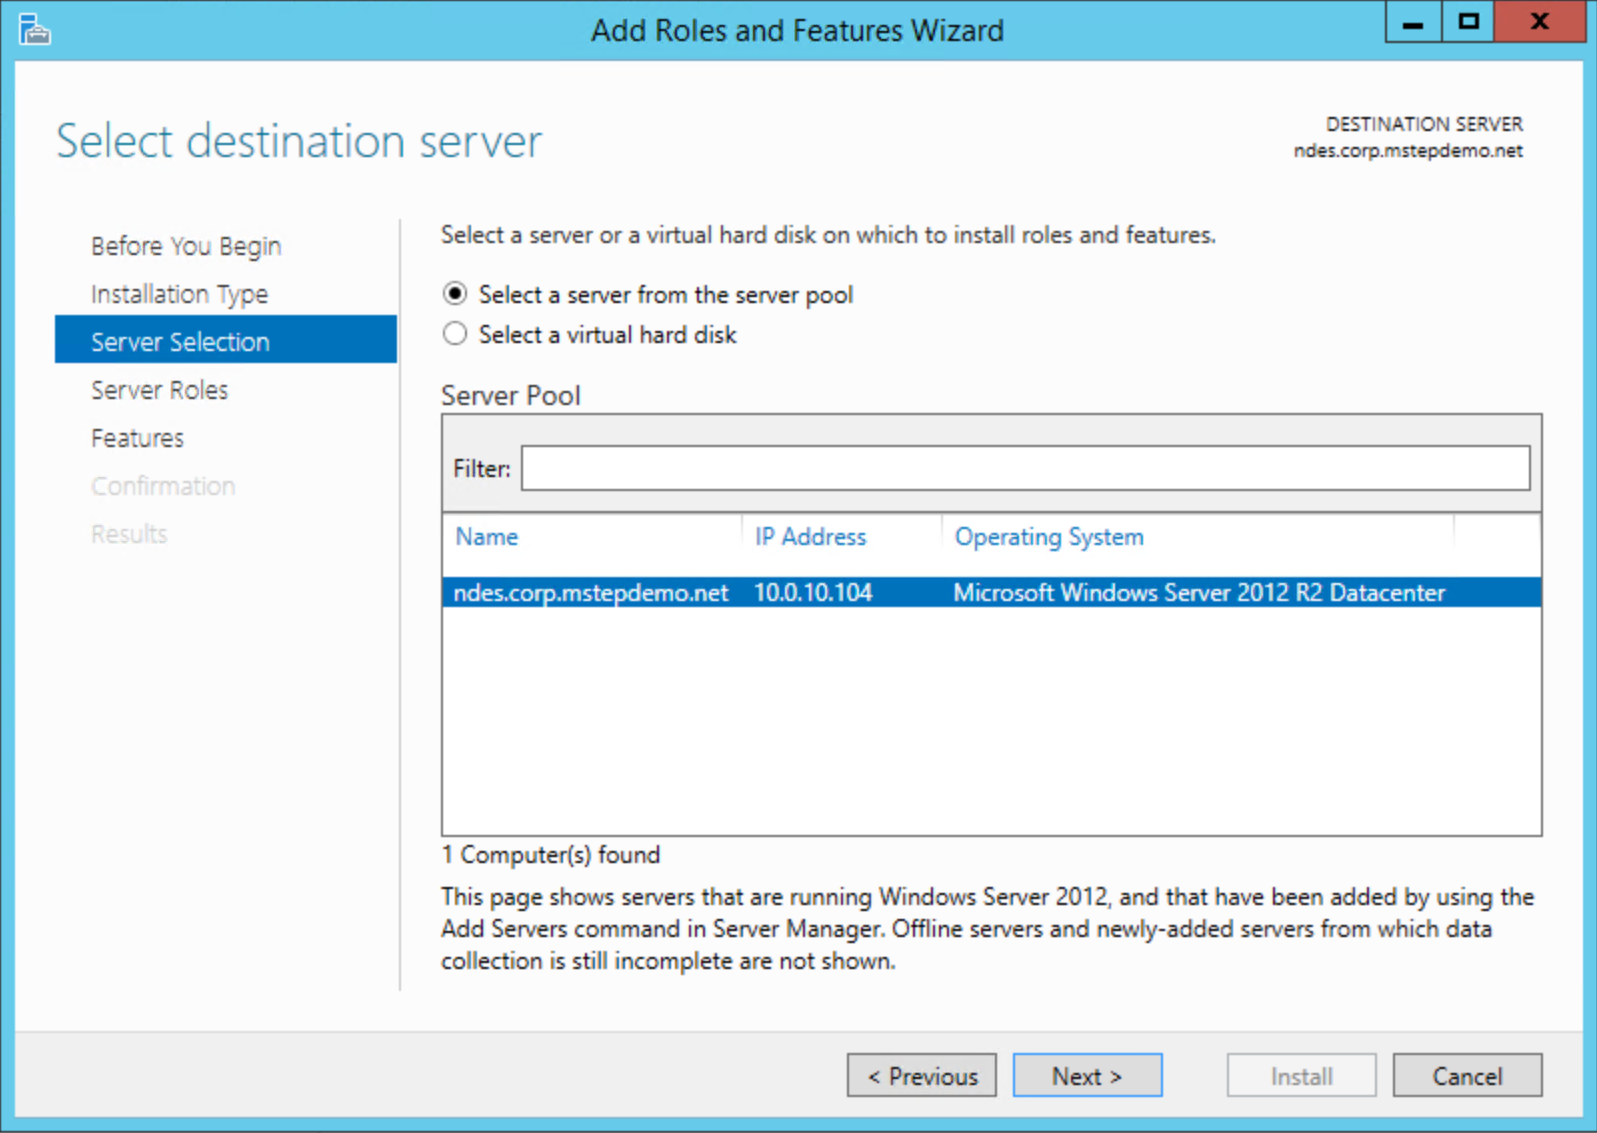
In the Add Roles and Features Wizard, on the Before you begin page, select Next. Select Role-based or feature-based installation on the Select installation type page. Select Next. Select Select a server from the server pool. Select the local server from the Server Pool list. Select Next.
-
On the Select server roles page, select Active Directory Certificate Services from the Roles list.
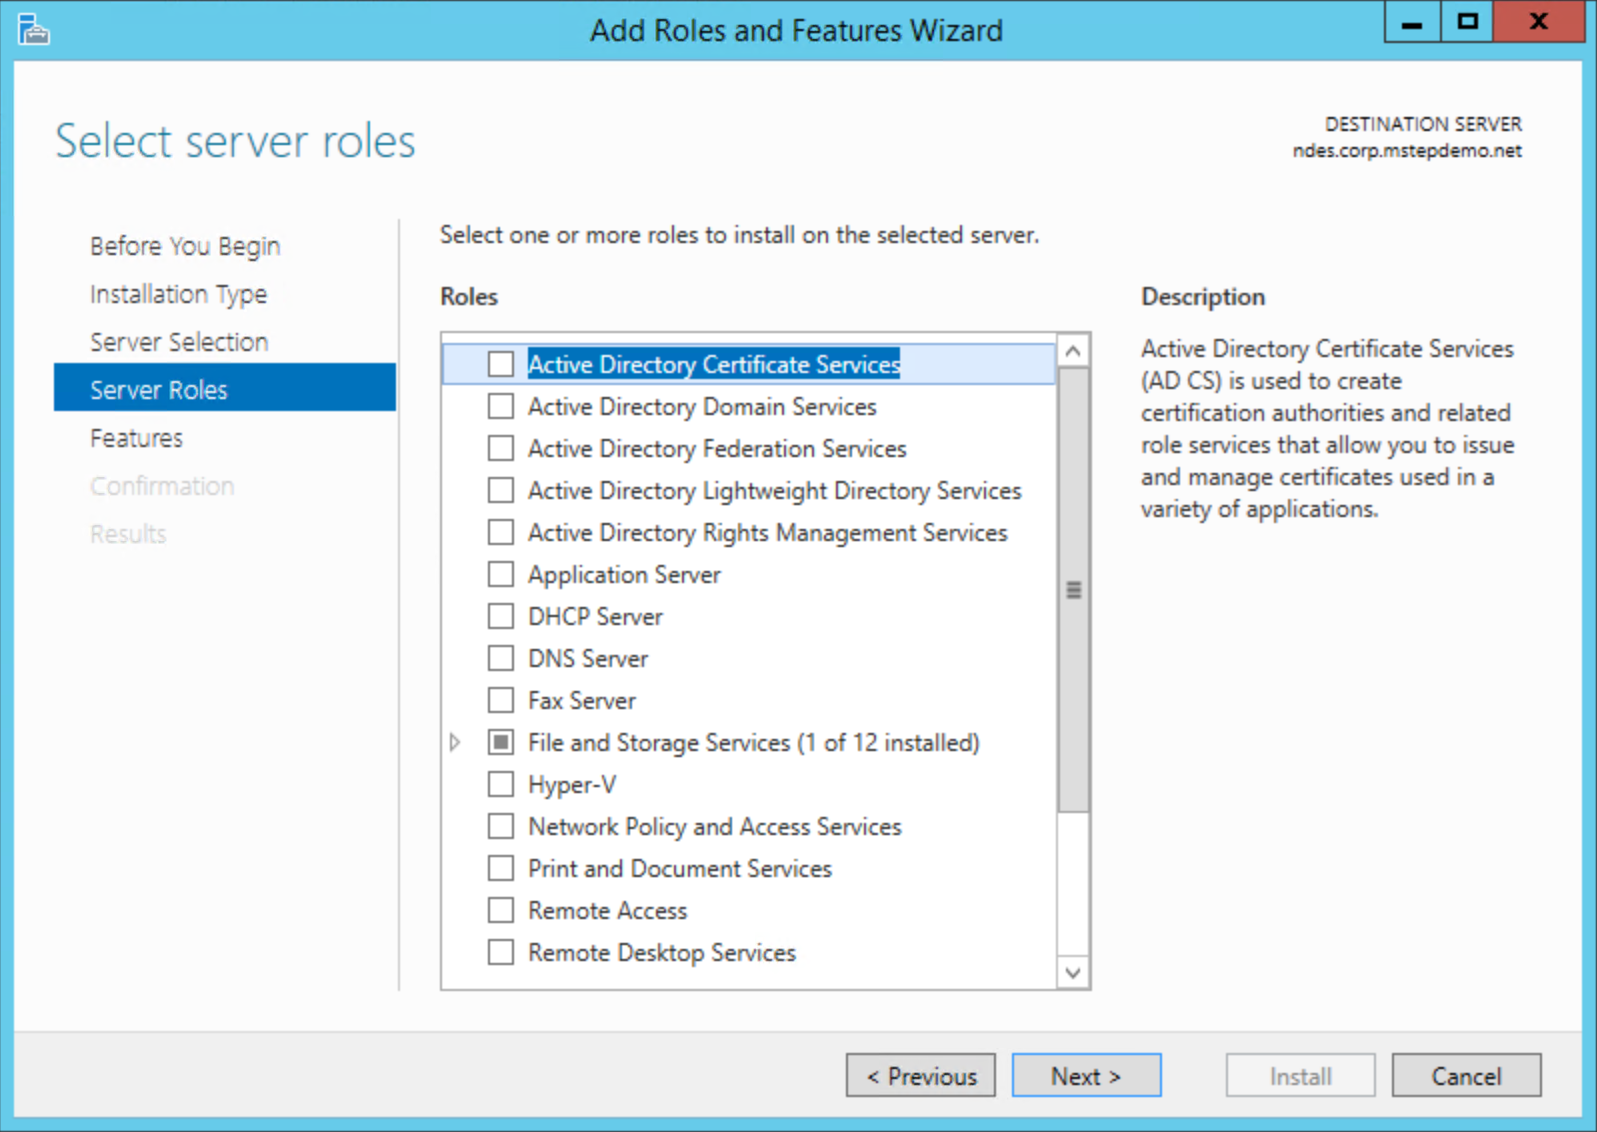
Select Add Features on the Add Roles and Feature Wizard dialog box. Select Next.

-
On the Features page, expand .NET Framework 3.5 Features. Select HTTP Activation. Select Add Features on the Add Roles and Feature Wizard dialog box. Expand .NET Framework 4.5 Features. Expand WCF Services. Select HTTP Activation. Select Add Features on the Add Roles and Feature Wizard dialog box. Select Next.

-
On the Select role services page, clear the Certificate Authority check box. Select the Network Device Enrollment Service. Select Add Features on the Add Roles and Features Wizard dialog box. Select Next.

-
Select Next on the Web Server Role (IIS) page.
-
On the Select role services page for the Web Serve role, Select the following additional services if they aren't already selected and then select Next.
- Web Server > Security > Request Filtering
- Web Server > Application Development > ASP.NET 3.5.
- Web Server > Application Development > ASP.NET 4.5. .
- Management Tools > IIS 6 Management Compatibility > IIS 6 Metabase Compatibility
- Management Tools > IIS 6 Management Compatibility > IIS 6 WMI Compatibility

-
Select Install. When the installation completes, continue with the next procedure. Do not click Close.
Important
.NET Framework 3.5 is not included in the typical installation. If the server is connected to the Internet, the installation attempts to get the files using Windows Update. If the server is not connected to the Internet, you need to Specify an alternate source path such as <driveLetter>:\Sources\SxS\

Configure the NDES service account
This task adds the NDES service account to the local IIS_USRS group. The task also configures the NDES service account for Kerberos authentication and delegation
Add the NDES service account to the IIS_USRS group
Sign-in the NDES server with access equivalent to local administrator.
-
Start the Local Users and Groups management console (
lusrmgr.msc). -
Select Groups from the navigation pane. Double-click the IIS_IUSRS group.
-
In the IIS_IUSRS Properties dialog box, select Add. Type NDESSvc or the name of your NDES service account. Select Check Names to verify the name and then select OK. Select OK to close the properties dialog box.
-
Close the management console.
Register a Service Principal Name on the NDES Service account
Sign-in the NDES server with access equivalent to Domain Admins.
-
Open an elevated command prompt.
-
Type the following command to register the service principal name
setspn -s http/[FqdnOfNdesServer] [DomainName\\NdesServiceAccount]where [FqdnOfNdesServer] is the fully qualified domain name of the NDES server and [DomainName\NdesServiceAccount] is the domain name and NDES service account name separated by a backslash (\). An example of the command looks like the following:
setspn -s http/ndes.corp.contoso.com contoso\ndessvc
Note
If you use the same service account for multiple NDES Servers, repeat the following task for each NDES server under which the NDES service runs.

Configure the NDES Service account for delegation
The NDES service enrolls certificates on behalf of users. Therefore, you want to limit the actions it can perform on behalf of the user. You do this through delegation.
Sign-in a domain controller with a minimum access equivalent to Domain Admins.
-
Open Active Directory Users and Computers
-
Locate the NDES Service account (NDESSvc). Right-click and select Properties. Select the Delegation tab.

-
Select Trust this user for delegation to specified services only.
-
Select Use any authentication protocol.
-
Select Add.
-
Select Users or Computers... Type the name of the NDES Server you use to issue Windows Hello for Business authentication certificates to Azure AD-joined devices. From the Available services list, select HOST. Select OK.

-
Repeat steps 5 and 6 for each NDES server using this service account. Select Add.
-
Select Users or computers... Type the name of the issuing certificate authority this NDES service account uses to issue Windows Hello for Business authentication certificates to Azure AD-joined devices. From the Available services list, select dcom. Hold the CTRL key and select HOST. Select OK.
-
Repeat steps 8 and 9 for each issuing certificate authority from which one or more NDES servers request certificates.

-
Select OK. Close Active Directory Users and Computers.
Configure the NDES Role and Certificate Templates
This task configures the NDES role and the certificate templates the NDES server issues.
Configure the NDES Role
Sign-in to the certificate authority or management workstations with an Enterprise Admin equivalent credential.
Note
If you closed Server Manger from the last set of tasks, start Server Manager and click the action flag that shows a yellow exclamation point.

-
Select the Configure Active Directory Certificate Services on the destination server link.
-
On the Credentials page, select Next.

-
On the Role Services page, select Network Device Enrollment Service and then select Next

-
On the Service Account for NDES page, select Specify service account (recommended). Select Select.... Type the user name and password for the NDES service account in the Windows Security dialog box. Select Next.

-
On the CA for NDES page, select CA name. Select Select.... Select the issuing certificate authority from which the NDES server requests certificates. Select Next.

-
On the RA Information, select Next.
-
On the Cryptography for NDES page, select Next.
-
Review the Confirmation page. Select Configure.

-
Select Close after the configuration completes.
Configure Certificate Templates on NDES
A single NDES server can request a maximum of three certificate templates. The NDES server determines which certificate to issue based on the incoming certificate request that is assigned in the Microsoft Intune SCEP certificate profile. The Microsoft Intune SCEP certificate profile has three values.
- Digital Signature
- Key Encipherment
- Key Encipherment, Digital Signature
Each value maps to a registry value name in the NDES server. The NDES server translates an incoming SCEP provided value into the corresponding certificate template. The table below shows the SCEP profile values of the NDES certificate template registry value names.
| SCEP Profile Key usage | NDES Registry Value Name |
|---|---|
| Digital Signature | SignatureTemplate |
| Key Encipherment | EncryptionTemplate |
| Key Encipherment Digital Signature |
GeneralPurposeTemplate |
Ideally, you should match the certificate request with the registry value name to keep the configuration intuitive (encryption certificates use the encryption template, signature certificates use the signature template, etc.). A result of this intuitive design is the potential exponential growth in the NDES server. Imagine an organization that needs to issue nine unique signature certificates across their enterprise.
If the need arises, you can configure a signature certificate in the encryption registry value name or an encryption certificate in the signature registry value to maximize the use of your NDES infrastructure. This unintuitive design requires current and accurate documentation of the configuration to ensure the SCEP certificate profile is configured to enroll the correct certificate, regardless of the actual purpose. Each organization needs to balance ease of configuration and administration with additional NDES infrastructure and the management overhead that comes with it.
Sign-in to the NDES Server with local administrator equivalent credentials.
-
Open an elevated command prompt.
-
Using the table above, decide which registry value name you'll use to request Windows Hello for Business authentication certificates for Azure AD-joined devices.
-
Type the following command:
reg add HKLM\Software\Microsoft\Cryptography\MSCEP /v [registryValueName] /t REG_SZ /d [certificateTemplateName]where registryValueName is one of the three value names from the above table and where certificateTemplateName is the name of the certificate template you created for Windows Hello for Business Azure AD-joined devices. Example:
reg add HKLM\Software\Microsoft\Cryptography\MSCEP /v SignatureTemplate /t REG_SZ /d AADJWHFBAuthentication -
Type Y when the command asks for permission to overwrite the existing value.
-
Close the command prompt.
Important
Use the name of the certificate template; not the display name. The certificate template name does not include spaces. You can view the certificate names by looking at the General tab of the certificate template's properties in the Certificates Templates management console (
certtmpl.msc).
Create a Web Application Proxy for the internal NDES URL.
Certificate enrollment for Azure AD-joined devices occurs over the Internet. As a result, the internal NDES URLs must be accessible externally. You can do this easily and securely using Azure Active Directory Application Proxy. Azure AD Application Proxy provides single sign-on and secure remote access for web applications hosted on-premises, such as Network Device Enrollment Services.
Ideally, you configure your Microsoft Intune SCEP certificate profile to use multiple external NDES URLs. This enables Microsoft Intune to round-robin load balance the certificate requests to identically configured NDES Servers (each NDES server can accommodate approximately 300 concurrent requests). Microsoft Intune sends these requests to Azure AD Application Proxies.
Azure AD Application proxies are serviced by lightweight Application Proxy Connector agents. See What is Application Proxy for more details. These agents are installed on your on-premises, domain joined devices and make authenticated secure outbound connection to Azure, waiting to process requests from Azure AD Application Proxies. You can create connector groups in Azure Active Directory to assign specific connectors to service specific applications.
Connector group automatically round-robin, load balance the Azure AD Application proxy requests to the connectors within the assigned connector group. This ensures Windows Hello for Business certificate requests have multiple dedicated Azure AD Application Proxy connectors exclusively available to satisfy enrollment requests. Load balancing the NDES servers and connectors should ensure users enroll their Windows Hello for Business certificates in a timely manner.
Download and Install the Application Proxy Connector Agent
Sign-in a workstation with access equivalent to a domain user.
-
Sign-in to the Azure portal with access equivalent to Global Administrator.
-
Select All Services. Type Azure Active Directory to filter the list of services. Under SERVICES, select Azure Active Directory.
-
Under MANAGE, select Application proxy.
-
Select Download connector service. Select Accept terms & Download. Save the file (AADApplicationProxyConnectorInstaller.exe) in a location accessible by others on the domain.

-
Sign-in the computer that will run the connector with access equivalent to a domain user.
Important
Install a minimum of two Azure Active Directory Proxy connectors for each NDES Application Proxy. Strategically locate Azure AD application proxy connectors throughout your organization to ensure maximum availability. Remember, devices running the connector must be able to communicate with Azure and the on-premises NDES servers.
-
Start AADApplicationProxyConnectorInstaller.exe.
-
Read the license terms and then select I agree to the license terms and conditions. Select Install.

-
Sign-in to Microsoft Azure with access equivalent to Global Administrator.

-
When the installation completes. Read the information regarding outbound proxy servers. Select Close.

-
Repeat steps 5 - 10 for each device that will run the Azure AD Application Proxy connector for Windows Hello for Business certificate deployments.
Create a Connector Group
Sign-in a workstation with access equivalent to a domain user.
-
Sign-in to the Azure portal with access equivalent to Global Administrator.
-
Select All Services. Type Azure Active Directory to filter the list of services. Under SERVICES, select Azure Active Directory.
-
Under MANAGE, select Application proxy.

-
Select New Connector Group. Under Name, type NDES WHFB Connectors.

-
Select each connector agent in the Connectors list that will service Windows Hello for Business certificate enrollment requests.
-
Select Save.
Create the Azure Application Proxy
Sign-in a workstation with access equivalent to a domain user.
-
Sign-in to the Azure portal with access equivalent to Global Administrator.
-
Select All Services. Type Azure Active Directory to filter the list of services. Under SERVICES, select Azure Active Directory.
-
Under MANAGE, select Application proxy.
-
Select Configure an app.
-
Under Basic Settings next to Name, type WHFB NDES 01. Choose a name that correlates this Azure AD Application Proxy setting with the on-premises NDES server. Each NDES server must have its own Azure AD Application Proxy as two NDES servers can't share the same internal URL.
-
Next to Internal URL, type the internal, fully qualified DNS name of the NDES server associated with this Azure AD Application Proxy. For example,
https://ndes.corp.mstepdemo.net. You need to match the primary host name (AD Computer Account name) of the NDES server, and prefix the URL with https. -
Under Internal URL, select https:// from the first list. In the text box next to https://, type the hostname you want to use as your external hostname for the Azure AD Application Proxy. In the list next to the hostname you typed, select a DNS suffix you want to use externally for the Azure AD Application Proxy. It's recommended to use the default, -[tenantName].msapproxy.net where [tenantName] is your current Azure Active Directory tenant name (-mstephendemo.msappproxy.net).

-
Select Passthrough from the Pre Authentication list.
-
Select NDES WHFB Connectors from the Connector Group list.
-
Under Additional Settings, select Default from Backend Application Timeout. Under the Translate URLs In section, select Yes next to Headers and select No next to Application Body.
-
Select Add.
-
Sign-out of the Azure portal.
Important
Write down the internal and external URLs. You will need this information when you enroll the NDES-Intune Authentication certificate.
Enroll the NDES-Intune Authentication certificate
This task enrolls a client and server authentication certificate used by the Intune connector and the NDES server.
Sign-in the NDES server with access equivalent to local administrators.
-
Start the Local Computer Certificate Manager (certlm.msc).
-
Expand the Personal node in the navigation pane.
-
Right-click Personal. Select All Tasks and Request New Certificate.
-
Select Next on the Before You Begin page.
-
Select Next on the Select Certificate Enrollment Policy page.
-
On the Request Certificates page, Select the NDES-Intune Authentication check box.
-
Select the More information is required to enroll for this certificate. Click here to configure settings link

-
Under Subject name, select Common Name from the Type list. Type the internal URL used in the previous task (without the https://, for example ndes.corp.mstepdemo.net) and then select Add.
-
Under Alternative name, select DNS from the Type list. Type the internal URL used in the previous task (without the https://, for example ndes.corp.mstepdemo.net). Select Add. Type the external URL used in the previous task (without the https://, for example ndes-mstephendemo.msappproxy.net). Select Add. Select OK when finished.
-
Select Enroll
-
Repeat these steps for all NDES Servers used to request Windows Hello for Business authentication certificates for Azure AD-joined devices.
Configure the Web Server Role
This task configures the Web Server role on the NDES server to use the server authentication certificate.
Sign-in the NDES server with access equivalent to local administrator.
-
Start Internet Information Services (IIS) Manager from Administrative Tools.
-
Expand the node that has the name of the NDES server. Expand Sites and select Default Web Site.

-
Select Bindings... under Actions. Select Add.

-
Select https from Type. Confirm the value for Port is 443.
-
Select the certificate you previously enrolled from the SSL certificate list. Select OK.

-
Select http from the Site Bindings list. Select Remove.
-
Select Close on the Site Bindings dialog box.
-
Close Internet Information Services (IIS) Manager.
Verify the configuration
This task confirms the TLS configuration for the NDES server.
Sign-in the NDES server with access equivalent to local administrator.
Disable Internet Explorer Enhanced Security Configuration
-
Open Server Manager. Select Local Server from the navigation pane.
-
Select On next to IE Enhanced Security Configuration in the Properties section.
-
In the Internet Explorer Enhanced Security Configuration dialog, under Administrators, select Off. Select OK.
-
Close Server Manager.
Test the NDES web server
-
Open Internet Explorer.
-
In the navigation bar, type
https://[fqdnHostName]/certsrv/mscep/mscep.dllwhere [fqdnHostName] is the fully qualified internal DNS host name of the NDES server.
A web page similar to the following should appear in your web browser. If you don't see a similar page, or you get a 503 Service unavailable message, ensure the NDES Service account has the proper user rights. You can also review the Application event log for events with the NetworkDeviceEnrollmentService source.

Confirm the web site uses the server authentication certificate.

Configure Network Device Enrollment Services to work with Microsoft Intune
You have successfully configured the Network Device Enrollment Services. You must now modify the configuration to work with the Intune Certificate Connector. In this task, you'll enable the NDES server and http.sys to handle long URLs.
- Configure NDES to support long URLs
Configure NDES and HTTP to support long URLs
Sign-in the NDES server with access equivalent to local administrator.
Configure the Default Web Site
-
Start Internet Information Services (IIS) Manager from Administrative Tools.
-
Expand the node that has the name of the NDES server. Expand Sites and select Default Web Site.
-
In the content pane, double-click Request Filtering. Select Edit Feature Settings... in the action pane.

-
Select Allow unlisted file name extensions.
-
Select Allow unlisted verbs.
-
Select Allow high-bit characters.
-
Type 30000000 in Maximum allowed content length (Bytes).
-
Type 65534 in Maximum URL length (Bytes).
-
Type 65534 in Maximum query string (Bytes).
-
Select OK. Close Internet Information Services (IIS) Manager.
Configure Parameters for HTTP.SYS
-
Open an elevated command prompt.
-
Run the following commands:
reg add HKLM\SYSTEM\CurrentControlSet\Services\HTTP\Parameters /v MaxFieldLength /t REG_DWORD /d 65534 reg add HKLM\SYSTEM\CurrentControlSet\Services\HTTP\Parameters /v MaxRequestBytes /t REG_DWORD /d 65534 -
Restart the NDES server.
Download, Install and Configure the Intune Certificate Connector
The Intune Certificate Connector application enables Microsoft Intune to enroll certificates using your on-premises PKI for users on devices managed by Microsoft Intune.
To learn how to download, install, and configure the Intune Certificate Connector, see Install the Certificate Connector for Microsoft Intune.
Configure the NDES Connector for certificate revocation (Optional)
Optionally (not required), you can configure the Intune connector for certificate revocation when a device is wiped, unenrolled, or when the certificate profile falls out of scope for the targeted user (users are removed, deleted, or the profile is deleted). You need to select the Certificate revocation option during the connector configuration to enable automatic certificate revocation for certificates issued from a Microsoft Active Directory Certification Authority. Additionally, you need to enable the NDES Service account for revocation.
-
Sign in the certificate authority used by the NDES Connector with access equivalent to domain administrator.
-
Start the Certification Authority management console.
-
In the navigation pane, right-click the name of the certificate authority and select Properties.
-
Select the Security tab, then select Add. In the Enter the object names to select box, enter NDESSvc (or the name you gave the NDES Service account). Select Check Names, then select OK. Select the NDES Service account from the Group or user names list. Select Allow for the Issue and Manage Certificates permission. Select OK.

-
Close the Certification Authority.
Create and Assign a Simple Certificate Enrollment Protocol (SCEP) Certificate Profile
Create an AADJ WHFB Certificate Users Group
Sign-in a workstation with access equivalent to a domain user.
-
Sign-in to the Azure portal with access equivalent to Global Administrator.
-
Select All Services. Type Azure Active Directory to filter the list of services. Under SERVICES, select Azure Active Directory.
-
Select Groups. Select New group.
-
Select Security from the Group type list.
-
Under Group Name, type the name of the group. For example, AADJ WHFB Certificate Users.
-
Provide a Group description, if applicable.
-
Select Assigned from the Membership type list.

-
Select Members. Use the Select members pane to add members to this group. When finished, select Select.
-
Select Create.
Create a SCEP Certificate Profile
Sign-in a workstation with access equivalent to a domain user.
-
Sign in to the Microsoft Endpoint Manager admin center.
-
Select Devices, and then select Configuration Profiles.
-
Select Create Profile.

-
Select Windows 10 and later from the Platform list.
-
Choose SCEP certificate from the Profile list, and select Create.
-
The SCEP Certificate wizard should open. Next to Name, type WHFB Certificate Enrollment.
-
Next to Description, provide a description meaningful for your environment, then select Next.
-
Select User as a certificate type.
-
Configure Certificate validity period to match your organization.
Important
Remember that you need to configure your certificate authority to allow Microsoft Intune to configure certificate validity.
-
Select Enroll to Windows Hello for Business, otherwise fail (Windows 10 and later) from the Key storage provider (KSP) list.
-
Next to Subject name format, type CN={{OnPrem_Distinguished_Name}} to make the on-premises distinguished name the subject of the issued certificate.
Note
If the distinguished name contains special characters like a plus sign ("+"), comma (","), semicolon (";"), or equal sign ("="), the bracketed name must be enclosed in quotation marks: CN=”{{OnPrem_Distinguished_Name}}”. If the length of the distinguished name is more than 64 characters, the name length enforcement on the Certification Authority must be disabled.
-
Specify User Principal Name (UPN) as a Subject Alternative Name parameter. Set its value as {{UserPrincipalName}}.
-
Refer to the "Configure Certificate Templates on NDES" task for how you configured the AADJ WHFB Authentication certificate template in the registry. Select the appropriate combination of key usages from the Key Usages list that map to the configured NDES template in the registry. In this example, the AADJ WHFB Authentication certificate template was added to the SignatureTemplate registry value name. The Key usage that maps to that registry value name is Digital Signature.
-
Select a previously configured Trusted certificate profile that matches the root certificate of the issuing certificate authority as a root certificate for the profile.
-
Under Extended key usage, type Smart Card Logon under Name. Type 1.3.6.1.4.1.311.20.2.2 under Object identifier. Select Add.
-
Type a percentage (without the percent sign) next to Renewal Threshold to determine when the certificate should attempt to renew. The recommended value is 20.

-
Under SCEP Server URLs, type the fully qualified external name of the Azure AD Application proxy you configured. Append to the name /certsrv/mscep/mscep.dll. For example,
https://ndes-mtephendemo.msappproxy.net/certsrv/mscep/mscep.dll. Select Add. Repeat this step for each additional NDES Azure AD Application Proxy you configured to issue Windows Hello for Business certificates. Microsoft Intune round-robin load balances requests among the URLs listed in the SCEP certificate profile. -
Select Next.
-
Select Next several times to skip the Scope tags, Assignments, and Applicability Rules steps of the wizard and select Create.
Assign Group to the WHFB Certificate Enrollment Certificate Profile
Sign-in a workstation with access equivalent to a domain user.
-
Sign-in to the Microsoft Endpoint Manager admin center.
-
Select Devices, and then select Configuration Profiles.
-
Select WHFB Certificate Enrollment.
-
Select Properties, and then select Edit next to the Assignments section.
-
In the Assignments pane, select Selected Groups from the Assign to list. Select Select groups to include.

-
Select the AADJ WHFB Certificate Users group. Select Select.
-
Select Review + Save, and then Save.
You have successfully completed the configuration. Add users that need to enroll a Windows Hello for Business authentication certificate to the AADJ WHFB Certificate Users group. This group, combined with the device enrollment Windows Hello for Business configuration prompts the user to enroll for Windows Hello for Business and enroll a certificate that can be used to authentication to on-premises resources.
Note
The Passport for Work configuration service provider (CSP) which is used to manage Windows Hello for Business with Mobile Device Management (MDM) contains a policy called UseCertificateForOnPremAuth. This policy is not needed when deploying certificates to Windows Hello for Business users through the instructions outlined in this document and should not be configured. Devices managed with MDM where UseCertificateForOnPremAuth is enabled will fail a prerequisite check for Windows Hello for Business provisioning. This failure will block users from setting up Windows Hello for Business if they don't already have it configured.
Section Review
[!div class="checklist"]
- Requirements
- Prepare Azure AD Connect
- Prepare the Network Device Enrollment Services (NDES) Service Account
- Prepare Active Directory Certificate Authority
- Install and Configure the NDES Role
- Configure Network Device Enrollment Services to work with Microsoft Intune
- Download, Install, and Configure the Intune Certificate Connector
- Create and Assign a Simple Certificate Enrollment Protocol (SCEP Certificate Profile)